WindowsForm(.NET Framework4.8)の表示、座標、画面キャプチャ等に関するメモ
記載のソースコードはusing System.Windows.Forms;前提です。
座標、領域
用語説明
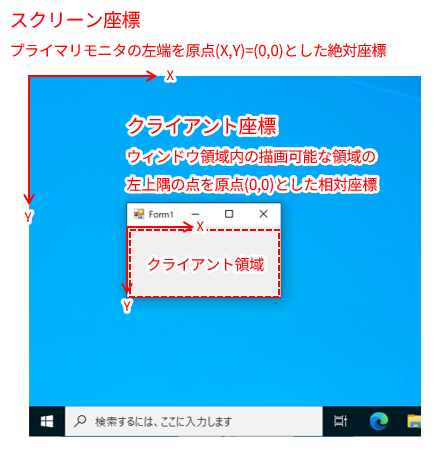
座標
| 種類 | 内容 |
|---|---|
| スクリーン座標 | プライマリモニタの左上隅を原点(0,0)とした座標。マルチモニタ環境では座標がマイナスになることもあるようです。仮想画面参照。 |
| クライアント座標 | ウィンドウ領域内の描画可能な領域(=クライアント領域)の左上隅の点を原点とした座標 |
参考URL
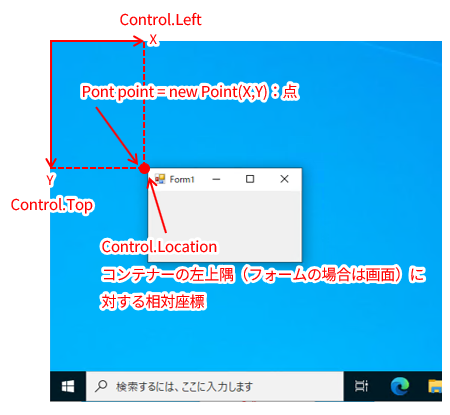
点
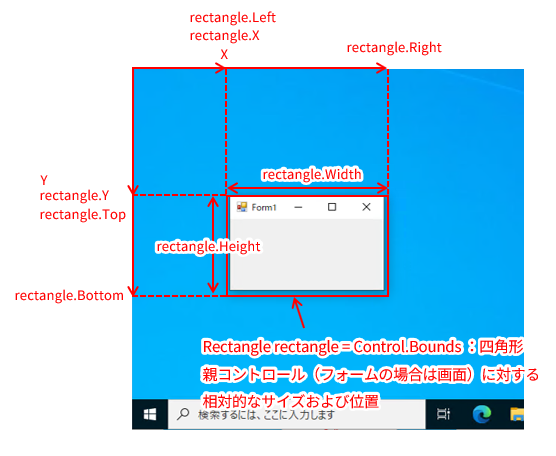
領域(四角形)
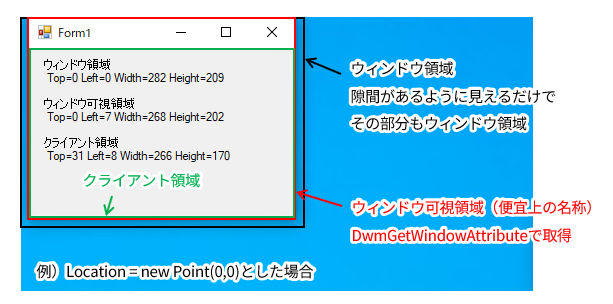
フォームの領域
スクリーン座標でのクライアント領域
Rectangle rectangle = form.RectangleToScreen(form.ClientRectangle);
スクリーン座標でのウィンドウ領域
Rectangle rectangle = form.Bounds;
スクリーン座標でのウィンドウ可視領域
[DllImport("dwmapi.dll")]
private static extern int DwmGetWindowAttribute(IntPtr hWnd, uint dwAttribute, out RECT pvAttribute, int cbAttribute);

[StructLayout(LayoutKind.Sequential)]
private struct RECT
{
    public int left;
    public int top;
    public int right;
    public int bottom;
}

RECT rect;
DwmGetWindowAttribute(form.Handle, DWMWA_EXTENDED_FRAME_BOUNDS, out rect, Marshal.SizeOf(typeof(RECT)));
Rectangle rectangle = new Rectangle(rect.left, rect.top, rect.right - rect.left, rect.bottom - rect.top);
サンプルコード(本項目の最初に表示してる画像用の全コード)
using System;
using System.Drawing;
using System.Text;
using System.Windows.Forms;
using System.Runtime.InteropServices;

namespace WindowsFormsApp1
{
    public partial class Form1 : Form
    {
        private Label label = new Label { AutoSize = true, Location = new Point(10, 10) };

        public Form1()
        {
            InitializeComponent();

            //画面の最左端に表示
            StartPosition = FormStartPosition.Manual;
            Location = new Point(0, 0);

            //ラベル追加
            Controls.Add(label);

            //フォーム表示時にウィンドウ領域情報を表示
            Shown += (sender, e) =>
            {
                label.Text += RectToString(WindowSizeMethod.GetWindowArea(this), "ウィンドウ領域");
                label.Text += RectToString(WindowSizeMethod.GetWindowVisibleArea(this), "ウィンドウ可視領域");
                label.Text += RectToString(WindowSizeMethod.GetClientArea(this), "クライアント領域");
            };
        }

        private string RectToString(Rectangle rectangle, string name)
        {
            StringBuilder stringBuilder = new StringBuilder();

            stringBuilder.AppendLine(name);
            stringBuilder.Append(" Top=");
            stringBuilder.Append(rectangle.Top.ToString());
            stringBuilder.Append(" Left=");
            stringBuilder.Append(rectangle.Left.ToString());
            stringBuilder.Append(" Width=");
            stringBuilder.Append(rectangle.Width.ToString());
            stringBuilder.Append(" Height=");
            stringBuilder.Append(rectangle.Height.ToString());
            stringBuilder.AppendLine("");
            stringBuilder.AppendLine("");

            return stringBuilder.ToString();
        }
    }

    //ウィンドウ領域取得
    public static class WindowSizeMethod
    {
        private const uint DWMWA_EXTENDED_FRAME_BOUNDS = 9;

        private static class NativeMethods
        {
            [DllImport("dwmapi.dll")]
            internal static extern int DwmGetWindowAttribute(IntPtr hWnd, uint dwAttribute, out RECT pvAttribute, int cbAttribute);
        }

        [StructLayout(LayoutKind.Sequential)]
        public struct RECT
        {
            public int left;
            public int top;
            public int right;
            public int bottom;
        }

        /// <summary>
        /// フォームのスクリーン座標でのクライアント領域
        /// </summary>
        public static Rectangle GetClientArea(Form form)
        {
            return form.RectangleToScreen(form.ClientRectangle);
        }

        /// <summary>
        /// フォームのスクリーン座標でのウィンドウ領域
        /// </summary>
        public static Rectangle GetWindowArea(Form form)
        {
            return form.Bounds;
        }

        /// <summary>
        /// フォームのスクリーン座標でのウィンドウ可視領域
        /// </summary>
        /// <returns>取得できなかった場合はウィンドウ領域を返す</returns>
        public static Rectangle GetWindowVisibleArea(Form form)
        {
            RECT rect;
            int ret = NativeMethods.DwmGetWindowAttribute(form.Handle, DWMWA_EXTENDED_FRAME_BOUNDS, out rect, Marshal.SizeOf(typeof(RECT)));
            if (ret == 0)
            {
                return new Rectangle(rect.left, rect.top, rect.right - rect.left, rect.bottom - rect.top);
            }

            return GetWindowArea(form);
        }
    }
}
参考URL
- C# Win32API完全入門 #C# - Qiita
- 【Windows/C#】なるべく丁寧にDllImportを使う - Qiita
- Control.ClientRectangle Property (System.Windows.Forms) | Microsoft Learn
- Control.Bounds プロパティ (System.Windows.Forms) | Microsoft Learn
コントロールの領域
スクリーン座標でのコントロールのクライアント領域
Rectangle rectangle = control.RectangleToScreen(control.ClientRectangle);
スクリーン座標でのコントロールの領域
Rectangle rectangle = control.Parent.RectangleToScreen(control.Bounds);
ディスプレイの領域
フォームのあるディスプレイ領域の取得
Rectangle displayArea = Screen.GetBounds(this);//thisはformを指す
フォームのあるディスプレイの作業領域(タスクバーなどを除いた領域)の取得
Rectangle workingArea = Screen.GetWorkingArea(this);//thisはformを指す
マルチディスプレイでの各ディスプレイ領域の取得
foreach (var screen in Screen.AllScreens)
{
    Rectangle rectangle = screen.Bounds;//各ディスプレイの領域
}
プライマリディスプレイ領域の取得
Rectangle rectangle = Screen.PrimaryScreen.Bounds;
仮想画面領域の取得
Rectangle rectangle = GetVirtualScreen();

//仮想画面の取得
private Rectangle GetVirtualScreen()
{
    return GetCombinedScreen(Screen.AllScreens);
}

//結合スクリーン領域の取得
private Rectangle GetCombinedScreen(Screen[] screens)
{
    int top = 0, left = 0, bottom = 0, right = 0;
    bool first = true;
    foreach (var screen in screens)
    {
        if (first)
        {
            first = false;
            top = screen.Bounds.Top;
            left = screen.Bounds.Left;
            bottom = screen.Bounds.Bottom;
            right = screen.Bounds.Right;
        }

        if (screen.Bounds.Top < top)
        {
            top = screen.Bounds.Top;
        }
        if (screen.Bounds.Left < left)
        {
            left = screen.Bounds.Left;
        }
        if (bottom < screen.Bounds.Bottom)
        {
            bottom = screen.Bounds.Bottom;
        }
        if (right < screen.Bounds.Right)
        {
            right = screen.Bounds.Right;
        }
    }

    return new Rectangle(left, top, right - left, bottom - top);
}
簡易タスクバー有無確認
Rectangle displayArea = Screen.GetBounds(this);
Rectangle workingArea = Screen.GetWorkingArea(this);
bool isTaskbarExist = !(displayArea.Height == workingArea.Height && displayArea.Width == workingArea.Width);
簡易タスクバー位置判定
Rectangle displayArea = Screen.GetBounds(this);
Rectangle workingArea = Screen.GetWorkingArea(this);

//タスクバーが下にあるか
bool isTaskbarPositionBottom = displayArea.Height != workingArea.Height && displayArea.Width == workingArea.Width && workingArea.Top == 0;

//タスクバーが上にあるか
bool isTaskbarPositionTop = displayArea.Height != workingArea.Height && displayArea.Width == workingArea.Width && workingArea.Top != 0;

//タスクバーが左にあるか
bool isTaskbarPositionLeft = displayArea.Height == workingArea.Height && displayArea.Width != workingArea.Width && workingArea.Left != 0;

//タスクバーが右にあるか
bool isTaskbarPositionRight = displayArea.Height == workingArea.Height && displayArea.Width != workingArea.Width && workingArea.Left == 0;
参考URL
座標変換
スクリーン座標をクライアント座標に変換:PointToClient、RectangleToClient
クライアント座標をスクリーン座標に変換:PointToScreen、RectangleToScreen
スクリーン座標でのマウスカーソル位置
Point mouse = Cursor.Position;
コントロール内にマウスカーソルがあるか
//実装例1
private bool IsCursorInControl(Control control)
{
    Point mouse = Cursor.Position;
    return control.ClientRectangle.Contains(control.PointToClient(mouse));
}

//実装例2
private bool IsCursorInControl(Control control)
{
    Point mouse = Cursor.Position;
    return control.RectangleToScreen(control.ClientRectangle).Contains(mouse);
}

//参考)ウィンドウ領域にマウスカーソルがあるか
private bool IsMouseInWindow => Bounds.Contains(Cursor.Position);
コントロールの左上隅の原点をスクリーン座標で取得
//Bounds:親コントロールに対する相対的なサイズおよび位置
Point point = control.Parent.PointToScreen(control.Bounds.Location);
参考URL
フォームの表示関連
コード内のformはフォームを指します。Form form = new Form();
フォームが表示されているか、存在しているか
formが表示されているか
bool isFormVisible => form?.Visible ?? false;//Hideで隠れている場合はfalse
formが存在しているか
bool isFormExist => form?.IsHandleCreated ?? false;//Hideで隠れている場合もtrue
formが存在していない場合は表示、存在している場合は閉じる
Form form = null;
bool isFormExist => form?.IsHandleCreated ?? false;

private void button_Click(object sender, EventArgs e)
{
    if (isFormExist)
    {
        form.Close();
    }
    else
    {
        form = new Form();
        form.Show();
    }
}
参考URL
- Control.Visible プロパティ (System.Windows.Forms) | Microsoft Learn
- Control.IsHandleCreated プロパティ (System.Windows.Forms) | Microsoft Learn
モーダルフォーム、モーダレスフォーム
モーダルフォーム:フォームを閉じないと他の操作ができない
//フォームの中央に表示
Form form = new Form();
form.StartPosition = FormStartPosition.CenterParent;
form.ShowDialog(this);
form.Dispose();
モードレスフォーム:フォーム閉じなくても他の操作ができる
//フォームの中央に表示
Form form = new Form { StartPosition = FormStartPosition.Manual };
form.Left = this.Location.X + (this.Width - form.Width) / 2;
form.Top = this.Location.Y + (this.Height - form.Height) / 2;
form.Show();
参考URL
画面キャプチャ
高DPI対応
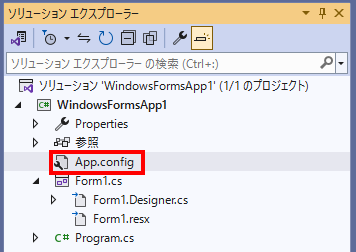
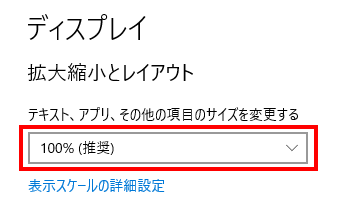
表示スケールが100%でないと正しくキャプチャできないため事前にApp.configを編集します。
表示スケールの確認
[設定]-[システム]-[ディスプレイ]
App.configの編集
<?xml version="1.0" encoding="utf-8" ?>
<configuration>
	<startup>
		<supportedRuntime version="v4.0" sku=".NETFramework,Version=v4.8" />
	</startup>
	<!--ここから追加-->
	<System.Windows.Forms.ApplicationConfigurationSection>
		<add key="DpiAwareness" value="PerMonitorV2" />
	</System.Windows.Forms.ApplicationConfigurationSection>
	<!--ここまで-->
</configuration>
補足
app.manifestファイルを編集して対応するやり方もあるようです。
- Visual Stuidoで[プロジェクト]-[新しい項目の追加]-[アプリケーション マニフェスト ファイル(Windows のみ)]で
app.manifestファイルを追加。 - 以下のコメントを解除
  <!--
  <application xmlns="urn:schemas-microsoft-com:asm.v3">
    <windowsSettings>
      <dpiAware xmlns="http://schemas.microsoft.com/SMI/2005/WindowsSettings">true</dpiAware>
      <longPathAware xmlns="http://schemas.microsoft.com/SMI/2016/WindowsSettings">true</longPathAware>
    </windowsSettings>
  </application>
  -->
参考URL
- C#で拡大率が違うマルチディスプレイ1画面キャプチャ: 黄昏のスペシャルパンダのブログ
- 高 DPI サポート - Windows Forms .NET Framework | Microsoft Learn
- c# - ディスプレイのカスタマイズでサイズの倍率を変更すると、スクリーンサイズが正しく取得できない - スタック・オーバーフロー
キャプチャ
CopyFromScreen を使用します。
指定領域をキャプチャしてクリップボードにコピーする関数
//指定領域のキャプチャ
private void CaptureRectangle(Rectangle rectangle)
{
    if (rectangle.Width != 0 && rectangle.Height != 0)
    {
        using (Bitmap bmp = new Bitmap(rectangle.Width, rectangle.Height))
        {
            using (Graphics graphics = Graphics.FromImage(bmp))
            {
                //領域キャプチャ
                graphics.CopyFromScreen(rectangle.Location, new Point(0, 0), bmp.Size);

                //クリップボードにコピー
                Clipboard.SetImage(bmp);
            }
        }
    }
}
指定領域をキャプチャしてクリップボードにコピーする関数(マウスカーソルもキャプチャする場合)
using System.Runtime.InteropServices;

//マウスカーソルの取得
internal static class NativeMethods
{
    [DllImport("user32.dll")]
    public static extern bool GetCursorInfo(ref CURSORINFO pci);
}

[StructLayout(LayoutKind.Sequential)]
public struct CURSORINFO
{
    public uint cbSize;
    public uint flags;
    public IntPtr hCursor;
    public POINT ptScreenPos;
}

[StructLayout(LayoutKind.Sequential)]
public struct POINT
{
    public int x;
    public int y;
}

//指定領域のキャプチャ
private void CaptureRectangle(Rectangle rectangle)
{
    if (rectangle.Width != 0 && rectangle.Height != 0)
    {
        using (Bitmap bmp = new Bitmap(rectangle.Width, rectangle.Height))
        {
            using (Graphics graphics = Graphics.FromImage(bmp))
            {
                //領域キャプチャ
                graphics.CopyFromScreen(rectangle.Location, new Point(0, 0), bmp.Size);

                //マウスカーソル取得
                CURSORINFO cursorinfo = new CURSORINFO();
                cursorinfo.cbSize = (uint)Marshal.SizeOf(cursorinfo);
                if (NativeMethods.GetCursorInfo(ref cursorinfo))
                {
                    Cursor cursor = new Cursor(cursorinfo.hCursor);
                    Point hotSpot = cursor.HotSpot;
                    Point cursorScreenPosition = Cursor.Position;

                    //マウスカーソルを描画
                    graphics.DrawIcon(Icon.FromHandle(cursorinfo.hCursor), cursorScreenPosition.X - hotSpot.X - rectangle.X, cursorScreenPosition.Y - hotSpot.Y - rectangle.Y);
                }

                //クリップボードにコピー
                Clipboard.SetImage(bmp);
            }
        }
    }
}
上記CaptureRectangleの使用例
//コントロールの表示領域を画像としてクリップボードにコピー
CaptureRectangle(control.Bounds);

//プライマリモニタのスクリーンを画像としてクリップボードにコピー
CaptureRectangle(Screen.PrimaryScreen.Bounds);
コントロールのコピーあればControl.DrawToBitmapを使用できます。 ※高DPI対応不要
private void SetControlImageToClipboard(Control control)
{
    int height = control.Size.Height;
    int width = control.Size.Width;

    using (Bitmap bitmap = new Bitmap(width, height))
    {
        control.DrawToBitmap(bitmap, new Rectangle(0, 0, width, height));
        Clipboard.SetImage(bitmap);
    }
}
参考URL
- フォームやコントロールの画像をファイルに保存するには?[2.0のみ、C#、VB] - @IT
- C#またはDelphiでカーソル付きでスクリーンキャプチャし、ちょっ… - 人力検索はてな
- C#でスクショを撮る時にカーソル付きで撮るには? - C#のCopy... - Yahoo!知恵袋
色の取得
マウスカーソル位置の色を取得
private Color GetCursorPositionColor()
{
    Color color = Color.Empty;
    using (Bitmap bitmap = new Bitmap(1, 1))
    {
        using (Graphics graphics = Graphics.FromImage(bitmap))
        {
            graphics.CopyFromScreen(Cursor.Position, new Point(0, 0), bitmap.Size);
        }
        color = bitmap.GetPixel(0, 0);
    }

    return color;
}
マウスカーソル位置の色を画像の透過色に設定
//フォーム上にpictureBoxがあり画像が表示されている前提
private void pictureBox_MouseClick(object sender, MouseEventArgs e)
{
    //現在の画像
    Bitmap transbmp = new Bitmap(pictureBox.Image);

    //透過色設定
    transbmp.MakeTransparent(GetCursorPositionColor());

    //画像切り替え
    if (pictureBox.Image != null)
    {
        pictureBox.Image.Dispose();
    }
    pictureBox.Image = transbmp;
}
