はじめに
前回、VATの説明時に大量のテクスチャを切り替えるのは大変という話をしました。
しかし、簡単な手段として動画があります。
UnityのVideo Playerには再生している動画をテクスチャとして送るコンポーネントが存在します。
(毎フレームテクスチャを送るだけなのでモーション補完ができませんが)
動画もテクスチャだと気付いた! pic.twitter.com/X0U2SKVJfP
— nekoco (@nekoco_vrc) July 29, 2024
それでは今回はモーションを毎フレームVTFテクスチャとして表示し、動画に保存するスクリプトを作成していきます。
Blender
座標値
まず、今までは32bitテクスチャを用いてfloat値をそのまま保存できていましたが、今回は8bitテクスチャかつAlpha値が使用できないため保存形式を考える必要があります。
1つの方法として、モーション内での座標値の最大・最小間で正規化し、その間を255分割しその値に近似するという方法があります。
import bpy
import numpy as np

class TextureClass:
    def __init__(self, texture_name, width, height):
        self.image = bpy.data.images.get(texture_name)
        if not self.image:
            self.image = bpy.data.images.new(texture_name, width=width, height=height, alpha=True)
        elif self.image.size[0] != width or self.image.size[1] != height:
            self.image.scale(width, height)

        self.point = np.array(self.image.pixels[:])
        self.point.resize(height, width * 4)
        self.point[:] = 0

        self.point_R = self.point[::, 0::4]
        self.point_G = self.point[::, 1::4]
        self.point_B = self.point[::, 2::4]
        self.point_A = self.point[::, 3::4]

    def SetPixel(self, py, px, r, g, b, a):
        self.point_R[py][px] = r
        self.point_G[py][px] = g
        self.point_B[py][px] = b
        self.point_A[py][px] = a

    def Export(self):
        self.image.pixels = self.point.flatten()


def GetMinMax(obj, start_frame, end_frame):
    min_x = float('inf')
    max_x = float('-inf')
    min_y = float('inf')
    max_y = float('-inf')
    min_z = float('inf')
    max_z = float('-inf')
    for frame in range(start_frame, end_frame + 1):
        bpy.context.scene.frame_set(frame)
        bpy.context.view_layer.update()
        depsgraph = bpy.context.evaluated_depsgraph_get()
        eval_obj = obj.evaluated_get(depsgraph)
        mesh = eval_obj.to_mesh()

        for polygon in mesh.polygons:
            for i, loop_index in enumerate(polygon.loop_indices):
                vertex_co = obj.matrix_world @ mesh.vertices[polygon.vertices[i]].co
                min_x = min(min_x, vertex_co.x)
                max_x = max(max_x, vertex_co.x)
                min_y = min(min_y, vertex_co.y)
                max_y = max(max_y, vertex_co.y)
                min_z = min(min_z, vertex_co.z)
                max_z = max(max_z, vertex_co.z)
    return min_x, max_x, min_y, max_y, min_z, max_z

def Normalize(value, min_value, max_value):
    return (value - min_value) / (max_value - min_value)


min_x, max_x, min_y, max_y, min_z, max_z = GetMinMax(obj, start_frame, end_frame)
print(f"X: ({min_x}, {max_x})")
print(f"Y: ({min_y}, {max_y})")
print(f"Z: ({min_z}, {max_z})")

# 使用方法
print(Normalize(vertex_co.x, min_x, max_x))
これで各座標値を8bitで保存できるようになりました。
(結構粗くなりますが)
なおこのままだと最大値と最小値が同じ場合、ZeroDivisionError: float division by zeroが発生してしまいます。
レンダリング
それではスクリプトでレンダリング設定とハンドラー関数を指定していきます。
import bpy
import numpy as np

class TextureClass:
    def __init__(self, texture_name, width, height):
        self.image = bpy.data.images.get(texture_name)
        if not self.image:
            self.image = bpy.data.images.new(texture_name, width=width, height=height, alpha=True)
        elif self.image.size[0] != width or self.image.size[1] != height:
            self.image.scale(width, height)

        self.point = np.array(self.image.pixels[:])
        self.point.resize(height, width * 4)
        self.point[:] = 0

        self.point_R = self.point[::, 0::4]
        self.point_G = self.point[::, 1::4]
        self.point_B = self.point[::, 2::4]
        self.point_A = self.point[::, 3::4]

    def SetPixel(self, py, px, r, g, b, a):
        self.point_R[py][px] = r
        self.point_G[py][px] = g
        self.point_B[py][px] = b
        self.point_A[py][px] = a

    def Export(self):
        self.image.pixels = self.point.flatten()


def GetMinMax(obj, start_frame, end_frame):
    min_x = float('inf')
    max_x = float('-inf')
    min_y = float('inf')
    max_y = float('-inf')
    min_z = float('inf')
    max_z = float('-inf')
    for frame in range(start_frame, end_frame + 1):
        bpy.context.scene.frame_set(frame)
        bpy.context.view_layer.update()
        depsgraph = bpy.context.evaluated_depsgraph_get()
        eval_obj = obj.evaluated_get(depsgraph)
        mesh = eval_obj.to_mesh()

        for polygon in mesh.polygons:
            for i, loop_index in enumerate(polygon.loop_indices):
                vertex_co = obj.matrix_world @ mesh.vertices[polygon.vertices[i]].co
                min_x = min(min_x, vertex_co.x)
                max_x = max(max_x, vertex_co.x)
                min_y = min(min_y, vertex_co.y)
                max_y = max(max_y, vertex_co.y)
                min_z = min(min_z, vertex_co.z)
                max_z = max(max_z, vertex_co.z)
    return min_x, max_x, min_y, max_y, min_z, max_z

def Normalize(value, min_value, max_value):
    return (value - min_value) / (max_value - min_value)

# フレームごとの処理を定義する関数
def process_frame(scene):
    bpy.context.view_layer.update()
    depsgraph = bpy.context.evaluated_depsgraph_get()
    mesh = obj.evaluated_get(depsgraph).to_mesh()

    for polygon in mesh.polygons:
        for i, loop_index in enumerate(polygon.loop_indices):
            uv = uv_layer.data[loop_index].uv
            pixel = [int(uv.y * resolution), int(uv.x * resolution)]

            vertex_co = obj.matrix_world @ mesh.vertices[polygon.vertices[i]].co

            image.SetPixel(*pixel,
                           Normalize(vertex_co.x, min_x, max_x),
                           Normalize(vertex_co.y, min_y, max_y),
                           Normalize(vertex_co.z, min_z, max_z),
                           1.0
                           )

    image.Export()


obj = bpy.context.active_object
uv_layer = obj.data.uv_layers.active
start_frame = bpy.context.scene.frame_start
end_frame = bpy.context.scene.frame_end

min_x, max_x, min_y, max_y, min_z, max_z = GetMinMax(obj, start_frame, end_frame)
print(f"X: ({min_x}, {max_x})")
print(f"Y: ({min_y}, {max_y})")
print(f"Z: ({min_z}, {max_z})")

resolution = 10
image = TextureClass("DynamicTexture", resolution, resolution)

bpy.app.handlers.frame_change_pre.clear()  # 既存のハンドラーをクリア
bpy.app.handlers.frame_change_pre.append(process_frame)

# レンダリング設定
scene = bpy.context.scene
scene.render.engine = 'BLENDER_EEVEE'
scene.eevee.taa_render_samples = 1
scene.render.image_settings.file_format = 'FFMPEG'
scene.render.ffmpeg.format = 'MPEG4'
scene.render.filepath = "//output_animation.mp4"
scene.frame_start = start_frame
scene.frame_end = end_frame

# レンダリングの実行
bpy.ops.render.render(animation=True)

bpy.app.handlers.frame_change_pre.clear()
print("アニメーションのレンダリングが完了しました。")
レンダリング設定は無圧縮でないので、無圧縮にしたい場合は適宜パラメータを調べてください。
ハンドラー
bpy.app.handlers.frame_change_pre.append(process_frame)
ここで設定したハンドラー関数が毎フレーム実行されます。
Application Handlers (bpy.app.handlers)
今回はDynamicTextureを毎フレームVTFする処理を追加しました。
UV
今回はUV値で記録するピクセルの判定を行いましたが、少し特別な加工が必要になるため頂点番号で記録するようにすれば良かったですね。
使用方法
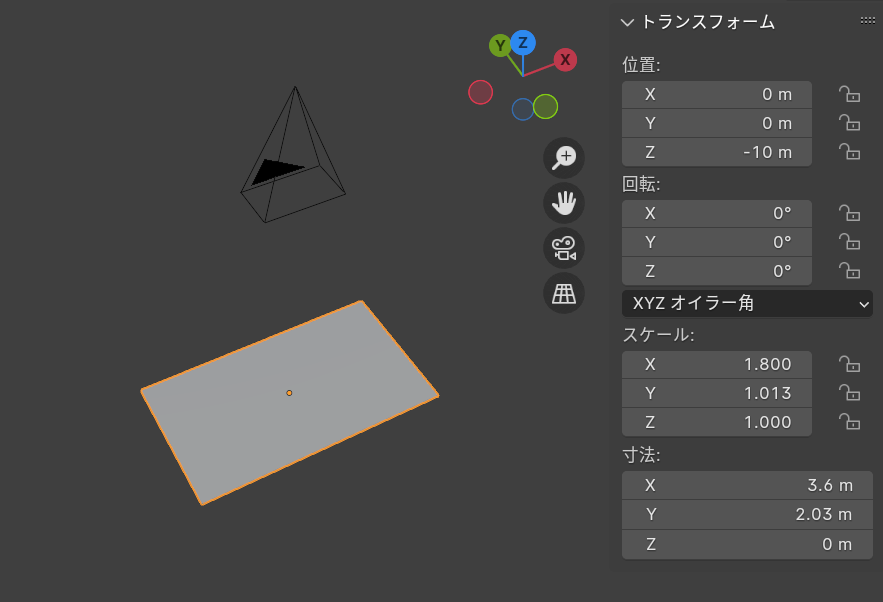
レンダリング用平面の5m上空にカメラを設置。
平面のスケールは1.8m×1.0125m。
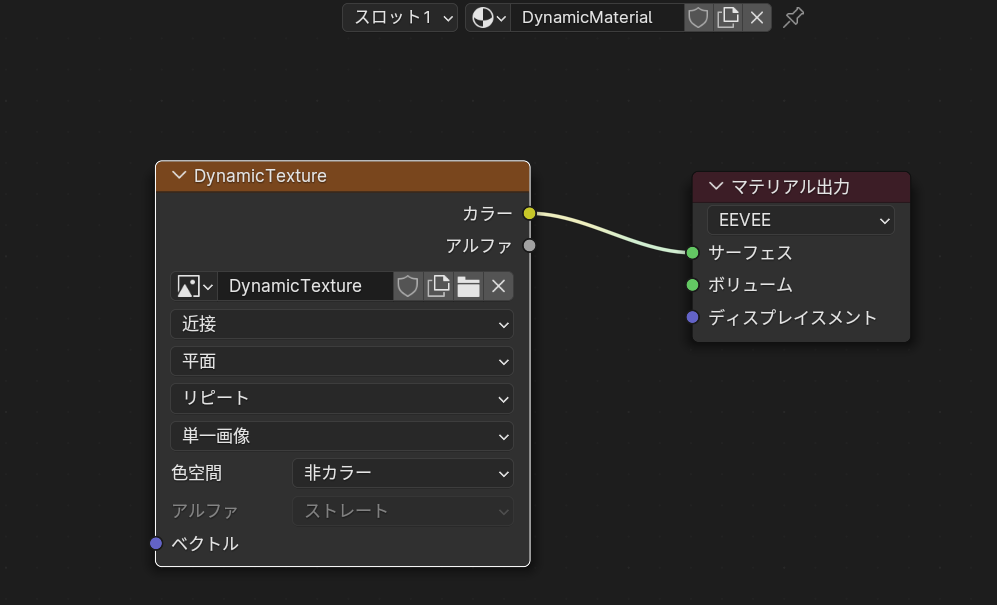
マテリアルを作成しDynamicTextureを表示させる。
平面にマテリアルを適応させる。
Unity
復元用のシェーダーは以下の通りです。
Shader "Unlit/VTF_Movie"
{
    Properties
    {
        _MainTex ("Texture", 2D) = "white" {}
    }
    SubShader
    {
        Tags { "RenderType"="Opaque" }
        LOD 100
        Cull Off

        Pass
        {
            CGPROGRAM
            #pragma vertex vert
            #pragma fragment frag

            #include "UnityCG.cginc"

            struct appdata
            {
                float4 vertex : POSITION;
                float2 uv : TEXCOORD0;
            };

            struct v2f
            {
                float4 vertex : SV_POSITION;
                float2 uv : TEXCOORD0;
            };

            sampler2D _MainTex;
            float4 _MainTex_ST;

            float Denormalize(float v, float min_v, float max_v){
                return v * (max_v - min_v) + min_v;
            }

            v2f vert (appdata v)
            {
                v2f o;
                float2 uv = floor(v.uv * 10.0f) / 11.0f + 1.0f / 22.0f;
                fixed4 col = tex2Dlod(_MainTex, float4(uv, 0, 0));
                v.vertex.xyz = float3(
                    Denormalize(col.r, -1.776728630065918, 1.6149073839187622),
                    Denormalize(col.b, -1.396386742591858, 0.9053383469581604),
                    Denormalize(col.g, -0.08301985263824463, 1.8455829620361328)
                    );
                o.vertex = UnityObjectToClipPos(v.vertex);
                o.uv = TRANSFORM_TEX(v.uv, _MainTex);
                return o;
            }

            fixed4 frag (v2f i) : SV_Target
            {
                return tex2D(_MainTex, i.uv);
            }
            ENDCG
        }
    }
}
Denormalizeに入っている値はスクリプトで得られた各座標値の最大値と最小値です。
適宜変更してください。
使用例
人間モドキ pic.twitter.com/iOlQpqwHc5
— nekoco (@nekoco_vrc) July 30, 2024
Graphilia ライブステージ! pic.twitter.com/NqQYkWK9Lh
— nekoco (@nekoco_vrc) July 31, 2024