はじめに
BlenderにてEXRテクスチャを出力してその情報をUnityで使うということがやりたかったのですが、案外情報が無くて困ったのでまとめていきます。
宣伝
Blenderのアニメーションをテクスチャに書きこんで、Unityにて再生させるVATを開発しました。
よろしくお願いします。
Blender
Blenderのバージョンは4.1.1 Stableを使っていきます。
テクスチャ作成
スクリプトを使って通常テクスチャを作成していきます。
import bpy
import numpy as np

texture_name = 'CustomTexture'
resolution = 4

# 画像を取得または作成
image = bpy.data.images.get(texture_name)
if not image:
    image = bpy.data.images.new(texture_name, width=resolution, height=resolution, alpha=True)
elif image.size[0] != resolution or image.size[1] != resolution:
    image.scale(resolution, resolution)

point = np.array(image.pixels[:])
point.resize(resolution, resolution * 4)
point[:] = 0

point_R = point[::, 0::4]
point_G = point[::, 1::4]
point_B = point[::, 2::4]
point_A = point[::, 3::4]

# 色を指定 [y][x]
point_R[0][0] = 1
point_A[0][0] = 1
point_G[3][0] = 1
point_A[3][0] = 1

# テクスチャに書きこむ
image.pixels = point.flatten()
基本的なテクスチャ作成スクリプトです。
参考ページ
Blender Python API - Image(ID)
Blenderではじめる画像処理
特筆すべき点を以下にまとめます。
テクスチャの作成
既に同名のテクスチャが存在する場合にimages.newを実行すると〇〇.001という名前のテクスチャが作成されます。
以降も同様に番号が増えてテクスチャが増えてきます。
そのためそれを回避しています。
またテクスチャサイズが異なる場合は変更します。
numpyの使用
今回は色の指定にnumpyを使用しています。
別途変数を作らなくても、image.pixelsに直接書きこむこともできます。
しかしその場合、色を指定するごとにテクスチャを更新するためか実行時間がかなり増えてしまいます。
そのため、numpyを用いて最後に書きこむこの形を採用します。
EXRテクスチャの作成
import bpy
import numpy as np

texture_name = 'EXR_Texture'
resolution = 4

# 画像を取得または作成
image = bpy.data.images.get(texture_name)
if not image:
-     image = bpy.data.images.new(texture_name, width=resolution, height=resolution)
+     image = bpy.data.images.new(texture_name, width=resolution, height=resolution, alpha=True, float_buffer=True)
elif image.size[0] != resolution or image.size[1] != resolution:
    image.scale(resolution, resolution)

+ image.file_format = 'OPEN_EXR'

point = np.array(image.pixels[:])
point.resize(resolution, resolution * 4)
point[:] = 0

point_R = point[::, 0::4]
point_G = point[::, 1::4]
point_B = point[::, 2::4]
point_A = point[::, 3::4]

# 色を指定 [y][x]
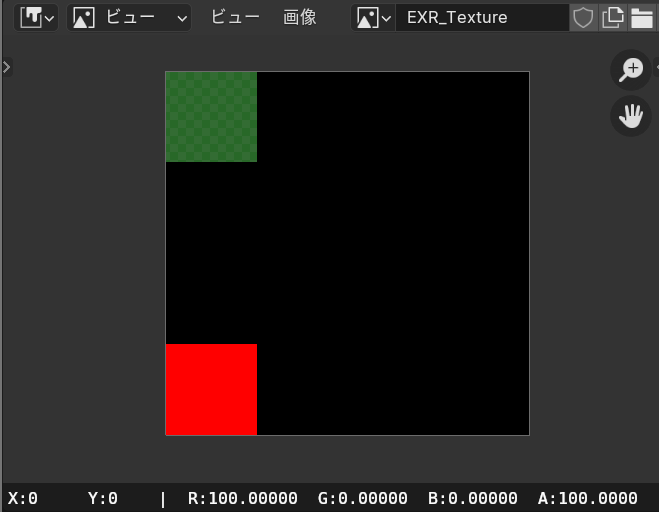
point_R[0][0] = 100
point_A[0][0] = 100
point_G[3][0] = 0.123456789
point_A[3][0] = 0.123456789

# テクスチャに書きこむ
image.pixels = point.flatten()
画像作成時の引数を追加しました。
色情報をfloat値として保存したいので、float_buffer=True
Blender Python API - BlendDataImages(bpy_struct)
また、ファイルフォーマットの指定をしました。
クラス化
今回の内容的に必須ではありませんが、やっておくと便利なので書いておきます。
import bpy
import numpy as np

class TextureClass:
    def __init__(self, texture_name, width, height):
        self.image = bpy.data.images.get(texture_name)
        if not self.image:
            self.image = bpy.data.images.new(texture_name, width=width, height=height, alpha=True, float_buffer=True)
        elif self.image.size[0] != width or self.image.size[1] != height:
            self.image.scale(width, height)

        self.point = np.array(self.image.pixels[:])
        self.point.resize(height, width * 4)
        self.point[:] = 0

        self.point_R = self.point[::, 0::4]
        self.point_G = self.point[::, 1::4]
        self.point_B = self.point[::, 2::4]
        self.point_A = self.point[::, 3::4]

    def SetPixel(self, py, px, r, g, b, a):
        self.point_R[py][px] = r
        self.point_G[py][px] = g
        self.point_B[py][px] = b
        self.point_A[py][px] = a

    def Export(self):
        self.image.colorspace_settings.name = 'Non-Color'
        self.image.pixels = self.point.flatten()
        self.image.file_format = 'OPEN_EXR'


image = TextureClass('EXR_Texture', 4)

image.SetPixel(0, 0, 100, 0, 0, 100)
image.SetPixel(3, 0, 0, 0.123456789, 0, 0.123456789)

image.Export()
テクスチャ保存方法
今回は手動でテクスチャを保存します。
画像エディターなどから作成したテクスチャを保存してください。
保存形式は以下の通りです。
| 項目 | 値 |
|---|---|
| ファイルフォーマット | OpenEXR |
| カラー | RGBA |
| 色深度 | Float(Full) |
| コーデック | なし |
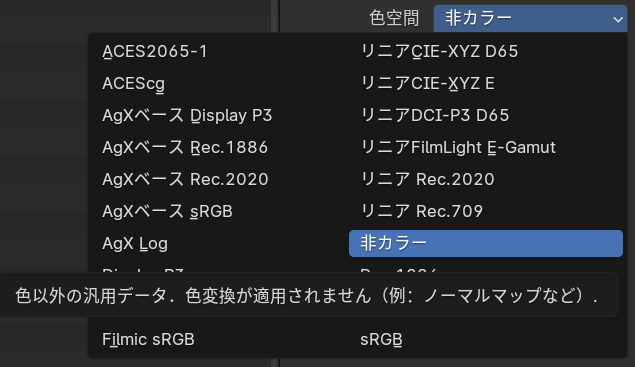
| 色空間 | 非カラー |
色空間は設定値が沢山ありますが、おそらく「非カラー」で保存すれば無変換で数値を保存できると思います。
Unity
知っておくべき前提知識があります。
それが色空間です。
色空間(Color Space)
まず、検証用のテクスチャを用意します。
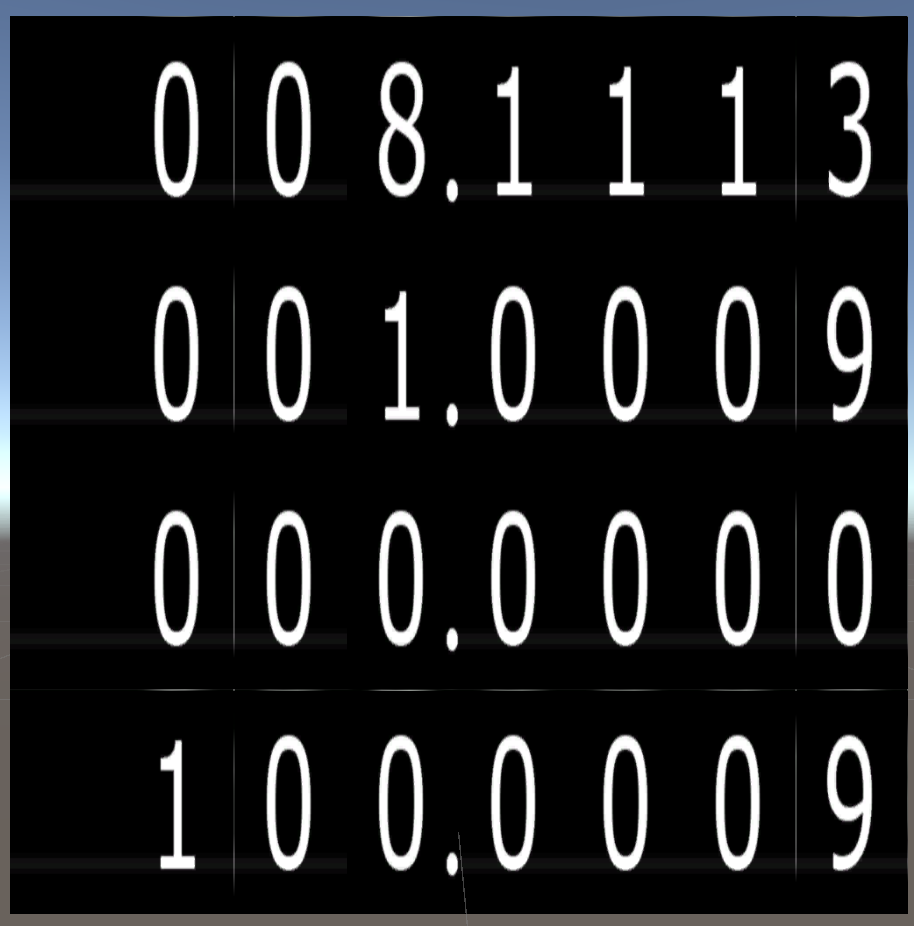
BlenderにてR:100、G:1、B:-1、A:100のテクスチャを用意しました。

次にこちらのテクスチャをUnityにて確認します。
テクスチャのインポート設定は以下の通りです。
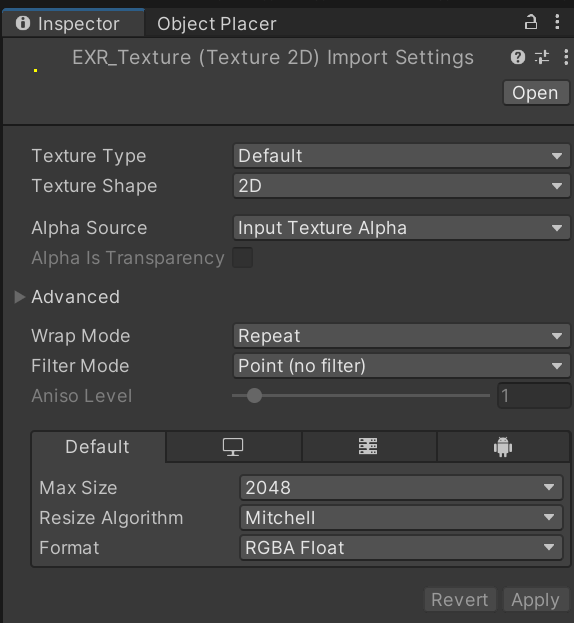
32bitテクスチャなので、FormatをRGBA Floatにしました。
次に、このテクスチャのRGBA値を表示します。
今回数値表示に使用したのはブタジエン氏のシェーダーを使用しました。
シェーダ内の任意の数値を任意の桁数を指定して表示するシェーダ(というか関数とテクスチャの組み合わせ)できた~ pic.twitter.com/IvxuqsFs4Z
— ブタジエン (@butadiene121) October 27, 2018
表示結果
小数4桁あたりの値は無視するにしても、Rが本来とかけ離れた値になっています。
この違いは色空間が異なるため起こっています。
色空間については以下の資料が良いでしょう。
物理ベースレンダリング -リニアワークフロー編 (1)-
物理ベースレンダリング -リニアワークフロー編 (2)-
色空間をガンマからリニアに変換する場合、参考記事によるとおおよそ2.2乗することで近い値となるようです。
8.1113^{2.2} = 99.99977…
100に近い値となりました。
つまり、テクスチャをリニアとして保存したがUnityがガンマだと認識しているようです。
テクスチャのImport Activityを見てみるとGammaとなっていました。
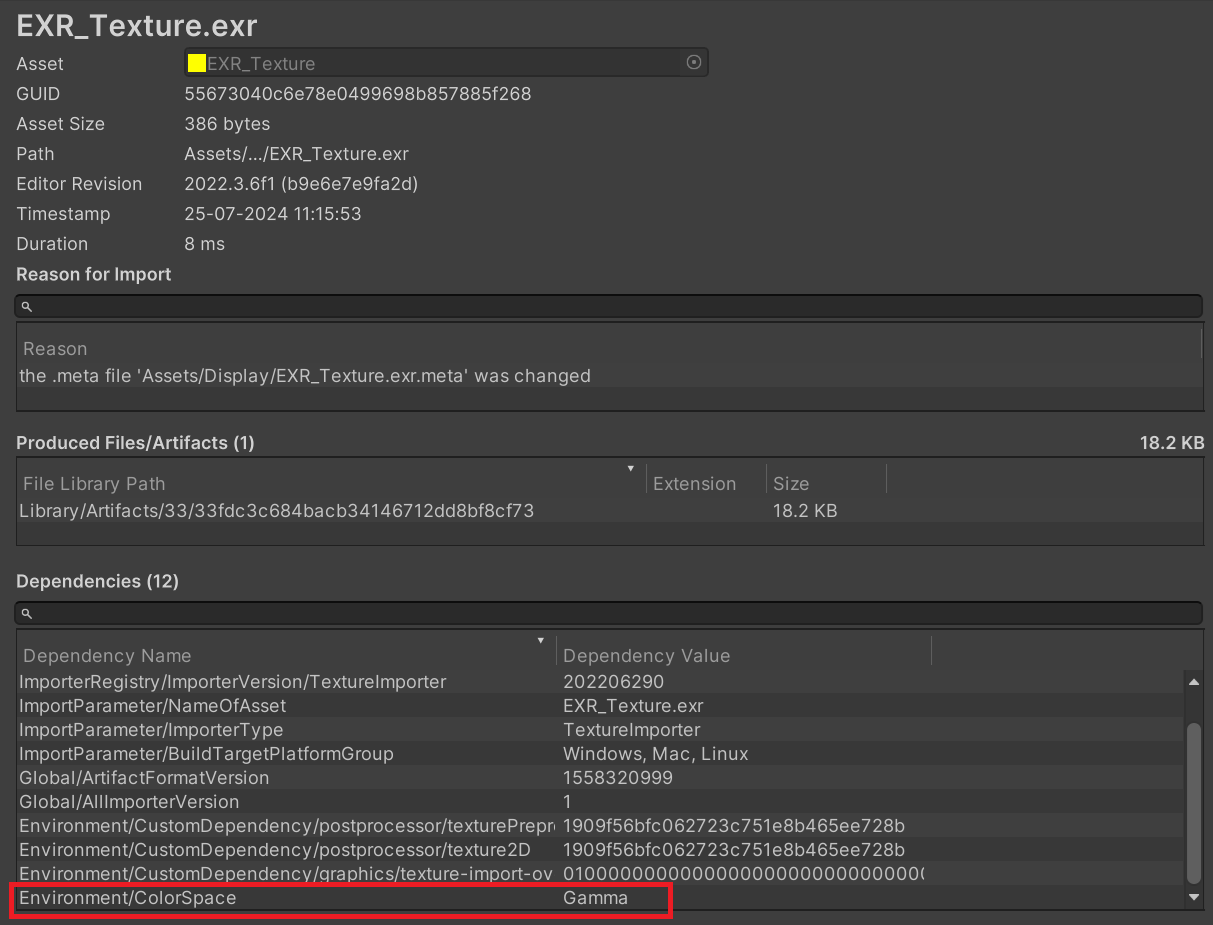
これをLinerに変更したいわけですが、テクスチャのインポート設定にはそれらしい項目が見当たりません。
png画像の場合はsRGBという項目が現れそれを変更することで設定できるのですが、どうやらexrでは消えてしまうようです。

ではexrはどこの設定値を参照しているかというと、プロジェクトの色空間を参照しているようです。
プロジェクト設定は[Edit]→[Project Settings]で表示できます。
その中の、[Player]→[Other Settings]→[Rendering]→[Color Space]で変更できます。

Linerに変更した結果、正常に数値を読み取ることが出来ました。

シェーダーでfloat値を読み出す場合は、代入する変数をfloat4にすればいいようです。
float4 tex = tex2D(_MainTex, i.uv);
これにて32bitテクスチャにてBlender→Unity間の数値の受け渡しを行うことが出来ました。
その他検証情報
Blender:非カラーで保存しても色味が異なる?
①色空間:非カラー
— nekoco (@nekoco_vrc) July 18, 2024
②Blenderでテクスチャを再読み込み、色味はおかしいがRGBの値は同じ
③Unityインポート時の設定
④Unity内での色味と値 pic.twitter.com/Di61yymkMz
色味は異なりますが、RGBA値は正常に取得できているようです。
Blender:色空間を指定できない?
import bpy
import numpy as np

# テクスチャ名を変数で設定
texture_name = 'EXR_Texture'
# 解像度を指定
resolution = 4
# 画像を取得または作成
image = bpy.data.images.get(texture_name)
if not image:
    image = bpy.data.images.new(texture_name, width=resolution, height=resolution, alpha=True, float_buffer=True)
elif image.size[0] != resolution or image.size[1] != resolution:
    image.scale(resolution, resolution)

point = np.array(image.pixels[:])
point.resize(resolution, resolution * 4)
point[:] = 0

point_R = point[::, 0::4]
point_G = point[::, 1::4]
point_B = point[::, 2::4]
point_A = point[::, 3::4]

# 色を指定
# [y][x]
point_R[0][0] = 100
point_A[0][0] = 100
point_G[3][0] = 0.123456789
point_A[3][0] = 0.123456789

# 書きこむ前に変更
image.colorspace_settings.name = 'Non-Color'
# テクスチャに書きこむ
image.pixels = point.flatten()
# 書きこんだ後に変更
image.file_format = 'OPEN_EXR'
指定できないことは無いのですが、上記のような順番でないと正常に認識しませんでした。
- 書きこんだ後に色空間を指定すると、色情報が無くなる
- 書きこむ前にフォーマットを指定すると、適応されない(PNGになる)
なおこの記述順の場合、テクスチャのリサイズが動かないようです。
サイズを変更していない場合は正常に動作するのですが、変更すると以下のようなエラーが発生します。
Python: Traceback (most recent call last):
File "C:\Users\neko\3D Objects\Blender\4.1.1\script_test_1.blend\SC_Texture_2.py", line 36, in
ValueError: bpy_struct: item.attr = val: Image.pixels: array length cannot be changed to 100 (expected 64)
Blender:EXRでファイル保存できない?
ファイルとして保存してくれるスクリプトを作成しました。
import bpy
import numpy as np

# テクスチャ名を変数で設定
texture_name = 'EXR_Texture'
# 解像度を指定
resolution = 4
# 画像を取得または作成
image = bpy.data.images.get(texture_name)
if not image:
    image = bpy.data.images.new(texture_name, width=resolution, height=resolution, alpha=True, float_buffer=True)
elif image.size[0] != resolution or image.size[1] != resolution:
    image.scale(resolution, resolution)

image.file_format = 'OPEN_EXR'

point = np.array(image.pixels[:])
point.resize(resolution, resolution * 4)

# 初期化
point[:] = 0

point_R = point[::, 0::4]
point_G = point[::, 1::4]
point_B = point[::, 2::4]
point_A = point[::, 3::4]

# 色を指定
# [y][x]
point_R[0][0] = 100
point_A[0][0] = 100
point_G[3][0] = 0.123456789
point_A[3][0] = 0.123456789

# テクスチャに書きこむ
image.pixels = point.flatten()

# 出力パスの設定
output_path = "C:/Users/neko/3D Objects/Blender/4.1.1/Texture/EXR_Texture.exr"
image.save_render(filepath=output_path, quality=100)
上記スクリプトで保存した画像を読み込んでみたのですが、RGBAの上限値が1.0になっています。
ファイルフォーマットがRGBA byte型となっており、色空間もSRGB_ABとして認識しているようです。
Unity:色空間が異なってもビルドイン関数で補完する?
シェーダー内で使えるUnityCG.cgincには色空間を変換する関数が実装されているそうです。
GammaToLinearSpaceExact - Unity-Built-in-Shaders/CGIncludes
/UnityCG.cginc
また色空間の判定はマクロで判定できるそうです。
#ifdef UNITY_COLORSPACE_GAMMA
    //...
#else
    //...
#endif
ではこれらを使えば色空間がガンマでも実装できるのでしょうか?
答えは、完全に復元することは不可能です。
まず、検証結果を見るとマイナス値がそもそも取れていないようです。
これでは変換のしようがありません。
続いてマイナス値以外ですが、こちらも完全には復元できないでしょう。
ビルドイン関数を見てみると、数値をべき乗して変換していることがわかります。
floatの仮数部は23bitですが、その数値をべき乗すると23bitに収まらないことは想像に難くありません。
つまり近似値でしかないようです。
そのためbit値を用いた数値圧縮などは用いることが出来ません。
VATでは16bit変数を32bitに2つ格納するということをやっていたのですが、それが出来ませんでした。

