1.前書き
Unityの機械学習、ML-Agentsをいろんな記事をフラフラ彷徨いながらやっと導入できました。
「途中でエラー出て詰まってるよー」って方は右側の目次からビュンビュンスキップしてもらってOKです!
2.必要なツール
Unity バージョン2018以降
Anaconda-Navigator
Python 3.7(Macは3.7じゃないとバグるので3.7は厳守)
これらがインストールできたら次の項目へ〜。
3.仮想環境の作成とML-Agentsのインストール
ターミナルを開き以下のコマンドを順番に打ち込んでください。
[ Python仮想環境の作成 ]
1行目で仮想環境を作成し、2行目で仮想環境を起動します。
※既に同じ名前の仮想環境が作成されている場合はエラーが出ます。作り直しましょう。
conda create -n ml-agents python3.7
conda activate ml-agents
[ ML-Agentsのインストール ]
※既に「ml-agents」という名前のファイルが開いているディレクトリ内に存在する場合エラーが出ます。
git clone https://github.com/Unity-Technologies/ml-agents.git
[ Pythonパッケージのインストール ]
cdコマンドで先ほどインストールしたml-agentsファイルの中に移動します。
そして、その中にあるPythonパッケージをインストールします。
cd ml-agents
pip install -e ./ml-agents-envs
pip install -e ./ml-agents
[ 完了! ]
これでターミナルはOKです!
Let‘s go to Unity!!
4.Unityで学習環境を作成
今回は、ボールが立方体に向かって転がるように訓練する学習環境を作ります。
2018以降のUnityでプロジェクトを作成します。
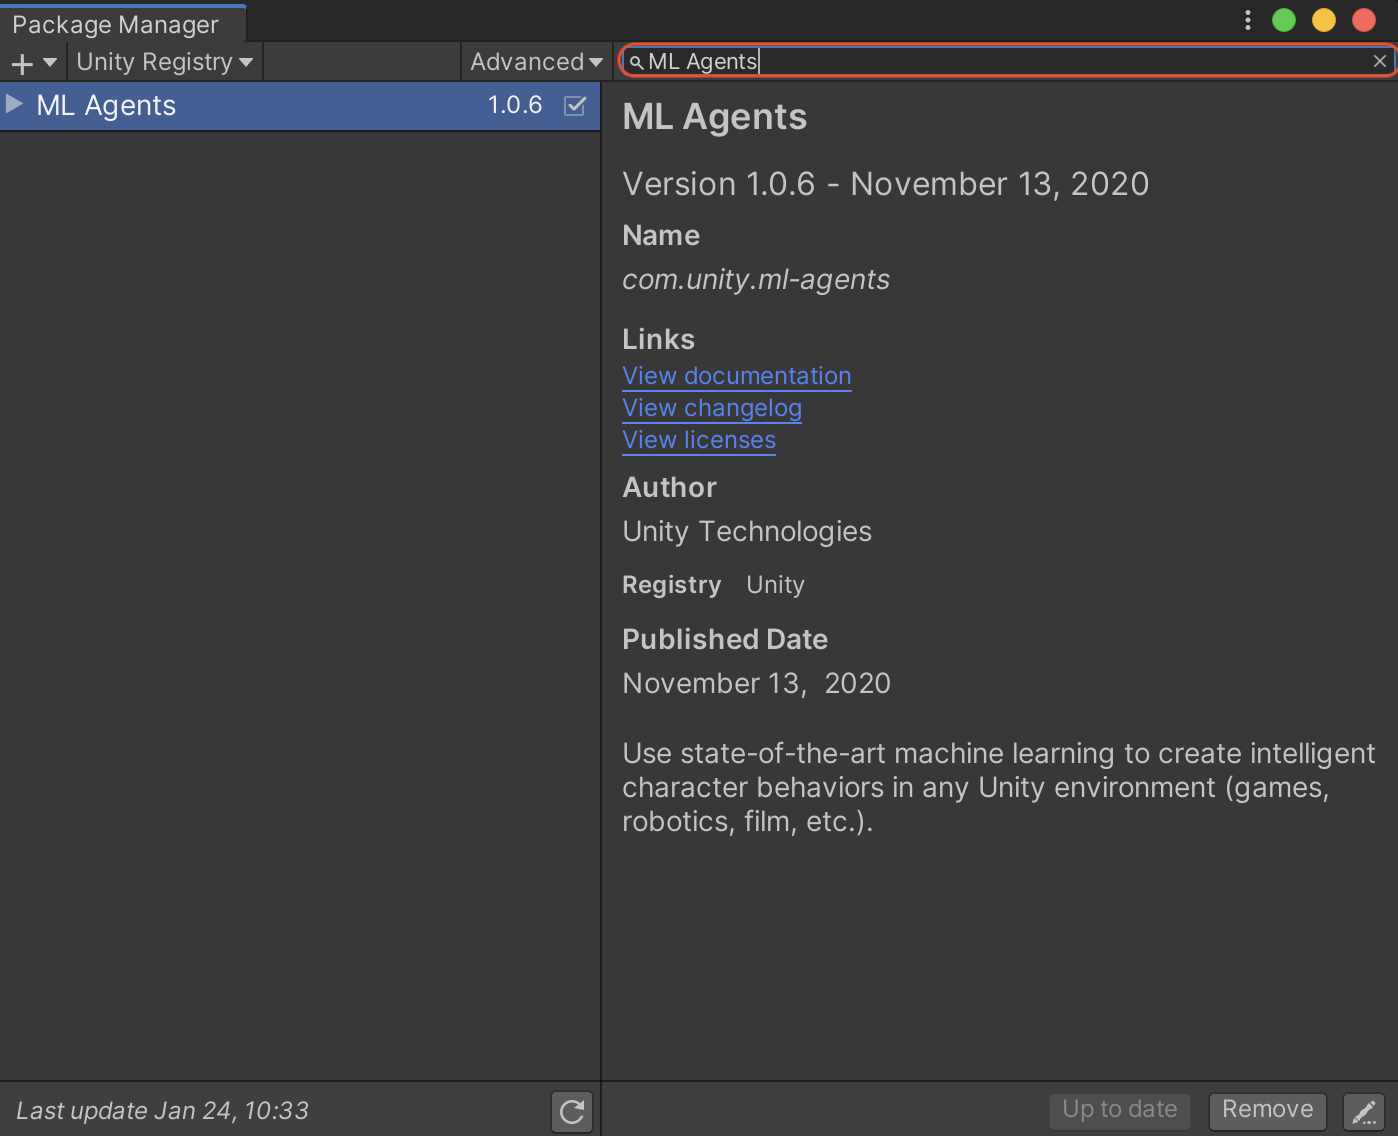
まずメニューバーのWindow > Package Managerを開いて下さい。
下の画像のように右上の検索欄に「ML Agnets」と入力すると出てくるので右下のinstallボタンからインストールして下さい。ProjectウィンドウのPackaegフォルダ内に「ML Agents」とあればインストール完了です!
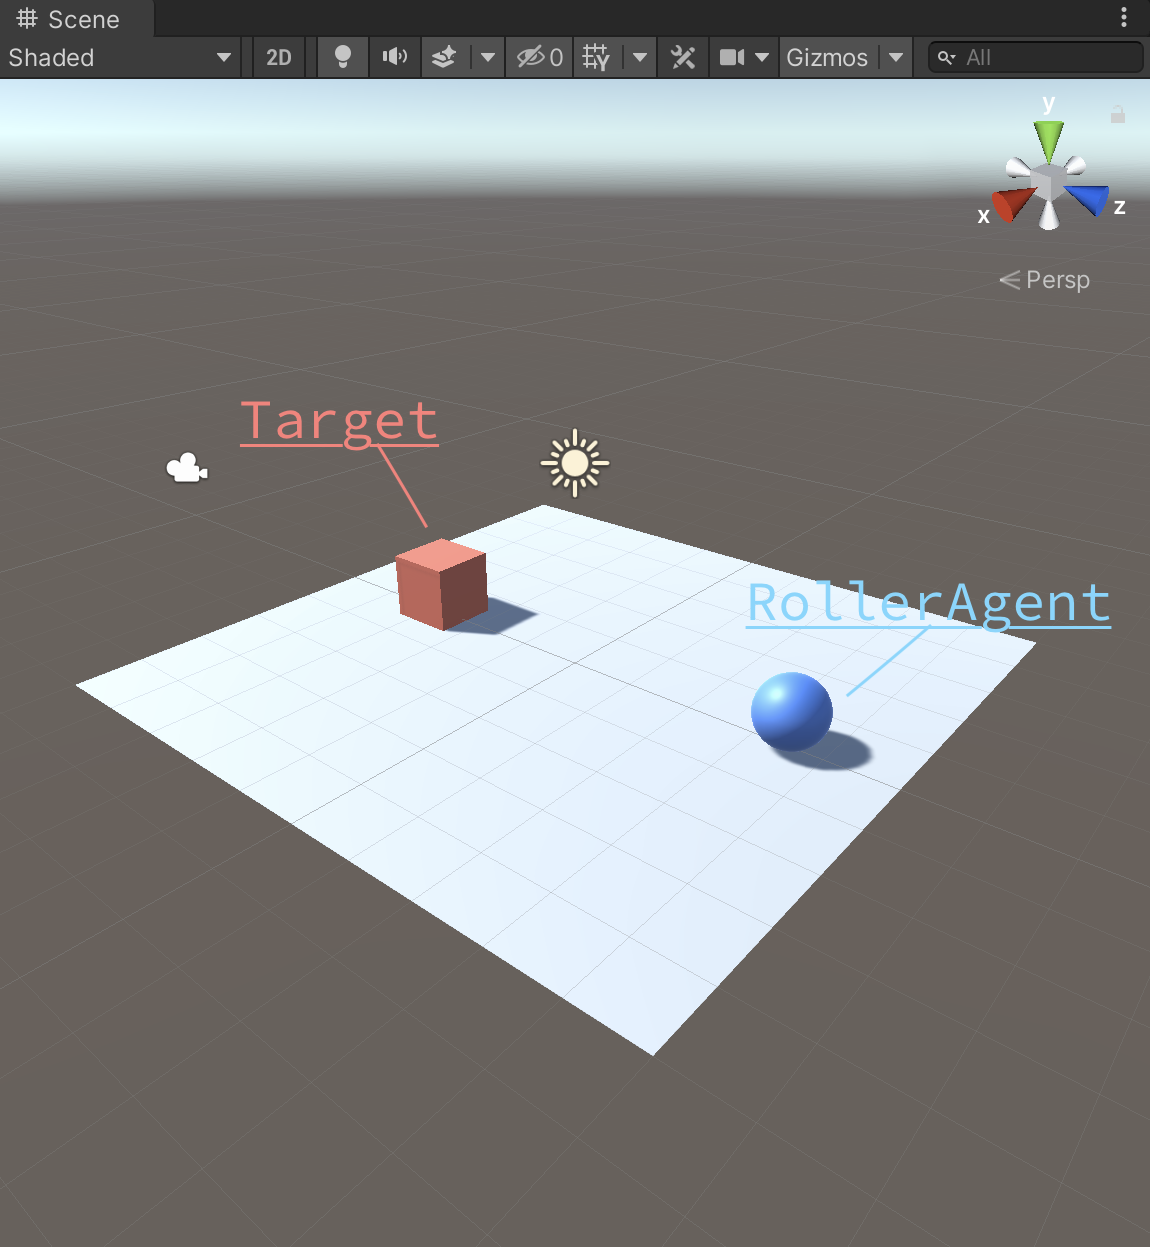
次に、PlaneとCubeとSphereを作成してそれぞれ順番に「Floor」「Target」「RollerAgent」という名前にして下さい。
それぞれにMaterialをつけるとこんな感じです↓
そして、「RollerAgent」という名前でスクリプトを作成して下記のコードをコピペして下さい。
using System.Collections.Generic;
using UnityEngine;
using Unity.MLAgents;
using Unity.MLAgents.Sensors;
// RollerAgent
public class RollerAgent : Agent
{
   public Transform target;
   Rigidbody rBody;
   // 初期化時に呼ばれる
   public override void Initialize()
   {
       rBody = GetComponent<Rigidbody>();
   }
   // エピソード開始時に呼ばれる
   public override void OnEpisodeBegin()
   {
       // RollerAgentが床から落下している時
       if (this.transform.localPosition.y < 0)
       {
           // RollerAgentの位置と速度をリセット
           this.rBody.angularVelocity = Vector3.zero;
           this.rBody.velocity = Vector3.zero;
           this.transform.localPosition = new Vector3(0.0f, 0.5f, 0.0f);
       }
       // Targetの位置のリセット
       target.localPosition = new Vector3(
           Random.value * 8 - 4, 0.5f, Random.value * 8 - 4);
   }
   // 観察取得時に呼ばれる
   public override void CollectObservations(VectorSensor sensor)
   {
       sensor.AddObservation(target.localPosition); //TargetのXYZ座標
       sensor.AddObservation(this.transform.localPosition); //RollerAgentのXYZ座標
       sensor.AddObservation(rBody.velocity.x); // RollerAgentのX速度
       sensor.AddObservation(rBody.velocity.z); // RollerAgentのZ速度
   }
   // 行動実行時に呼ばれる
   public override void OnActionReceived(float[] vectorAction)
   {
       // RollerAgentに力を加える
       Vector3 controlSignal = Vector3.zero;
       controlSignal.x = vectorAction[0];
       controlSignal.z = vectorAction[1];
       rBody.AddForce(controlSignal * 10);
       // RollerAgentがTargetの位置に到着した時
       float distanceToTarget = Vector3.Distance(
           this.transform.localPosition, target.localPosition);
       if (distanceToTarget < 1.42f)
       {
           AddReward(1.0f);
           EndEpisode();
       }
       // RollerAgentが床から落下した時
       if (this.transform.localPosition.y < 0)
       {
           EndEpisode();
       }
   }
}
スクリプトが作成できたらRollerAgent(オブジェクト)にAddComponentでRIgidBody、Behaviour Parameters、RollerAgent、DecisionRequesterを順番に追加し、下の画像のようにパラメータを変更して下さい。
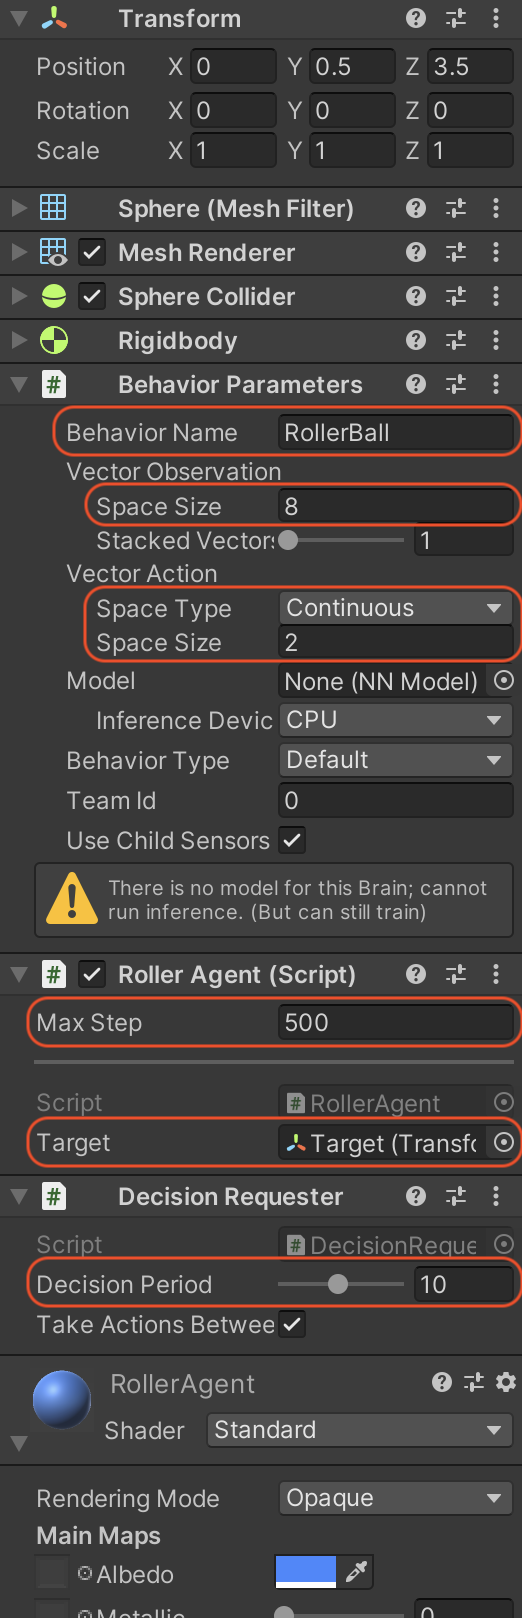
これで学習環境の設定は完了です!
5.Pythonスクリプトで学習
[ 訓練設定ファイルの作成 ]
ターミナルコマンドでダウンロードしたml-agents > configフォルダ内にsampleという名前でフォルダを作りその中にyamlファイルを作成します。
config内の他のフォルダにもyamlファイルがあるのでそれを複製して書き換えるのでもいいでしょう。
では、作ったyamlファイルを「RollerBall」という名前に設定し以下のコードをコピペして下さい。
RollerBall:
  summary_freq: 1000
  batch_size: 10
  buffer_size: 100
  normalize: true

↓

behaviors:
 RollerBall:
   trainer_type: ppo
   hyperparameters:
     batch_size: 10
     buffer_size: 100
     learning_rate: 0.0003
     beta: 0.005
     epsilon: 0.2
     lambd: 0.95
     num_epoch: 3
     learning_rate_schedule: linear
   network_settings:
     normalize: true
     hidden_units: 128
     num_layers: 2
     vis_encode_type: simple
   reward_signals:
     extrinsic:
       gamma: 0.99
       strength: 1.0
   keep_checkpoints: 5
   checkpoint_interval: 500000
   max_steps: 500000
   time_horizon: 64
   summary_freq: 1000
   threaded: true
[ Terminalで学習開始 ]
では、ターミナルをもう一度開いて次の2つのコマンドを入力!
cd ml-agents
mlagents-learn ./config/sample/RollerBall.yaml --run-id=RollerBall-ppo-1 --force
これで下のような画面が出たらUnityの[▶︎]を押して学習スタートです!
                        ▄▄▄▓▓▓▓
                  ╓▓▓▓▓▓▓█▓▓▓▓▓
             ,▄▄▄m▀▀▀'  ,▓▓▓▀▓▓▄                           ▓▓▓  ▓▓▌
           ▄▓▓▓▀'      ▄▓▓▀  ▓▓▓      ▄▄     ▄▄ ,▄▄ ▄▄▄▄   ,▄▄ ▄▓▓▌▄ ▄▄▄    ,▄▄
         ▄▓▓▓▀        ▄▓▓▀   ▐▓▓▌     ▓▓▌   ▐▓▓ ▐▓▓▓▀▀▀▓▓▌ ▓▓▓ ▀▓▓▌▀ ^▓▓▌  ╒▓▓▌
       ▄▓▓▓▓▓▄▄▄▄▄▄▄▄▓▓▓      ▓▀      ▓▓▌   ▐▓▓ ▐▓▓    ▓▓▓ ▓▓▓  ▓▓▌   ▐▓▓▄ ▓▓▌
       ▀▓▓▓▓▀▀▀▀▀▀▀▀▀▀▓▓▄     ▓▓      ▓▓▌   ▐▓▓ ▐▓▓    ▓▓▓ ▓▓▓  ▓▓▌    ▐▓▓▐▓▓
         ^█▓▓▓        ▀▓▓▄   ▐▓▓▌     ▓▓▓▓▄▓▓▓▓ ▐▓▓    ▓▓▓ ▓▓▓  ▓▓▓▄    ▓▓▓▓`
           '▀▓▓▓▄      ^▓▓▓  ▓▓▓       └▀▀▀▀ ▀▀ ^▀▀    `▀▀ `▀▀   '▀▀    ▐▓▓▌
              ▀▀▀▀▓▄▄▄   ▓▓▓▓▓▓,                                      ▓▓▓▓▀
                  `▀█▓▓▓▓▓▓▓▓▓▌
                       ¬`▀▀▀█▓


Version information:
 ml-agents: 0.24.0.dev0,
 ml-agents-envs: 0.24.0.dev0,
 Communicator API: 1.3.0,
 PyTorch: 1.7.1
2021-01-24 12:05:49 INFO [learn.py:269] run_seed set to 223
2021-01-24 12:05:49 INFO [environment.py:205] Listening on port 5004. Start training by pressing the Play button in the Unity Editor.
[▶︎]を押したらReward(報酬)が記録されていきます。
他にStepという値があるはずなのでそのStepが50000を超えたら学習をストップ(Unityエディタの[▶︎]を押す)してください。
これで学習完了です!
[ 推論モデルを実行 ]
ml-agents内のresultというフォルダの中を調べていくとRollerBall.onnxというものがあるはずです。それが推論モデルになります。それをUnityにインポートしてRollerBall(オブジェクト)のBehaviour ParametersのModelsにドラッグ&ドロップしてください。そのまま[▶︎]を押せば学習した内容の通りに動きます!
後書き
これで一人でも「嗚呼分からない。嗚呼。」という方を減らせれば幸いです!
フォローも宜しくお願いしまs ((殴