devise を使って、
- メールアドレスのみで初期登録を行う
- トークン付きのパスワード登録用 URL を受信する
- パスワードを入力し登録を完了する
という3ステップのユーザー登録を実現する方法です。
環境
- Ruby: 2.3.1
- Rails: 4.2.6
- Devise: 4.1.1
サンプル
記事執筆時に作成したサンプルリポジトリを以下に置いています。
注意
メールアドレスおよびパスワードのバリデーションについては、完全に省いた説明となっております。
実際に運用する際は、不正な値を登録させないよう、バリデーションを追加しておく必要があります。
また、password confirmation (パスワード確認用入力) も使用していません。
こちらを利用したい場合、この記事の参考元である devise の wiki か、日本語記事であれば Devise confirmable用のテスト(フィーチャスペック)を書く(解説動画付き) などを参考にしてください。
手順
1. devise の導入
devise を公式ドキュメントに従い導入します。
ここでは User を devise で作成しています。
またこの時、
confirmable を有効化
devise :confirmable, :database_authenticatable, :registerable,
       :recoverable, :rememberable, :trackable, :validatable
## Confirmable
t.string   :confirmation_token
t.datetime :confirmed_at
t.datetime :confirmation_sent_at
t.string   :unconfirmed_email # Only if using reconfirmable
views/controllers をカスタム可能にする
$ rails g devise:views users
$ rails g devise:controllers users
devise_for :users, controllers: {
  registrations: "users/registrations",
  confirmations: "users/confirmations"
}
という設定を行っています。
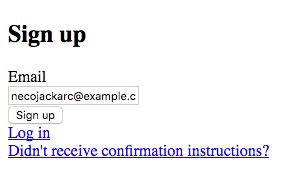
2. ユーザー登録画面の編集
パスワード入力が不要になるので、画面から削除します。
<h2>Sign up</h2>

<%= form_for(resource, as: resource_name, url: registration_path(resource_name)) do |f| %>
  <%= devise_error_messages! %>

  <div class="field">
    <%= f.label :email %><br />
    <%= f.email_field :email, autofocus: true %>
  </div>

  <div class="actions">
    <%= f.submit "Sign up" %>
  </div>
<% end %>

<%= render "users/shared/links" %>
画面から削除しただけだと、バリデーションが通らないので password_required? をオーバーライドします。
def password_required?
  super if confirmed?
end
このメソッドは lib/devise/models/validatable.rb に定義されているメソッドで、その名の通り passowrd 有無を判定するメソッドです。
以下のように devise 内部で利用されています。
lib/devise/models/validatable.rbvalidates_presence_of :password, if: :password_required? validates_confirmation_of :password, if: :password_required?
動作確認
/users/sign_up にアクセスしメールアドレスを入力します。
Sign upボタンをクリックすると、メールアドレスの登録が成功しトップページへ遷移します。
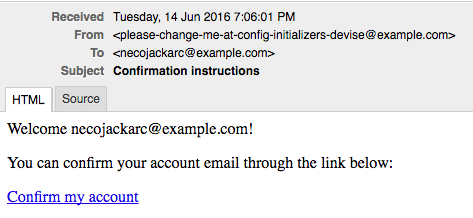
このとき、devise のメッセージを表示するように設定を行っていれば、上記の通り確認メールが送られたという旨のメッセージが表示されます。
メールの内容は以下の通りです。
以降では Confirm my account に遷移後、パスワードの登録とメールアドレスの確認を実施するようにします。
3. パスワード入力画面の作成
メール内に記載されている Confirm my account は /users/confirmation?confirmation_token=abcdef への GET リクエストですので、このアクションを修正します。
# GET /resource/confirmation?confirmation_token=abcdef
def show
  self.resource = resource_class.find_by_confirmation_token(params[:confirmation_token])
  super if resource.nil? || resource.confirmed?
end
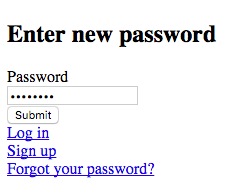
このアクションに対応するパスワード入力画面を作成します。
画面には hidden_field で confirmation_token を埋め込み、パスワード入力欄を設置します。
<h2>Enter new password</h2>

<%= form_for(resource, as: resource_name, url: confirmation_path(resource_name)) do |f| %>
  <%= f.hidden_field :confirmation_token %>

  <%= devise_error_messages! %>

  <div class="field">
    <%= f.label :password %>
    <% if @minimum_password_length %>
    <em>(<%= @minimum_password_length %> characters minimum)</em>
    <% end %><br />
    <%= f.password_field :password, autocomplete: "off" %>
  </div>

  <div class="actions">
    <%= f.submit "Submit" %>
  </div>
<% end %>

<%= render "users/shared/links" %>
入力した情報の submit 先は users/confirmation としています。
devise_scope :user do
  patch "users/confirmation", to: "users/confirmations#confirm"
end
submit 先のアクションを作成します。
def confirm
  confirmation_token = params[resource_name][:confirmation_token]
  self.resource = resource_class.find_by_confirmation_token!(confirmation_token)

  if resource.update(confirmation_params)
    self.resource = resource_class.confirm_by_token(confirmation_token)
    set_flash_message :notice, :confirmed
    sign_in_and_redirect resource_name, resource
  else
    render :show
  end
end

private

def confirmation_params
  params.require(resource_name).permit(:password)
end
以上で設定完了です。
動作確認
先ほどの動作確認で受信したメールに記載されている URL へ移動します。
パスワードを入力して submit すれば登録完了です。
できました!
まとめ
簡単に手順をまとめると以下の通りです。
-
sign upページからパスワード入力欄を取り除く - パスワード無しでも登録可能になるよう model を編集する
- メールアドレス確認用 URL にパスワード登録画面を作成する
- パスワード登録 & メールアドレス確認のアクションを作成する


