はじめに
私はプログラミング初心者(趣味でかじる程度、非エンジニア)です。
勉強しながらの作成です。
以下のページを参考にさせていただきました。誠にありがとうございました。
環境
Windows10
Python 3.8
OpenCV 4.0.1
notebook
動機やら着手までの流れ
アプリに組み込むデジモンはデジモンペンデュラムZを
- 育成し
- 写真を撮り
- ドット絵を手打ちで作る
という流れで用意していました。
この3のドット絵を作る部分がとても面倒になったわけです。
というのも、実機のデジモン自体は16×16で描かれているのですが
そのまま描いても引き伸ばすとぼやけてしまう
(左:実機のアグモン 右:32×32で描かれたアグモン)


その上私は実機のドット間の線も表現したいので1ドット7px(ドット間1px)として8倍尺の128×128で描いていました。

この無駄なこだわりによるドット打ちが非常に面倒になったわけで、
写真からドット絵作れないかと思い立ったわけです。
着手
流れ的には
元画像→閾値で2値化→再生成
というものを考えて開始。
(ほとんど参考にさせていただいたページをなぞるだけです)
1.画像の用意

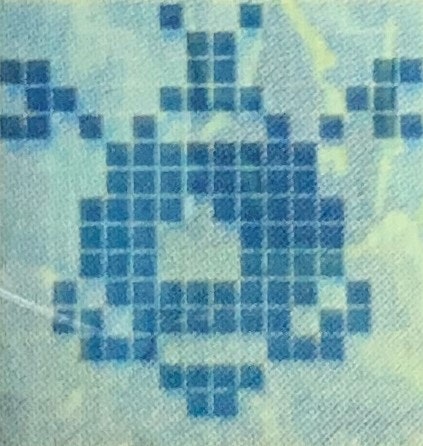
今回用意したのはアポカリモン(apocaly_0.jpg)です。
作成したい16×16の範囲でトリミングしてあります。
# 各種インポート
import cv2, matplotlib
import numpy as np
import matplotlib.pyplot as plt

# 画像の読み込み
img = cv2.imread('images/apocaly_0.jpg')
2.閾値処理
# グレースケール化
gray_img = cv2.cvtColor(img, cv2.COLOR_RGB2GRAY)

# 閾値 128 で二値化
_, threshold_img = cv2.threshold(gray_img, 128, 255, cv2.THRESH_BINARY)

# グレースケールをRGBに戻して画像の表示
threshold_img = cv2.cvtColor(threshold_img, cv2.COLOR_GRAY2RGB)
plt.imshow(threshold_img)
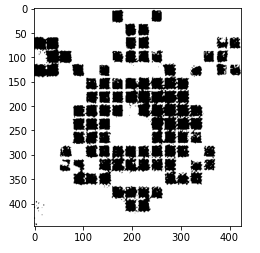
いい感じで白黒に分けられました。閾値の調整はいくつか試してみて128に落ち着きました。
画像を16×16に分割して領域の値を算出
# 画像自体の高さと幅を16分割
h, w, _ = img.shape
cell_width = w/16
cell_height = h/16

# 区切りの位置を配列にする
col_cell = list(range(17))
row_cell = list(range(17))

for i in range(17):
    col_cell[i] = round(cellWidth * col_cell[i])
    row_cell[i] = round(cellHeight * row_cell[i])
として区切り位置の配列を作成しました。
print(col_cell)
# 結果 [0, 26, 53, 79, 106, 132, 159, 185, 212, 238, 264, 291, 317, 344, 370, 397, 423]
print(row_cell)
# 結果 [0, 28, 56, 84, 112, 139, 167, 195, 223, 251, 279, 307, 334, 362, 390, 418, 446]
16×16の領域の格子は用意できたのでいよいよ計算
# [i行目 ,j列目] の要素取得
for i in range(16):
    for j in range(16):
        #領域cellとして切り取る
        cell = threshold_img[row_cell[i]:row_cell[i+1]-1, col_cell[j]:col_cell[j+1]-1]

        #cell内の行平均
        ave_per_row = np.average(cell,axis=0)

        #行平均の平均 = 全体の平均
        ave_color = np.average(ave_per_row, axis=0)
        ave_value = np.average(ave_color)

        # 白→0 黒→1 で格納
        if ave_value >= 220:
            dot[i][j] = 0
        else:
            dot[i][j] = 1
平均値のave_valueが255に近ければ白い→0を代入、そうでなければ黒に近いので1を代入しました
print(dot)
# 結果
[[0, 0, 0, 0, 0, 0, 1, 0, 0, 1, 0, 0, 0, 0, 0, 0],
 [0, 0, 0, 0, 0, 0, 0, 1, 1, 0, 0, 0, 0, 0, 0, 0],
 [1, 1, 0, 0, 0, 0, 0, 1, 1, 0, 0, 0, 0, 0, 1, 1],
 [0, 1, 1, 0, 0, 0, 1, 1, 1, 1, 0, 0, 0, 1, 1, 0],
 [1, 1, 0, 1, 0, 1, 0, 0, 0, 0, 1, 0, 1, 0, 1, 1],
 [0, 0, 0, 0, 1, 1, 1, 1, 1, 1, 1, 1, 0, 0, 0, 0],
 [0, 0, 0, 0, 1, 1, 1, 1, 1, 1, 1, 1, 0, 0, 0, 0],
 [0, 0, 0, 1, 1, 1, 1, 0, 1, 1, 1, 1, 1, 0, 0, 0],
 [0, 0, 0, 1, 1, 1, 0, 0, 0, 1, 1, 1, 1, 0, 0, 0],
 [0, 0, 0, 1, 1, 1, 0, 0, 0, 1, 1, 1, 1, 0, 0, 0],
 [0, 0, 1, 0, 1, 1, 1, 1, 1, 1, 1, 1, 0, 1, 0, 0],
 [0, 0, 1, 1, 0, 1, 1, 1, 1, 1, 1, 0, 1, 1, 0, 0],
 [0, 0, 0, 1, 1, 1, 0, 0, 0, 0, 1, 1, 1, 0, 0, 0],
 [0, 0, 0, 0, 0, 0, 1, 1, 1, 1, 0, 0, 0, 0, 0, 0],
 [0, 0, 0, 0, 0, 0, 0, 1, 1, 0, 0, 0, 0, 0, 0, 0],
 [0, 0, 0, 0, 0, 0, 0, 0, 0, 0, 0, 0, 0, 0, 0, 0]]
アポカリモンを無事に01で表現できました。
ここすごくデジモンっぽいなーと思いました。
再生成
いよいよ再生成
# 128×128の領域を作る
width = 128
height = 128
dot_img = np.zeros((height,width,3), dtype=np.uint8)

for i in range(16):
    for j in range(16):
        if dot[i][j] == 0:
            #白→255
            dot_img[i*8:i*8+8,j*8:j*8+8] = 255
        else:
       #黒→0
            dot_img[i*8:i*8+8,j*8:j*8+8] = 0

plt.imshow(dot_img)
無事できました!
ドット間の1px線や白部分は透過してpngにしたりなどまだ途中ではありますがとりあえずの目標は達成です。
さいごに
ここまで読んでいただきありがとうございました。
この記事を書いていて
途中で白→0 黒→1としたけど 白→1 黒→0にして再生成時に dot[i][j] * 255 にしたほうがスマートだなと思ったりしました。
見返すって大事ですね。


