Tutorial: Thymeleaf + Spring を自動翻訳した
序文
このチュートリアルでは、ThymeleafをSpring Framework、特に SpringMVC と統合する方法について説明します。
Thymeleaf には、Spring Framework の バージョン3.x と 4.x の両方が統合されており、 thymeleaf-spring3 と thymeleaf-spring4 という2つの別個のライブラリによって提供されることに注意してください。これらのライブラリは個別の .jarファイル( thymeleaf-spring3-{version}.jar および thymeleaf-spring4-{version}.jar )にパッケージ化されており、ThymeleafのSpringを使用するにはクラスパスに追加する必要があります。アプリケーションへの統合。
このチュートリアルのコードサンプルとサンプルアプリケーションは、Spring 4.x とそれに対応する Thymeleaf 統合を利用していますが、このテキストの内容は Spring3.x でも有効です。アプリケーションで Spring3.x を使用している場合は、コードサンプルの org.thymeleaf.spring4 パッケージを org.thymeleaf.spring3 に置き換えるだけです。
1 Thymeleaf と Spring の統合
Thymeleaf は、 SpringMVC アプリケーションでフル機能の JSP の代替として使用できるように、一連の Spring 統合を提供します。
これらの統合により、次のことが可能になります。
- Spring MVC
@Controllerオブジェクトのメソッドを、JSPの場合とまったく同じように、Thymeleafテンプレートで利用できます。 - テンプレートでは、 OGNL の代わりに Spring Expression Language (Spring EL) を使用します。
- プロパティエディタ、変換サービス、検証エラー処理の使用など、 フォームバッキングBean および 結果バインディング と完全に統合されたフォームをテンプレートに作成できます。
- Spring が管理するメッセージファイルから国際化メッセージを(通常の
MessageSourceオブジェクトを介して)表示します。 - Spring 独自のリソース解決メカニズムを使用してテンプレートを解決します。
このチュートリアルは前提として "Using Thymeleaf" チュートリアルを履修済みとしています。このチュートリアルでは、 SpringStandard方言 について詳しく説明しています。
2 The SpringStandard 方言
より簡単でより良い統合を実現するために、Thymeleafは、Springで正しく機能するために必要なすべての機能を具体的に実装する方言を提供します。
この特定の方言は、Thymeleaf標準方言に基づいており、実際には org.thymeleaf.standard.StandardDialect から拡張された org.thymeleaf.spring4.dialect.SpringStandardDialect と呼ばれるクラスに実装されています。
標準方言にすでに存在するすべての機能に加えて、SpringStandard 方言には次の機能が導入されています:
- OGNLの代わりに、Spring式言語(Spring ELまたはSpEL)を変数式言語として使用します。すべての
${...}と*{...}は Spring EL として評価されます。 Spring ELコンパイラーがサポートされています(Spring 4.2.4+)。 - SpringELの構文を使用してアプリケーションコンテキスト内のすべてのBeanにアクセスします:
${@myBean.doSomething()} - フォーム処理のための新しい属性:
th:field、th:errors、th:errorclass、th:objectはフォームコマンドの選択に使用できるようにするための新しい実装が追加されました。 - 式のオブジェクトとメソッド
#themes.code(...)はspring:themeJSPカスタムタグと同等です。 - 式のオブジェクトとメソッド
#mvc.uri(...)はspring:mvcUrl(...)JSPカスタム関数と同等です(Spring 4.1以降のみ)。
ほとんどの場合、構成の一部として通常の
TemplateEngineオブジェクトでこの方言を直接使用するべきではないことに注意してください。非常に具体的なSpring統合のニーズがない限り、代わりに、必要なすべての構成手順を自動的に実行する新しいテンプレートエンジンクラスのインスタンスを作成すべきですorg.thymeleaf.spring4.SpringTemplateEngine.
Bean構成の例:
@Bean
public SpringResourceTemplateResolver templateResolver(){
    // SpringResourceTemplateResolverは、Spring独自のリソース解決インフラストラクチャと自動的に統合されます。
    // これを強くお勧めします。
    SpringResourceTemplateResolver templateResolver = new SpringResourceTemplateResolver();
    templateResolver.setApplicationContext(this.applicationContext);
    templateResolver.setPrefix("/WEB-INF/templates/");
    templateResolver.setSuffix(".html");
    // HTMLがデフォルト値ですが、わかりやすくするためにここに追加されています。
    templateResolver.setTemplateMode(TemplateMode.HTML);
    // テンプレートキャッシュはデフォルトでtrueです。
    // テンプレートを変更したときに自動的に更新する場合は、falseに設定します。
    templateResolver.setCacheable(true);
    return templateResolver;
}

@Bean
public SpringTemplateEngine templateEngine(){
    // SpringTemplateEngineは自動的にSpringStandardDialectを適用し、
    // Spring独自のMessageSourceメッセージ解決メカニズムを有効にします。
    SpringTemplateEngine templateEngine = new SpringTemplateEngine();
    templateEngine.setTemplateResolver(templateResolver());
    // Spring 4.2.4以降でSpringELコンパイラを有効にすると、ほとんどのシナリオ
    // で実行速度が向上しますが、1つのテンプレートの式が異なるデータ型で再利用
    // される特定のケースと互換性がない可能性があるため、
    // このフラグはデフォルトで「false」になり、下位互換性が確保されます
    templateEngine.setEnableSpringELCompiler(true);
    return templateEngine;
}
Or, using Spring's XML-based configuration:
<!-- SpringResourceTemplateResolverは、Spring独自のリソース解決インフラストラクチャと自動的に統合されます。 -->
<!-- これを強くお勧めします。 -->
<bean id="templateResolver"
       class="org.thymeleaf.spring4.templateresolver.SpringResourceTemplateResolver">
  <property name="prefix" value="/WEB-INF/templates/" />
  <property name="suffix" value=".html" />
  <!-- HTMLがデフォルト値ですが、わかりやすくするためにここに追加されています。      -->
  <property name="templateMode" value="HTML" />
  <!-- テンプレートキャッシュはデフォルトでtrueです。 -->
  <!-- テンプレートを変更したときに自動的に更新する場合は、falseに設定します。 -->
  <property name="cacheable" value="true" />
</bean>

<!-- SpringTemplateEngineは自動的にSpringStandardDialectを適用し、     -->
<!-- Spring独自のMessageSourceメッセージ解決メカニズムを有効にします。 -->
<bean id="templateEngine"
      class="org.thymeleaf.spring4.SpringTemplateEngine">
  <property name="templateResolver" ref="templateResolver" />
  <!-- Spring 4.2.4以降でSpringELコンパイラを有効にすると、ほとんどのシナリオ  -->
  <!-- で実行速度が向上しますが、1つのテンプレートの式が異なるデータ型で再利用 -->
  <!-- される特定のケースと互換性がない可能性があるため、                      -->
  <!-- このフラグはデフォルトで「false」になり、下位互換性が確保されます。     -->
  <property name="enableSpringELCompiler" value="true" />
</bean>
3 Views and View Resolvers
3.1 Views and View Resolvers in Spring MVC
Spring MVCには、テンプレートシステムのコアに準拠する2つのインターフェイスがあります。
org.springframework.web.servlet.Vieworg.springframework.web.servlet.ViewResolver
アプリケーションのモデルページを表示し、Beanとして定義することで、動作を変更および事前定義できるようにします。ビューは、通常、Thymeleafなどのテンプレートエンジンの実行によって、実際のHTMLインターフェイスのレンダリングを担当します。
ViewResolversは、特定の操作およびロケールのViewオブジェクトの取得を担当するオブジェクトです。通常、コントローラーはViewResolversに特定の名前(コントローラーメソッドによって返される文字列)のビューに転送するように要求し、アプリケーション内のすべてのビューリゾルバーは、いずれかがそのビューを解決できるようになるまで、順序付けられたチェーンで実行されます。 Viewオブジェクトが返され、HTMLのレンダリングのためにコントロールがオブジェクトに渡される場合。
アプリケーションのすべてのページをビューとして定義する必要はありませんが、動作を非標準にしたり、特定の方法で構成したりする必要があるページのみに注意してください(たとえば、いくつかの特別なBeanをビューに配線するなど)。対応するBeanがないビューがViewResolverに要求される --これは一般的なケースです-- 、新しいViewオブジェクトがアドホックに作成され、返されます。
過去のSpringMVCアプリケーションでの JSP + JSPLViewResolver の一般的な構成は次のようになりました。
<bean class="org.springframework.web.servlet.view.InternalResourceViewResolver">
  <property name="viewClass" value="org.springframework.web.servlet.view.JstlView" />
  <property name="prefix" value="/WEB-INF/jsps/" />
  <property name="suffix" value=".jsp" />
  <property name="order" value="2" />
  <property name="viewNames" value="*jsp" />
</bean>
そのプロパティをざっと見るだけで、どのように構成されているかを知ることができます:
-
viewClassは、Viewインスタンスのクラスを確立します。 これはJSPリゾルバーに必要ですが、Thymeleafを使用している場合はまったく必要ありません。 -
prefixとsuffixは、Thymeleaf の TemplateResolver オブジェクトの同じ名前の属性と同じように機能します。 -
orderは、 ViewResolver がチェーン内で照会される順序を確立します。 -
viewNamesは、この ViewResolver によって解決されるビュー名の定義(ワイルドカードを使用)を許可します。
3.2 Views and View Resolvers in Thymeleaf
Thymeleaf は、上記の2つのインターフェースの実装を提供します。
org.thymeleaf.spring4.view.ThymeleafVieworg.thymeleaf.spring4.view.ThymeleafViewResolver
これらの2つのクラスは、コントローラーの実行の結果として Thymeleaf テンプレートの処理を担当します。
Thymeleaf ビューリゾルバーの構成は、 JSP の構成と非常によく似ています。
@Bean
public ThymeleafViewResolver viewResolver(){
    ThymeleafViewResolver viewResolver = new ThymeleafViewResolver();
    viewResolver.setTemplateEngine(templateEngine());
    // NOTE 'order' and 'viewNames' are optional
    viewResolver.setOrder(1);
    viewResolver.setViewNames(new String[] {".html", ".xhtml"});
    return viewResolver;
}
...or in XML:
<bean class="org.thymeleaf.spring4.view.ThymeleafViewResolver">
  <property name="templateEngine" ref="templateEngine" />
  <!-- NOTE 'order' and 'viewNames' are optional -->
  <property name="order" value="1" />
  <property name="viewNames" value="*.html,*.xhtml" />
</bean>
もちろん、 templateEngineパラメータは、前の章で定義した SpringTemplateEngineオブジェクトです。他の2つ( order と viewNames )はどちらもオプションであり、前に見た JSPViewResolver と同じ意味を持ちます。
prefix または suffix パラメータはテンプレートリゾルバですでに指定されているため(テンプレートエンジンに渡されるため)、これらは必要ないことに注意してください。
そして、 View Beanを定義し、それに静的変数を追加したい場合はどうでしょうか。簡単です。 prototype Beanを定義するだけです。
@Bean
@Scope("prototype")
public ThymeleafView mainView() {
    ThymeleafView view = new ThymeleafView("main"); // templateName = 'main'
    view.setStaticVariables(
        Collections.singletonMap("footer", "The ACME Fruit Company"));
    return view;
}
これにより、Bean名(この場合は mainView)で選択して、この View Bean を具体的に実行できるようになります。
4 Spring Thyme Seed Starter Manager
このガイドのこの章と今後の章に示されている例のソースコードは、 Spring Thyme Seed Starter Manager GitHubリポジトリ にあります。
4.1 The Concept
Thymeleafでは、タイムの大ファンです。毎年春に、良い土壌とお気に入りの種子を使って Seed Starter キットを準備し、スペインの太陽の下に置いて、新しい植物が成長するのを辛抱強く待ちます。
しかし、今年は、コンテナの各セルにどのシードが入っているかを知るためにシードスターターコンテナにラベルを貼るのにうんざりしていたので、Spring MVC と Thymeleaf を使用して、スターターのカタログ化に役立つアプリケーションを準備することにしました: Spring Thyme SeedStarterマネージャー
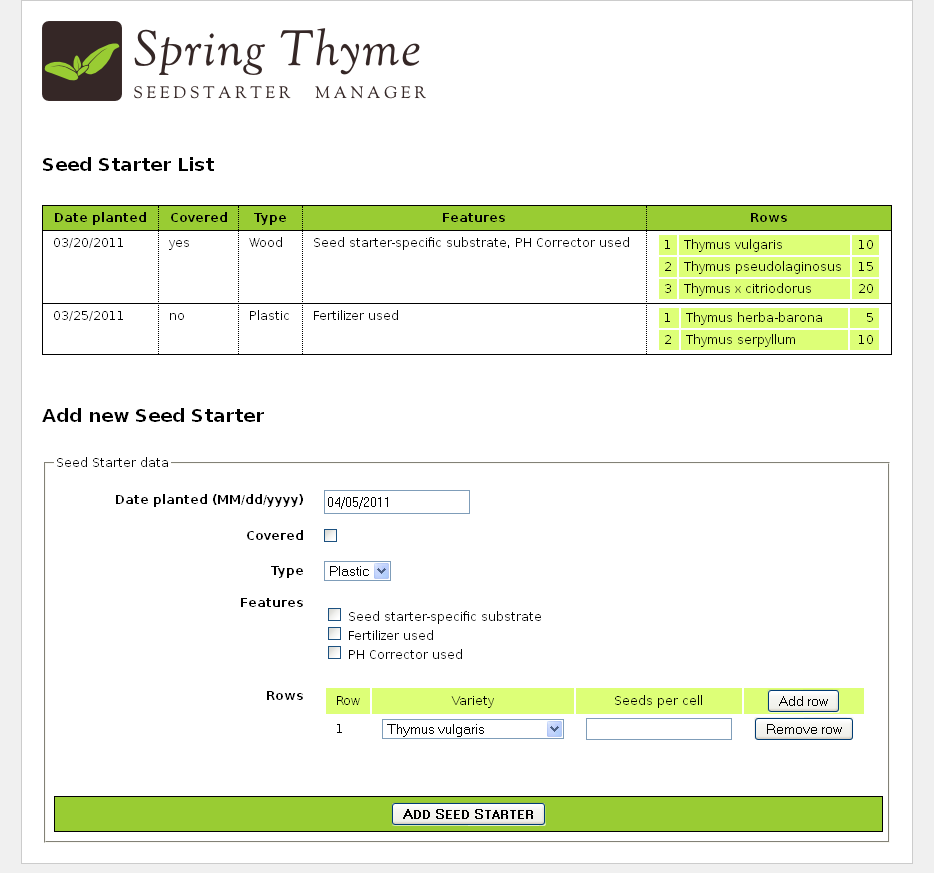
Thymeleafの使用 チュートリアルで開発した GoodThymes Virtual Groceryアプリケーションと同様に、STSMを使用すると、SpringMVCのテンプレートエンジンとしてのThymeleafの統合の最も重要な側面を例示できます。
4.2 Business Layer
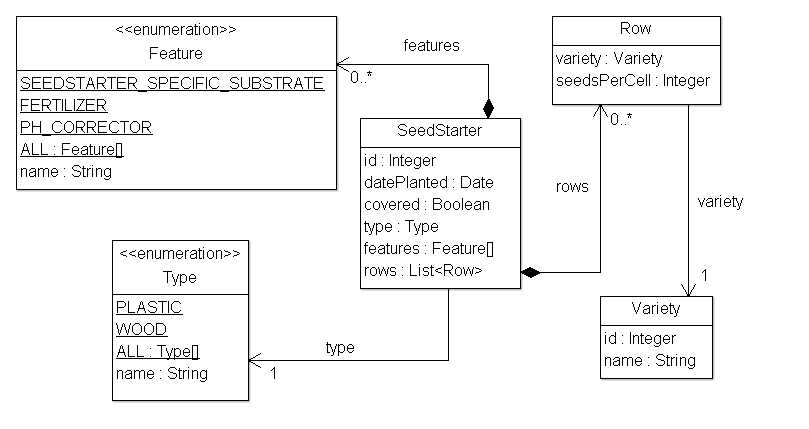
アプリケーションには、非常に単純なビジネス層が必要になります。まず、モデルエンティティを見てみましょう:
いくつかの非常に単純なサービスクラスが、必要なビジネスメソッドを提供します。次のように:
@Service
public class SeedStarterService {

    @Autowired
    private SeedStarterRepository seedstarterRepository;

    public List<SeedStarter> findAll() {
        return this.seedstarterRepository.findAll();
    }

    public void add(final SeedStarter seedStarter) {
        this.seedstarterRepository.add(seedStarter);
    }

}
And:
@Service
public class VarietyService {

    @Autowired
    private VarietyRepository varietyRepository;

    public List<Variety> findAll() {
        return this.varietyRepository.findAll();
    }

    public Variety findById(final Integer id) {
        return this.varietyRepository.findById(id);
    }

}
4.3 Spring MVC configuration
次に、アプリケーションのSpring MVC構成をセットアップする必要があります。これには、リソース処理やアノテーションスキャンなどの標準のSpring MVCアーティファクトだけでなく、テンプレートエンジンとビューリゾルバーインスタンスの作成も含まれます。
@Configuration
@EnableWebMvc
@ComponentScan
public class SpringWebConfig
        extends WebMvcConfigurerAdapter implements ApplicationContextAware {

    private ApplicationContext applicationContext;


    public SpringWebConfig() {
        super();
    }


    public void setApplicationContext(final ApplicationContext applicationContext)
            throws BeansException {
        this.applicationContext = applicationContext;
    }


    /* ******************************************************************* */
    /*  GENERAL CONFIGURATION ARTIFACTS                                    */
    /*  Static Resources, i18n Messages, Formatters (Conversion Service)   */
    /* ******************************************************************* */

    @Override
    public void addResourceHandlers(final ResourceHandlerRegistry registry) {
        super.addResourceHandlers(registry);
        registry.addResourceHandler("/images/**").addResourceLocations("/images/");
        registry.addResourceHandler("/css/**").addResourceLocations("/css/");
        registry.addResourceHandler("/js/**").addResourceLocations("/js/");
    }

    @Bean
    public ResourceBundleMessageSource messageSource() {
        ResourceBundleMessageSource messageSource = new ResourceBundleMessageSource();
        messageSource.setBasename("Messages");
        return messageSource;
    }

    @Override
    public void addFormatters(final FormatterRegistry registry) {
        super.addFormatters(registry);
        registry.addFormatter(varietyFormatter());
        registry.addFormatter(dateFormatter());
    }

    @Bean
    public VarietyFormatter varietyFormatter() {
        return new VarietyFormatter();
    }

    @Bean
    public DateFormatter dateFormatter() {
        return new DateFormatter();
    }


    /* **************************************************************** */
    /*  THYMELEAF-SPECIFIC ARTIFACTS                                    */
    /*  TemplateResolver <- TemplateEngine <- ViewResolver              */
    /* **************************************************************** */

    @Bean
    public SpringResourceTemplateResolver templateResolver(){
        // SpringResourceTemplateResolverは、Spring独自のリソース解決インフラストラクチャと自動的に統合されます。
        // これを強くお勧めします。
        SpringResourceTemplateResolver templateResolver = new SpringResourceTemplateResolver();
        templateResolver.setApplicationContext(this.applicationContext);
        templateResolver.setPrefix("/WEB-INF/templates/");
        templateResolver.setSuffix(".html");
        // HTMLがデフォルト値ですが、わかりやすくするためにここに追加されています。
        templateResolver.setTemplateMode(TemplateMode.HTML);
        // テンプレートキャッシュはデフォルトでtrueです。
        // テンプレートを変更したときに自動的に更新する場合は、falseに設定します。
        templateResolver.setCacheable(true);
        return templateResolver;
    }

    @Bean
    public SpringTemplateEngine templateEngine(){
        // SpringTemplateEngineは自動的にSpringStandardDialectを適用し、
        // Spring独自のMessageSourceメッセージ解決メカニズムを有効にします。
        SpringTemplateEngine templateEngine = new SpringTemplateEngine();
        templateEngine.setTemplateResolver(templateResolver());
        // Spring 4.2.4以降でSpringELコンパイラを有効にすると、ほとんどのシナリオ
        // で実行速度が向上しますが、1つのテンプレートの式が異なるデータ型で再利用
        // される特定のケースと互換性がない可能性があるため、
        // このフラグはデフォルトで「false」になり、下位互換性が確保されます
        templateEngine.setEnableSpringELCompiler(true);
        return templateEngine;
    }

    @Bean
    public ThymeleafViewResolver viewResolver(){
        ThymeleafViewResolver viewResolver = new ThymeleafViewResolver();
        viewResolver.setTemplateEngine(templateEngine());
        return viewResolver;
    }

}
4.4 The Controller
もちろん、アプリケーション用のコントローラーも必要になります。 STSMにはシードスターターのリストと新しいシードスターターを追加するためのフォームを含む1つのWebページしか含まれないため、すべてのサーバーの相互作用に対して1つのコントローラークラスのみを記述します:
@Controller
public class SeedStarterMngController {

    @Autowired
    private VarietyService varietyService;

    @Autowired
    private SeedStarterService seedStarterService;

    ...

}
次に、このコントローラークラスに何を追加できるかを見てみましょう。
Model Attributes
まず、ページに必要なモデル属性をいくつか追加します:
@ModelAttribute("allTypes")
public List<Type> populateTypes() {
    return Arrays.asList(Type.ALL);
}

@ModelAttribute("allFeatures")
public List<Feature> populateFeatures() {
    return Arrays.asList(Feature.ALL);
}

@ModelAttribute("allVarieties")
public List<Variety> populateVarieties() {
    return this.varietyService.findAll();
}

@ModelAttribute("allSeedStarters")
public List<SeedStarter> populateSeedStarters() {
    return this.seedStarterService.findAll();
}
Mapped methods
そして今、コントローラーの最も重要な部分であるマップされたメソッド:1つはフォームページを表示するためのもので、もう1つは新しい SeedStarter オブジェクトの追加を処理するためのものです。
@RequestMapping({"/","/seedstartermng"})
public String showSeedstarters(final SeedStarter seedStarter) {
    seedStarter.setDatePlanted(Calendar.getInstance().getTime());
    return "seedstartermng";
}

@RequestMapping(value="/seedstartermng", params={"save"})
public String saveSeedstarter(
        final SeedStarter seedStarter, final BindingResult bindingResult, final ModelMap model) {
    if (bindingResult.hasErrors()) {
        return "seedstartermng";
    }
    this.seedStarterService.add(seedStarter);
    model.clear();
    return "redirect:/seedstartermng";
}
4.5 変換サービスの構成
ビューレイヤーで Date と Variety を簡単にフォーマットできるように、 Spring の ConversionService に必要な Formatter を追加するよう( WebMvcConfigurerAdapter の拡張する)アプリケーションを構成しました。もう一度見てください:
@Override
public void addFormatters(final FormatterRegistry registry) {
    super.addFormatters(registry);
    registry.addFormatter(varietyFormatter());
    registry.addFormatter(dateFormatter());
}

@Bean
public VarietyFormatter varietyFormatter() {
    return new VarietyFormatter();
}

@Bean
public DateFormatter dateFormatter() {
    return new DateFormatter();
}
Spring Formatter は、 org.springframework.format.Formatter インターフェースの実装です。 Spring変換インフラストラクチャの仕組みの詳細については、 spring.io のドキュメント を参照してください。
Messages.properties の date.format メッセージキーにあるフォーマット文字列に従って日付をフォーマットする DateFormatter を見てみましょう:
public class DateFormatter implements Formatter<Date> {

    @Autowired
    private MessageSource messageSource;


    public DateFormatter() {
        super();
    }

    public Date parse(final String text, final Locale locale) throws ParseException {
        final SimpleDateFormat dateFormat = createDateFormat(locale);
        return dateFormat.parse(text);
    }

    public String print(final Date object, final Locale locale) {
        final SimpleDateFormat dateFormat = createDateFormat(locale);
        return dateFormat.format(object);
    }

    private SimpleDateFormat createDateFormat(final Locale locale) {
        final String format = this.messageSource.getMessage("date.format", null, locale);
        final SimpleDateFormat dateFormat = new SimpleDateFormat(format);
        dateFormat.setLenient(false);
        return dateFormat;
    }

}
VarietyFormatter は、 Variety Entity と Form での使用方法(基本的には id フィールド値)に自動的に変換します:
public class VarietyFormatter implements Formatter<Variety> {

    @Autowired
    private VarietyService varietyService;


    public VarietyFormatter() {
        super();
    }

    public Variety parse(final String text, final Locale locale) throws ParseException {
        final Integer varietyId = Integer.valueOf(text);
        return this.varietyService.findById(varietyId);
    }


    public String print(final Variety object, final Locale locale) {
        return (object != null ? object.getId().toString() : "");
    }

}
これらのフォーマッターがデータの表示方法にどのように影響するかについては、後で詳しく説明します。
5 シードスターターデータの一覧表示
/WEB-INF/templates/seedstartermng.html ページに最初に表示されるのは、現在保存されているシードスターターのリストです。このために、いくつかの外部化されたメッセージと、モデル属性のいくつかの式の評価が必要になります:
<div class="seedstarterlist" th:unless="${#lists.isEmpty(allSeedStarters)}">

  <h2 th:text="#{title.list}">List of Seed Starters</h2>

  <table>
    <thead>
      <tr>
        <th th:text="#{seedstarter.datePlanted}">Date Planted</th>
        <th th:text="#{seedstarter.covered}">Covered</th>
        <th th:text="#{seedstarter.type}">Type</th>
        <th th:text="#{seedstarter.features}">Features</th>
        <th th:text="#{seedstarter.rows}">Rows</th>
      </tr>
    </thead>
    <tbody>
      <tr th:each="sb : ${allSeedStarters}">
        <td th:text="${{sb.datePlanted}}">13/01/2011</td>
        <td th:text="#{|bool.${sb.covered}|}">yes</td>
        <td th:text="#{|seedstarter.type.${sb.type}|}">Wireframe</td>
        <td th:text="${#strings.arrayJoin(
                           #messages.arrayMsg(
                               #strings.arrayPrepend(sb.features,'seedstarter.feature.')),
                           ', ')}">Electric Heating, Turf</td>
        <td>
          <table>
            <tbody>
              <tr th:each="row,rowStat : ${sb.rows}">
                <td th:text="${rowStat.count}">1</td>
                <td th:text="${row.variety.name}">Thymus Thymi</td>
                <td th:text="${row.seedsPerCell}">12</td>
              </tr>
            </tbody>
          </table>
        </td>
      </tr>
    </tbody>
  </table>
</div>
見るべきことがたくさんあります。個別に見ていきましょう。
まず、このセクションは、シードスターターがある場合にのみ表示されます。これは、 th:unless 属性と #lists.isEmpty(...) 関数を使用して実現します。
<div class="seedstarterlist" th:unless="${#lists.isEmpty(allSeedStarters)}">
#lists のようなすべてのユーティリティオブジェクトは、標準方言のOGNL式と同じように SpringEL式 で使用できることに注意してください。
次に。次のような多くの国際化された(外部化された)テキストを御覧ください:
<h2 th:text="#{title.list}">List of Seed Starters</h2>

<table>
  <thead>
    <tr>
      <th th:text="#{seedstarter.datePlanted}">Date Planted</th>
      <th th:text="#{seedstarter.covered}">Covered</th>
      <th th:text="#{seedstarter.type}">Type</th>
      <th th:text="#{seedstarter.features}">Features</th>
      <th th:text="#{seedstarter.rows}">Rows</th>
      ...
これはSpringMVCアプリケーションであるため、Spring configurationで MessageSource Beanをすでに定義しています( MessageSourceは SpringMVC でテキストを外部化する標準的な方法です):
@Bean
public ResourceBundleMessageSource messageSource() {
    ResourceBundleMessageSource messageSource = new ResourceBundleMessageSource();
    messageSource.setBasename("Messages");
    return messageSource;
}
...そしてその basename プロパティは、クラスパスに Messages_es.properties や Messages_en.properties のようなファイルがあることを示しています。スペイン語版を見てみましょう:
title.list=Lista de semilleros

date.format=dd/MM/yyyy
bool.true=sí
bool.false=no

seedstarter.datePlanted=Fecha de plantación
seedstarter.covered=Cubierto
seedstarter.type=Tipo
seedstarter.features=Características
seedstarter.rows=Filas

seedstarter.type.WOOD=Madera
seedstarter.type.PLASTIC=Plástico

seedstarter.feature.SEEDSTARTER_SPECIFIC_SUBSTRATE=Sustrato específico para semilleros
seedstarter.feature.FERTILIZER=Fertilizante
seedstarter.feature.PH_CORRECTOR=Corrector de PH
表リストの最初の列には、シードスターターが準備された日付が表示されます。ただし、 DateFormatter で定義した方法で フォーマットされたものを表示します 。これを行うために、二重中括弧構文(${{...}})を使用します。これにより、構成時に登録した DateFormatter を含むSpring ConversionServiceが自動的に適用されます。
<td th:text="${{sb.datePlanted}}">13/01/2011</td>
次に、ブール値でカバーされたBeanプロパティの値を、リテラル置換式を使用して国際化された「 yes 」または「 no 」に変換することにより、シードスターターコンテナがカバーされているかどうかを示します。
<td th:text="#{|bool.${sb.covered}|}">yes</td>
次に、シードスターターコンテナのタイプを表示する必要があります。 Type は2つの値( WOOD と PLASTIC )を持つJava列挙型です。そのため、 Messages ファイルで seedstarter.type.WOOD と seedstarter.type.PLASTIC という2つのプロパティを定義しました。
ただし、 type の国際化された名前を取得するには、 seedstarter.type を追加する必要があります。式を使用して列挙値のプレフィックスを付けます。その結果、メッセージキーとして使用されます:
<td th:text="#{|seedstarter.type.${sb.type}|}">Wireframe</td>
このリストの最も難しい部分は、 features の列です。その中で、コンテナのすべての features ( Feature 列挙型の配列の形式で提供される)をコンマで区切って表示したいと思います。 Electric Heating, Turf のように。
type で行ったように、これらの列挙値も外部化する必要があるため、これは特に難しいことに注意してください。その場合のフローは次のとおりです:
-
features配列のすべての要素に対応するプレフィックスを付加します。 - 手順1のすべてのキーに対応する外部化されたメッセージを取得します。
- 区切り文字としてコンマを使用して、手順2で取得したすべてのメッセージを結合します。
これを実現するために、次のコードを作成します:
<td th:text="${#strings.arrayJoin(
                   #messages.arrayMsg(
                       #strings.arrayPrepend(sb.features,'seedstarter.feature.')),
                   ', ')}">Electric Heating, Turf</td>
実際、リストの最後の列は非常に単純です。コンテナ内の各行の内容を表示するためのネストされたテーブルがある場合でも:
<td>
  <table>
    <tbody>
      <tr th:each="row,rowStat : ${sb.rows}">
        <td th:text="${rowStat.count}">1</td>
        <td th:text="${row.variety.name}">Thymus Thymi</td>
        <td th:text="${row.seedsPerCell}">12</td>
      </tr>
    </tbody>
  </table>
</td>
6 Creating a Form
6.1 Handling the command object
Command object は、Spring MVCがフォームバッキングBeanに付ける名前です。フォームのフィールドをモデル化し、ユーザーが入力した値を取得するためのゲッター/セッターを提供するオブジェクトです。
Thymeleaf では、 <form> タグで th:object 属性を使用して Command object を指定する必要があります:
<form action="#" th:action="@{/seedstartermng}" th:object="${seedStarter}" method="post">
    ...
</form>
これは th:object の他の使用法と同じですが、このシナリオでは、SpringMVCのインフラストラクチャと正しく統合するためにいくつかの制限が追加されています:
- フォームタグの
th:object属性の値は、プロパティナビゲーションなしで、モデル属性の名前のみを指定する変数式(${...})である必要があります。例えば、${seedStarter}は有効ですが、${seedStarter.data}は無効です。 -
<form>タグ内に入ると、他のth:object属性を指定することはできません。これは、HTMLフォームをネストできない仕様と一致しています。
6.2 Inputs
フォームに入力を追加する方法を見てみましょう:
<input type="text" th:field="*{datePlanted}" />
新しい属性 th:field が出てきました。これはSpring MVC統合にとって非常に重要な機能で、入力をフォームバッキングBeanのプロパティにバインドするという重い作業をすべて行ってくれます。SpringMVCのJSPタグライブラリの <form:input> タグのpath属性に相当するものです。
th:field 属性は、 <input> 、 <select> 、または <textarea> タグのいずれにアタッチされているかによって(また、 <input> タグの type 属性によっても)動作が異なります。 この場合( input[type=text] )、上記のコード行は次のようになります:
<input type="text" id="datePlanted" name="datePlanted" th:value="*{datePlanted}" />
...しかし実際はそれだけでなく th:field は以前に見た DateFormatter を含む登録済みのSpringConversion Serviceも適用するので、それだけではありません(フィールド式が二重括弧で囲まれていない場合でも) 。これにより、日付が正しくフォーマットされて表示されます。
th:field 属性の値は選択式( *{...} )である必要があります。これは、コンテキスト変数(Spring MVC専門用語では model attributes)ではなくフォームバッキングBeanで評価されるからです。
th:object の式とは異なり、これらの式はプロパティナビゲーションを含めることができます(実際、 <form:input> JSPタグのpath属性に許可されている式はすべてここで許可されます)。
th:field は、<input type="datetime" ... />、<input type="color" ... /> など、HTML5によって導入された新しい <input> type 属性も理解します。 SpringMVC に完全なHTML5サポートが追加されました。
6.3 Checkbox fields
th:fieldでは、チェックボックスの入力を定義することもできます。 HTMLページの例を見てみましょう:
<div>
  <label th:for="${#ids.next('covered')}" th:text="#{seedstarter.covered}">Covered</label>
  <input type="checkbox" th:field="*{covered}" />
</div>
チェックボックス自体のほかに、外部化されたラベルや、チェックボックス入力のid属性の値を動的に生成するための #ids.next('covered') 関数など、いくつかのすばらしい機能があることに注意してください。
このフィールドにid属性を動的に生成する必要があるのはなぜか? チェックボックスは潜在的に複数あるので、同じ値のチェックボックスがそれぞれ異なるID値を持つようにするためです。それらのID値には常にシーケンス番号の接尾辞が付きます(内部で #ids.seq(...) 関数を使用)。
複数値のチェックボックスフィールドを見ると確認できます:
<ul>
  <li th:each="feat : ${allFeatures}">
    <input type="checkbox" th:field="*{features}" th:value="${feat}" />
    <label th:for="${#ids.prev('features')}"
           th:text="#{${'seedstarter.feature.' + feat}}">Heating</label>
  </li>
</ul>
今回は th:value 属性を追加したことに注意してください。これは、featuresフィールドのようにブール値ではなく、配列であるためです。
このコードによって生成されたHTML出力を見てみましょう:
<ul>
  <li>
    <input id="features1" name="features" type="checkbox" value="SEEDSTARTER_SPECIFIC_SUBSTRATE" />
    <input name="_features" type="hidden" value="on" />
    <label for="features1">Seed starter-specific substrate</label>
  </li>
  <li>
    <input id="features2" name="features" type="checkbox" value="FERTILIZER" />
    <input name="_features" type="hidden" value="on" />
    <label for="features2">Fertilizer used</label>
  </li>
  <li>
    <input id="features3" name="features" type="checkbox" value="PH_CORRECTOR" />
    <input name="_features" type="hidden" value="on" />
    <label for="features3">PH Corrector used</label>
  </li>
</ul>
ここで、シーケンス番号の接尾辞がid属性に追加される具体例と、 #ids.prev(...) 関数によって生成された最後のシーケンス値を取得する方法を確認できます。
<input name="_features" type="hidden">という input タグは「ブラウザがチェックされていないチェックボックスの値をサーバーに送信しない」という問題を回避するために、生成されており、心配する必要はありません。
また(フォームバッキングBean の features フィールドが)選択された値を持つ場合、 th:field がそれを処理し、対応する入力タグに checked="checked" 属性を追加することに注意してください。
6.4 Radio Button fields
ラジオボタンフィールドは、非ブール(複数値)チェックボックスと同様の方法で指定されます ---もちろん、複数値ではないことを除いて:
<ul>
  <li th:each="ty : ${allTypes}">
    <input type="radio" th:field="*{type}" th:value="${ty}" />
    <label th:for="${#ids.prev('type')}" th:text="#{${'seedstarter.type.' + ty}}">Wireframe</label>
  </li>
</ul>
6.5 Dropdown/List selectors
選択フィールドには、 <select> タグとそのネストされた <option> タグの2つの部分があります。この種のフィールドを作成する場合、 <select> タグに th:field 属性を含める必要がありますが、ネストされた <option> タグの th:value 属性は非常に重要です。現在選択されているオプションを知る手段を提供します(ブール値以外のチェックボックスやラジオボタンと同様の方法で)。
ドロップダウン選択としてタイプフィールドを再構築しましょう:
<select th:field="*{type}">
  <option th:each="type : ${allTypes}"
          th:value="${type}"
          th:text="#{${'seedstarter.type.' + type}}">Wireframe</option>
</select>
この時点で、このコードを理解するのは非常に簡単です。属性の優先順位により、 <option> タグ自体に th:each 属性を設定できることに注意してください。
6.6 Dynamic fields
Spring MVCの高度なフォームフィールドバインディング機能のおかげで、複雑なSpring EL式を使用して、動的フォームフィールドをフォームバッキングBeanにバインドできます。これにより、 SeedStarter Beanに新しいRowオブジェクトを作成し、ユーザーの要求に応じてそれらの行のフィールドをフォームに追加できるようになります。
これを行うには、コントローラーにいくつかの新しいマップされたメソッドが必要です。これにより、特定のリクエストパラメーターの存在に応じて、 SeedStarter に行が追加または削除されます。:
@RequestMapping(value="/seedstartermng", params={"addRow"})
public String addRow(final SeedStarter seedStarter, final BindingResult bindingResult) {
    seedStarter.getRows().add(new Row());
    return "seedstartermng";
}

@RequestMapping(value="/seedstartermng", params={"removeRow"})
public String removeRow(
        final SeedStarter seedStarter, final BindingResult bindingResult,
        final HttpServletRequest req) {
    final Integer rowId = Integer.valueOf(req.getParameter("removeRow"));
    seedStarter.getRows().remove(rowId.intValue());
    return "seedstartermng";
}
これで、フォームに動的テーブルを追加できます:
<table>
  <thead>
    <tr>
      <th th:text="#{seedstarter.rows.head.rownum}">Row</th>
      <th th:text="#{seedstarter.rows.head.variety}">Variety</th>
      <th th:text="#{seedstarter.rows.head.seedsPerCell}">Seeds per cell</th>
      <th>
        <button type="submit" name="addRow" th:text="#{seedstarter.row.add}">Add row</button>
      </th>
    </tr>
  </thead>
  <tbody>
    <tr th:each="row,rowStat : *{rows}">
      <td th:text="${rowStat.count}">1</td>
      <td>
        <select th:field="*{rows[__${rowStat.index}__].variety}">
          <option th:each="var : ${allVarieties}"
                  th:value="${var.id}"
                  th:text="${var.name}">Thymus Thymi</option>
        </select>
      </td>
      <td>
        <input type="text" th:field="*{rows[__${rowStat.index}__].seedsPerCell}" />
      </td>
      <td>
        <button type="submit" name="removeRow"
                th:value="${rowStat.index}" th:text="#{seedstarter.row.remove}">Remove row</button>
      </td>
    </tr>
  </tbody>
</table>
ここで見るべきことはかなりたくさんありますが、今では理解してはいけないことはあまりありません... 1つの 奇妙 なことを除いて:
<select th:field="*{rows[__${rowStat.index}__].variety}">

    ...

</select>
"Using Thymeleaf" チュートリアルを思い出すと、その __${...}__ 構文は前処理式であり、式全体を実際に評価する前に評価される内部式です。しかし、なぜそのように行インデックスを指定するのでしょうか? これで十分ではないでしょうか:
<select th:field="*{rows[rowStat.index].variety}">

    ...

</select>
...まあ、実際には、だめです。問題は、Spring ELが配列のインデックスブラケット内の変数を評価しないため、上記の式を実行すると、 rows[rowStat.index] が ( rows[0], row[1] など ではなく) 行コレクション内の有効な位置ではないことを示すエラーが発生することです。そのため、ここでは前処理が必要です。
"Add Row" を数回押した後、結果のHTMLのフラグメントを見てみましょう:
<tbody>
  <tr>
    <td>1</td>
    <td>
      <select id="rows0.variety" name="rows[0].variety">
        <option selected="selected" value="1">Thymus vulgaris</option>
        <option value="2">Thymus x citriodorus</option>
        <option value="3">Thymus herba-barona</option>
        <option value="4">Thymus pseudolaginosus</option>
        <option value="5">Thymus serpyllum</option>
      </select>
    </td>
    <td>
      <input id="rows0.seedsPerCell" name="rows[0].seedsPerCell" type="text" value="" />
    </td>
    <td>
      <button name="removeRow" type="submit" value="0">Remove row</button>
    </td>
  </tr>
  <tr>
    <td>2</td>
    <td>
      <select id="rows1.variety" name="rows[1].variety">
        <option selected="selected" value="1">Thymus vulgaris</option>
        <option value="2">Thymus x citriodorus</option>
        <option value="3">Thymus herba-barona</option>
        <option value="4">Thymus pseudolaginosus</option>
        <option value="5">Thymus serpyllum</option>
      </select>
    </td>
    <td>
      <input id="rows1.seedsPerCell" name="rows[1].seedsPerCell" type="text" value="" />
    </td>
    <td>
      <button name="removeRow" type="submit" value="1">Remove row</button>
    </td>
  </tr>
</tbody>
7 Validation and Error Messages
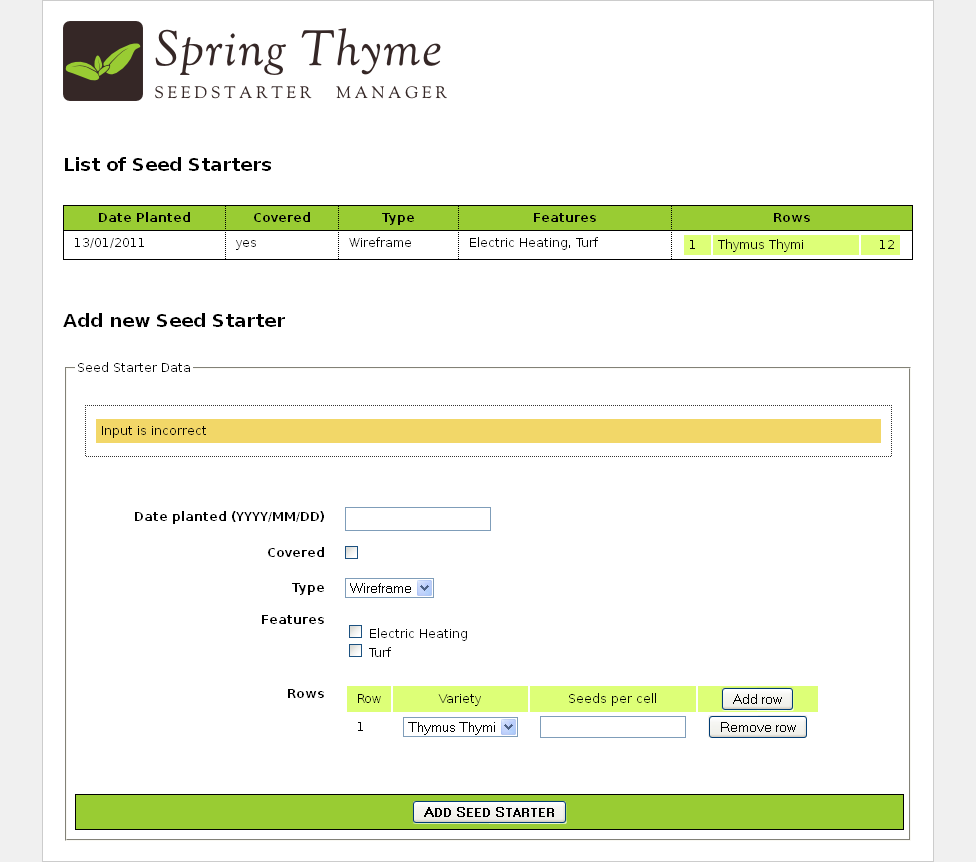
ほとんどのフォームでは、ユーザーが犯したエラーをユーザーに通知するために、検証メッセージを表示する必要があります。
Thymeleafは、このためのいくつかのツールを提供します。 #fields オブジェクトのいくつかの関数、 th:errors および th:errorclass 属性。
7.1 Field errors
エラーが発生した場合に特定のCSSクラスをフィールドに設定する方法を見てみましょう:
<input type="text" th:field="*{datePlanted}"
                   th:class="${#fields.hasErrors('datePlanted')}? fieldError" />
ご覧のとおり、 #fields.hasErrors(...) 関数は、フィールド式をパラメーター( datePlanted )として受け取り、そのフィールドに検証エラーが存在するかどうかを示すブール値を返します。
また、そのフィールドのすべてのエラーを取得して、それらを繰り返すこともできます:
<ul>
  <li th:each="err : ${#fields.errors('datePlanted')}" th:text="${err}" />
</ul>
繰り返す代わりに、 th:errors を使用することもできます。これは、指定されたセレクターのすべてのエラーを <br/> で区切ってリストを作成する特殊な属性です:
<input type="text" th:field="*{datePlanted}" />
<p th:if="${#fields.hasErrors('datePlanted')}" th:errors="*{datePlanted}">Incorrect date</p>
エラーベースのCSSスタイリングの簡素化: th:errorclass
上で見た例、フィールドにエラーがある場合にCSSクラスをフォーム入力に設定する は非常に一般的であるため、Thymeleafは正確に次のような特定の属性を提供します: th:errorclass 。
フォームフィールドタグ(input、select、textarea ...)に適用すると、同じタグ内の既存の name または th:field 属性から検査対象のフィールドの名前を読み取り、そのようなフィールドに関連するエラーがある場合は、タグにCSSクラスを指定します:
<input type="text" th:field="*{datePlanted}" class="small" th:errorclass="fieldError" />
datePlanted にエラーがある場合、これは次のようにレンダリングされます:
<input type="text" id="datePlanted" name="datePlanted" value="2013-01-01" class="small fieldError" />
7.2 All errors
そして、フォームにすべてのエラーを表示したい場合はどうなりますか? '*' または 'all' 定数(これらは同等です)を使用して、 #fields.hasErrors(...) メソッドと#fields.errors(...) メソッドをクエリする必要があります。
<ul th:if="${#fields.hasErrors('*')}">
  <li th:each="err : ${#fields.errors('*')}" th:text="${err}">Input is incorrect</li>
</ul>
上記の例のように、すべてのエラーを取得して反復することができます...
<ul>
  <li th:each="err : ${#fields.errors('*')}" th:text="${err}" />
</ul>
...また、 <br /> で区切られたリストを作成します。
<p th:if="${#fields.hasErrors('all')}" th:errors="*{all}">Incorrect date</p>
最後に、 #fields.hasErrors( '*') は #fields.hasAnyErrors() と同等であり、 #fields.errors('*') は #fields.allErrors() と同等であることに注意してください。好みの構文を使用してください:
<div th:if="${#fields.hasAnyErrors()}">
  <p th:each="err : ${#fields.allErrors()}" th:text="${err}">...</p>
</div>
7.3 Global errors
Spring形式には3番目のタイプのエラーがあります:グローバルエラー。これらは、フォーム内の特定のフィールドに関連付けられていないが、まだ存在しているエラーです。
Thymeleafは、これらのエラーにアクセスするための global 定数を提供します:
<ul th:if="${#fields.hasErrors('global')}">
  <li th:each="err : ${#fields.errors('global')}" th:text="${err}">Input is incorrect</li>
</ul>
<p th:if="${#fields.hasErrors('global')}" th:errors="*{global}">Incorrect date</p>
...および同等の #fields.hasGlobalErrors() および #fields.globalErrors() :
<div th:if="${#fields.hasGlobalErrors()}">
  <p th:each="err : ${#fields.globalErrors()}" th:text="${err}">...</p>
</div>
7.4 Displaying errors outside forms
フォーム検証エラーは、選択( *{...} )式の代わりに変数( ${...} )を使用し、フォームバッキングBeanの名前の前に付けることで、フォームの外部に表示することもできます。:
<div th:errors="${myForm}">...</div>
<div th:errors="${myForm.date}">...</div>
<div th:errors="${myForm.*}">...</div>

<div th:if="${#fields.hasErrors('${myForm}')}">...</div>
<div th:if="${#fields.hasErrors('${myForm.date}')}">...</div>
<div th:if="${#fields.hasErrors('${myForm.*}')}">...</div>

<form th:object="${myForm}">
    ...
</form>
7.5 Rich error objects
Thymeleafは、 fieldName(String)、 message(String)、および global(boolean)属性を使用して、(単なる 文字列 ではなく)Beanの形式でフォームエラー情報を取得する可能性を提供します。
これらのエラーは、 #fields.detailedErrors() ユーティリティメソッドを使用して取得できます。:
<ul>
    <li th:each="e : ${#fields.detailedErrors()}" th:class="${e.global}? globalerr : fielderr">
        <span th:text="${e.global}? '*' : ${e.fieldName}">The field name</span> |
        <span th:text="${e.message}">The error message</span>
    </li>
</ul>
8 It's still a Prototype!
これでアプリケーションの準備が整いました。しかし、私たちが作成した .htmlページをもう一度見てみましょう...
Thymeleafを使用した場合の最も良い結果の1つは、HTMLにこの機能をすべて追加した後でも、プロトタイプとして使用できることです(これは ナチュラルテンプレート と言います)。アプリケーションを実行せずに、ブラウザで直接 seedstartermng.htmlを開いてみましょう:
そこにそれがある!これは動作するアプリケーションではなく、実際のデータでもありません...しかし、完全に表示可能なHTMLコードで構成された完全に有効なプロトタイプです。
9 The Conversion Service
9.1 Configuration
前に説明したように、Thymeleafはアプリケーションコンテキストに登録された変換サービスを利用できます。私たちのアプリケーション構成クラスは、Spring独自の WebMvcConfigurerAdapter ヘルパーを拡張することにより、そのような変換サービスを自動的に登録します。これは、必要な フォーマッター を追加することで構成できます。それがどのように見えるかをもう一度見てみましょう:
@Override
public void addFormatters(final FormatterRegistry registry) {
    super.addFormatters(registry);
    registry.addFormatter(varietyFormatter());
    registry.addFormatter(dateFormatter());
}

@Bean
public VarietyFormatter varietyFormatter() {
    return new VarietyFormatter();
}

@Bean
public DateFormatter dateFormatter() {
    return new DateFormatter();
}
9.1 Double-brace syntax
変換サービスは、任意のオブジェクトを文字列に変換/フォーマットするために簡単に適用できます。これは、中括弧式の構文を使用して行われます。:
- 変数式の場合:
${{...}} - 選択式の場合:
*{{...}}
したがって、たとえば、3桁の区切り文字としてコンマを追加する整数から文字列へのコンバータが与えられた場合、これは:
<p th:text="${val}">...</p>
<p th:text="${{val}}">...</p>
...結果として:
<p>1234567890</p>
<p>1,234,567,890</p>
9.2 Use in forms
以前、すべての th:field 属性が常に変換サービスを適用することを確認したので、これは:
<input type="text" th:field="*{datePlanted}" />
...実際にはと同等です:
<input type="text" th:field="*{{datePlanted}}" />
Springの要件により、これは、単一中括弧構文を使用する式に変換サービスが適用される唯一のシナリオであることに注意してください。
9.3 #conversions utility object
#conversions 式ユーティリティオブジェクトを使用すると、必要に応じて変換サービスを手動で実行できます
<p th:text="${'Val: ' + #conversions.convert(val,'String')}">...</p>
このユーティリティオブジェクトの構文:
-
#conversions.convert(Object,Class): オブジェクトを指定されたクラスに変換します。 -
#conversions.convert(Object,String): 上記と同じですが、ターゲットクラスを文字列として指定します(java.lang.パッケージは省略できます)。
10 テンプレートフラグメントのレンダリング
Thymeleafは、実行の結果としてテンプレートの一部( フラグメント )のみをレンダリングする可能性を提供します。
これは、便利なコンポーネント化ツールになります。たとえば、AJAX呼び出しで実行されるコントローラーで使用できます。これにより、ブラウザーに既に読み込まれているページのマークアップフラグメントが返される場合があります(選択の更新、ボタンの有効化/無効化など)。
フラグメントレンダリングは、Thymeleafの フラグメント仕様 : org.thymeleaf.fragment.IFragmentSpec」 インターフェースを実装するオブジェクトを使用して実現できます。
これらの実装の最も一般的なものは org.thymeleaf.standard.fragment.StandardDOMSelectorFragmentSpec です。これにより、 th:include または th:replace で使用されるものとまったく同じようにDOMセレクターを使用してフラグメントを指定できます。
10.1 ビューBeanでフラグメントを指定する
ビューBean は、アプリケーションコンテキストで宣言された org.thymeleaf.spring4.view.ThymeleafView クラスのBeanです(Java構成を使用している場合は @Bean 宣言)。これらは、次のようなフラグメントの指定を可能にします。
@Bean(name="content-part")
@Scope("prototype")
public ThymeleafView someViewBean() {
    ThymeleafView view = new ThymeleafView("index"); // templateName = 'index'
    view.setMarkupSelector("content");
    return view;
}
上記のBean定義を前提として、コントローラーが content-part (上記のBeanの名前)を返す場合...
@RequestMapping("/showContentPart")
public String showContentPart() {
    ...
    return "content-part";
}
...thymeleafは、 index テンプレートの content フラグメントのみを返します。プレフィックスとサフィックスが適用されると、この場所はおそらく /WEB-INF/templates/index.html のようになります。したがって、結果は index :: content を指定するのと完全に同等になります。:
<!DOCTYPE html>
<html>
  ...
  <body>
    ...
    <div th:fragment="content">
      Only this div will be rendered!
    </div>
    ...
  </body>
</html>
また、Thymeleafマークアップセレクターの機能のおかげで、 th:fragment 属性をまったく必要とせずにテンプレート内のフラグメントを選択できることにも注意してください。たとえば、 id 属性を使用してみましょう:
@Bean(name="content-part")
@Scope("prototype")
public ThymeleafView someViewBean() {
    ThymeleafView view = new ThymeleafView("index"); // templateName = 'index'
    view.setMarkupSelector("#content");
    return view;
}
...これは完全に選択されます:
<!DOCTYPE html>
<html>
  ...
  <body>
    ...
    <div id="content">
      Only this div will be rendered!
    </div>
    ...
  </body>
</html>
10.2 コントローラの戻り値にフラグメントを指定する
ビューBean を宣言する代わりに、 フラグメント式 の構文を使用して、コントローラー自体からフラグメントを指定できます。 th:insert または th:replace 属性と同じように
@RequestMapping("/showContentPart")
public String showContentPart() {
    ...
    return "index :: content";
}
もちろん、ここでもDOMセレクターの全機能を利用できるため、 id="content" などの標準のHTML属性に基づいてフラグメントを選択できます:
@RequestMapping("/showContentPart")
public String showContentPart() {
    ...
    return "index :: #content";
}
また、次のようなパラメータを使用することもできます:
@RequestMapping("/showContentPart")
public String showContentPart() {
    ...
    return "index :: #content ('myvalue')";
}
11 高度な統合機能
11.1 Integration with RequestDataValueProcessor
Thymeleafは、Springの RequestDataValueProcessor インターフェースとシームレスに統合されます。このインターフェイスを使用すると、リンクURL、フォームURL、フォームフィールドの値をマークアップ結果に書き込む前にインターセプトできます。また、非表示のフォームフィールドを透過的に追加して、 CSRF(クロスサイトリクエストフォージェリ)に対する保護のようなセキュリティ機能を有効にすることもできます。
RequestDataValueProcessorの実装は、アプリケーションコンテキストで簡単に構成できます。 org.springframework.web.servlet.support.RequestDataValueProcessor インターフェースを実装し、Bean名として requestDataValueProcessor を使用する必要があります:
@Bean
public RequestDataValueProcessor requestDataValueProcessor() {
  return new MyRequestDataValueProcessor();
}
...そしてThymeleafはそれをこのように使用します:
-
th:hrefとth:srcは、URLをレンダリングする前にRequestDataValueProcessor.processUrl(...)を呼び出します。 -
th:actionは、フォームのaction属性をレンダリングする前にRequestDataValueProcessor.processAction(...)を呼び出し、さらに、この属性が<form>タグ ---とにかく唯一の場所--- に適用されていることを検出します。そしてそのような場合はRequestDataValueProcessor.getExtraHiddenFields(...)を呼び出し、返された非表示フィールドを終了</form>タグの直前に追加します。 -
th:valueは、同じタグにth:fieldが存在しない限り、参照する値をレンダリングするためにRequestDataValueProcessor.processFormFieldValue(...)を呼び出します(この場合、th:fieldは ケア)。 -
th:fieldは、適用するフィールド(または<textarea>の場合はタグ本体)の値をレンダリングするためにRequestDataValueProcessor.processFormFieldValue(...)を呼び出します。
アプリケーションに
RequestDataValueProcessorを明示的に実装する必要があるシナリオはほとんどないことに注意してください。ほとんどの場合、これは、「Spring SecurityのCSRFサポート」など、透過的に使用するセキュリティライブラリによって自動的に使用されます。
11.1 Building URIs to controllers
バージョン4.1以降、Springでは、これらのコントローラーがマップされているURIを知らなくても、ビューから直接注釈付きコントローラーへのリンクを構築できるようになりました。
Thymeleafでは、これは #mvc.url(...) 式オブジェクトメソッドを使用して実現できます。これにより、コントローラーメソッドを、それらが含まれるコントローラークラスの大文字とそれに続く名前で指定できます。メソッド自体。これは、JSPの spring:mvcUrl(...) カスタム関数と同等です。
たとえば:
public class ExampleController {

    @RequestMapping("/data")
    public String getData(Model model) { ... return "template" }

    @RequestMapping("/data")
    public String getDataParam(@RequestParam String type) { ... return "template" }

}
次のコードはそれへのリンクを作成します:
<a th:href="${(#mvc.url('EC#getData')).build()}">Get Data Param</a>
<a th:href="${(#mvc.url('EC#getDataParam').arg(0,'internal')).build()}">Get Data Param</a>
このメカニズムの詳細については、次のURLをご覧ください。 http://docs.spring.io/spring-framework/docs/4.1.2.RELEASE/spring-framework-reference/html/mvc.html#mvc-links-to-controllers-from-views
12 Spring WebFlow integration
12.1 Basic configuration
Thymeleaf + Spring統合パッケージには、Spring WebFlow(2.3+)との統合が含まれています。
WebFlowには、特定のイベント(transitions)がトリガーされたときに、表示されたページのフラグメントをレンダリングするためのAJAX機能がいくつか含まれています。ThymeleafがこれらのAJAXリクエストに参加できるようにするには、次のように構成された別の ViewResolver 実装を使用する必要があります。:
<bean id="thymeleafViewResolver" class="org.thymeleaf.spring4.view.AjaxThymeleafViewResolver">
    <property name="viewClass" value="org.thymeleaf.spring4.view.FlowAjaxThymeleafView" />
    <property name="templateEngine" ref="templateEngine" />
</bean>
...and then this ViewResolver can be configured at your WebFlow ViewFactoryCreator
like:
<bean id="mvcViewFactoryCreator"
      class="org.springframework.webflow.mvc.builder.MvcViewFactoryCreator">
    <property name="viewResolvers" ref="thymeleafViewResolver"/>
</bean>
これ以降、ビューステートでThymeleafテンプレートを指定できます:
<view-state id="detail" view="bookingDetail">
    ...
</view-state>
上記の例では、 bookingDetail は通常の方法で指定されたThymeleafテンプレートであり、 TemplateEngine で構成された TemplateResolvers のいずれかによって理解できます。
12.2 AJAX fragments in Spring WebFlow
ここで説明するのは、Spring WebFlow で使用するAJAXフラグメントを作成する方法にすぎないことに注意してください。 WebFlow を使用していない場合、AJAXリクエストに応答してHTMLのチャンクを返すSpring MVCコントローラーを作成することは、他のテンプレートを返すコントローラーを作成するのと同じくらい簡単です。おそらくコントローラメソッドから
"main :: admin"のようなフラグメントを返すことになるでしょう。
WebFlowを使用すると、次のように、 <render> タグを使用してAJAXを介してフラグメントをレンダリングできます。
<view-state id="detail" view="bookingDetail">
    <transition on="updateData">
        <render fragments="hoteldata"/>
    </transition>
</view-state>
これらのフラグメント(この場合は hoteldata)は、th:fragment を使用してマークアップで指定されたフラグメントのコンマ区切りリストにすることができます:
<div id="data" th:fragment="hoteldata">
    This is a content to be changed
</div>
ブラウザで実行されているSpringJavaScriptライブラリがマークアップを置き換えることができるように、指定されたフラグメントには id 属性が必要であることを常に覚えておいてください。
<render>タグは、DOMセレクターを使用して指定することもできます:
<view-state id="detail" view="bookingDetail">
    <transition on="updateData">
        <render fragments="[//div[@id='data']]"/>
    </transition>
</view-state>
...そしてこれは th:fragment が必要ないことを意味します:
<div id="data">
    This is a content to be changed
</div>
updateData 遷移をトリガーするコードは、次のようになります。
<script type="text/javascript" th:src="@{/resources/dojo/dojo.js}"></script>
<script type="text/javascript" th:src="@{/resources/spring/Spring.js}"></script>
<script type="text/javascript" th:src="@{/resources/spring/Spring-Dojo.js}"></script>

  ...

<form id="triggerform" method="post" action="">
    <input type="submit" id="doUpdate" name="_eventId_updateData" value="Update now!" />
</form>

<script type="text/javascript">
    Spring.addDecoration(
        new Spring.AjaxEventDecoration({formId:'triggerform',elementId:'doUpdate',event:'onclick'}));
</script>