はじめに
Unityのエディタ拡張は生産性を上げるうえで非常に重要ですが、
自分はUnityのいわゆる”ツールバー”の部分も拡張できることをついぞ最近まで知りませんでした。

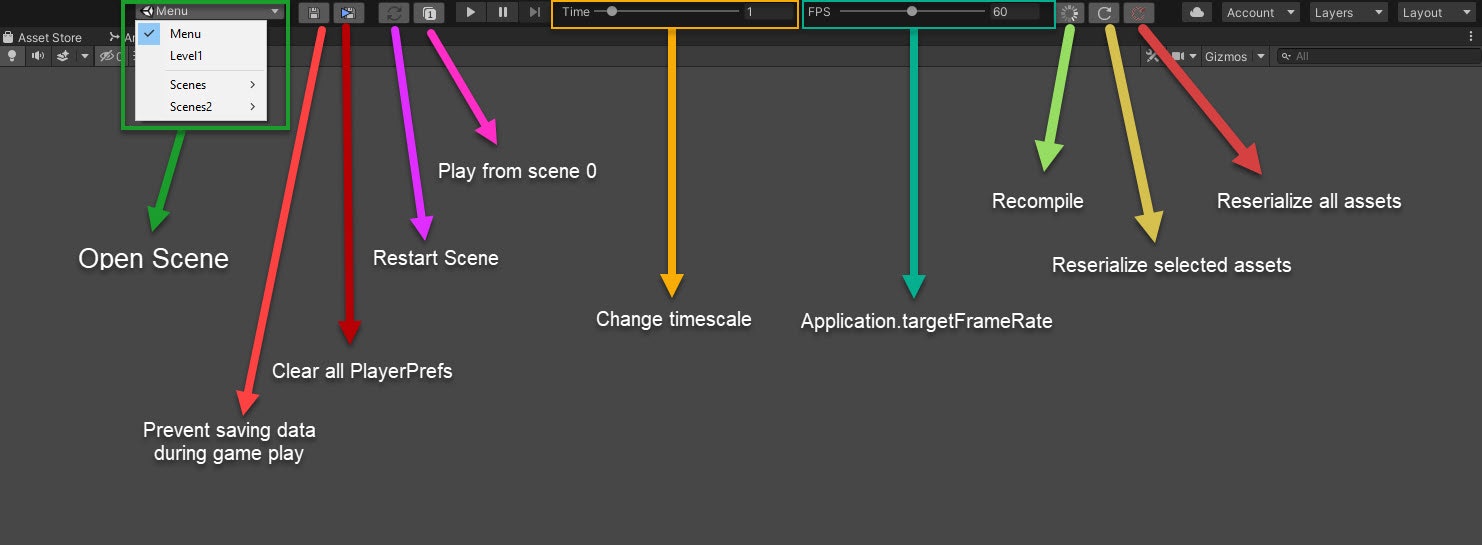
こちらのリポジトリでは上の画像のように「プロジェクト上のシーンを選択して開く」「TimeScaleの変更」「Framerateの変更」といった操作がツールバー上でできるようになっており非常に便利です。
昔のUnityエディタではこのスペースにもっといろいろなUIがありその名残でこのスペースが大きく空いているといった状況になっているようですが、エディタの一番上という”一等地”を更地のままにしておくのは非常にもったいないと感じます。
こちらを拡張して埋め尽くしてやりましょう。
環境
Unity 2022.2.8f1, 2021.3.19f1
今回、従来のエディタ拡張における主流であるGUILayoutではなく、UI Elementsを使用しています。
そのため、古めのバージョンによってはこちらで紹介する方法では動作しない可能性がございますのでご留意ください。
1.asmdefを追加しToolbarのインスタンスを取得する
追加するためにはまず件のツールバーを取得してくる必要があるのですが、ツールバーの実装はinternalクラスとなっており、通常アクセスできないようになっています。
namespace UnityEditor
{
  internal class Toolbar : GUIView
  {
    private const float k_ToolbarHeight = 30f;
    public static Toolbar get;
    ...
以下のように記述してもコンパイルエラーとなります。
using UnityEditor;

public class CustomToolbar
{
    [InitializeOnLoadMethod]
    private static void InitializeOnLoad()
    {
        EditorApplication.update += OnUpdate;
    }

    private static void OnUpdate()
    {
        var toolbar = Toolbar.get; // 'Toolbar' is inaccessible due to its protection level のエラー
    }
}
これを取得できるようにするためにはいくつか方法がありますが、今回は以下の記事でも紹介されている、InternalsVisibleToAttributeからinternalなクラスにアクセスします。
具体的にはUnityEditor.dllのAssemblyInfo.csに記載されている中から、すでにProjectに同名のasmdefがないものを選びます。
ここは試してみるしかほかないと思いますが、"Unity.InternalAPIEditorBridge.001 ~ 024"または、"Unity.InternalAPIEditorBridgeDev.001 ~ 005"のいずれかを利用するとよさそうです。
今回は"Unity.InternalAPIEditorBridge.020"を選びました。
ついでにPlatformsをEditorのみに限定しています。
これでToolbar.getから、ツールバーのインスタンスを取得できるようになりました。
2.追加したい場所のVisualElementを取得する
今回はツールバー内の左側、再生ボタンの左のスペースに拡張を追加していきたいので、その場所のVisualElementを取得します。
OnUpdate内に以下の通り記述します。
    private static void OnUpdate()
    {
        var toolbar = Toolbar.get; // ツールバーの取得
        if (toolbar.windowBackend?.visualTree is not VisualElement visualTree) return; // ツールバーのVisualTreeを取得
        if (visualTree.Q("ToolbarZoneLeftAlign") is not { } leftZone) return; // ツールバー左側のゾーンを取得
        EditorApplication.update -= OnUpdate; // 描画は一回のみでよい
    }
ToolbarZoneLeftAlignといったVisualElementsの名前は、UI Toolkit DebuggerのPick Elementを選択し、マウスカーソルをホバーすることで確認することができます。

3.追加したいVisualElementを追加する
さらにOnUpdate内につづけて、以下の通り記述します。
    // VisualElementの追加
    var sampleButton = new ToolbarButton()
    {
        text = "Sample Button"
    };
    sampleButton.clicked += () => Debug.Log("Sample Buttonがクリックされました");
    leftZone.Add(sampleButton); // 左側のゾーンに追加
エディターのツールバーを見るとボタンが追加されており、クリックするとConsoleにログが出ます。

注意
特定のVisualElementはToolbar内で描画が崩れます。
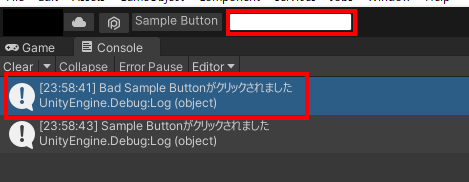
以下の通り記述した場合、Bad Sample Buttonは白く塗りつぶされて文字が見えない状態になっています。
    var sampleButton = new ToolbarButton()
    {
        text = "Sample Button"
    };
    sampleButton.clicked += () => Debug.Log("Sample Buttonがクリックされました");
    leftZone.Add(sampleButton);

    var badSampleButton = new Button()
    {
        text = "Bad Sample Button"
    };
    badSampleButton.clicked += () => Debug.Log("Bad Sample Buttonがクリックされました");
    leftZone.Add(badSampleButton);
4.エディタ内蔵のアイコンなどを表示してデコる
VisualElementsは、追加していくことで入れ子構造的に要素を追加していくことができます。
文字だけでは味気ないので、内臓のアイコン画像をボタンに表示してみましょう。内臓のアイコンの名前は以下のリポジトリなどを参考にします。
先ほどのSampleButtonの実装を変更し、見た目を調整してみます。
    // VisualElementの追加
    var sampleButton = new ToolbarButton()
    {
        style = { width = 80 } // 画像によってボタンが大きくなりすぎてしまわないように幅を制限
    };
    sampleButton.clicked += () => Debug.Log("Sample Buttonがクリックされました");
    sampleButton.Add(new Label("デバッグ")
    {
        style = // 文字の見た目などの調整
        {
            fontSize = 10,
            unityFontStyleAndWeight = new StyleEnum<FontStyle>(FontStyle.Bold)
        }
    });
    sampleButton.Add(new Image()
    {
        image = EditorGUIUtility.IconContent("d_DebuggerAttached@2x").image // デバッグっぽいアイコン
    });
    leftZone.Add(sampleButton);
画像のように内臓のアイコンでボタンの機能を表しやすくなりました。

最終的なソースコード
using UnityEditor;
using UnityEditor.UIElements;
using UnityEngine;
using UnityEngine.UIElements;
using Toolbar = UnityEditor.Toolbar;

public class CustomToolbar
{
    [InitializeOnLoadMethod]
    private static void InitializeOnLoad()
    {
        EditorApplication.update += OnUpdate;
    }

    private static void OnUpdate()
    {
        var toolbar = Toolbar.get; // ツールバーの取得
        if (toolbar.windowBackend?.visualTree is not VisualElement visualTree) return; // ツールバーのVisualTreeを取得
        if (visualTree.Q("ToolbarZoneLeftAlign") is not { } leftZone) return; // ツールバー左側のゾーンを取得
        EditorApplication.update -= OnUpdate; // 描画は一回のみでよい

        // VisualElementの追加
        var sampleButton = new ToolbarButton()
        {
            style = { width = 80 } // 画像によってボタンが大きくなりすぎてしまわないように幅を制限
        };
        sampleButton.clicked += () => Debug.Log("Sample Buttonがクリックされました");
        sampleButton.Add(new Label("デバッグ")
        {
            style = // 文字の見た目などの調整
            {
                fontSize = 10,
                unityFontStyleAndWeight = new StyleEnum<FontStyle>(FontStyle.Bold)
            }
        });
        sampleButton.Add(new Image()
        {
            image = EditorGUIUtility.IconContent("d_DebuggerAttached@2x").image // デバッグっぽいアイコン
        });
        leftZone.Add(sampleButton);
    }
}
まとめ
多くの人のツールバーがスッカスカではないかと思いますので、
エディタ上でよく開くシーンや、よく使うMenuItemなどをToolbarに移植し、普段の開発をより効率化しましょう。
参考

