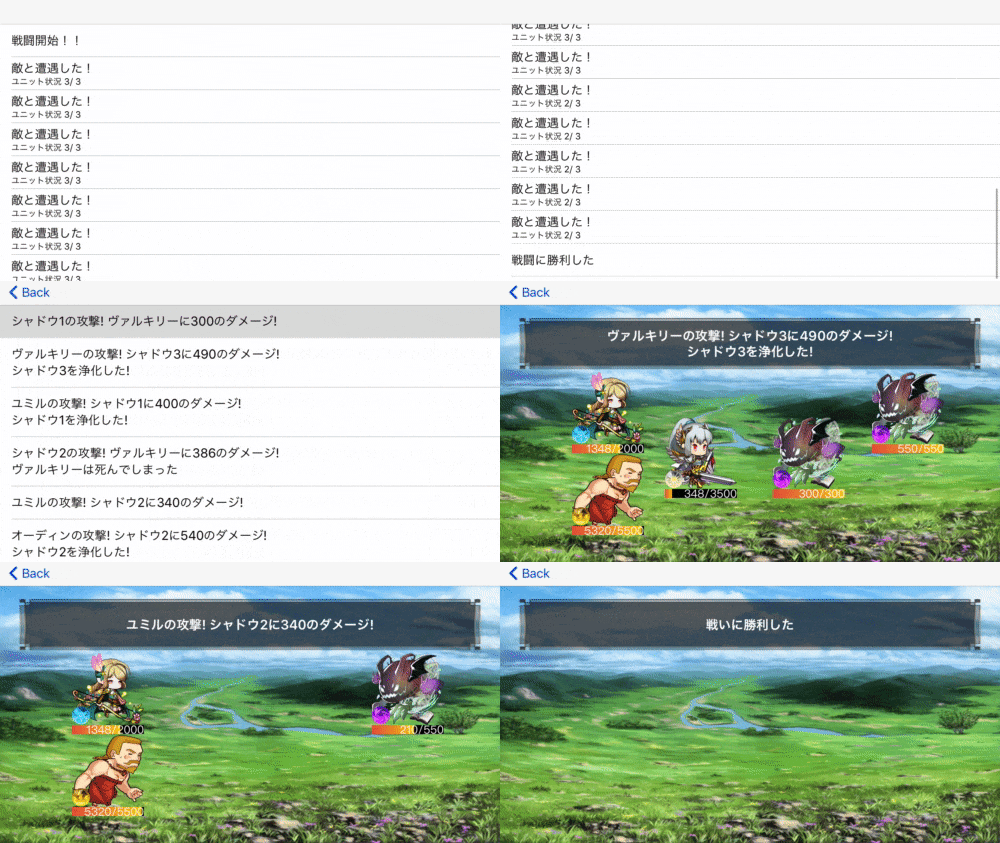
今日のゴール
- なんとなく動く戦闘画面ができた

やったこと
- 前回の記事から4ヶ月も経過しててもはや失踪感あったけどコツコツとやっていたよ
- ある程度動くものができたので何やったかを記事にするよ
- やったこと全部書くとものすごい量になりそうなので作ったクラスと、簡単な処理を記事にしていくことにするよ
- あとプロジェクトファイルとかがぶっ壊れちゃってクラスファイルとかからなんとか復元したのでリポジトリが変更になっているよ
作成したクラスたちとその役割
- Unit.swift
- 今までCharacter.swiftでキャラを生成していたけど、戦闘用のEnemyクラスも必要になった(気がする)ので処理を寄せるために大元のUnitというクラスを作成したよ
- Character.swiftとEnemy.swift(後述)はこのUnitクラスを継承するようにするよ
- Enemy.swift
- 敵キャラ生成用のクラス
- 親クラスであるUnitのinitを使ってるのみ
- BattleLogicProtocol.swift
- 戦闘で使うメソッドを定義しているクラス
- 今後何か戦闘で使いたいメソッドはここに書いていくイメージ
- attackメソッド
- damagedメソッド
- UnitもしくはCharacter or Enemyが拡張して具体的な処理を実装するよ
- 今回はこんな感じでattackメソッドを実装したよ
BattleLogicProtocol.swift
    func attack(to target: Unit, result: ((BattleLog) -> Void)) {
        var dead: UnitType? = nil
        var damage: Int {
            if status.strength - target.status.defence > 0 {
                return status.strength - target.status.defence
            }
            return 0
        }

        if target.status.hitPoint.present > 0 {
            target.damaged(amount: damage){ isDead in
                if isDead {
                    dead = UnitType(rawValue: target.type.rawValue)
                }
            }

            let log = BattleLog(attacker: displayName, attackerType: type, target: target.displayName, damage: damage, lastHPOfTarget: target.status.hitPoint.present, dead: dead)

            result(log)
        }
    }
- BattleLog.swift
- 攻撃一回ごとに「どのタイプの」「誰が」「誰に」「どの程度のダメージを与えて」「対象のHPが0になったかどうか」「0でなければ残りのHPはいくつか」を記録しておくクラス
- 上記のattackメソッドの中で生成されるよ
BattleLog.swift
final class BattleLog {
    let attacker: String
    let attackerType: UnitType
    let target: String
    let dead: UnitType?
    let damage: Int
    let lastHPOfTarget: Int

    init(attacker: String, attackerType: UnitType, target: String, damage: Int, lastHPOfTarget: Int, dead: UnitType?) {
        self.attacker = attacker
        self.attackerType = attackerType
        self.target = target
        self.dead = dead
        self.damage = damage
        self.lastHPOfTarget = lastHPOfTarget
    }
}
- BattleLogGenerator.swift
- 引数に戦闘に参加するcharacterとenemyの配列を渡すとbattleLogを配列にして返してくれるgeneratorクラス
- このクラスで戦闘シーケンスの繰り返しを実行しているよ
BattleLogGenerator.swift
final class BattleLogGenerator {
    class func generateBattleLog(divines: [Unit], enemies: [Unit]) -> [BattleLog] {
        var battleLogs: [BattleLog] = []
        var continueBattle = true

        var divines = divines
        var enemies = enemies
        var allUnit = divines + enemies

        // 戦闘開始
        // 1. HPが0以上のユニットだけに絞る
        while continueBattle {
            DispatchQueue.global().sync {
                allUnit = allUnit.filter { $0.status.hitPoint.present > 0 }
                divines = divines.filter { $0.status.hitPoint.present > 0 }
                enemies = enemies.filter { $0.status.hitPoint.present > 0 }

                // 2. Agilityで素早さ順に並べる
                allUnit.sort{ $0.status.agility > $1.status.agility }

                allUnit.forEach { unit in
                    // forEach中にダメージを受けてユニットのHPが0になっていることがあるため、改めてHPをチェック
                    if unit.status.hitPoint.present > 0 {
                        var target: Unit {
                            var index: Int = 0
                            switch unit.type {
                            case  .divine:
                                index = arc4random_uniform(UInt32(enemies.count)).hashValue
                                return enemies[index]
                            case .enemy:
                                index = arc4random_uniform(UInt32(divines.count)).hashValue
                                return divines[index]
                            }
                        }
                        // 3. 素早さ順でunitが攻撃する
                        unit.attack(to: target) { log in
                            battleLogs.append(log)
                        }
                    }
                }
            }

            DispatchQueue.global().sync {
                // 4. 生き残った敵・味方のユニット数で戦闘続行か判断する
                if divines.filter({ $0.status.hitPoint.present > 0 }).count == 0 {
                    continueBattle = false
                } else if enemies.filter({$0.status.hitPoint.present > 0}).count == 0 {
                    continueBattle = false
                }
            }
        }

        return battleLogs
    }
}
- BattleLogGeneratorにキャラと敵を突っ込むとこんな感じのBattleLogの配列を返してくれるよ
- 例えばこのバトルは6回の戦闘で終わったみたいだね
  ▿ Digikore2.BattleLog #0
    - attacker: "シャドウ1"
    - attackerType: Digikore2.UnitType.enemy
    - target: "オーディン"
    - dead: nil
    - damage: 0
    - lastHPOfTarget: 5500
  ▿ Digikore2.BattleLog #1
    - attacker: "ヴァルキリー"
    - attackerType: Digikore2.UnitType.divine
    - target: "シャドウ2"
    - dead: nil
    - damage: 490
    - lastHPOfTarget: 60
  ▿ Digikore2.BattleLog #2
    - attacker: "シャドウ3"
    - attackerType: Digikore2.UnitType.enemy
    - target: "ユミル"
    - dead: nil
    - damage: 0
    - lastHPOfTarget: 2000
  ▿ Digikore2.BattleLog #3
    - attacker: "ユミル"
    - attackerType: Digikore2.UnitType.divine
    - target: "シャドウ2"
    ▿ dead: Optional(Digikore2.UnitType.enemy)
      - some: Digikore2.UnitType.enemy
    - damage: 340
    - lastHPOfTarget: 0
  ▿ Digikore2.BattleLog #4
    - attacker: "シャドウ1"
    - attackerType: Digikore2.UnitType.enemy
    - target: "オーディン"
    - dead: nil
    - damage: 0
    - lastHPOfTarget: 5500
  ▿ Digikore2.BattleLog #5
    - attacker: "ヴァルキリー"
    - attackerType: Digikore2.UnitType.divine
    - target: "シャドウ3"
    ▿ dead: Optional(Digikore2.UnitType.enemy)
      - some: Digikore2.UnitType.enemy
    - damage: 490
    - lastHPOfTarget: 0
  ▿ Digikore2.BattleLog #6
    - attacker: "オーディン"
    - attackerType: Digikore2.UnitType.divine
    - target: "シャドウ1"
    ▿ dead: Optional(Digikore2.UnitType.enemy)
      - some: Digikore2.UnitType.enemy
    - damage: 600
    - lastHPOfTarget: 0
-
BattleLogViewController.swift
- 簡易的な戦闘ログをTableViewで表示するクラス
- このVCの中で戦闘に参加するcharacterとenemyを生成、複数回戦闘を回してBattleLogGeneratorに突っ込んで結果を返してもらいTableViewで表示しているよ
- セルをタップすることでより詳細な戦闘ログを確認できるBattleDetailLogViewControllerに遷移するよ
- 簡易的な戦闘ログをTableViewで表示するクラス
-
DungeonLog
- BattleLogVCで表示するための簡易ログをインスタンス化する用のクラス
- こいつは専用のファイルに切り出してなくてBattleLogViewControllerの中で定義しているよ(他のクラスで使うことがなさそうなので)
-
BattleDetailLogViewController.swift
- BattleLogVCから遷移してくるクラス
- BattleLogVCからBattleLogの配列を受け取って、その中身を一つずつパース、パースされた要素をTableViewに表示しているよ
- タップすることでBattleAnimationViewController(後述)に遷移するよ
BattleDetailLogViewController.swift
~~省略~~
    func tableView(_ tableView: UITableView, cellForRowAt indexPath: IndexPath) -> UITableViewCell {
        let cell = UITableViewCell()
        cell.textLabel?.numberOfLines = 0
        cell.textLabel?.text = parse(battleLogs[indexPath.row])
        return cell
    }
~~省略~~
    private func parse(_ log: BattleLog) -> String {
        var parsedText: String = ""
        if log.damage > 0 {
            parsedText = ("\(log.attacker)の攻撃! \(log.target)に\(log.damage)のダメージ!")

            if let dead = log.dead {
                switch dead {
                case .divine:
                    parsedText  += "\n" + log.target + "は死んでしまった"
                case .enemy:
                    parsedText += "\n" + log.target + "を浄化した!"
                }
            }

            return  parsedText
        }

        parsedText = ("\(log.attacker)の攻撃! ミス!")
        return parsedText
    }
-
BattleAnimationViewController.swift
- 今回のキモになる部分だよ
- BattleDetailLogVCからタップで遷移してくる戦闘アニメーション再生用のVC
- 主にこんな処理を実行しているよ
- 渡ってきたUnitの情報を元にBattleUnitView(後述)を生成して戦闘画面をセットアップする
- Timerを使って1.3秒ごとに配列で受け取ったBattleLogを一つパース、どのユニットが攻撃してどのユニットがダメージを受けたかを判別してBattleUnitViewをアニメーションさせる
- 受け取ったBattleLogの配列分Timerが回ってアニメーションさせたら、最後に残ったBattleUnitViewのunitTypeからcharacterが生き残ったか、enemyが生き残ったか判定
- characterが生き残っていればWin, enemyが生き残っていれば全滅と表示させてTimerを止める
-
BattleUnitView.swift
- 戦闘画面用のユニットビュークラス
- ユニットのビジュアルとステータス表示を担当するよ
- 主にBattleAnimationVCがこのビューを操作して残りHPを減らしたりHPが0になればalphaを変化させてVCから消したりしているよ
- HPを減らすのを視覚的に表すために、HPBarのwidthにConstraintを貼ってIBOutlet接続、残りHPと最大HPとの比を計算して動的にConstraintを短くすることで実現しているよ
結果
- とりあえずやりたいことができて嬉しかった(小並感)
- ただ冷静になってみると、「これ別に面白くねぇな🤔」感
- 特にBattleAnimationViewはエフェクトとかないと、こう「戦闘してる感」が出ないなあと
- 攻撃エフェクト頑張って素材見つけてgifとかで貼り付けようとしたけど、恐ろしい沼にハマりそうな雰囲気がムンムンしたのでやめました😇 根本から実装方法見直さないとできない気がする
- ゲームは音ハメが重要なのを知ったよ
- 効果音がバチっとハマっているといい感じになることがわかったよ
- これからやりたいことがどんどん出てきてヤバみが深い😊
- 複数/全体攻撃とかバフ/デバフとか回復とかの戦闘メソッド多様化
- 特にBattleLogicProtocolを有効に使える気がしない というかあいついるのかな🤔
- よくわかってないけどGoFのStrategyパターンとか使ったら良さげになりそう・・?
- ダメージ計算式の修正
- アルテリオス計算式だと限界があるなあ
- 経験値の実装
- アイテム拾うとか戦闘以外のイベントの実装
- 時間ごとにBattleLogを生成して真の放置型ゲームにする
- 戦闘にいくフィールドの選択と出現する敵のランダム化&強さの調整
- BattleAnimationVCの全体的な修正
- Timerで1.3秒ごとにパースする、パースできたらindexをインクリメントする・・・って方法をやめたい(けどいい方法が思い浮かばない)
- 決めた回数分Timerをリピートさせることってできないかな・・?
- 複数/全体攻撃とかバフ/デバフとか回復とかの戦闘メソッド多様化
- 今回の作業ブランチはこちら
最後に
- 本格的にブログでやれ案件になってきたね😇
- でもなんか楽しくなってきたぞい😇
次回
- やりたいことが多すぎて模索中
最後に
- ご指摘大歓迎です🙏
