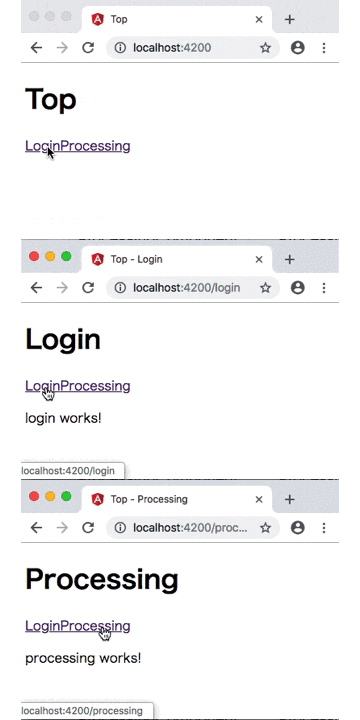
前回の記事でTypeScriptとAngularの開発環境を構築した後、Angular (のチュートリアル) を完全理解したので、いよいよ実装に入ろうとしたらいきなりつまづいてしまいました。親コンポーネントがページ内に持っているタイトルを、子コンポーネントが遷移するたびに合わせて更新する方法が分からず右往左往したので解決策をシェアします。
やりたかったこと
例えば、AppComponentという親コンポーネントがTopというタイトルで、LoginComponentとProcessingComponentの二つの子コンポーネントを持つとします。
このとき、以下のような仕様を実現したかったのですが、app-routing.moduleを使用してコンポーネントの遷移をテンプレート上に直接定義していない場合は、@Outputによる子から親への連携が効かないのです。
| コンポーネント | ページのタイトル | ブラウザのタイトル |
|---|---|---|
| AppComponent | Top | Top |
| LoginComponent | Login | Top - Login |
| ProcessingComponent | Processing | Top - Processing |
問題点
Angularのドキュメントではコンポーネントの相互作用の章で、親子間のメッセージ連携について@Input、@Outputなどの方法が記載されていますが、子から親へのイベント送信である@Outputは、app.component.thmlテンプレート内で子コンポーネントを直接指定する場合は動作しますが、ルーティングを使用して動的に子コンポーネントが切り替わる場合には動作しません。
そこで、サービスを介して親子間での連携を実現するしかないのですが、公式ドキュメントに載っているサンプルはちと分かりにくい…
現実には、プロデューサー・コンシューマーパターンを利用したパブリッシャー・サブスクライバーモデルで、コンポーネント間の対話を実現するサービスを実装することになります。このパターンでは、親子関係である場合だけではなくパブリッシャーとサブスクライバー間であればどのような関係であれ対話を実現できるので、かなり汎用性のあるメッセージ連携を実現できそうな気もします。
公式ドキュメントのObservableに書かれている内容を読むと、思った以上に強力なメッセージ連携機構が実装されているようです。マルチキャストなども面白そうですが、それよりも大事なのはスコープを抜ける時にunsubscribeしている点ではないでしょうか。JavaでもC#でもそうですが、こういったイベントハンドラー/リスナーの解除忘れがInvalidOperationなどの例外を引き起こしたり、使い終わったオブジェクトがGCされずにリソースリークを引き起こすことになりますから注意が必要ですね。
実際に今回作成したメッセージ連携用のサービスは以下の通りです。
import { Injectable } from '@angular/core';
import { Subject } from 'rxjs';

@Injectable({
  providedIn: 'root'
})
export class ComponentInteractionService {

    private subject = new Subject<any>();

    // The event property for the subscribers.
    event$ = this.subject.asObservable();

    // Publish the event to the subscribers.
    publish(change: any) {
        this.subject.next(change);
    }
}
イベントを待ち受けするサブスクライバー側(このケースではAppComponentという親コンポーネント)では、以下のコードで発行されるイベントを待ち受けします。イベントを受け取ったらブラウザタイトルとページ内のタイトルの両者を更新しています。イベントを発行したのが誰かは一切関知していません。
もし、多種の異なるイベントが飛び交うようなら、内容はイベントオブジェクトにカプセル化してイベントIDのようなプロパティを用意し、サブスクライバー側で処理すべきイベントか否かを判定するようにした方が良いでしょう。
import { Component } from '@angular/core';
import { Title } from '@angular/platform-browser';
import { ComponentInteractionService } from 'src/component-interaction.service';

@Component({
  selector: 'app-root',
  templateUrl: './app.component.html',
  styleUrls: ['./app.component.css'],
  providers: [Title]
})

export class AppComponent {
  // The initial vslue of the title.
  baseTitle = 'Top';
  title = this.baseTitle;

  constructor(private pageTitle: Title, private interactionService: ComponentInteractionService) {
    // Subscribe the event from the component interaction service
    this.interactionService.event$.subscribe(text => this.onTitleChanged(text));
  }

  // Sets the title of the browser title bar and the title in the page.
  onTitleChanged(event: string) {
    this.title = event;
    this.pageTitle.setTitle(`${this.baseTitle} - ${event}`);
  }
}
一方、イベントを発行する子コンポーネント側(このケースではLoginComponentという子コンポーネント)では、以下のようにDependency Injectionで注入されたサービスに対して、コンポーネントのロード時にタイトルに設定するテキストをイベントとして発行しています。
import { Component, OnInit } from '@angular/core';
import { ComponentInteractionService } from 'src/component-interaction.service';

@Component({
  selector: 'app-login',
  templateUrl: './login.component.html',
  styleUrls: ['./login.component.css']
})

export class LoginComponent implements OnInit {

  constructor(private interactionService: ComponentInteractionService) { }

  ngOnInit() {
    // Publish the title text!
    this.interactionService.publish('Login');
  }

}
実装のステップ・バイ・ステップ
それでは、ステップ・バイ・ステップで実装を見ていきましょう。まずVSCodeのターミナルからコマンドを発行してプロジェクトを作成し各コンポーネントの雛形を作ります。
# 新しいプロジェクトを作成
$ ng new angular-component-interaction
#  ルーティングモジュールを作成
$ ng generate module app-routing --flat --module=app
# loginとprocessingコンポーネントを作成
$ ng generate component login
$ ng generate component processing
作成されたapp-routing.module.tsを以下のように変更します。Route = [...]で設定されているパスとコンポーネントのバインドが鍵です。
import { NgModule } from '@angular/core';
import { RouterModule, Routes } from '@angular/router';

import { LoginComponent } from './login/login.component';
import { ProcessingComponent } from './processing/processing.component';

// The components and path are bound by this settings.
const routes: Routes = [
  { path: 'login', component: LoginComponent },
  { path: 'processing', component: ProcessingComponent }
];

@NgModule({
  imports: [RouterModule.forRoot(routes)],
  exports: [RouterModule]
})
export class AppRoutingModule { }
起動時のブラウザタイトルには、以下のindex.htmlの<title>で定義されている内容が表示されるので、これをTopに変えます。
<!doctype html>
<html lang="en">
<head>
  <meta charset="utf-8">
  <title>Top</title>
  <base href="/">

  <meta name="viewport" content="width=device-width, initial-scale=1">
  <link rel="icon" type="image/x-icon" href="favicon.ico">
</head>
<body>
  <app-root></app-root>
</body>
</html>
続いてイベントを発行する側の子コンポーネントふたつを以下のように変更します。
import { Component, OnInit } from '@angular/core';
import { ComponentInteractionService } from 'src/component-interaction.service';

@Component({
  selector: 'app-login',
  templateUrl: './login.component.html',
  styleUrls: ['./login.component.css']
})

export class LoginComponent implements OnInit {

  constructor(private interactionService: ComponentInteractionService) { }

  ngOnInit() {
    // Publish the title text!
    this.interactionService.publish('Login');
  }

}
import { Component, OnInit } from '@angular/core';
import { ComponentInteractionService } from 'src/component-interaction.service';

@Component({
  selector: 'app-processing',
  templateUrl: './processing.component.html',
  styleUrls: ['./processing.component.css']
})
export class ProcessingComponent implements OnInit {

  constructor(private interactionService: ComponentInteractionService) { }

  ngOnInit() {
    this.interactionService.publish('Processing');
  }

}
最後にイベントを受け取り、ページ内のタイトルとブラウザタイトルを更新するコンポーネントです。
import { Component } from '@angular/core';
import { Title } from '@angular/platform-browser';
import { ComponentInteractionService } from 'src/component-interaction.service';

@Component({
  selector: 'app-root',
  templateUrl: './app.component.html',
  styleUrls: ['./app.component.css'],
  providers: [Title]
})

export class AppComponent {
  // The initial vslue of the title.
  baseTitle = 'Top';
  title = this.baseTitle;

  constructor(private pageTitle: Title, private interactionService: ComponentInteractionService) {
    // Subscribe the event from the component interaction service
    this.interactionService.event$.subscribe(text => this.onTitleChanged(text));
  }

  // Sets the title of the browser title bar and the title in the page.
  onTitleChanged(event: string) {
    this.title = event;
    this.pageTitle.setTitle(`${this.baseTitle} - ${event}`);
  }
}
app-component.htmlを以下のように変更します。下記の<router-outlet>部分が実行時に子コンポーネントで置き換えられます。
<h1>{{title}}</h1>
<nav>
  <a routerLink="/login">Login</a>
  <a routerLink="/processing">Processing</a>
</nav>
<router-outlet></router-outlet>
コード全体はこちらのGithubリポジトリにアップしてありますのでご利用ください。十数年ぶりにHTMLとCSSを触っていますが、昔懐かしタグ打ちをこの歳になって再開することになるとは😅
