作ったもの
普通は電子ピアノなどのサステインペダルとして使われる、YAMAHAのフットスイッチをArduino Unoと繋げ、
MacのElectron製のアプリとシリアル通信し、足でiTunesを操作できるようなものを作りました。
デスクの下に置いて、新MacBookProのなくなったファンクションキーの代わりとしても使えます。持ってないけど・・・
材料
| 名前 | 部品 | 値段 |
|---|---|---|
| フットスイッチ |  YAMAHA FC4 |
¥2,786 |
| モノラルフォンジャック |  MJ-160M |
¥70 |
フットスイッチはメーカーによって極性が違ったり、切り替えるためのスイッチが付いているので注意。
基本的に、楽器系で使われるコードは6.3mmの標準というサイズです。
一般的に使われるイヤフォンなどは、ミニ(ミニプラグ)3.5mmのひとまわり小さいですが、
変換コネクターとかも普通に売っています。
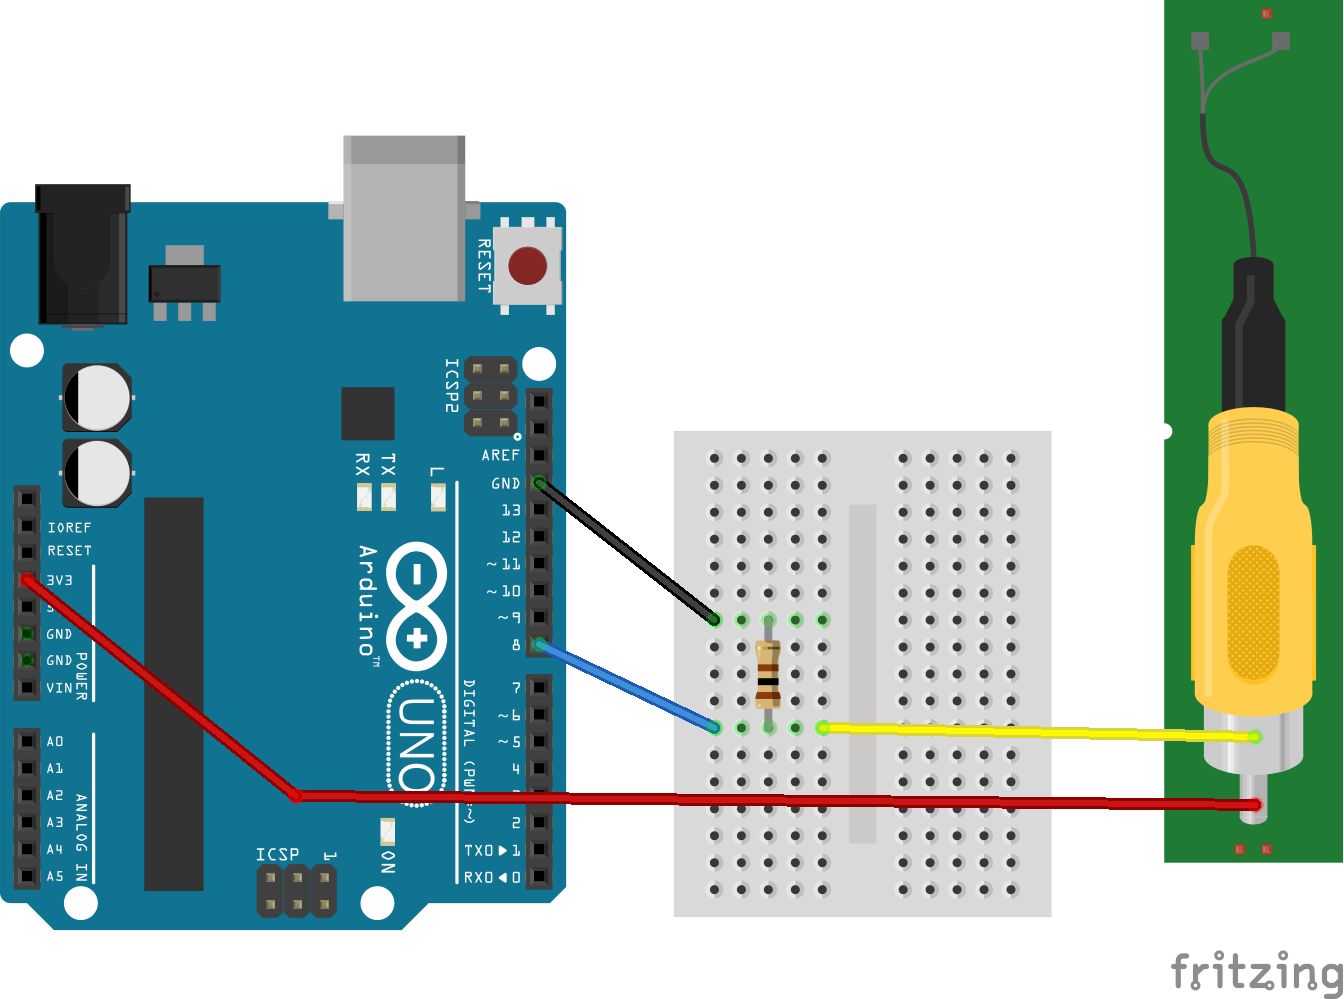
Arduino
この楽器用のフットスイッチは電子工作にも普通に扱えます。楽器用なので結構丈夫。
プラグの先端の黒い帯(絶縁体)を境目に、普通のタクトスイッチみたいな動作をさせることができます。
ジャックを使わないでこんな感じでも一応できる。
回路もDigital Buttonとほぼ同様な感じです。
フットスイッチのONとOFFをdigitalRead で取得しSerialで送信する。
const int buttonPin = 8;

void setup() {
  pinMode(buttonPin, INPUT);
  Serial.begin(9600);
}

void loop() {
  if (digitalRead(buttonPin) == HIGH) {
    Serial.println("on");
    Serial.print("\n");
    delay(500);
  } else {
    Serial.print("off");
    Serial.print("\n");
  }
  delay(50);
}
Serial.printlnを使わず直接改行コードで'\n'と書いているのは、Electron側でparserの区切り文字として使うためです。
実際に動かしてみると、無事に取得できました。
LEDまわりはおまけで、押している最中に点滅するようになってます。


Electron
シリアル通信をする方法
electron-quick-startが準備できている状態にします。
$ git clone git@github.com:electron/electron-quick-start.git
Node.jsでシリアル通信するためにnpmでserialportをインストール
$ npm install --save serialport
この状態でserialportを読み込んでnpm startした起動しようとすると
Uncaught Exception:
Error: Module version mismatch. Expected 50, got 48.
    at Error (native)
    at process.module.(anonymous function) [as dlopen] (ELECTRON_ASAR.js:173:20)
...
とエラーになり怒られます。
このエラーはelectron-rebuildを使い解消できます。
$ npm install --save-dev electron-rebuild
$ ./node_modules/.bin/electron-rebuild
フロント側から読み込まれるrenderer.jsに書き加えていきます。
const serialPort = require('serialport');
serialPort.list(function(err, ports) {
  ports.forEach(function(port){
    console.log(port);
  });
});
これでElectronを起動
$ npm start
おそらくArduino IDEのシリアルポートに表示されるものと同じものがログに出力されているとおもいますが、
2つ目がcomName: "/dev/cu.usbmodem1411", manufacturer: "Arduino (www.arduino.cc)"となっているので接続しているArduinoだとわかります。
本来はUIで選択できるようにしたほうが良いですが、
面倒なのでmanufacturerがArduinoだったときにシリアル接続するようにします。
ちなみにウィンドウはcommand+RでWebViewをリロードできる。
const serialPort = require('serialport');
serialPort.list((err, ports) => {
  ports.forEach((port) => {
    console.log(port);
    if (port.manufacturer === 'Arduino (www.arduino.cc)') {
      const sp = new serialPort(port.comName, {
        baudrate: 9600,
        parser: serialPort.parsers.readline("\n"),
      });

      sp.on('data', function(res) {
        console.log('data received: ' + res);
      });
    }
  });
});
sp.on('data', callback)でシリアル通信を受信し、onとoffが取得できました。
Arduino IDE側でシリアルポート接続しているとうまく取得できないので注意。
iTunesを操作する方法
Node.js経由でiTunesを操作できるitunes-remoteをインストールします。
$ npm install --save itunes-remote
こんな感じで使えます。
const itunesRemote = require('itunes-remote');
// 再生
itunesRemote("play", () => {});
// 停止
itunesRemote("pause", () => {});
// 次の曲
itunesRemote("next", () => {});
両方合わせてみる
フットスイッチを踏んだらiTunesを再生・停止、長く踏んだら次の曲が再生されるようにしたいので、
onが連続するの数をcountする。
const serialPort = require('serialport');
const itunesRemote = require('itunes-remote');

var playing = false;
var count = 0;
serialPort.list((err, ports) => {
  ports.forEach((port) => {
    console.log(port);
    if (port.manufacturer === 'Arduino (www.arduino.cc)') {
      const sp = new serialPort(port.comName, {
        baudrate: 9600,
        parser: serialPort.parsers.readline("\n"),
      });

      sp.on('data', function(res) {
        // console.log('data received: ' + res);
        if (count === 3) {
          itunesRemote("next", () => {});
          console.log('itunes: next');
        }

        if ('on' === res) {
          count++;
        } else {
          if (0 < count && count < 3) {
            if (playing) {
              playing = false;
              itunesRemote("pause", () => {});
              console.log('itunes: pause');
            } else {
              playing = true;
              itunesRemote("play", () => {});
              console.log('itunes: play');
            }
          }
          count = 0;
        }
      });
    }
  });
});
baudrateとparserにはArduino側と同じ値をセットします。
これでリロードすると・・・
動きました!
iTunesが操作できる。
良い感じ
このアプリよく考えるとウィンドウいらなくね?
ウィンドウ必要ないのでmain.jsのapp.on('ready', createWindow)部分を書き換えてしまい、
準備ができたらウィンドウを作らずに、シリアル通信できるようにしました。
const serialPort = require('serialport');
const itunesRemote = require('itunes-remote');
app.on('ready', function() {
  var playing = false;
  var count = 0;
  serialPort.list((err, ports) => {
    ports.forEach((port) => {
      if (port.manufacturer === 'Arduino (www.arduino.cc)') {
        const sp = new serialPort(port.comName, {
          baudrate: 9600,
          parser: serialPort.parsers.readline("\n"),
        });

        sp.on('data', function(res) {
          if (count === 3) {
            itunesRemote("next", () => {});
            console.log('itunes: next');
          }

          if ('on' === res) {
            count++;
          } else {
            if (0 < count && count < 3) {
              if (playing) {
                playing = false;
                itunesRemote("pause", () => {});
                console.log('itunes: pause');
              } else {
                playing = true;
                itunesRemote("play", () => {});
                console.log('itunes: play');
              }
            }
            count = 0;
          }
        });
      }
    });
  });
})
ウィンドウなくてもちゃんと動きます。

Electronのパッケージング
毎回ターミナル経由で起動するのは面倒なのでパッケージングして、Macアプリとして簡単に使えるようにします。
$ npm install --save-dev electron-packager
$ ./node_modules/.bin/electron-packager ./ itunes-foot-controller --platform=darwin
Packaging app for platform darwin x64 using electron v1.4.12
Wrote new app to /Users/xxx/Documents/works/itunes-foot-controller/itunes-foot-controller-darwin-x64
itunes-foot-controller.appという名前のファイルができあがり、ダブルクリックで起動できます。
後はアイコン付けたり、trayでメニューバーにアイコンを表示したり、フットスイッチの操作パターン増やしたり色々やりたい。
おわり
ArduinoとElectronと組み合わせることで、PC向けアプリが構築できるようになりかなり応用の範囲が広がる、
IoT的な業務用のアプリケーションとかも開発できるんじゃないかと企んだりできる。


