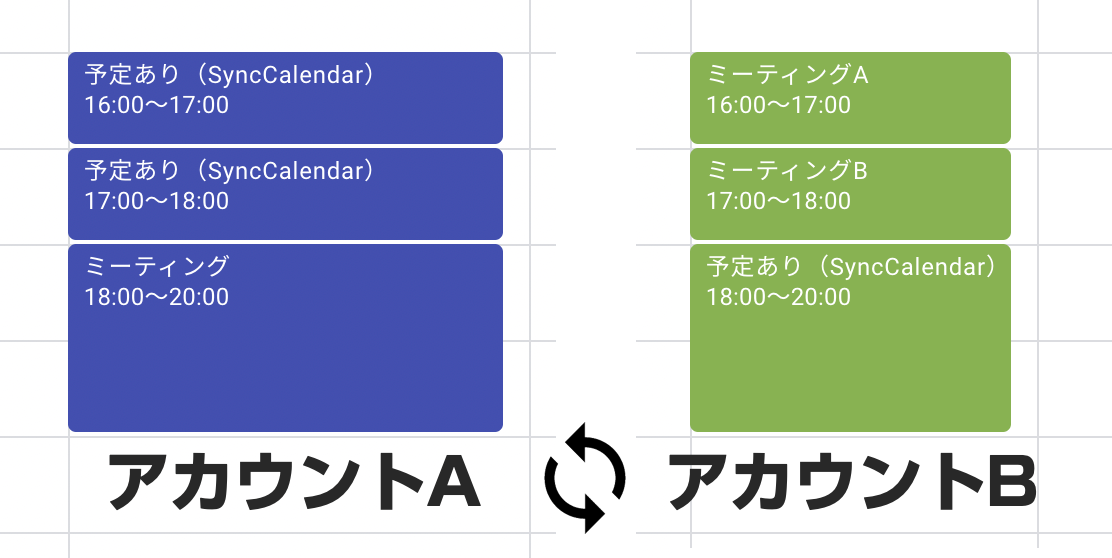
プライベートの予定は個人アカウントのGoogleカレンダーには登録しておいたんだけど、
会社のカレンダーに登録していなくて、空いていると思われミーティング設定されてしまいました。
こういうのは後で調整し直さないといけなくて面倒です。
ゲストに会社のアドレスを追加しておけば良いのですが、面倒なのと、プライベート→会社への共有はできても逆は無理です。
また家族用とか常駐先とか副業先とかもっとカレンダーが多くなってしまっている人も多いでしょう。
そういったカレンダーの予定を取得し、それぞれのカレンダーに予定枠を作り、予定を入れられてしまうのをブロックしてもらうシステムを作ります。
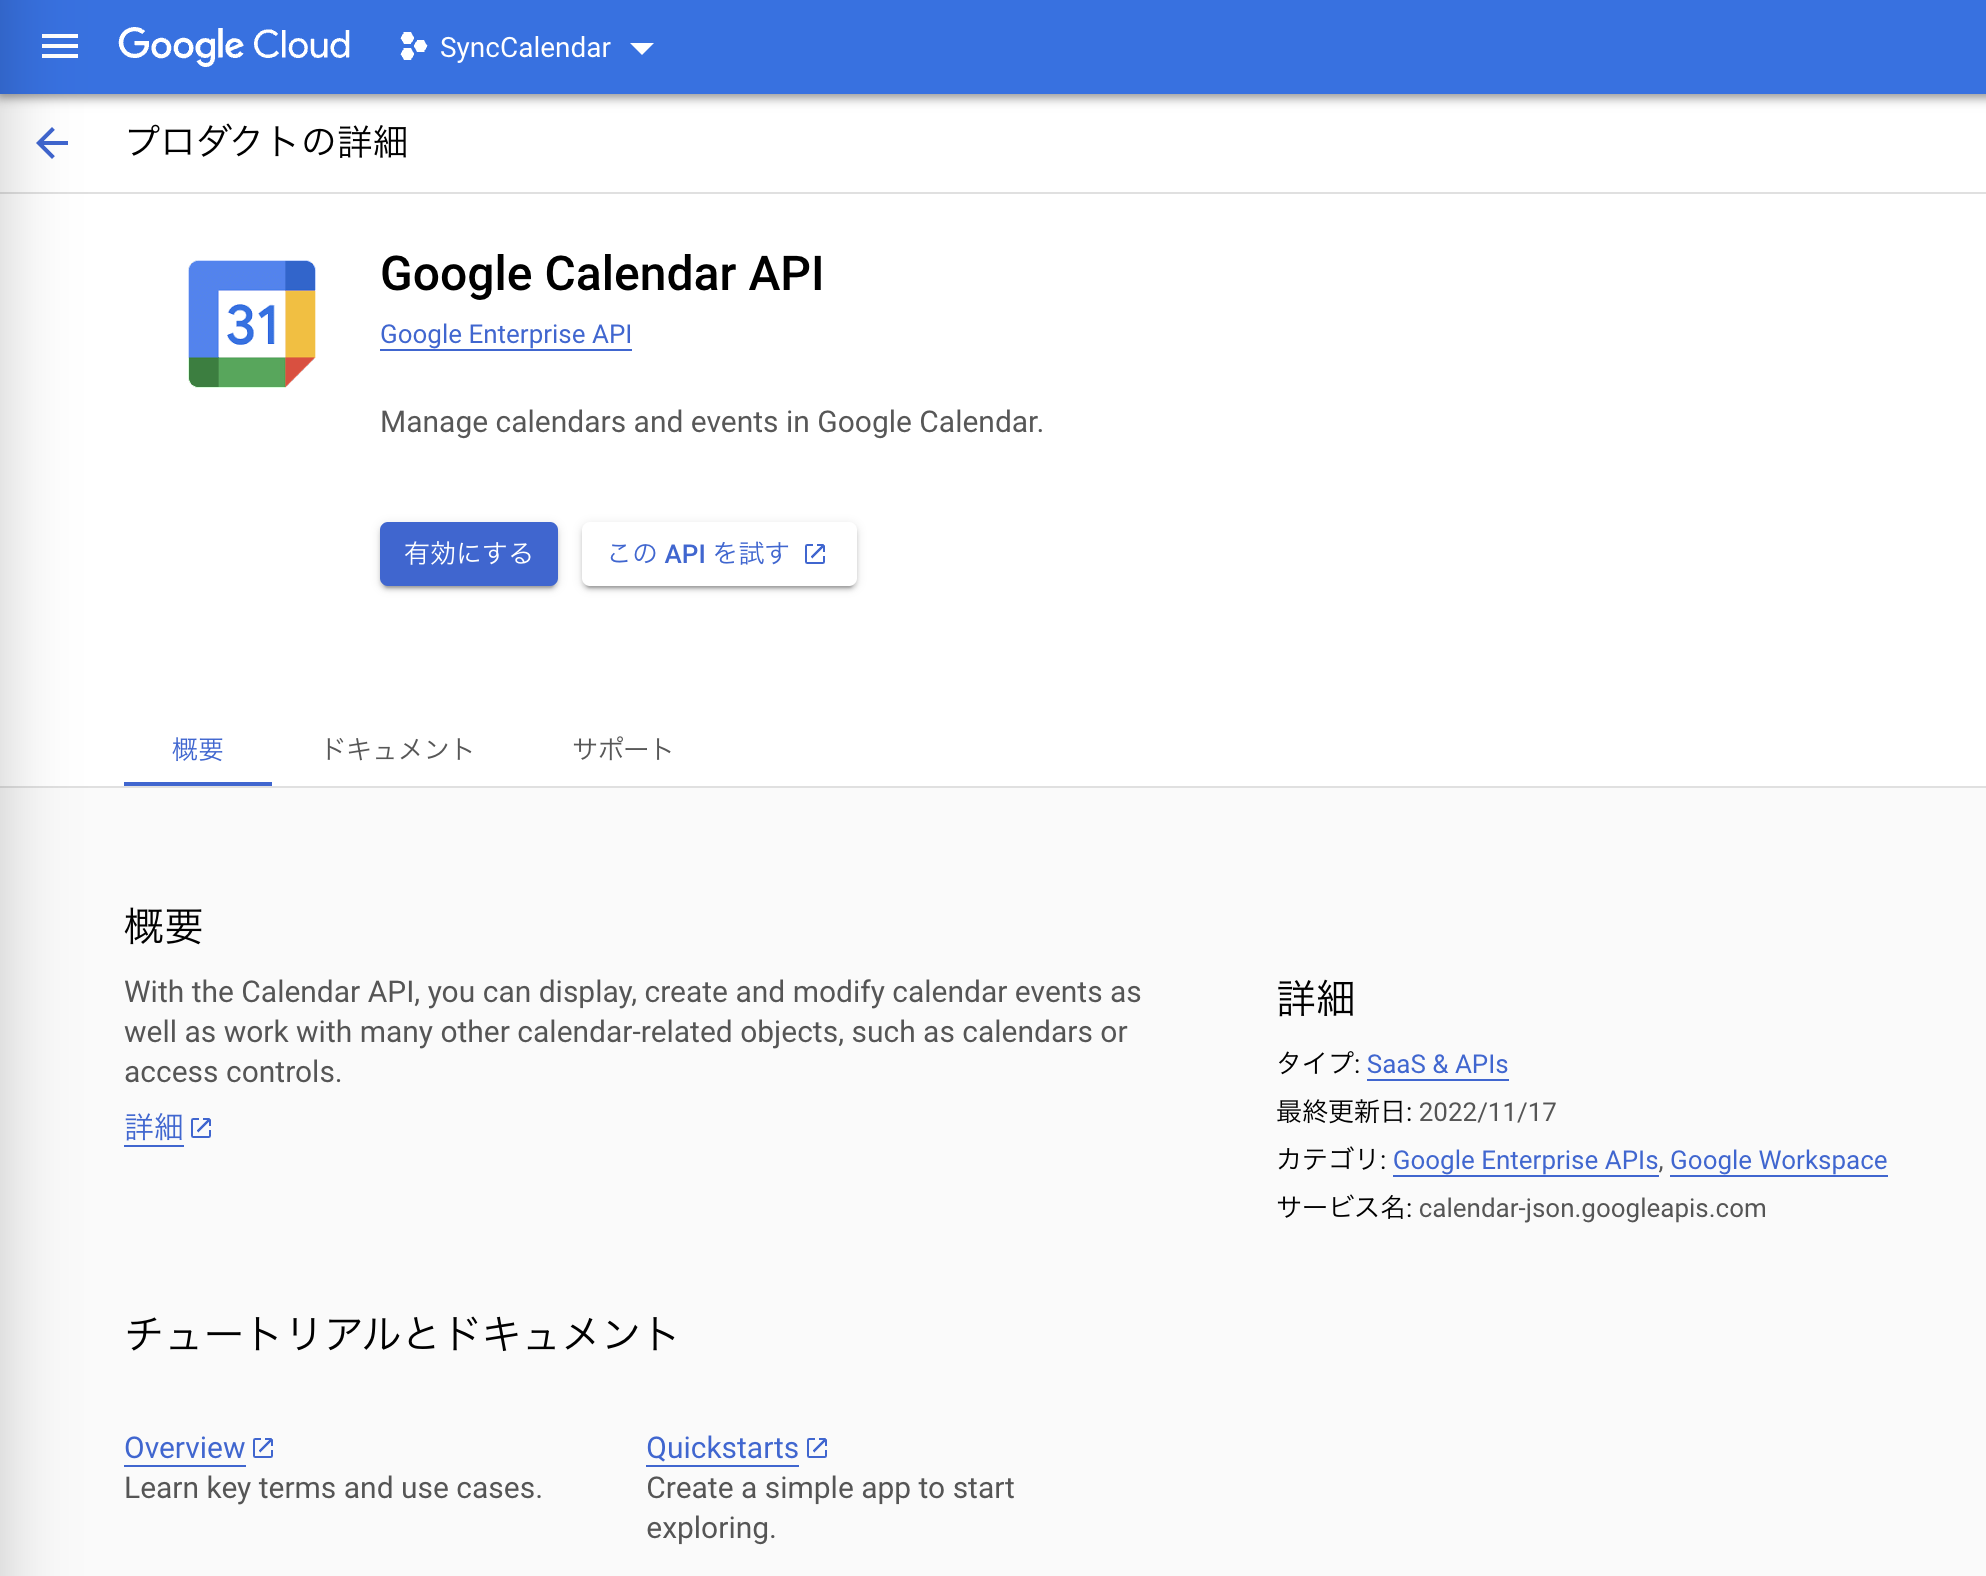
今回は会社側のアカウント設定など自由の利かない部分もあるので、OAuthを使ったウェブアプリ(サーバーの用意が面倒なのでPHP)にしました。
Google Calendar API
Google Calendar APIを有効化します。
認証情報を作成
認証情報 から 認証情報を作成 →
OAuth クライアント ID の作成 →
アプリケーションの種類にはウェブ アプリケーションを選択します。
リダイレクト URIにもコールバック先にURLを入力します。
テストユーザー
今回は自分専用のアプリとして作成するので、OAuth 同意画面 で同期させたいアカウントのメールアドレスをテストユーザーへ登録します。
Composerまわり
Composerで必要なライブラリーを入手します。
$ composer require google/apiclient
$ cat composer.json
{
    "require": {
        "google/apiclient": "^2.12"
    }
}
Google OAuth認証
Google APIで使用するRefreshTokenを取得します。
DBとかに入れるでも良いが、今回は適当にファイルへ保存。
$aimJsonPathには作成した認証情報からダウンロードできるjsonファイルを配置してください。
先程設定したコールバック先にこちらのURLを指定する。
AccessType = offline と ApprovalPrompt = force をセットで使用しないと初回の認証時しかリフレッシュトークンが取得できなくてちょっとハマった。
<?php
require_once(__DIR__.'/vendor/autoload.php');

function getClient() {
	$aimJsonPath = __DIR__ . '/key/client_secret_xxxxxxxxxxx.apps.googleusercontent.com.json';

	$client = new Google_Client();
	$client->setAuthConfig($aimJsonPath);
	$client->setApplicationName('Sync Calendar');
	$client->setScopes(Google_Service_Calendar::CALENDAR_EVENTS);
    $client->setAccessType('offline');
    $client->setApprovalPrompt('force');

	return $client;
}

$client = getClient();

if (isset($_GET['code'])) {
	$token = $client->fetchAccessTokenWithAuthCode($_GET['code']);

	if (isset($token['error'])) {
		var_dump($token);
		exit();
	}

	// refresh_token を保存する
	file_put_contents(__DIR__ . '/tokens/' . $token['created'], $client->getRefreshToken());
	echo 'save RefreshToken!.';
	exit();
}

$authUrl = $client->createAuthUrl();
header('Location: '.$authUrl);
Googleカレンダー 予定を取得
同期する calendarId と refreshToken をセットにしてスケジュールを取得していきます。
$accountItem = [
	'calendarId' => 'xxxxxxxxxx@gmail.com',
	'refreshToken' => '3i43YYu#!wLezz3i43YYu#!wLezz3i43YYu#!xxxxxxxxxxxxxxxxx',
];

$client = getClient();
$client->fetchAccessTokenWithRefreshToken($accountItem['refreshToken']);
$service = new Google_Service_Calendar($client);
$events = getEvents($service, $accountItem['calendarId']);
このままだと階層が深いので扱いやすいように変換
そして、終日予定と既に欠席にしている予定は除きます。
function isResponseStatusDeclined($attendees, $email) {
	foreach ($attendees as $attendee) {
		if ($attendee['email'] != $email) {
			continue;
		}

		if ($attendee['responseStatus'] == 'declined') {
			return true;
		}
	}

	return false;
}

$list = [];
foreach ($events as $event) {
    if (empty($event['start']['dateTime']) || empty($event['end']['dateTime'])) {
        continue;
    }
    if (isResponseStatusDeclined($event['attendees'], $accountItem['calendarId'])) {
        continue;
    }

    $item = [
        'id' => $event['id'],
        'description' => $event['description'],
        'start' => $event['start']['dateTime'],
        'end' => $event['end']['dateTime'],
    ];
    $list[] = $item;
}
Googleカレンダー の同期
どうやって同期したイベントを見分けるようにしたかというと、
同期元のイベントのイベントIDを、同期先のカレンダーのイベントの説明文に入れて、どのイベントと対応しているのかを判別します。
また、ぱっと見でわかりやすいように #!# のプレフィックスを与えています。
const SYNC_EVENT_PREFIX = '#!#';
$isMatch = (SYNC_EVENT_PREFIX.$eventItem['id'] == $targetEventItem['description']);
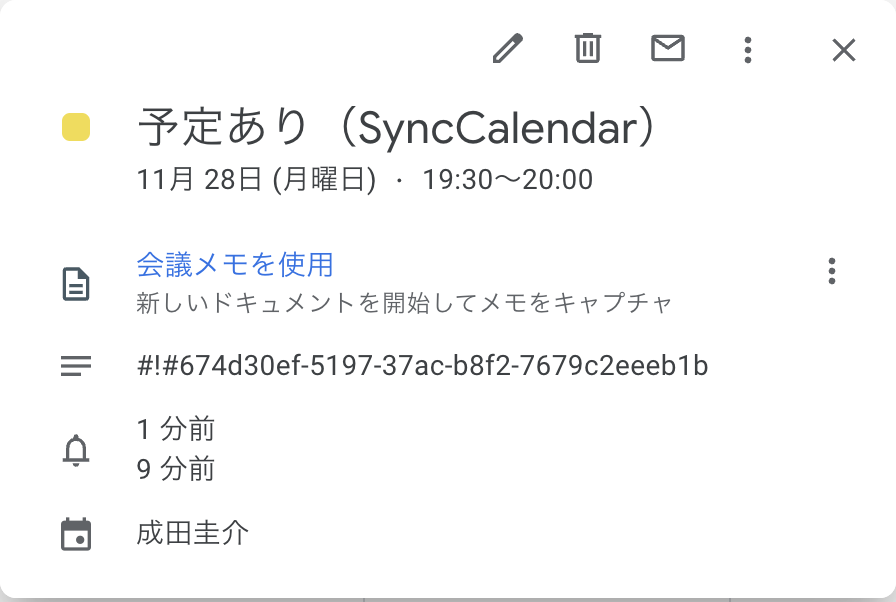
Googleカレンダー 予定の作成・更新
まだ同期していなかった予定を、同期先に予定を作成し枠を抑えます。
そして、時間が変更になった予定に関しては更新をかけます。
タイトルは事故が発生しないように 予定あり が表示されるように設定。
const SYNC_EVENT_TITLE = '予定あり(SyncCalendar)';

function createSyncEvent($service, $calendarId, $eventItem) {
	$newEvent = new Google_Service_Calendar_Event([
		'summary' => SYNC_EVENT_TITLE,
		'description' => SYNC_EVENT_PREFIX.$eventItem['id'],
	    'start' => array(
	        'dateTime' => $eventItem['start'],
	        'timeZone' => 'Asia/Tokyo',
	    ),
	    'end' => array(
	        'dateTime' => $eventItem['end'],
	        'timeZone' => 'Asia/Tokyo',
	    ),
	]);

	$result = $service->events->insert($calendarId, $newEvent);
}

function updateSyncedEvent($service, $calendarId, $syncedEvent, $eventItem) {
	$updateEvent = new Google_Service_Calendar_Event([
		'summary' => SYNC_EVENT_TITLE,
		'description' => SYNC_EVENT_PREFIX.$eventItem['id'],
	    'start' => array(
	        'dateTime' => $eventItem['start'],
	        'timeZone' => 'Asia/Tokyo',
	    ),
	    'end' => array(
	        'dateTime' => $eventItem['end'],
	        'timeZone' => 'Asia/Tokyo',
	    ),
	]);

	$result = $service->events->update($calendarId, $syncedEvent['id'], $updateEvent);
}
おわり
あとはこのスクリプトを10分毎に実行し、予定を同期することができました。
しかし、これをお互いのカレンダーで同期するイベントを作り合ってしまうと、全部のカレンダーを読み込んでいるiPhoneでは予定が2重、3重に表示されてしまいます。
この対策として、別カレンダーを作り、こっちにはタイトルもコピーするようにし、このカレンダーをiPhoneで読み込んでいます。