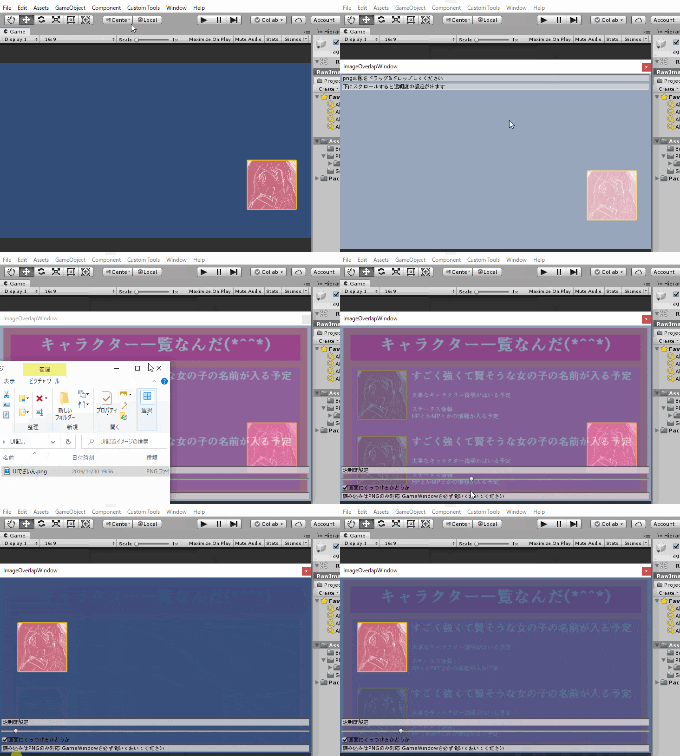
こんちにわ!
今回、ちょっとしたUnityの拡張機能を作ったのでご紹介します。
2024/11/01 最新のUnityで動くように修正しました
#作ったもの
UnityのGameWindowに好きな画像を重ねられる機能です。

上記の画像のようにドラッグ・アンド・ドロップで
GameViewの表示にぴったり合うようにして
手元の好きなイメージが重ねられて
透明度を変えてそれぞれの画像を見ることができます。
予めGameViewのサイズを画像のアスペクト比と合わせておく必要があります
#なんで作ったの?
開発をする際にUIの仮配置を行うときに当たりになる物が欲しく
今までは、
- UIデザイン画像をインポートする
- 新しくImageオブジェクトを作る
- サイズや位置、表示順など調整する
- UI画像アタッチする
- アルファ変えながら画像見て調整する
- 他のアス比にしても大丈夫か3-4を繰り返す
- 不要になった画像とGameObject削除
- おわり!
とやっていたのですがこの方法では手数が多く
仮画像をうっかり入れそうになったり不要なGameObject残したり
してしまい不便でした。
そのため今回の機能を作ってみました。
これにより
- Windowを開く
- 画像をドラッグ・アンド・ドロップする
- アルファ変えながら画像見て調整する
- 他のアス比にしても大丈夫か2-3を繰り返す
- おわり!
な感じでそんなに手間を掛けずプロジェクトを汚さず
確認できるようになりました。
#使い方
- GameViewを表示します。表示してないと動かないです。理由は後述
- ImageOverlapWindowを開きます。
- Windowがでるので自分の好きな画像をドラッグ・アンド・ドロップでぺっちょんします。(大人の事情でPNGしか対応できてないです
- 下にスクロールすると怪しいスライダーが出るのでそれを動かすと透明度変わります。
- GameViewと同じサイズで追従するのでチェックボックスで切り替えられます。
- おわり!
*予めGameViewのサイズを画像のアスペクト比と合わせておく必要があります。
#内部の実装について
    RenderTexture GetGameTexture()
    {
        var gameMainView = GetMainGameView();
        if (gameMainView == null)
        {
            return null;
        }

        var t = System.Type.GetType("UnityEditor.GameView,UnityEditor");
        if (t == null) return null;
        var renderTexture = t.GetField("m_TargetTexture",
            BindingFlags.NonPublic | BindingFlags.Instance | BindingFlags.GetField | BindingFlags.FlattenHierarchy |
            BindingFlags.SetField);
        if (renderTexture == null)
        {
            return null;
        }

        return (RenderTexture) renderTexture.GetValue(gameMainView);

    }

    public static EditorWindow GetMainGameView()
    {
        var t = System.Type.GetType("UnityEditor.GameView,UnityEditor");
        if (t == null) return null;
        var getMainGameView = t.GetMethod("GetMainGameView", BindingFlags.NonPublic | BindingFlags.Static);
        if (getMainGameView == null) return null;
        var res = getMainGameView.Invoke(null, null) ?? GetWindow(t);
        return (EditorWindow)res;

    }
上記のようにReflectionで取得してGameViewのRenderTextureを無理やり拾ってきて表示しています。
リフレクションでGameViewを出してるWindowを取得して
その中のRenderTextureを取得している感じになります。
そのためタブ切り替えとかでGameViewが隠れると表示が更新されなくなります。
また、OSによってUVが反転したりしてしまったので
シェーダーでその辺り直して二枚合成して表示しています。
全体のコードはこちらからDLできます。
#反響
社内でデザイナーさんがUIの配置調整をやっているため
こちらのツールを利用してかなり楽に配置できているようです。
作ってよかった!思っております。
パッケージで欲しい人はこちら
*画像を重ねる際に専用のシェーダーを利用してるのでそちらも必要になります