はじめに
JUnit5 がリリースされてから半年以上経過しましたが、やっと Eclipse で JUnit5 を使ってみたのでその時のメモです。
環境
- JUnit
- JUnit Platform: 1.2.0
- JUnit Jupiter: 5.2.0
- JUnit Vintage: 5.2.0
- Java
- 8
- Eclipse
- Pleiades All in One 4.7.3a
What is JUnit5?
JUnit5 = JUnit Platform + JUnit Jupiter + JUnit Vintage
本家にはこの式で記載されていますが、 JUnit5 のフレームワーク上で JUnit4 を実行しないのであれば JUnit Vintage の依存は不要です。
詳しくは後述する依存関係をご覧ください。
依存関係
JUnit5 関連すべての依存関係は 本家 に記載されています。

もう少し省略した図はこんな感じです。
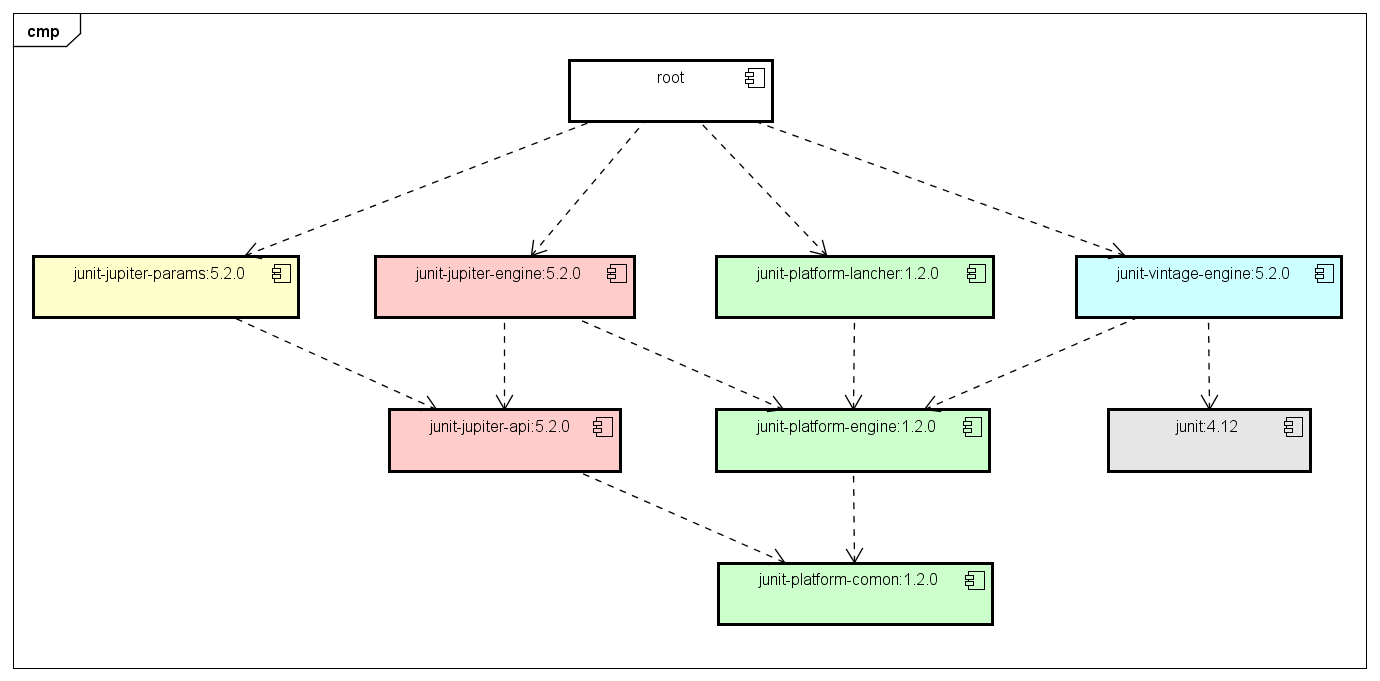
各コンポーネントの簡単な説明は下記の通りです。
| コンポーネント | 説明 |
|---|---|
| junit-platform-launcher | JVM 上でテストを実行するための基盤となるコンポーネント群 |
| junit-jupiter-engine | プラットフォーム上で JUnit5 ベースのテストを実行するためのコンポーネント群 |
| junit-jupiter-api | JUnit5 ベースのテストを書くためのコンポーネント群 |
| junit-jupiter-params | JUnit5 ベースのパラメータライズドなテストを書くためのコンポーネント群 |
| junit-vintage-engine | プラットフォーム上で JUnit3 または JUnit4 ベースのテストを実行するためのコンポーネント群 |
それぞれが推移的に依存しているため、特にバージョンを気にしなければ下記の依存関係だけで JUnit5 ベースのテストを実行できます。
// http://mvnrepository.com/artifact/org.junit.jupiter/junit-jupiter-engine
dependency group: 'org.junit.jupiter', name: 'junit-jupiter-engine', version: "5.2.0"
// https://mvnrepository.com/artifact/org.junit.platform/junit-platform-launcher
dependency group: 'org.junit.platform', name: 'junit-platform-launcher', version: "1.2.0"
ただし、依存するバージョンが必ずしも統一されていない可能性もあるので gradlew dependencies などで確認することをお勧めします。
Gradle
依存するすべてのコンポーネントを指定した場合の build.gradle はこんな感じです。
buildscript {
  ext {
    junit5MinorVersion = '2.0'
  }
}
dependencyManagement {
  dependencies {
    // http://mvnrepository.com/artifact/org.junit.jupiter/junit-jupiter-engine
    dependency group: 'org.junit.jupiter', name: 'junit-jupiter-engine', version: "5.${junit5MinorVersion}"
    // http://mvnrepository.com/artifact/org.junit.jupiter/junit-jupiter-params
    dependency group: 'org.junit.jupiter', name: 'junit-jupiter-params', version: "5.${junit5MinorVersion}"
    // https://mvnrepository.com/artifact/org.junit.jupiter/junit-jupiter-api
    dependency group: 'org.junit.jupiter', name: 'junit-jupiter-api', version: "5.${junit5MinorVersion}"
    // https://mvnrepository.com/artifact/org.junit.vintage/junit-vintage-engine
    dependency group: 'org.junit.vintage', name: 'junit-vintage-engine', version: "5.${junit5MinorVersion}"
    // https://mvnrepository.com/artifact/org.junit.platform/junit-platform-launcher
    dependency group: 'org.junit.platform', name: 'junit-platform-launcher', version: "1.${junit5MinorVersion}"
  }
}
dependencies {
  testCompile group: 'org.junit.jupiter', name: 'junit-jupiter-engine'
  testCompile group: 'org.junit.jupiter', name: 'junit-jupiter-params'
  testCompile group: 'org.junit.jupiter', name: 'junit-jupiter-api'
  testCompile group: 'org.junit.vintage', name: 'junit-vintage-engine'
  testCompile group: 'org.junit.platform', name: 'junit-platform-launcher'
}
JUnit5 のアノテーション
JUnit4 からの主なアノテーション
主要なアノテーションの変更はこちら。
JUnit5 のよく使うアノテーション一覧は こちら。
| Annotation | Junit5 | Junit4 | 備考 |
|---|---|---|---|
@Test |
org.junit.jupiter.api.Test |
org.junit.Test |
ー |
@BeforeEach |
org.junit.jupiter.api.BeforeEach |
org.junit.Before |
各テストの開始前に実行 |
@AfterEach |
org.junit.jupiter.api.AfterEach |
org.junit.After |
各テストの終了後に実行 |
@BeforeAll |
org.junit.jupiter.api.BeforeAll |
org.junit.BeforeClass |
全テストの開始前に 1 度だけ実行 |
@AfterAll |
org.junit.jupiter.api.AfterAll |
org.junit.AfterClass |
全テストの終了後に 1 度だけ実行 |
@Disabled |
org.junit.jupiter.api.Disabled |
org.junit.Ignore |
テストの無効化。クラス名にもメソッド名にも使用可能 |
その他、便利そうなアノテーション
@DisplayName
org.junit.jupiter.api.DisplayName- 絵文字でも顔文字でも使えます
- だけど HTML でレポート出力したときに文字化けしたし、実際仕事で絵文字を使うことは無さそう?
- テストクラスやテストメソッド名に直接日本語を使うことが許されないプロジェクトでは「待ってました!」機能
- メソッド名にもクラス名にも使えます
@Tag
org.junit.jupiter.api.Tag- JUnit4 時代なら
org.junit.experimental.categories.Category - ビルドツールなどからの実行時にフィルタリングが可能
- クラスに付与したタグはメソッドやネストしたクラスに継承される
- 下記例であれば
@Tag("fast")が付いたテストクラス・及びメソッドと、@Tag("slow")と@Tag("feature")両方が付いたテストクラス・及びメソッドが実行対象となる
...
test {
  useJUnitPlatform {
    includeTags 'fast', 'slow & feature'
    includeEngines 'junit-jupiter'
  }
}
...
@EnabledOnOs / @DisabledOnOs
- 実行中の OS に応じてテストの実行を制御可能
@EnabledOnOs(WINDOWS) // Windows 環境でしか実行されない
@DisabledOnOs(WINDOWS) // Windows 環境では実行されない
@RepeatedTest
- 対象テストメソッドを指定回数繰り返す
-
{displayName},{currentRepetition},{totalRepetitions}を使うことで表示内容を変更可能- デフォルトは
repetition 1 of 10のように出力される
- デフォルトは
@EnabledIf / @DisabledIf
- スクリプトベースで実行制御が可能
- JavaScript や Groovy などで記述可能
その他、実験的な API 一覧
詳しくは下記参照。
http://junit.org/junit5/docs/current/user-guide/#api-evolution-experimental-apis
Standard Test Class
ここまでの話を踏まえた基本形のテストクラスを示します。
package learning.junit5;

import static org.assertj.core.api.Assertions.*;
import static org.junit.jupiter.api.condition.OS.*;

import java.util.Map;

import org.assertj.core.util.Maps;
import org.junit.jupiter.api.AfterAll;
import org.junit.jupiter.api.AfterEach;
import org.junit.jupiter.api.BeforeAll;
import org.junit.jupiter.api.BeforeEach;
import org.junit.jupiter.api.Disabled;
import org.junit.jupiter.api.DisplayName;
import org.junit.jupiter.api.Nested;
import org.junit.jupiter.api.RepeatedTest;
import org.junit.jupiter.api.RepetitionInfo;
import org.junit.jupiter.api.Tag;
import org.junit.jupiter.api.Test;
import org.junit.jupiter.api.TestInfo;
import org.junit.jupiter.api.TestReporter;
import org.junit.jupiter.api.condition.DisabledOnOs;
import org.junit.jupiter.api.condition.EnabledOnOs;

// class が public 宣言である必要がなくなりました!!
@Tag("base")
class StandardJUnit5Test {

    StandardJUnit5Test() {
        // do something...
    }

    // 事前処理・事後処理のメソッドも public 宣言なくても OK
    @BeforeAll
    static void beforeAll() throws Exception {
        // 全テストの開始前に 1 度だけ実行
    }

    @AfterAll
    static void afterAll() throws Exception {
        // 全テストの終了後に 1 度だけ実行
    }

    @BeforeEach
    void before() throws Exception {
        // 各テストの開始前に実行
    }

    @AfterEach
    void after() throws Exception {
        // 各テストの終了後に実行
    }

    // もちろんテストメソッドも public 宣言なしでも OK
    @Test
    @DisplayName("2 * 3 = 6 であること😆")
    void test() throws Exception {
        assertThat(2 * 3).isEqualTo(6);
    }

    @Disabled
    @Test
    @DisplayName("無効化されたテスト😑")
    void disabledTest() throws Exception {
        fail("実行されないはず!!");
    }

    @Test
    @EnabledOnOs(WINDOWS)
    void enabledOnWindows() throws Exception {
        // Windows 環境でしか実行されない
    }

    @Test
    @DisabledOnOs(WINDOWS)
    void disabledOnWindows() throws Exception {
        // Windows 環境では実行されない
    }

    @DisplayName("(」・ω・)」ウー")
    @Nested
    class InnerTest {

        @Test
        @DisplayName("(/・ω・)/ニャー")
        void test() throws Exception {
            assertThat("InnerTest").startsWith("Inner").endsWith("Test").hasSize(9);
        }
    }
}
※JUnit5 から追加された検証用メソッドはいくつかありますが、そこは他の記事にお任せします。
※個人的に AssertJ 推しなのでここは割愛させていただいます🙇🙇🙇
JUnit5 で出来るようになった点
コンストラクタとテストメソッドに引数を受け取れるようになった
org.junit.jupiter.api.extension.ParameterResolver は実行時に動的にパラメータをバインドさせるための API を定義。
junit-jupiter-engine に組み込まれている Resolver は下記 3 つ。
-
org.junit.jupiter.engine.extension.TestInfoParameterResolver- 引数に使用できるのは
org.junit.jupiter.api.TestInfo - テストのメタ情報を取得可能(メソッド情報、Tag など)
- 引数に使用できるのは
@Tag("TestInfo")
@Test
void receivedTestInfo(TestInfo info) throws Exception {
	assertThat(info.getTestMethod().get().getName()).isEqualTo("receivedTestInfo");
	assertThat(info.getTestClass().get()).isEqualTo(StandardJUnit5Test.class);
	assertThat(info.getTags()).containsOnly("TestInfo", "base");
	assertThat(info.getDisplayName()).isEqualTo("receivedTestInfo(TestInfo)");
}
-
org.junit.jupiter.engine.extension.TestReporterParameterResolver- 引数に使用できるのは
org.junit.jupiter.api.TestReporter -
publishEntryで設定した内容が stdout or stderr に出力される
- 引数に使用できるのは
@Test
void receivedTestReporter(TestReporter reporter) throws Exception {
    reporter.publishEntry("名前", "テストタロウ");
    Map<String, String> map = Maps.newHashMap("Foo", "Bar");
    reporter.publishEntry(map);
}

// 標準出力に下記が出力される
TestIdentifier [receivedTestReporter(TestReporter)]
ReportEntry [timestamp = 2018-06-30T11:54:45.075, 名前 = 'テストタロウ']
TestIdentifier [receivedTestReporter(TestReporter)]
ReportEntry [timestamp = 2018-06-30T11:54:45.080, Foo = 'Bar']
-
org.junit.jupiter.engine.extension.RepetitionInfoParameterResolver- 引数に使用できるのは
org.junit.jupiter.api.RepetitionInfo -
@RepeatedTest使用時にのみ現在の繰り返し回数や合計回数を取得可能 -
@RepeatedTest以外で使用すると実行時例外が発生します
- 引数に使用できるのは
@RepeatedTest(6)
void receivedRepetitionInfo(RepetitionInfo repetition) throws Exception {
    assertThat(repetition.getCurrentRepetition()).isBetween(1, 6);
    assertThat(repetition.getTotalRepetitions()).isEqualTo(6);
}
Extension Model
- JUnit4 時代の Runner,
@Rule,@ClassRuleの競合する拡張ポイントが Extension API に統一(といっても Extension 自体はマーカーインターフェースに過ぎない) - JUnit5 では
@ExtendWithで指定。Java のサービスローダー指定も可能 -
@ExtendWithの指定はメソッド、クラスどちらでも OK - 複数指定することも可能
- テスト実行前後などに Intercept することも可能(Callback)
SpringFramework 5.x から JUnit5 をサポート
くわしくはこちらの記事をご確認ください。
Spring Framework 5.0 Test関連の主な変更点
JUnit5 で出来なくなった点
- QuickJUnit プラグインの
Ctrl + 0が反応しなくなった- JUnit4 系の
@Testを対象としているからかな🤔 - Eclipse キーバインド設定を変更すれば何とか対応可能😇
- JUnit4 系の
おわりに
JUnit5 にはこの他にも Parameterized Tests や Dynamic Tests など、新たに追加された機能もありますが、それらについては(きっと)追々。。。
触ってみた感じ、JUnit4 を既に使っているプロジェクトで、既存のテストを置き換えてまで JUnit5 を使う理由はそこまで多く感じませんでした。
あと、もちろんですが 1 つのプロダクトの中で JUnit4 と JUnit5 が混在するのはあまり得策ではないかと。
後から見た人が「JUnit4 と JUnit5 のどちらで書くのが正解なのか😢?」と混乱させてしまうので。
今あるプロダクトで既に JUnit4 のテストコードが存在するなら JUnit4 を踏襲したほうが良いと思います。
テストコードがそもそも存在しない(レガシーな)プロダクトで、これからテストコードを追加しようと考えているなら JUnit5 を導入するのが良いかなー🤔
と、ここまで書いたけどあんまり Eclipse は関係ない内容になってしもうた。
でも Eclipse 4.7.2 以前だと Eclipse 上で JUnit5 が実行できなかったので、それが改善されてまぁよかった。
Enjoy JUnit5 Life😘!!