Live2DモデルのモーションをMecanimで管理できないかな~って考えてたら、簡単なやり方を思いついたので試してみました。
まずはLive2D Unity SDKのMotionプロジェクトを開きます。
(sample\Motion\Assets\Scene\Sample.unity)
このプロジェクトはモーションを1つ再生するだけのシンプルなものです。
Live2DモデルをMecanimで制御する手順
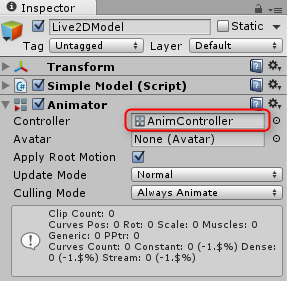
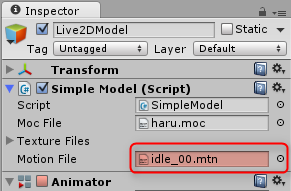
1)まずはLive2DModelにAnimatorを追加します

2)[Assets]-[Create]からAnimator Controllerを作成し、Live2DModelにアタッチします
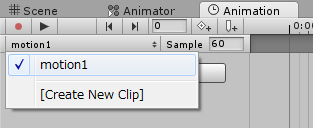
3)HirarchyでLive2DModelを選択した状態で、[Window]-[Animation]を開き[Create New Clip]で新規Animationを作ります
4)Add Curveボタン押下し、Motion Fileの+ボタン押下します
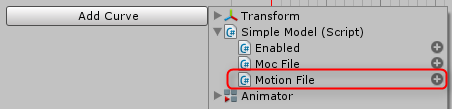
5)1:00のキーフレームはDeleteし、0:00の方を選択し、InspectorのMotion Fileを指定します
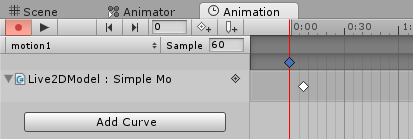
要するに(3)~(5)を繰り返して、Motion File名を変えて上げればOK!
モーションファイルはサンプルモデルとかから持ってきて下さい。
6)Animatorの方にAnimationをドラッグ&ドロップします。
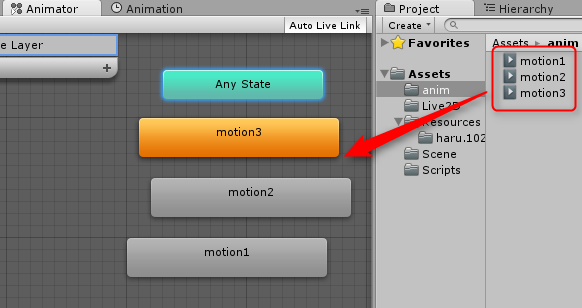
7)MakeTranstionでつないでパラメータを作ります

8)あとはソースをちょっと直せばMecanimで管理できます!
using UnityEngine;
using System;
using System.IO;
using System.Collections;
using live2d;

[ExecuteInEditMode]
public class SimpleModel : MonoBehaviour
{
    private Live2DModelUnity live2DModel;
    private Live2DMotion motion;
    private MotionQueueManager motionMgr;

    private Matrix4x4 live2DCanvasPos;

    public TextAsset mocFile;
    public Texture2D[] textureFiles;
    public TextAsset motionFile;

    private Animator anim;            // Animator
    private int mtnnum = 0;           // モーション番号
    private bool changeflg = false;   // モーションチェンジフラグ


    void Start()
    {
        Live2D.init();
        // Animatorを取得
        anim = GetComponent<Animator>();


        live2DModel = Live2DModelUnity.loadModel(mocFile.bytes);

        for (int i = 0; i < textureFiles.Length; i++)
        {
          live2DModel.setTexture(i, textureFiles[i]);
        }

        float modelWidth = live2DModel.getCanvasWidth();
        live2DCanvasPos = Matrix4x4.Ortho(0, modelWidth, modelWidth, 0, -50.0f, 50.0f);

        motionMgr = new MotionQueueManager();
  }


  void OnRenderObject()
  {
        if (live2DModel == null) return;
        live2DModel.setMatrix(transform.localToWorldMatrix * live2DCanvasPos);

        if (!Application.isPlaying)
        {
          live2DModel.update();
          live2DModel.draw();
          return;
        }

        // 現在のフラグ値とMecanimのフラグ値を比較
        if (mtnnum != anim.GetInteger("Motion"))
        {
          // Mecanimからフラグ値取得
          mtnnum = anim.GetInteger("Motion");
          // モーションを読み直す
          motion = Live2DMotion.loadMotion(motionFile.bytes);
          // フラグをONにする
          changeflg = true;
        }

        // モーションが終了していたら or フラグが更新されていたら
        if (motionMgr.isFinished() || changeflg == true)
        {
          motionMgr.startMotion(motion);

          // フラグをOFFにする
          changeflg = false;
        }

        motionMgr.updateParam(live2DModel);

        live2DModel.update();
        live2DModel.draw();
        }
}
これで簡単にMecanim制御できました!
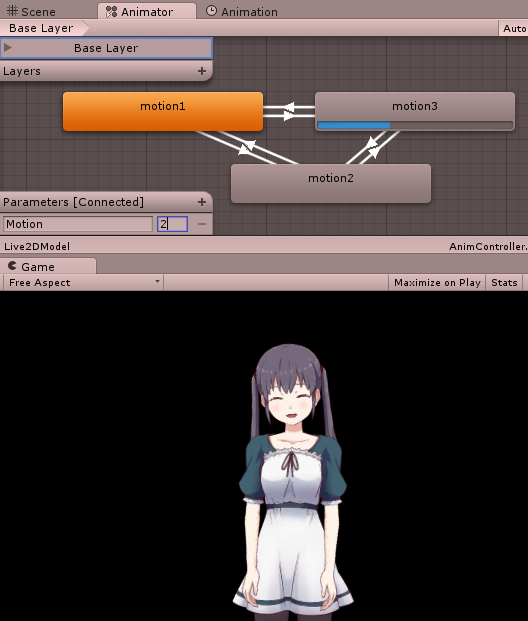
たぶん、音声やLive2DのモデルファイルもPublicにしとけばMecanimで管理できるかと思います
2015/05/11追記
・モーション切り替えがスパッと切り替わらないバグあったので、修正版書きました
Live2DモーションをStateMachineBehaviours制御する