React での新規生徒追加ページの実装解説
はじめに
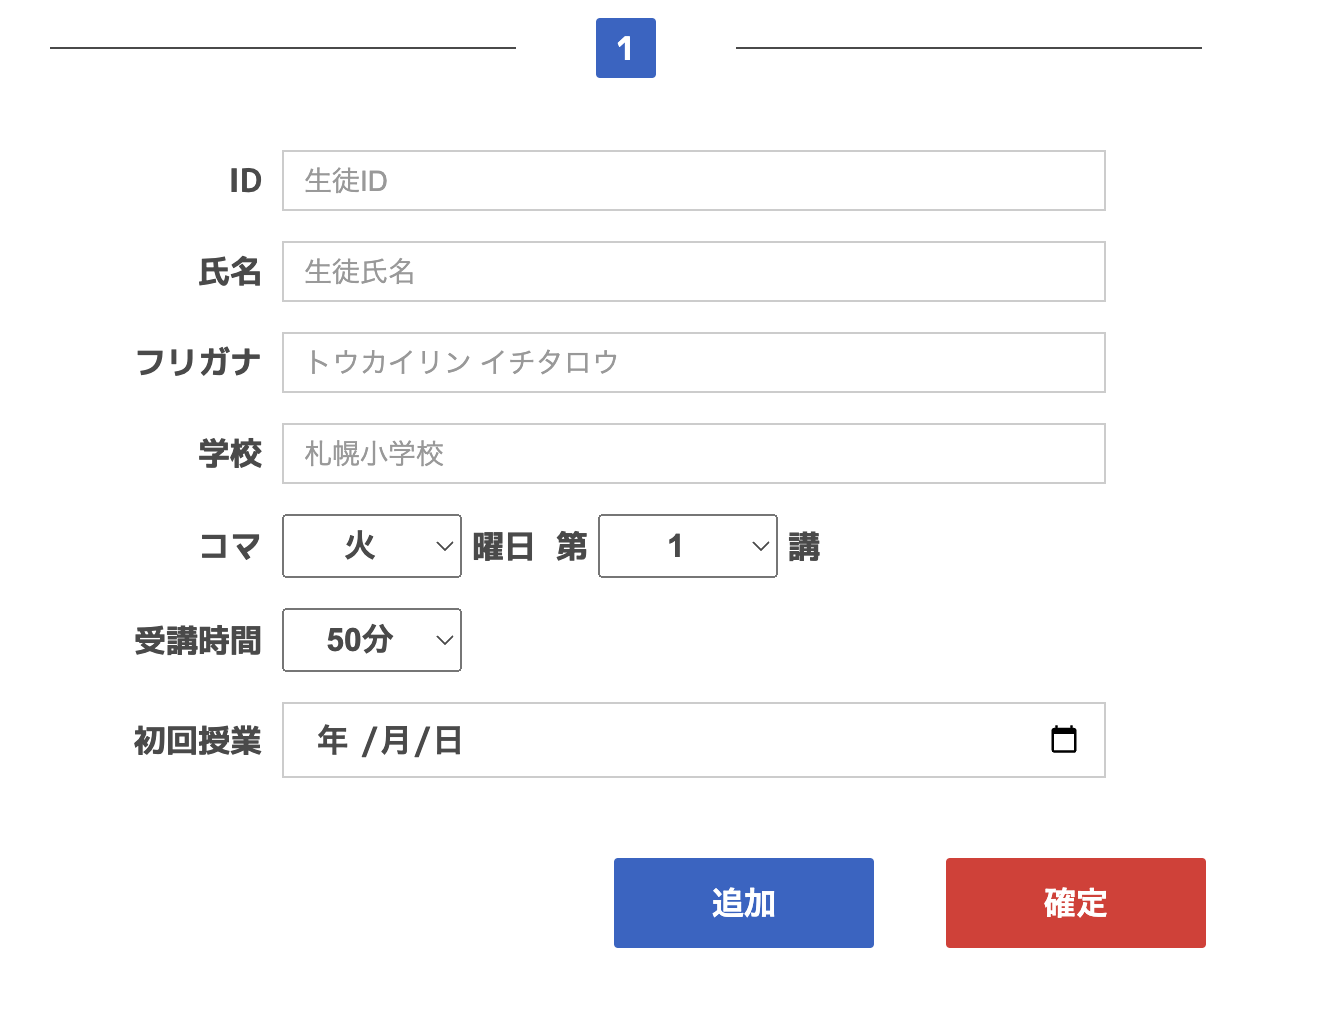
この記事では、時間割アプリ制作にあたってReact を使用して実装した新規生徒追加ページのコードを抜粋して解説します。
このページには生徒の情報を入力するフォームが追加され、バリデーション機能や、追加・確定ボタンの機能が含まれています。
また最下部に各ページの最終的なコードを記載しています。
以下の内容を詳しく解説します。
- フォームの動的追加
- バリデーション(未入力項目のエラー表示)
- 確定ボタンによる処理の流れ
- 各コンポーネントの役割
コンポーネントの概要
まず、AddStudentPage コンポーネントがメインとなるページです。このコンポーネントには、複数のフォーム(生徒の情報を入力するためのフォーム)を管理するロジックが含まれています。
AddStudentPage.jsx
1. フォームの追加機能
const [forms, setForms] = useState([{}]); // フォームのリストを管理
const handleAddForm = () => {
  setForms([...forms, {}]); // 新しい空のフォームを追加
};
このコードでは、useState を使用してフォームを管理しています。forms は現在表示されているフォームのリストで、handleAddForm 関数を呼ぶと、新しい空のフォームが追加されます。[...forms, {}] により、既存のフォームに新しい空のオブジェクトを追加する形です。
2. バリデーション機能
const InputField = styled.input`
  font-size: 16px;
  color: #000;
  border: ${({ isError }) => (isError ? "2px solid red" : "1px solid #ccc")};

  &::placeholder {
    font-size: 14px;
    font-weight: 400;
    color: #999;
  }
`;

const handleValidate = (e) => {
  e.preventDefault();
  let hasError = false;
  const newErrors = forms.map((_, index) => {
    const formErrors = {};
    const inputs = refs.current[index]; // フォームの各入力項目を参照
    if (inputs.id.value === "") {
      formErrors.id = true;
      hasError = true;
    }
    // 他の入力項目についても同様にチェック
    return formErrors;
  });
  setErrors(newErrors);
  if (!hasError) {
    alert("生徒が追加されました");
  }
};
handleValidate はバリデーションを行う関数です。ここでは、refs を使って各フォームの入力項目にアクセスし、空欄がある場合には hasError フラグを立て、エラーステートを更新します。エラーがなければ、アラートで「生徒が追加されました」と表示されます。
styled-componentsの記述ではエラーがあった時に項目のborderを赤くするように記述しています。
3. フォームの JSX 構造
<FormContainer key={index}>
  <FormInner>
    <FormHeader number={index + 1} />
    <InputField
      type="text"
      placeholder="生徒ID"
      isError={errors[index]?.id}
      ref={(el) => (refs.current[index] = { ...refs.current[index], id: el })}
    />
    {/* 他の入力フィールドも同様に配置 */}
  </FormInner>
</FormContainer>
各フォームは map 関数を使って、動的に生成されます。index を使ってフォームごとに一意のキーを設定し、エラーがある場合には InputField コンポーネントに isError プロップを渡して、エラー表示を制御しています。
4. ボタンの処理
<AddCompleteButton
  handleAddForm={handleAddForm}
  handleValidate={handleValidate}
/>
AddCompleteButton コンポーネントを通じて、追加 と 確定 のボタンがレンダリングされます。handleAddForm で新しいフォームを追加し、handleValidate でバリデーションを実行します。
FormHeader.jsx
const FormHeaderWrapper = styled.div`
  width: 30px;
  height: 30px;
  background-color: #2c65c7;
  display: flex;
  justify-content: center;
  align-items: center;
`;

const FormNumberSpan = styled.span`
  color: #fff;
  font-size: 16px;
`;

export const FormHeader = ({ number }) => {
  return (
    <FormHeaderWrapper>
      <FormNumberSpan>{number}</FormNumberSpan>
    </FormHeaderWrapper>
  );
};
この FormHeader コンポーネントは、各フォームの番号を表示します。例えば、1つ目のフォームには "1" が、2つ目のフォームには "2" が表示されます。
MonthWeek.jsx
export const MonthWeek = () => {
  return (
    <div className="student-info">
      <label htmlFor="slot">コマ</label>
      <select id="day">
        <option>火</option>
        <option>木</option>
        {/* 他の曜日 */}
      </select>
      <span>曜日</span>
      <select id="period">
        <option>1</option>
        <option>2</option>
        {/* 他のコマ */}
      </select>
      <span>講</span>
    </div>
  );
};
MonthWeek コンポーネントは、授業が行われる曜日と週を選択するための部分です。曜日とコマの選択肢が提供され、生徒ごとの時間割を設定できます。
AddCompleteButton.jsx
const DoubleButton = styled.div`
  .add {
    background-color: #2c65c7;
    margin-right: 36px;
  }
`;

export const AddCompleteButton = ({ handleAddForm, handleValidate }) => {
  return (
    <DoubleButton>
      <button className="add" onClick={handleAddForm}>
        追加
      </button>
      <button className="complete" onClick={handleValidate}>
        確定
      </button>
    </DoubleButton>
  );
};
この AddCompleteButton では、2つのボタンを表示しています。1つ目の「追加」ボタンは handleAddForm を呼び出して新しいフォームを追加し、2つ目の「確定」ボタンは handleValidate を呼び出してバリデーションを実行します。
まとめ
今回の記事では、React を使った生徒追加フォームの実装方法について、コードを参照しながら解説しました。動的にフォームを追加したり、バリデーションを行ったりするロジックは、他のアプリケーションにも応用できるポイントです。
ぜひこのコードを参考に、自分のプロジェクトでも実践してみてください!
最終的なコード
    import React, { useState, useRef } from "react";
import styled from "styled-components";
import { FormHeader } from "./FormHeader";
import { MonthWeek } from "./MonthWeek";
import { AddCompleteButton } from "./AddCompleteButton";

const FormContainer = styled.div`
  width: 700px;
  display: flex;
  flex-direction: column;
  align-items: center;
  margin: 0 auto 25px auto;
`;

const FormInner = styled.form`
  width: 520px;
  display: flex;
  flex-wrap: wrap;
  align-items: center;
  margin-inline: auto;
`;

// スタイル付きのinputフィールド
const InputField = styled.input`
  font-size: 16px;
  color: #000;
  border: ${({ isError }) => (isError ? "2px solid red" : "1px solid #ccc")};

  &::placeholder {
    font-size: 14px;
    font-weight: 400;
    color: #999;
  }
`;

export const AddStudentPage = () => {
  const [forms, setForms] = useState([{}]); // FormContainerのリスト
  const [errors, setErrors] = useState([{}]); // 各フォームごとのエラーステート
  const refs = useRef([]); // 各フォームのinputフィールドを参照するためのリファレンス

  // フォームを追加する
  const handleAddForm = () => {
    setForms([...forms, {}]); // 新しい空のフォームを追加
    setErrors([...errors, {}]); // 新しいフォームに対応するエラーステートも追加
  };

  // バリデーションを実行
  const handleValidate = (e) => {
    e.preventDefault();
    let hasError = false;

    const newErrors = forms.map((_, index) => {
      const formErrors = {};
      const inputs = refs.current[index];

      if (inputs.id.value === "") {
        formErrors.id = true;
        hasError = true;
      }

      if (inputs.name.value === "") {
        formErrors.name = true;
        hasError = true;
      }

      if (inputs.kana.value === "") {
        formErrors.kana = true;
        hasError = true;
      }

      if (inputs.school.value === "") {
        formErrors.school = true;
        hasError = true;
      }

      return formErrors;
    });

    setErrors(newErrors);

    if (hasError) {
      {
      }
    } else {
      alert("生徒が追加されました");
    }
  };

  return (
    <>
      {forms.map((form, index) => (
        <FormContainer key={index}>
          <FormInner>
            <FormHeader
              beforeWidth="233px"
              afterWidth="233px"
              beforeLeft="70px"
              afterRight="70px"
              number={index + 1}
            />
            <div className="student-info">
              <label htmlFor={`id-${index}`}>ID</label>
              <InputField
                type="text"
                id={`id-${index}`}
                placeholder="生徒ID"
                isError={errors[index]?.id}
                ref={(el) =>
                  (refs.current[index] = { ...refs.current[index], id: el })
                }
              />
            </div>
            <div className="student-info">
              <label htmlFor={`name-${index}`}>氏名</label>
              <InputField
                type="text"
                id={`name-${index}`}
                placeholder="生徒氏名"
                isError={errors[index]?.name}
                ref={(el) =>
                  (refs.current[index] = { ...refs.current[index], name: el })
                }
              />
            </div>
            <div className="student-info">
              <label htmlFor={`kana-${index}`}>フリガナ</label>
              <InputField
                type="text"
                id={`kana-${index}`}
                placeholder="トウカイリン イチタロウ"
                isError={errors[index]?.kana}
                ref={(el) =>
                  (refs.current[index] = { ...refs.current[index], kana: el })
                }
              />
            </div>
            <div className="student-info">
              <label htmlFor={`school-${index}`}>学校</label>
              <InputField
                type="text"
                id={`school-${index}`}
                placeholder="札幌小学校"
                isError={errors[index]?.school}
                ref={(el) =>
                  (refs.current[index] = { ...refs.current[index], school: el })
                }
              />
            </div>
            <MonthWeek />
            <div className="student-info">
              <label htmlFor={`duration-${index}`}>受講時間</label>
              <select id={`duration-${index}`}>
                <option>50分</option>
                <option>75分</option>
              </select>
            </div>
            <div className="student-info">
              <label htmlFor={`start-${index}`}>初回授業</label>
              <InputField type="date" id={`start-${index}`} />
            </div>
          </FormInner>
        </FormContainer>
      ))}
      <AddCompleteButton
        handleAddForm={handleAddForm}
        handleValidate={handleValidate}
      />
    </>
  );
};
import styled from "styled-components";

const FormHeaderWrapper = styled.div`
  width: 30px;
  height: 30px;
  background-color: #2c65c7;
  border-radius: 2px;
  display: flex;
  justify-content: center;
  align-items: center;
  position: relative;
  margin-bottom: 36px;
  margin-inline: auto;

  &::before,
  &::after {
    position: absolute;
    content: "";
    height: 1px;
    background-color: #4a4a4a;
  }

  &::before {
    width: ${(props) => props.beforeWidth || "233px"};
    left: ${(props) => props.beforeLeft || "70px"};
  }

  &::after {
    width: ${(props) => props.afterWidth || "233px"};
    right: ${(props) => props.afterRight || "70px"};
  }
`;

const FormNumberSpan = styled.span`
  display: block;
  color: #fff;
  font-size: 16px;
  inset: 0;
  margin: auto;
`;

export const FormHeader = ({
  width,
  beforeWidth,
  afterWidth,
  beforeLeft,
  afterRight,
  number,
}) => {
  return (
    <>
      <FormHeaderWrapper
        width={width}
        beforeWidth={beforeWidth}
        afterWidth={afterWidth}
        beforeLeft={beforeLeft}
        afterRight={afterRight}
      >
        <FormNumberSpan>{number}</FormNumberSpan>
      </FormHeaderWrapper>
    </>
  );
};
export const MonthWeek = () => {
  return (
    <>
      <div className="student-info">
        <label htmlFor="slot">コマ</label>
        <select id="day">
          <option>火</option>
          <option>木</option>
          <option>金</option>
          <option>土</option>
          <option>日</option>
        </select>
        <span>曜日</span>
        <span>第</span>
        <select id="period">
          <option>1</option>
          <option>2</option>
          <option>3</option>
          <option>4</option>
          <option>5</option>
          <option>6</option>
          <option>7</option>
        </select>
        <span>講</span>
      </div>
    </>
  );
};
import styled from "styled-components";

const DoubleButton = styled.div`
  width: 580px;
  text-align: right;
  margin-inline: auto;

  .add {
    background-color: #2c65c7;
    margin-right: 36px;
  }
`;

export const AddCompleteButton = ({ handleAddForm, handleValidate }) => {
  return (
    <DoubleButton>
      <button className="add" onClick={handleAddForm}>
        追加
      </button>
      <button className="complete" onClick={handleValidate}>
        確定
      </button>
    </DoubleButton>
  );
};