検証環境
この記事の内容は、以下の環境で検証した。
- Java:open jdk 1.8.0_152
- Kotlin 1.2.10
- Android Studio 3.0.2
- CompileSdkVersion:26
- Fuel 1.12.0
はじめに
タイトルの通り、通知(Notification)でダウンロードの状況などを表示したい!と思っている方も多いかと思います。
また、OreoでサービスをForeground Serviceにしないといけなくなりました。Foreground Serviceは、処理中に通知を出しっぱなしにする必要があります。
通知のメッセージに変化がないと、ユーザは「あれ?これ止まってる?」って勘違いしてしまうかもしれません。
進捗状況を表示することは、ユーザにとってもいいのではないでしょうか。
今回は、そんなお話です。
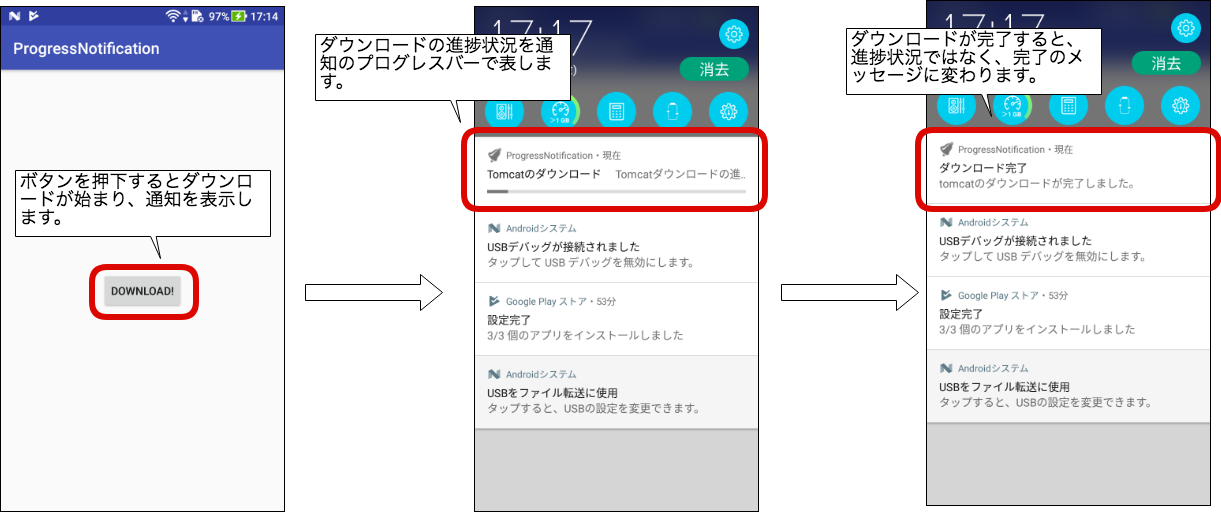
アプリの完成図
ダウンロードボタンを押下すると、ダウンロードが始まります。
ダウンロードが始まると通知が表示し、その通知に進捗状況を表示します。
ダウンロードしたファイルはCacheに格納します。
アプリのイメージは、以下のとおりです。
アプリの全体像
アプリの全体像は以下のとおりです。
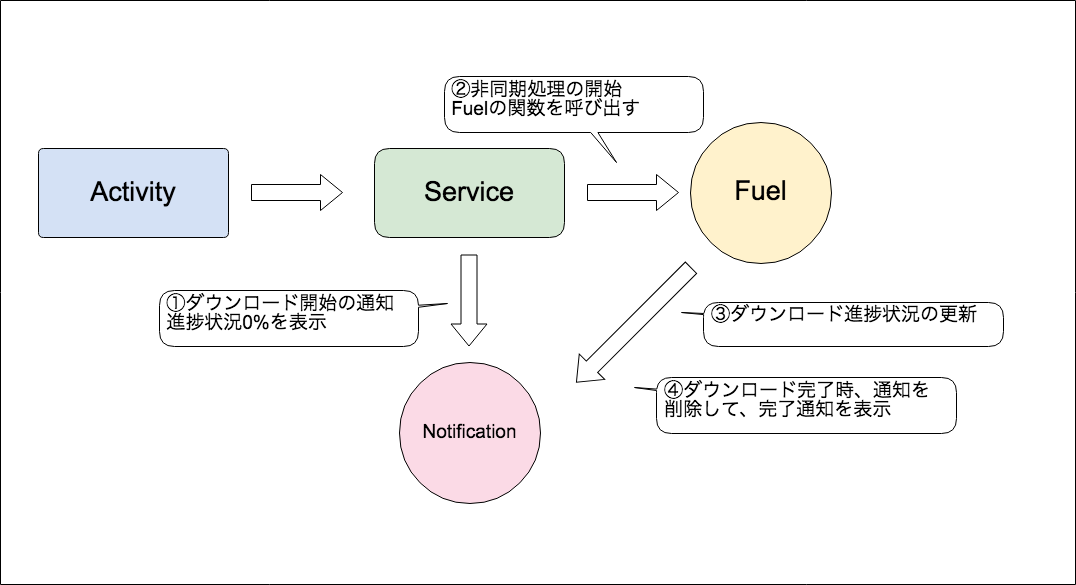
ダウンロード処理はサービスで実装します。
また、ダウンロードでは、Fuel(外部ライブラリー)を使用しています。
Fuelの基本的な使い方は下記を参照してください。
KotlinでHTTP通信(FuelとHttpURLConnection)
サンプルではOreo以降も対応させるために、Foreground Serviceで実装しています。
Foreground Serviceについては、下記を参照してください。
Foreground Serviceの基本
作成&修正したファイル
- AndroidManifest.xml
- MainActivity.kt
- DownloadService.kt
- build.gradle
- bell.png(通知用のアイコン)
サービスの実装
まずは、クラスの全体は以下のとおりです。
その下に処理の説明を記載します。
package jp.co.casareal.progressnotification.service

import android.app.NotificationManager
import android.app.Service
import android.content.Context
import android.content.Intent
import android.os.IBinder
import android.support.v4.app.NotificationCompat
import com.github.kittinunf.fuel.httpDownload
import jp.co.casareal.progressnotification.R
import java.io.File

class DownloadService : Service() {

    override fun onBind(intent: Intent): IBinder? {
        // TODO: Return the communication channel to the service.
        throw UnsupportedOperationException("Not yet implemented")
    }

    override fun onStartCommand(intent: Intent?, flags: Int, startId: Int): Int {

        val notificationId = 1;

        val manager = getSystemService(Context.NOTIFICATION_SERVICE) as NotificationManager

        val url = "http://ftp.jaist.ac.jp/pub/apache/tomcat/tomcat-9/v9.0.6/bin/apache-tomcat-9.0.6.zip"


        val builder = NotificationCompat.Builder(this).apply {
            mContentTitle = "Tomcatのダウンロード"
            mContentText = "Tomcatダウンロードの進捗状況"
            setSmallIcon(R.drawable.bell)
            setProgress(100, 0, false)
        }

        // Notification Managerを使用する場合の記述方法は下記の通り
        // manager.notify(notificationId,builder.build())

        startForeground(notificationId, builder.build())
        url.httpDownload()
                .destination { response, url ->
                    val tempFile = File.createTempFile("tomcat", ".zip")
                    tempFile
                }
                .progress { readBytes, totalBytes ->
                    val total = (readBytes.toFloat() / totalBytes.toFloat()) * 100.0
                    builder.setProgress(100, total.toInt(), false)
                    // Notification Managerを使用する場合の記述方法は下記の通り
                    // manager.notify(notificationId,builder.build())
                    startForeground(notificationId, builder.build())
                }
                .response { request, response, result ->
                    stopForeground(true)

                    val (res, err) = result

                    val completeNotification = NotificationCompat.Builder(this)
                            .apply {

                                mContentTitle = "ダウンロード完了"
                                mContentText = "tomcatのダウンロードが完了しました。"
                                setSmallIcon(R.drawable.bell)
                            }.build()
                    manager.notify(notificationId, completeNotification)
                }

        return START_STICKY
    }
}
それでは1つずつ処理を見ていきます。
val notificationId = 1;

val manager = getSystemService(Context.NOTIFICATION_SERVICE) as NotificationManager

val url = "http://ftp.jaist.ac.jp/pub/apache/tomcat/tomcat-9/v9.0.6/bin/apache-tomcat-9.0.6.zip"


val builder = NotificationCompat.Builder(this).apply {
    mContentTitle = "Tomcatのダウンロード"
    mContentText = "Tomcatダウンロードの進捗状況"
    setSmallIcon(R.drawable.bell)
    setProgress(100, 0, false)
}
通知の表示準備とダウンロードするファイルのURLを定義しています。
ここでのポイントは、 NotificationCompat.Builderクラスを生成しますが、Buildはしません。
「 setProgress(100, 0, false)」はプログレスバーの進捗状況を0%に設定しています。
// Notification Managerを使用する場合の記述方法は下記の通り
// manager.notify(notificationId,builder.build())

startForeground(notificationId, builder.build())
ここでは、『アプリの全体像の①』にあるように、ダウンロードを開始する前に進捗状況0%で通知を表示します。
ここからはFuelも含めた説明です。
まずはFuelの関数の全体像について説明します。
1
url.httpDownload()
                .destination { response, url ->
      2
                }
                .progress { readBytes, totalBytes ->
      3
                }
                .response { request, response, result ->
      4
                }
1.urlは文字列です。拡張関数であるhttpDownload関数を呼び出しています。
2.destination関数では、Fileクラスのオブジェクトを返し、ダウンロードしたファイルの保存場所を指定します。ダウンロード処理開始時に呼び出される関数です。
3.progress関数では、進捗状況の更新処理を記述します。第1引数にこれまでに読み込んだファイルのサイズ、第2引数にダウンロードするファイルのサイズが格納されています。ダウンロードの最中に定期的によびだされる関数です。
4.response関数では、完了通知やプログレスバーの通知を終了したりします。ダウンロード処理が完了すると呼び出される関数です。
それでは、各関数内の処理を確認します。
.destination { response, url ->
                    val tempFile = File.createTempFile("tomcat", ".zip")
                    tempFile
}
今回は、ダウンロードするファイルはCacheに格納するため、FileクラスのcreateTempFileメソッドを使用します。
第1引数に、拡張子までのファイル名を指定します。第2引数に拡張子をしていします。この時「.」 ドットを忘れないように注意してください。
「tomcat102440503.zip」のようにファイル名が生成されます。
メソッドの詳細は、下記を参照してください。
https://developer.android.com/reference/java/io/File.html?hl=ja#createTempFile(java.lang.String,%20java.lang.String,%20java.io.File)
ダウンロードしたファイルを移動したり、何かしらで使用する時は、Fileクラスのオブジェクトはプロパティなどに格納する必要があります。
.progress { readBytes, totalBytes ->
                    val total = (readBytes.toFloat() / totalBytes.toFloat()) * 100.0
                    builder.setProgress(100, total.toInt(), false)
                    // Notification Managerを使用する場合の記述方法は下記の通り
                    // manager.notify(notificationId,builder.build())
                    startForeground(notificationId, builder.build())
}
progress関数では、総ダウンロードファイルサイズとこれまでダウンロードしたファイルのサイズが取得できるので、割合を計算します。その結果をBuildしていないNotificartion.Builderクラスに「setProgress(100, total.toInt(), false)」で設定し、Buildし直します。
通知を内容を更新するために、「startForeground(notificationId, builder.build())」を呼び出します。
通知の更新は、同じ通知のIDを指定して上書きすることにより実現します。その為、Notification.Builderクラスを生成してもすぐにはBuildしません。
.response { request, response, result ->
    stopForeground(true)

    val (res, err) = result

    val completeNotification = NotificationCompat.Builder(this)
            .apply {

                mContentTitle = "ダウンロード完了"
                mContentText = "tomcatのダウンロードが完了しました。"
                setSmallIcon(R.drawable.bell)
            }.build()
    manager.notify(notificationId, completeNotification)
}
ダウンロードが完了するとresponseメソッドが呼び出されます。
進捗状況を表す通知は、「stopForeground(true)」で閉じています。
最後に、ダウンロード完了を通知しています。
サービス以外の実装
今回のポイントはサービスクラスに全て集約しているため、それ以外の実装は簡単です。
サービス以外の実装は以下のとおりです。
build.gradle
dependencies {
    compile 'com.github.kittinunf.fuel:fuel:1.12.1'
    compile 'com.github.kittinunf.fuel:fuel-android:1.12.1' //for Android
}
Fuelを使用するため、dependenciesに追記しています。
AndroidManifest.xml
<uses-permission android:name="android.permission.INTERNET"/>
外部ネットワークに接続するので、uses-permissionを追記しておきます。
activity_main.xml
<?xml version="1.0" encoding="utf-8"?>
<android.support.constraint.ConstraintLayout xmlns:android="http://schemas.android.com/apk/res/android"
    xmlns:app="http://schemas.android.com/apk/res-auto"
    xmlns:tools="http://schemas.android.com/tools"
    android:layout_width="match_parent"
    android:layout_height="match_parent"
    tools:context="jp.co.casareal.progressnotification.MainActivity">

    <Button
        android:id="@+id/btnDownload"
        android:layout_width="wrap_content"
        android:layout_height="wrap_content"
        android:text="Download!"
        app:layout_constraintBottom_toBottomOf="parent"
        app:layout_constraintLeft_toLeftOf="parent"
        app:layout_constraintRight_toRightOf="parent"
        app:layout_constraintTop_toTopOf="parent" />

</android.support.constraint.ConstraintLayout>
ボタンを表示しているだけの画面です。
MainActivity.kt
package jp.co.casareal.progressnotification

import android.content.Intent
import android.os.Bundle
import android.support.v7.app.AppCompatActivity
import jp.co.casareal.progressnotification.service.DownloadService
import kotlinx.android.synthetic.main.activity_main.*

class MainActivity : AppCompatActivity() {

    override fun onCreate(savedInstanceState: Bundle?) {
        super.onCreate(savedInstanceState)
        setContentView(R.layout.activity_main)
    }

    override fun onResume() {
        super.onResume()
        btnDownload.setOnClickListener {
            val serviceIntent = Intent(this, DownloadService::class.java)
            startService(serviceIntent)
        }
    }
}
まとめ
まともに進捗状況をしようとするとかなり大変ですが、Fuelを使用すると簡単に実装できます。
また、FuelはKotlinに対応しているので、安心して使えます。
参考
今回使用したアイコンはIcons8を使用しています。
Icons8のライセンスは、 CC BY-ND 3.0です。
https://icons8.com/
Android Developersの通知
https://developer.android.com/training/notify-user/build-notification.html#progressbar