はじめに
この記事で説明した通り、様々な機能を活用していきましょう。
今回は、実行する際に条件を設定する方法から学習していきます。
動作環境
この記事の動作環境は以下のとおりです。
- Android Studio:3.3
- Kotln:1.3.11
- Open JDK:1.8
- compileSdkVersion:28
- targetSdkVersion:28
- minSdkVersion:19
目標
Workerを実行する条件の種類と設定方法を理解する!!
イメージ
条件を設定すると目標に掲げてみましたが、まだイメージが沸かないので絵を描いてみました。
このように、端末の状態を条件にして、特定の条件に一致した時に実行する事ができます。
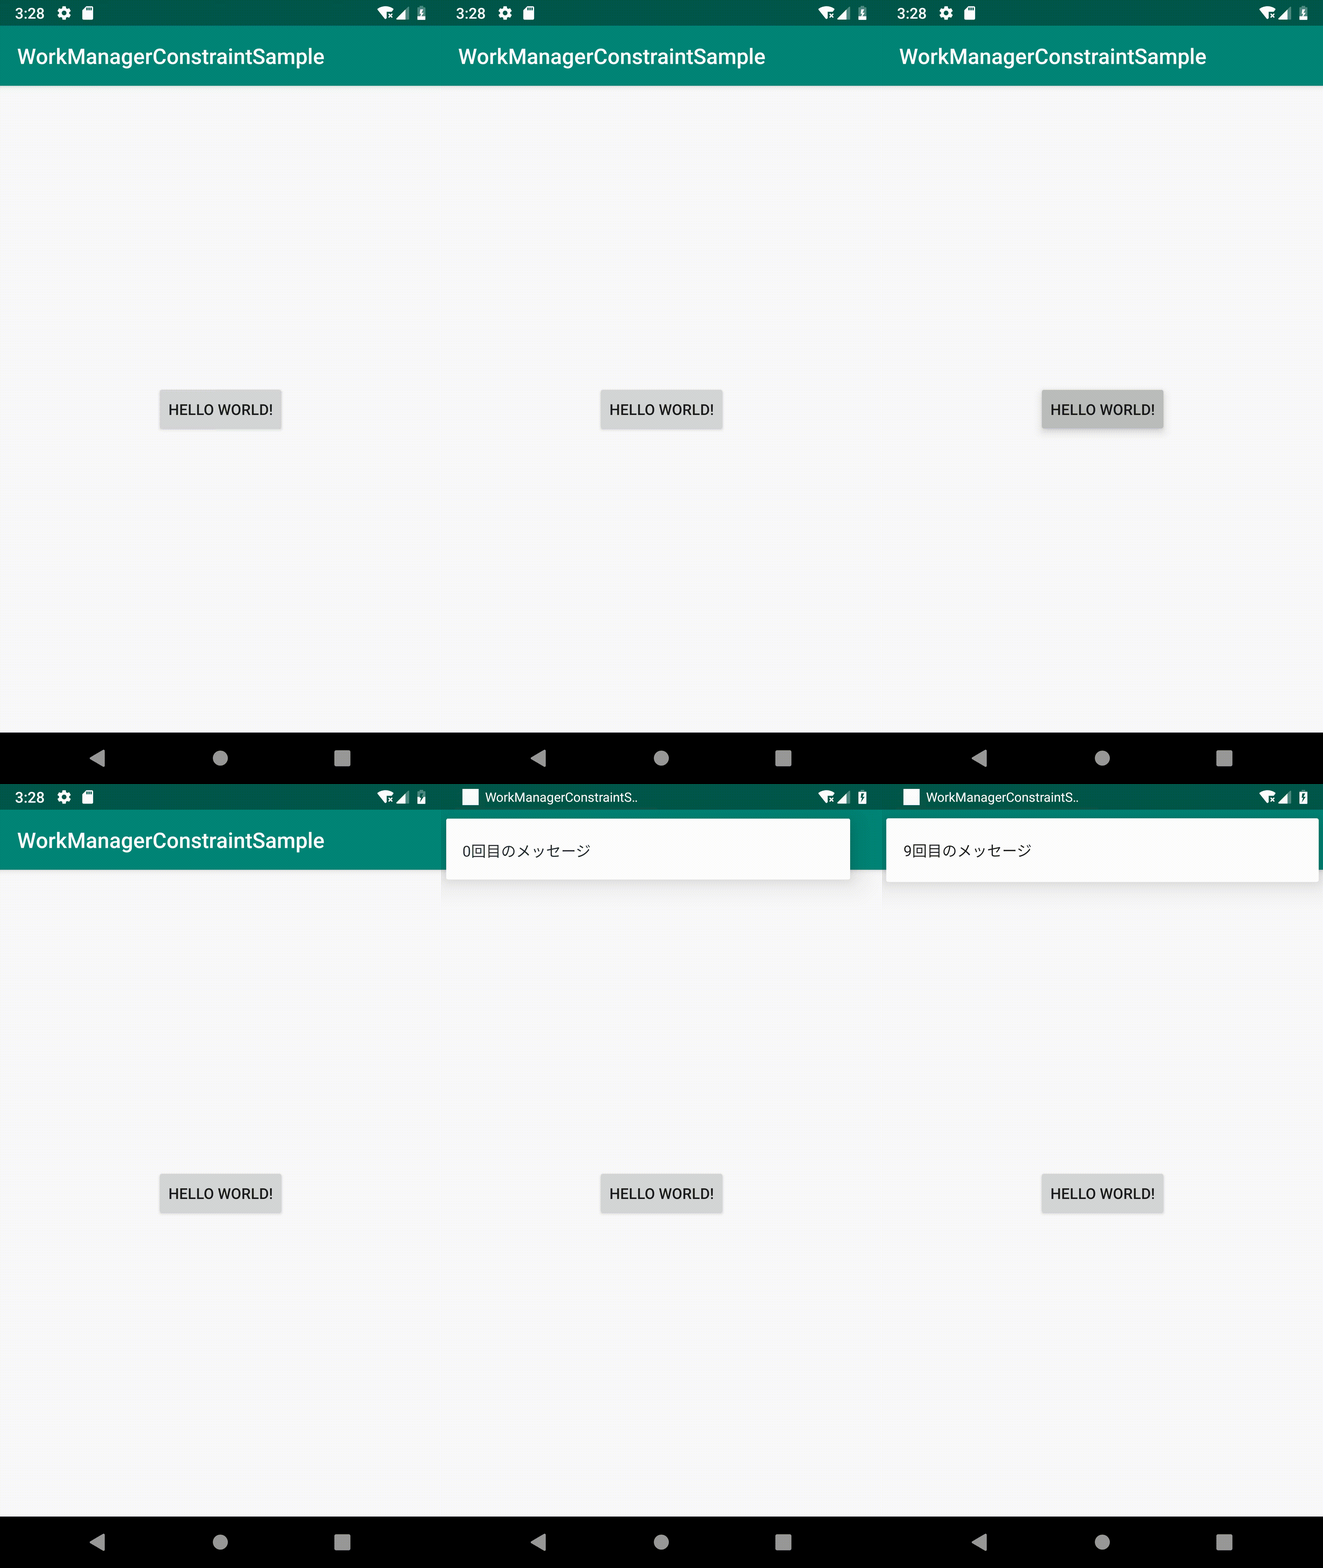
実行イメージ
ボタンを押下することにより、WorkManagerにWorkが登録されます。
今回の条件は、 充電されている時に実行する としています。
少し分かりづらいかもしれませんが、右上の電池が充電になり、電池の残量が増えると充電していることを認識して処理が実行されます。
処理内容は今までと同じように、ノーティフィケーションを表示するだけです。

条件
それでは、どの様な条件が設定できるのか確認していきます。
設定出来る条件を知っておきましょう。まずは概要だけをおさえておきます。
実装の説明で、細かい設定項目について説明します。
| 条件 | 設定可能な内容 | メソッド名 | 引数 | 説明 |
|---|---|---|---|---|
| ネットワークの状態 | ネットワークの接続要否や従量制かどうか | setRequiredNetworkType | NetworkType networkType | |
| 充電の状態 | 充電が少ない状態でも実行するか | setRequiresBatteryNotLow | boolean requiresBatteryNotLow | |
| 充電の状態 | 充電が少ない状態でも実行するか | setRequiresCharging | boolean requiresCharging | |
| 端末の状態 | アイドルの状態で実行するか | setRequiresDeviceIdle | boolean requiresDeviceIdle | Android OS M以降でないとダメ(API Level 23以降) |
| ストレージの状態 | 空き容量が少ない状態で実行しないかどうか | setRequiresStorageNotLow | boolean requiresStorageNotLow | |
| 特定コンテンツの状態 | コンテンツが更新されたかどうか | addContentUriTrigger | Uri uri, boolean triggerForDescendants | コンテンツは「content://」で始まる。Android OS M以降でないとダメ(API Level 23以降) |
| 特定コンテンツの状態 | コンテンツの 初回更新 が検出されてからWorkRequestがスケジューリングされるまでの最大遅延時間 | setTriggerContentMaxDelay | Duration duration | Android OS M以降でないとダメ(API Level 23以降) |
| 特定コンテンツの状態 | 上とは引数が違うだけ。コンテンツの 初回更新 が検出されてからWorkRequestがスケジューリングされるまでの最大遅延時間 | setTriggerContentMaxDelay | long duration, TimeUnit timeUnit | Android OS M以降でないとダメ(API Level 23以降) |
| 特定コンテンツの状態 | 上とは初回かどうかが大きな違いですが、コンテンツの 更新 が検出されてからWorkRequestがスケジューリングされるまでの最大遅延時間 | setTriggerContentUpdateDelay | long duration, TimeUnit timeUnit | Android OS M以降でないとダメ(API Level 23以降) |
| 特定コンテンツの状態 | 上とは引数が違うだけコンテンツの 更新 が検出されてからWorkRequestがスケジューリングされるまでの最大遅延時間 | setTriggerContentUpdateDelay | Duration duration | Android OS M以降でないとダメ(API Level 23以降) |
こう見てみると様々な条件があります。
実際に条件を設定するために必要なクラスを確認してみましょう。
Constraints.BuilderクラスとOneTimeWorkRequestBuilderクラス
条件を設定するにはConstraints.Builderで条件を作成します。
実際に設定している例このようになります。
val constraints = Constraints.Builder().apply {
    // 充電中
    setRequiresCharging(true)

    // アイドル状態
    if (Build.VERSION.SDK_INT >= Build.VERSION_CODES.M) {
        setRequiresDeviceIdle(true)
    }

}.build()
今回は充電中であることと、アイドル状態であることを条件にしてみました。
2つを見比べると少し違いがあります。
アイドル状態の設定で、M以降の条件分がついています。OSのバージョンによって設定できない項目があるようなので注意が必要ですね。
続いて、条件をWorkRequestに付与していきます。
前回の記事では、「OneTimeWorkRequest#from」でOneTimeWorkRequestクラスのオブジェクトを生成していました。じつは、OneTimeWorkRequestクラスのオブジェクト作成用にBuilderクラスも用意されているので、今回はそれを使用します。
実装例を確認してみましょう。
val workRequest = OneTimeWorkRequestBuilder<MyWorker>().apply {
    setConstraints(constraints)
}.build()
ソースコードからも確認ができますが、setConstraintsメソッドを利用することに寄って条件を付与できます。
動作イメージ
少しわかり辛いですが、バッテリー駆動から充電に切り替えると処理が開始されるような作りにしてみました。
ボタンを押すことによって、WorkRequestがキューに追加される仕様になっています。その後、充電に切り替えてみると実行されます。

コード
以降は、サンプルで作成するために使用したコードを掲載します。
本サンプルで重要となる下記のファイルのみを掲載しています。
- build.gradle
- MainActivity.kt
- MyWork.kt
<?xml version="1.0" encoding="utf-8"?>
<manifest xmlns:android="http://schemas.android.com/apk/res/android"
          package="jp.co.casareal.workmanagerconstraintsample">
    <application
            android:allowBackup="true"
            android:icon="@mipmap/ic_launcher"
            android:label="@string/app_name"
            android:roundIcon="@mipmap/ic_launcher_round"
            android:supportsRtl="true"
            android:theme="@style/AppTheme">
        <activity android:name=".MainActivity">
            <intent-filter>
                <action android:name="android.intent.action.MAIN"/>

                <category android:name="android.intent.category.LAUNCHER"/>
            </intent-filter>
        </activity>
    </application>

</manifest>
package jp.co.casareal.workmanagerconstraintsample

import android.Manifest
import android.net.Uri
import android.os.Build
import android.support.v7.app.AppCompatActivity
import android.os.Bundle
import android.support.v4.app.ActivityCompat
import androidx.work.Constraints
import androidx.work.OneTimeWorkRequest
import androidx.work.OneTimeWorkRequestBuilder
import androidx.work.WorkManager
import kotlinx.android.synthetic.main.activity_main.*
import java.time.Duration

class MainActivity : AppCompatActivity() {

    private val manager = WorkManager.getInstance()

    override fun onCreate(savedInstanceState: Bundle?) {
        super.onCreate(savedInstanceState)
        setContentView(R.layout.activity_main)


        buttonStart.setOnClickListener {

            val constraints = Constraints.Builder().apply {
                // 充電中
                setRequiresCharging(true)

                // アイドル状態
                if (Build.VERSION.SDK_INT >= Build.VERSION_CODES.M) {
                    setRequiresDeviceIdle(true)
                }

            }.build()

            val workRequest = OneTimeWorkRequestBuilder<MyWorker>().apply {
                setConstraints(constraints)
            }.build()

            manager.enqueue(workRequest)
        }

    }

}
package jp.co.casareal.workmanagerconstraintsample

import android.app.NotificationChannel
import android.app.NotificationManager
import android.content.Context
import android.os.Build
import android.support.v4.app.NotificationCompat
import androidx.work.Worker
import androidx.work.WorkerParameters

class MyWorker(cxt: Context, params: WorkerParameters) : Worker(cxt, params) {
    val notificationManager =
        applicationContext.getSystemService(Context.NOTIFICATION_SERVICE) as NotificationManager
    // カテゴリー名(通知設定画面に表示される情報)
    val name = "通知のタイトル的情報を設定"
    // システムに登録するChannelのID
    val id = "casareal_chanel"
    // 通知の詳細情報(通知設定画面に表示される情報)
    val notifyDescription = "この通知の詳細情報を設定します"


    init {
        // Channelの取得と生成
        if (Build.VERSION.SDK_INT >= Build.VERSION_CODES.O) {
            notificationManager.getNotificationChannel(id) == null
            val mChannel = NotificationChannel(id, name, NotificationManager.IMPORTANCE_HIGH)
            mChannel.apply {
                description = notifyDescription
            }
            notificationManager.createNotificationChannel(mChannel)
        }
    }

    override fun doWork(): Result {

        repeat(10) {

            val notification = NotificationCompat.Builder(applicationContext, id).apply {

                setContentText("${it}回目のメッセージ")
                setSmallIcon(R.drawable.ic_launcher_background)
            }

            notificationManager.notify(1, notification.build())

            Thread.sleep(1000)
        }
        return Result.success()
    }
}
まとめ
この記事ではWorkを起動する条件について説明してきました。
条件を組み合わせることによって安全にWorkが実行できます。
WorkManagerはそれ以外にもまだまだ機能があります。
次回は繰り返すときの設定について説明していきます。
