はじめに
この記事で説明した通り、様々な機能を活用していきましょう。
今回は、繰り返し処理を設定する方法を学習していきます。
動作環境
この記事の動作環境は以下のとおりです。
- Android Studio:3.3
- Kotln:1.3.11
- Open JDK:1.8
- compileSdkVersion:28
- targetSdkVersion:28
- minSdkVersion:19
目標
繰り返して処理を実行出来るようになる!
概要
繰り返し処理を実行したい場合は、PeriodicWorkRequestクラスを利用します。
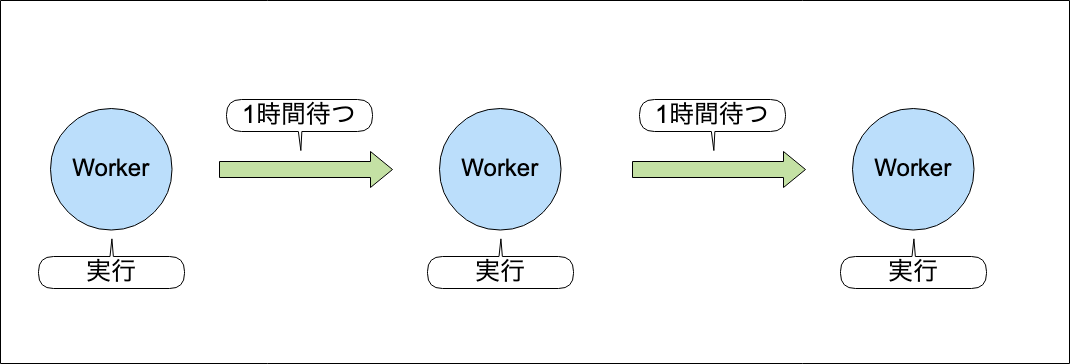
連続して実行は出来ませんが、ある一定時間(インターバル)を置いて実行が可能です。
イメージとしてはこんな感じでしょうか。
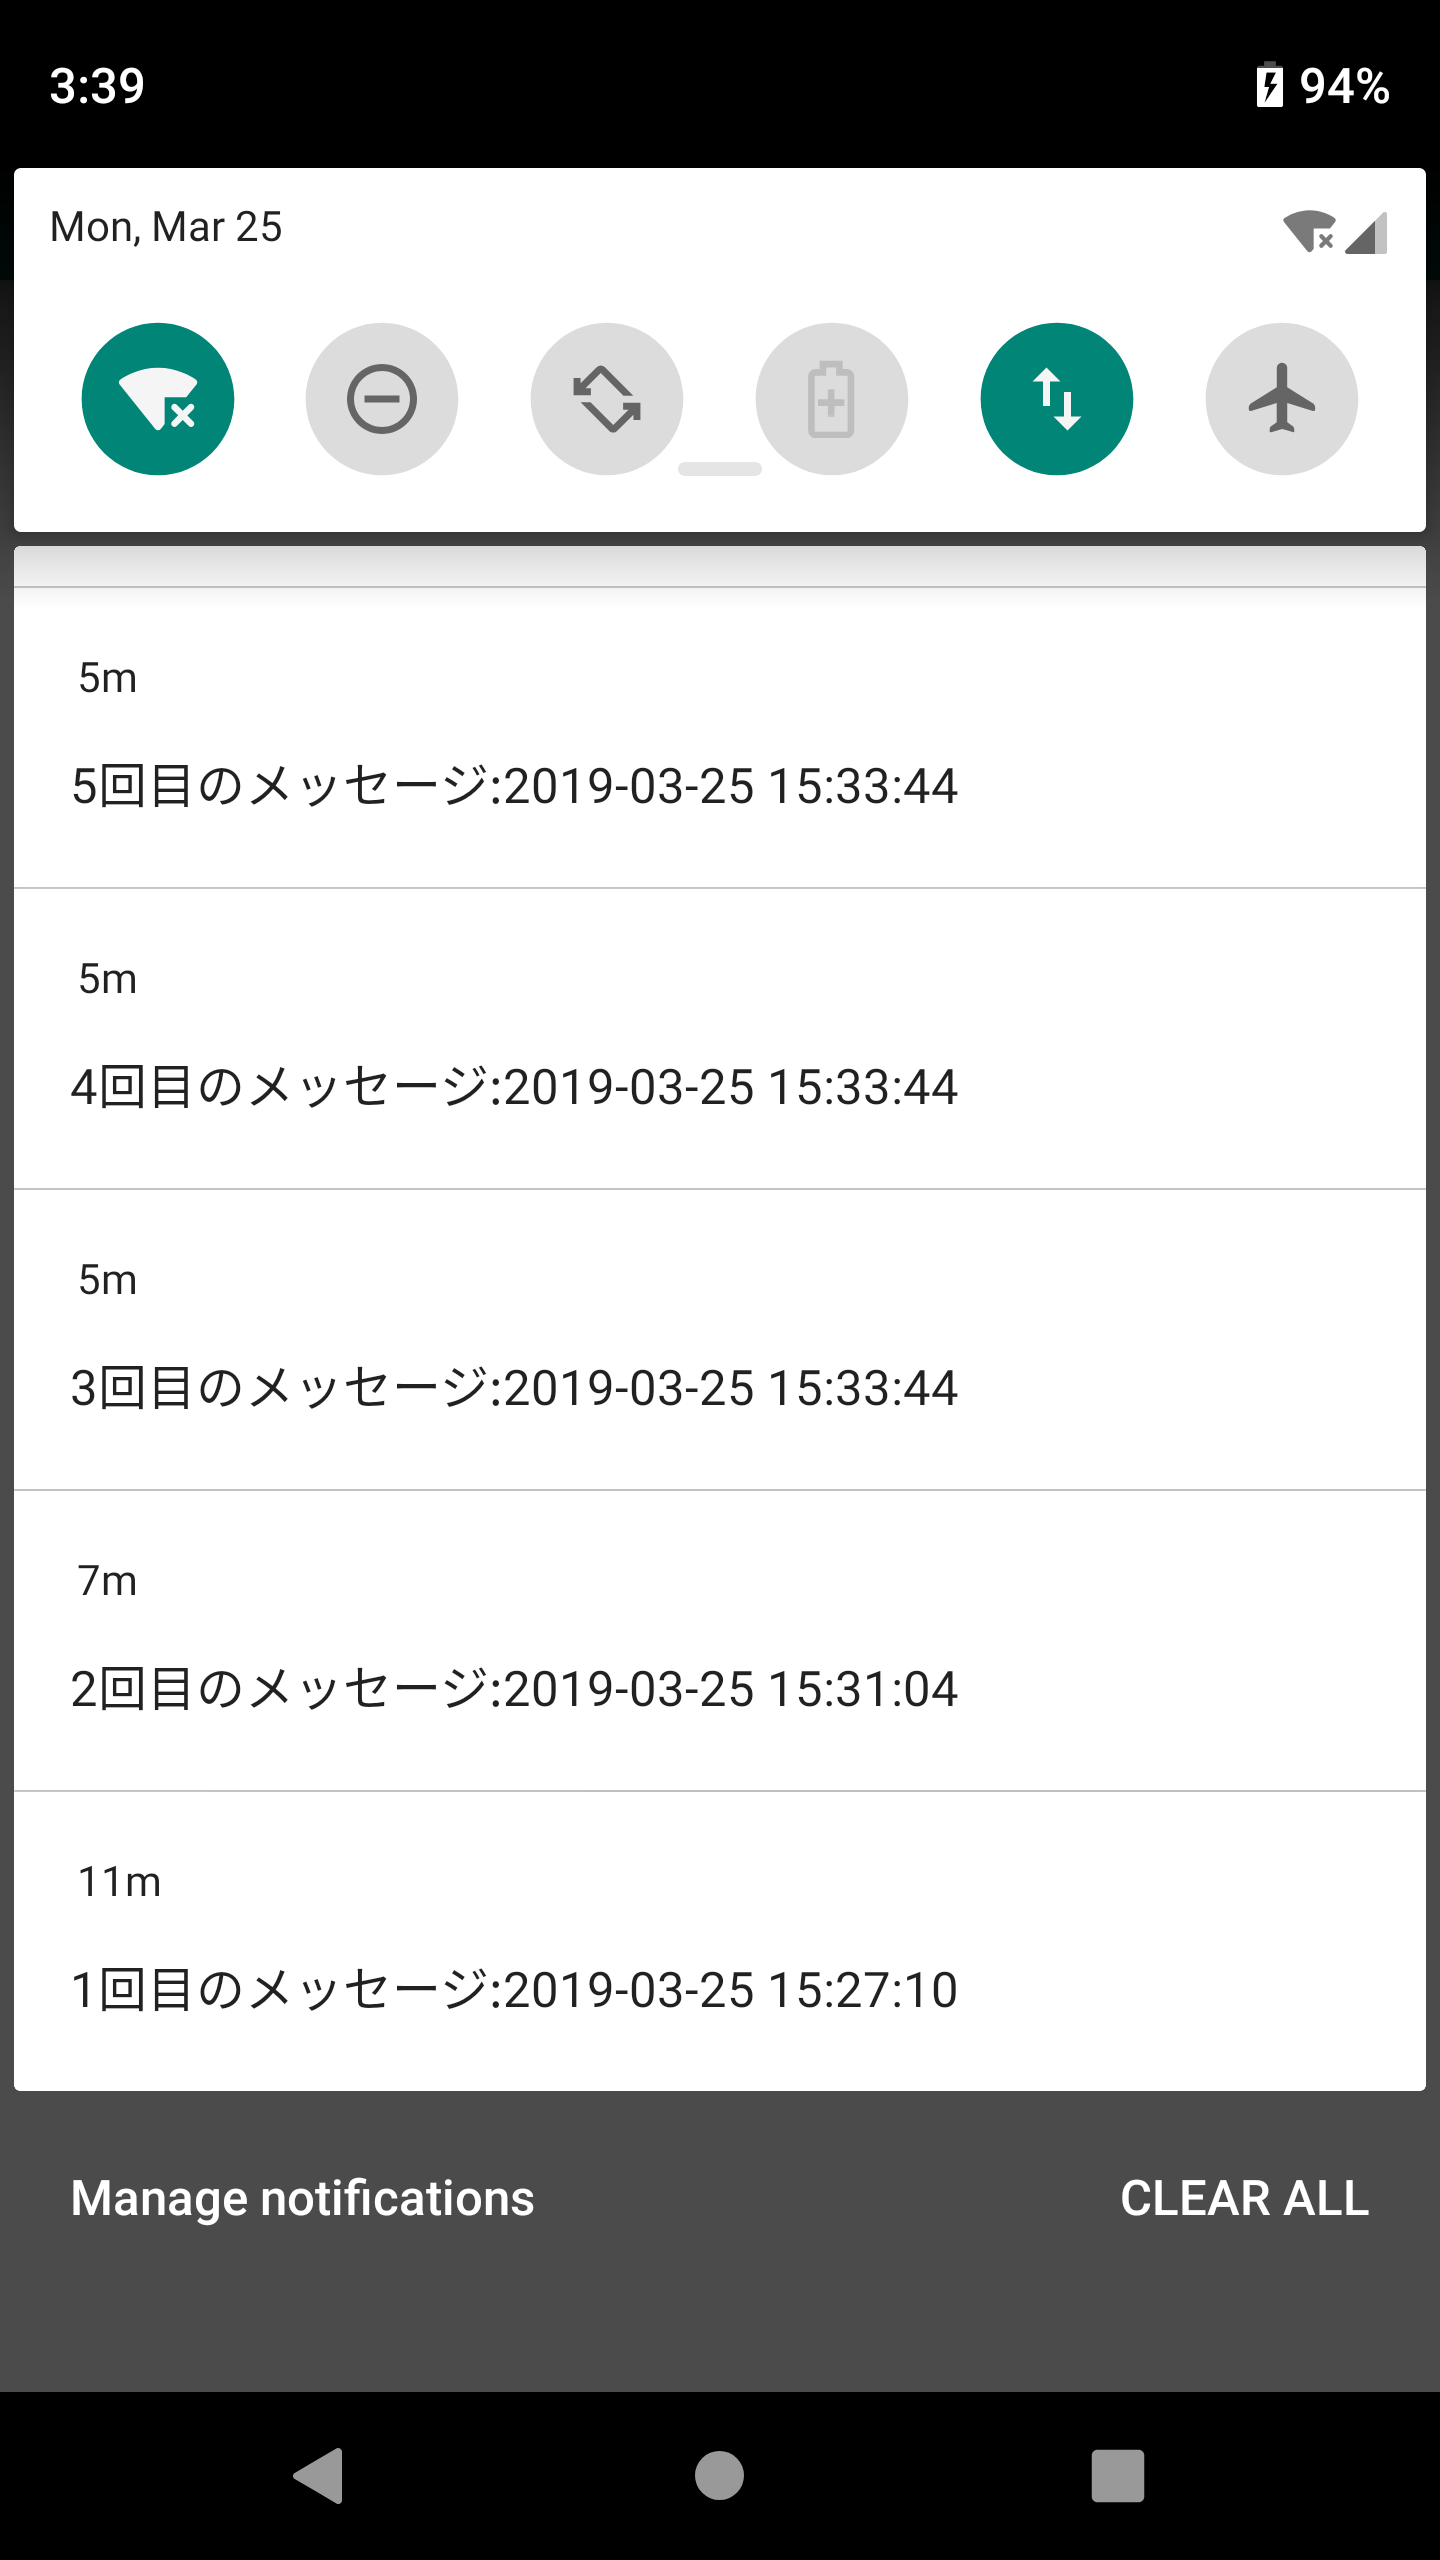
実際に一定のインターバルでノーティフィケーションを表示する処理をすると下図のような実行結果になります。

実装方法
基本的な実装方法はOnetimeWorkRequestと同じですが、最後のRequestオブジェクトを作成する時に、インターバルなどの設定を行います。
PeriodicWorkRequestオブジェクトを生成するには、Builderクラスを利用します。
そのコンストラクタで、インターバルを設定します。
共通の条件
インターバルの最小時間は決まっています。 PeriodicWorkRequest.MIN_PERIODIC_INTERVAL_MILLIS 以上でなければなりません。
定義を確認してみると。。。
public final class PeriodicWorkRequest extends WorkRequest {

    /**
     * The minimum interval duration for {@link PeriodicWorkRequest} (in milliseconds).
     */
    public static final long MIN_PERIODIC_INTERVAL_MILLIS = 15 * 60 * 1000L; // 15 minutes.
 〜〜〜省略〜〜〜〜
}
となっていました。
なので、最低でも 15分 以上は開ける必要があります。
PeriodicWorkRequest.Builder(Class extends ListenableWorker> workerClass, long repeatInterval, TimeUnit repeatIntervalTimeUnit)
コンストラクタの引数
| 引数 | 値と説明 |
|---|---|
| 第1引数 | Workerクラスのクラス情報 |
| 第2引数 | インターバルの時間 |
| 第3引数 | 時間の単位 |
説明
APIの説明を読むと以下のように記述されています。
引数で指定したインターバル期間に実行するPeriodicWorkRequeクラスのオブジェクトを生成します。
PeriodicWorkRequestはインターバルの期間中に1度だけ実行されることが保証されています。
バッテリーや端末の状況によっては、その影響を受ける可能性はあります。実行する処理は15以上間隔を開ける必要があります。それ以外の条件が満たされていれば、その期間中に実行可能状態になります。また、実行する処理の時間はフレックス期間を設定し、制限することも可能です。
ということは、インターバル期間中に実行が可能なれば実行できるみたいです。
きっちり15分間とかではなく、その15分間の中で実行されるイメージみたいです。
分かりづらいですが、絵にすると下図のような感じになります。
また、フレックスについては、後述します。
実装例
val periodicWork = PeriodicWorkRequest.Builder(
    MyWorker::class.java,
    15, TimeUnit.MINUTES
).build()
public PeriodicWorkRequest.Builder (Class extends ListenableWorker> workerClass, Duration repeatInterval)
コンストラクタの引数
| 引数 | 値と説明 |
|---|---|
| 第1引数 | Workerクラスのクラス情報 |
| 第2引数 | インターバルの時間と単位 |
説明
基本的には、上記に記載した「PeriodicWorkRequest.Builder(Class extends ListenableWorker> workerClass, long repeatInterval, TimeUnit repeatIntervalTimeUnit)」と同じです。
違いとしては、インターバルの時間をDurationクラスのメソッドを使用して、時間と単位を一度に設定できることです。
実装例
val periodicWork = PeriodicWorkRequest.Builder(
    MyWorker::class.java,
    Duration.ofMinutes(15)
).build()
PeriodicWorkRequest.Builder(Class extends ListenableWorker> workerClass, long repeatInterval, TimeUnit repeatIntervalTimeUnit, long flexInterval, TimeUnit flexIntervalTimeUnit)
コンストラクタの引数
| 引数 | 値と説明 |
|---|---|
| 第1引数 | Workerクラスのクラス情報 |
| 第2引数 | インターバルの時間 |
| 第3引数 | インターバルの時間の単位 |
| 第4引数 | フレックスの時間 |
| 第5引数 | フレックスの時間の単位 |
説明
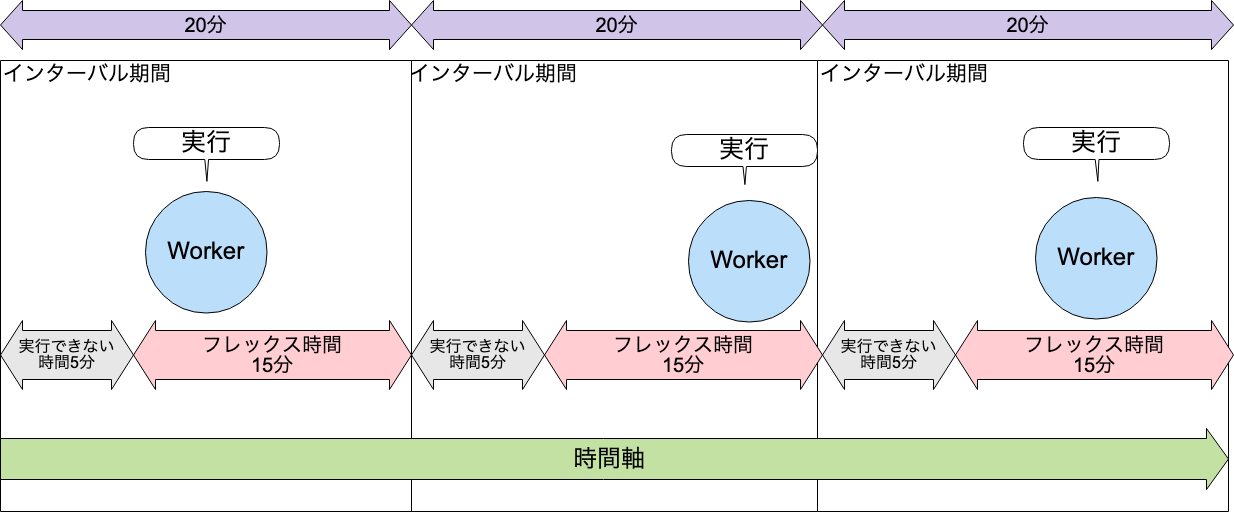
インターバルの時間内にフレックス時間を設け、そのフレックス時間内に処理が実行されます。
フレックス時間は下記で計算された時間からインターバル終了までとします。
フレックス開始時間 = インターバル時間 ー フレックス時間
また、インターバルの時間は最低でもPeriodicWorkRequest.MIN_PERIODIC_INTERVAL_MILLIS(15分以上) 以上、フレックスの時間は、最低でもPeriodicWorkRequest.MIN_PERIODIC_FLEX_MILLIS(15以上)に設定しなければなりません。
これだけだといまいちピンとこなかったので、図にしてみました。
要するに、インターバルの中にフレックスがありそのフレックスの時間の間で処理を実行します。
フレックス時間の終了はインターバルの終了時間と同じであるため、インターバルの最初の方で処理が実行されることはありません。
実装例
val periodicWork = PeriodicWorkRequest.Builder(
    MyWorker::class.java,
    20, TimeUnit.MINUTES, // インターバルの時間
    15, TimeUnit.MINUTES  // フレックスの時間
).build()
PeriodicWorkRequest.Builder(Class extends ListenableWorker> workerClass, Duration repeatInterval, Duration flexInterval)
コンストラクタの引数
| 引数 | 値と説明 |
|---|---|
| 第1引数 | Workerクラスのクラス情報 |
| 第2引数 | インターバルの時間と単位 |
| 第3引数 | フレックスの時間と単位 |
説明
基本的な内容は**PeriodicWorkRequest.Builder(Class extends ListenableWorker> workerClass, long repeatInterval, TimeUnit repeatIntervalTimeUnit, long flexInterval, TimeUnit flexIntervalTimeUnit)**と同じです。
違いとしては、Durationクラスを利用して、時間と単位を一気に設定します。
実装例
val periodicWork = PeriodicWorkRequest.Builder(
    MyWorker::class.java,
    Duration.ofMinutes(20), // インターバルの時間
    Duration.ofMinutes(15) // フレックスの時間
).build()
動作確認をした際のコード
最後に、動作確認した際のコードをすべて掲載します。
AndroidManifest.xmlはプロジェクトのテンプレートから変更していないため、掲載はしません。
apply plugin: 'com.android.application'

apply plugin: 'kotlin-android'

apply plugin: 'kotlin-android-extensions'

android {
    compileSdkVersion 28
    defaultConfig {
        applicationId "jp.co.casareal.workmanagerperiodicwork"
        minSdkVersion 19
        targetSdkVersion 28
        versionCode 1
        versionName "1.0"
        testInstrumentationRunner "android.support.test.runner.AndroidJUnitRunner"
    }
    buildTypes {
        release {
            minifyEnabled false
            proguardFiles getDefaultProguardFile('proguard-android-optimize.txt'), 'proguard-rules.pro'
        }
    }
}

dependencies {
    implementation fileTree(dir: 'libs', include: ['*.jar'])
    implementation "org.jetbrains.kotlin:kotlin-stdlib-jdk7:$kotlin_version"
    implementation 'com.android.support:appcompat-v7:28.0.0'
    implementation 'com.android.support.constraint:constraint-layout:1.1.3'
    testImplementation 'junit:junit:4.12'
    androidTestImplementation 'com.android.support.test:runner:1.0.2'
    androidTestImplementation 'com.android.support.test.espresso:espresso-core:3.0.2'
    def work_version = "1.0.0"

    implementation "android.arch.work:work-runtime-ktx:$work_version"

}
package jp.co.casareal.workmanagerperiodicwork

import android.app.NotificationChannel
import android.app.NotificationManager
import android.content.Context
import android.os.Build
import android.support.v4.app.NotificationCompat
import androidx.work.Worker
import androidx.work.WorkerParameters
import java.text.SimpleDateFormat

class MyWorker(cxt: Context, params: WorkerParameters) : Worker(cxt, params) {
    val notificationManager =
        applicationContext.getSystemService(Context.NOTIFICATION_SERVICE) as NotificationManager
    // カテゴリー名(通知設定画面に表示される情報)
    val name = "通知のタイトル的情報を設定"
    // システムに登録するChannelのID
    val id = "casareal_chanel"
    // 通知の詳細情報(通知設定画面に表示される情報)
    val notifyDescription = "この通知の詳細情報を設定します"

    private val simpleDateFormat = SimpleDateFormat("yyyy-MM-dd HH:mm:ss")

    companion object {
        var nid = 1;
    }


    init {
        // Channelの取得と生成
        if (Build.VERSION.SDK_INT >= Build.VERSION_CODES.O) {
            notificationManager.getNotificationChannel(id) == null
            val mChannel = NotificationChannel(id, name, NotificationManager.IMPORTANCE_HIGH)
            mChannel.apply {
                description = notifyDescription
            }
            notificationManager.createNotificationChannel(mChannel)
        }
    }

    override fun doWork(): Result {


        val notification = NotificationCompat.Builder(applicationContext, id).apply {

            setContentText("${nid}回目のメッセージ:${simpleDateFormat.format(System.currentTimeMillis())}")
            setSmallIcon(R.drawable.ic_launcher_background)
        }

        notificationManager.notify(MyWorker.nid, notification.build())

        MyWorker.nid++

        return Result.success()
    }
}
package jp.co.casareal.workmanagerperiodicwork

import android.os.Build
import android.os.Bundle
import android.support.v7.app.AppCompatActivity
import androidx.work.PeriodicWorkRequest
import androidx.work.WorkManager
import kotlinx.android.synthetic.main.activity_main.*
import java.time.Duration

class MainActivity : AppCompatActivity() {


    private val manager = WorkManager.getInstance()

    override fun onCreate(savedInstanceState: Bundle?) {
        super.onCreate(savedInstanceState)
        setContentView(R.layout.activity_main)


        buttonStart.setOnClickListener {

            if (Build.VERSION.SDK_INT >= Build.VERSION_CODES.O) {
                val periodicWork = PeriodicWorkRequest.Builder(
                    MyWorker::class.java,
                    Duration.ofMinutes(15)
                ).build()

                val operation = manager.enqueue(periodicWork)

            }


        }
    }
}
<?xml version="1.0" encoding="utf-8"?>
<android.support.constraint.ConstraintLayout
        xmlns:android="http://schemas.android.com/apk/res/android"
        xmlns:tools="http://schemas.android.com/tools"
        xmlns:app="http://schemas.android.com/apk/res-auto"
        android:layout_width="match_parent"
        android:layout_height="match_parent"
        tools:context=".MainActivity">

    <Button
            android:id="@+id/buttonStart"
            android:layout_width="wrap_content"
            android:layout_height="wrap_content"
            android:text="Hello World!"
            app:layout_constraintBottom_toBottomOf="parent"
            app:layout_constraintLeft_toLeftOf="parent"
            app:layout_constraintRight_toRightOf="parent"
            app:layout_constraintTop_toTopOf="parent"/>

</android.support.constraint.ConstraintLayout>
まとめ
繰り返し実行する場合は、インターバルの時間を設定することが大事なようです。
そこで、インターバルの時間を開始してから実行を遅らせるためにフレックスの時間を利用することによって適切なタイミングでの実行が可能になっていることがわかりました。


