検証環境
この記事の内容は、以下の環境で検証しました。
- Java 8
- Android studio 2.3
- CompileSdkVersion:25
- MinSdkVersion:19
- TargetSdkVersion:25
- BuildToolsVersion:25.0.2
Fragmentとは
- FragmentはActivityのUIの挙動や部位を表すもの。
- Fragmentは必ずActivityに埋め込まれている必要がある。よって、FragmentはActivityで再利用可能な『サブアクティビティ』のようなものである。
- Fragmentは独自のライフサイクルを持っているが、ホストとなるActivityの影響を直接受ける。
- ActivityはFragmentの追加や削除が行える。
Fragmentの作成方法
Activityと同様にFragmentのサブクラスを作成する。
Fragmentクラスは、android.appパッケージとandroid.support.v4.appパッケージに存在するが、
support v4のFragmentクラスを使用すべき。
android.appパッケージのFragmentクラスの不具合を修正したFragmentクラスがsupport v4に格納されている。
ライフサイクルメソッド
Activity同様、ライフサイクルが存在する。ライフサイクルメソッドはActivityのライフサイクルに深く関わりがある。
下記は、ActivityのonCreateでFragmentを追加した時の順序になる。もし、Activityのレイアウトファイルにfragmentタグを記述し、name属性でfragmentクラスの完全クラス名を記述した場合は、下記の順序にはならない。
フォアグラウンドになる際のメソッド
| メソッド | 説明 |
|---|---|
| onAttach(Activity) ※API Level 23以降はonAttach(Context) |
アクティビティと結びついたときに呼び出されるメソッド |
| onCreate(Bundle) | フラグメントを生成するときに呼び出されるメソッド |
| onCreateView(LayoutInflater, ViewGroup, Bundle) | フラグメントで表示するViewを生成するときに呼び出されるメソッド |
| onActivityCreated(Bundle) | ActivityのonCreateメソッドの処理が完了したときに呼び出されるメソッド |
| onViewStateRestored(Bundle) | 状態を保存したフラグメントのリストアが完了したときに呼び出されるメソッド |
| onStart() | ActivityのonStartメソッド実行後に呼び出され、ユーザに対し画面表示を処理するメソッド |
| onResume() | ActivityのonResumeメソッド実行後に呼び出され、処理完了後にユーザからのイベントを待ち受ける。 |
バックグラウンドになる際のメソッド
| メソッド | 説明 |
|---|---|
| onPause() | ActivityのonPauseメソッド実行の直前に呼び出される。 |
| onStop() | ActivityのonStopメソッド実行の直前に呼び出される。 |
| onDestroyView() | ActivityのonDestroyメソッドの前に呼び出される。Fragmentに紐付いているViewをクリーンする際に呼び出されるメソッド |
| onDestroy() | ActivityのonDestroyメソッドの前に呼び出される。Fragmentの状態をクリーンする際に呼び出されるメソッド |
| onDetach() | ActivityのonDestroyメソッドの前に呼び出される。Activityとの結びつきを解除するときによびだされるメソッド |
Fragmentを使用したのアプリの例
アプリの仕様
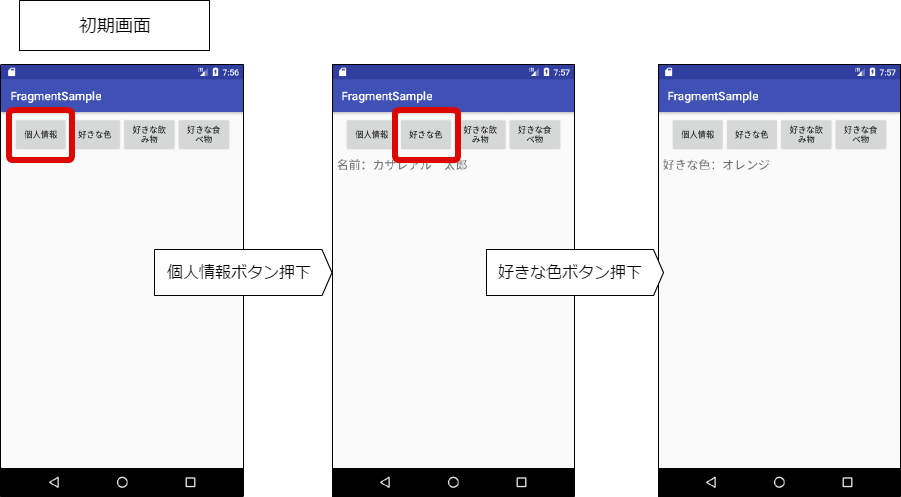
ボタンを用意し、ボタンが押させれるとボタンに応じたFragmentが生成されて差し替えられるアプリ
完成イメージ
ボタンが押されたときに表示するFragment
個人情報ボタン
レイアウトファイル
<LinearLayout xmlns:android="http://schemas.android.com/apk/res/android"
    xmlns:tools="http://schemas.android.com/tools"
    android:layout_width="match_parent"
    android:layout_height="match_parent"
    android:orientation="vertical"
    tools:context="jp.co.casareal.sample.fragmentsample.fragment.UserInfoFragment">

    <!-- TODO: Update blank fragment layout -->
    <TextView
        android:textSize="20sp"
        android:layout_width="match_parent"
        android:layout_height="match_parent"
        android:text="名前:カサレアル 太郎" />
    <TextView
        android:textSize="20sp"
        android:layout_width="match_parent"
        android:layout_height="match_parent"
        android:text="年齢:33歳" />

</LinearLayout>
Javaのソースコード
package jp.co.casareal.sample.fragmentsample.fragment;


import android.os.Bundle;
import android.support.v4.app.Fragment;
import android.view.LayoutInflater;
import android.view.View;
import android.view.ViewGroup;

import jp.co.casareal.sample.fragmentsample.R;

public class UserInfoFragment extends Fragment {


    @Override
    public View onCreateView(LayoutInflater inflater, ViewGroup container,
                             Bundle savedInstanceState) {
        // Inflate the layout for this fragment
        return inflater.inflate(R.layout.fragment_user_info, container, false);
    }

}
好きな色ボタン
レイアウトファイル
<LinearLayout xmlns:android="http://schemas.android.com/apk/res/android"
    xmlns:tools="http://schemas.android.com/tools"
    android:layout_width="match_parent"
    android:layout_height="match_parent"
    android:orientation="vertical"
    tools:context="jp.co.casareal.sample.fragmentsample.fragment.ColorFragment">

    <!-- TODO: Update blank fragment layout -->
    <TextView
        android:textSize="20sp"
        android:layout_width="match_parent"
        android:layout_height="match_parent"
        android:text="好きな色:オレンジ" />

</LinearLayout>
Javaのソースコード
package jp.co.casareal.sample.fragmentsample.fragment;


import android.os.Bundle;
import android.support.v4.app.Fragment;
import android.view.LayoutInflater;
import android.view.View;
import android.view.ViewGroup;

import jp.co.casareal.sample.fragmentsample.R;

public class ColorFragment extends Fragment {

    @Override
    public View onCreateView(LayoutInflater inflater, ViewGroup container,
                             Bundle savedInstanceState) {
        // Inflate the layout for this fragment
        return inflater.inflate(R.layout.fragment_color, container, false);
    }
}
4つのボタンを表示するFragment
4つのボタンを表示する部分もFragmetで作成している。
ここでのポイントとして、ButtonタグのonClick属性にしていした文字列のメソッドを
定義すれば紐付く仕様だが、onClick属性のメソッドを実装するクラスはFragmentを保持するActivityでなければならない。
もし、Fragmentで実装する場合は、Fragmentないで、findViewByIdでViewを取得し、setOnClickListenerで設定する必要がある。
レイアウトファイル
<?xml version="1.0" encoding="utf-8"?>
<LinearLayout xmlns:android="http://schemas.android.com/apk/res/android"
    android:orientation="horizontal" android:layout_width="match_parent"
    android:layout_height="match_parent">

        <Button
            android:onClick="onClickUserInfo"
            android:layout_width="0dp"
            android:layout_height="match_parent"
            android:layout_weight="0.25"
            android:id="@+id/userInfoButton"
            android:text="@string/btnUserInfo"
            />
        <Button
            android:onClick="onClickColor"
            android:layout_width="0dp"
            android:layout_height="match_parent"
            android:layout_weight="0.25"
            android:id="@+id/colorButton"
            android:text="@string/btnColor"
            />


        <Button
            android:onClick="onClickDrink"
            android:layout_width="0dp"
            android:layout_height="match_parent"
            android:layout_weight="0.25"
            android:id="@+id/drinkButton"
            android:text="@string/btnDrink"
            />
        <Button
            android:onClick="onClickFood"
            android:layout_width="0dp"
            android:layout_height="match_parent"
            android:layout_weight="0.25"
            android:id="@+id/foodButton"
            android:text="@string/btnFood"
            />

</LinearLayout>
Javaのソースコード
package jp.co.casareal.sample.fragmentsample.fragment;

import android.app.Activity;
import android.content.Context;
import android.net.Uri;
import android.os.Bundle;
import android.support.v4.app.Fragment;
import android.support.v4.app.FragmentManager;
import android.util.Log;
import android.view.LayoutInflater;
import android.view.View;
import android.view.ViewGroup;
import android.widget.Button;

import jp.co.casareal.sample.fragmentsample.R;


public class MenuFragment extends Fragment {

    @Override
    public View onCreateView(LayoutInflater inflater, ViewGroup container,
                             Bundle savedInstanceState) {
       return inflater.inflate(R.layout.fragment_menu, container, false);
    }


}
画面全体を構成するActivity
Fragmentタグ
4つのボタンを表示するFragmentは、タグで記述し、name属性でJavaとの紐付けを行っている。
ボタンが押されたときに表示するFramentは動的に入れ替えられるようにするため、id属性でidを指定している。
Fragmentの入れ替え
FragmentManagerクラスのbeginTransaction()メソッドを呼び出し、FragmentTransactionを取得する。
replace()メソッドでFragmentを入れ替えている。Fragmentの設定が完了したら、commit()メソッドを呼び出す。
また、戻るボタンを押下されたときに以前のFragmentを表示したいときは、Fragment設定のタイミングで、
addToBackStack()メソッドでバックスタックに保存しておく必要がある。
レイアウトファイル
<?xml version="1.0" encoding="utf-8"?>
<android.support.constraint.ConstraintLayout xmlns:android="http://schemas.android.com/apk/res/android"
    xmlns:app="http://schemas.android.com/apk/res-auto"
    xmlns:tools="http://schemas.android.com/tools"
    android:layout_width="match_parent"
    android:layout_height="match_parent"
    tools:context="jp.co.casareal.sample.fragmentsample.MainActivity">

    <FrameLayout
        android:id="@+id/menuFrame"
        android:layout_width="368dp"
        android:layout_height="wrap_content"
        android:layout_marginRight="8dp"
        app:layout_constraintRight_toRightOf="parent"
        android:layout_marginLeft="8dp"
        app:layout_constraintLeft_toLeftOf="parent"
        app:layout_constraintTop_toTopOf="parent"
        android:layout_marginTop="8dp"
        android:layout_marginStart="8dp"
        android:layout_marginEnd="8dp">

    <fragment
        android:id="@+id/menuFragment"
        android:name="jp.co.casareal.sample.fragmentsample.fragment.MenuFragment"
        android:layout_width="match_parent"
        android:layout_height="match_parent"
        tools:layout="@layout/fragment_menu"
        />
    </FrameLayout>

    <FrameLayout
        android:id="@+id/contents"
        android:layout_width="368dp"
        android:layout_height="417dp"

        android:layout_marginBottom="8dp"
        android:layout_marginLeft="8dp"
        android:layout_marginRight="8dp"
        android:layout_marginTop="8dp"
        app:layout_constraintBottom_toBottomOf="parent"
        app:layout_constraintHorizontal_bias="0.0"
        app:layout_constraintLeft_toLeftOf="parent"
        app:layout_constraintRight_toRightOf="parent"
        app:layout_constraintTop_toBottomOf="@+id/menuFrame"
        app:layout_constraintVertical_bias="0.0" />
</android.support.constraint.ConstraintLayout>
Javaのソースコード
package jp.co.casareal.sample.fragmentsample;


import android.support.v4.app.Fragment;
import android.support.v4.app.FragmentManager;
import android.support.v4.app.FragmentTransaction;
import android.support.v7.app.AppCompatActivity;
import android.os.Bundle;
import android.util.Log;
import android.view.View;

import jp.co.casareal.sample.fragmentsample.fragment.ColorFragment;
import jp.co.casareal.sample.fragmentsample.fragment.DrinkFragment;
import jp.co.casareal.sample.fragmentsample.fragment.FoodFragment;
import jp.co.casareal.sample.fragmentsample.fragment.UserInfoFragment;

public class MainActivity extends AppCompatActivity {

    private FragmentManager fragmentManager;

    @Override
    protected void onCreate(Bundle savedInstanceState) {
        super.onCreate(savedInstanceState);
        setContentView(R.layout.activity_main);
        fragmentManager = getSupportFragmentManager();
    }

    public void onClickUserInfo(View view) {
        Fragment fragment = new UserInfoFragment();
        FragmentTransaction transaction = fragmentManager.beginTransaction();
        transaction.replace(R.id.contents,fragment );
        transaction.addToBackStack(null);
        transaction.commit();
    }

    public void onClickColor(View view) {
        Fragment fragment = new ColorFragment();
        FragmentTransaction transaction = fragmentManager.beginTransaction();
        transaction.replace(R.id.contents,fragment );
        transaction.addToBackStack(null);
        transaction.commit();
    }

    public void onClickDrink(View view) {
        Fragment fragment = new DrinkFragment();
        FragmentTransaction transaction = fragmentManager.beginTransaction();
        transaction.replace(R.id.contents,fragment );
        transaction.addToBackStack(null);
        transaction.commit();

    }

    public void onClickFood(View view) {
        Fragment fragment = new FoodFragment();
        FragmentTransaction transaction = fragmentManager.beginTransaction();
        transaction.replace(R.id.contents,fragment );
        transaction.addToBackStack(null);
        transaction.commit();
    }
}
参考