検証環境
この記事の内容は、以下の環境で検証した。
- Java:open jdk 1.8.0_152
- Kotlin 1.2.10
- Android Studio 3.0.2
- CompileSdkVersion:26
はじめに
Android 8.0(以降、Oreo)から通知(Notification)を表示させる方法が変わりました。
この記事では、Oreoで通知するさいに必要となる新しい機能と最低限の実装方法について説明します。また、実装は最小限の構成です。
参考情報
Notification Channelsの設定方法
https://developer.android.com/training/notify-user/channels.html
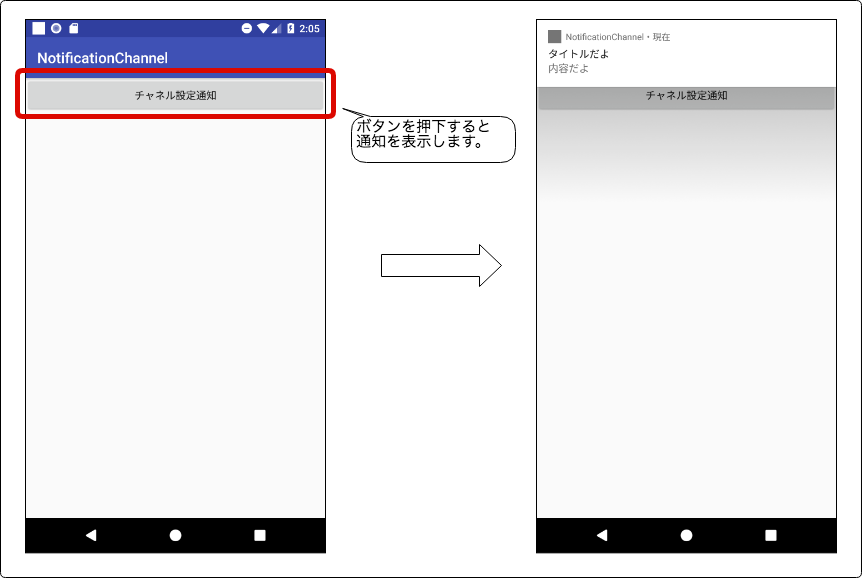
完成イメージ
完成イメージは以下のとおりです。
実装方法
実装する前に、まずChannelsの全体像を理解する必要があります。
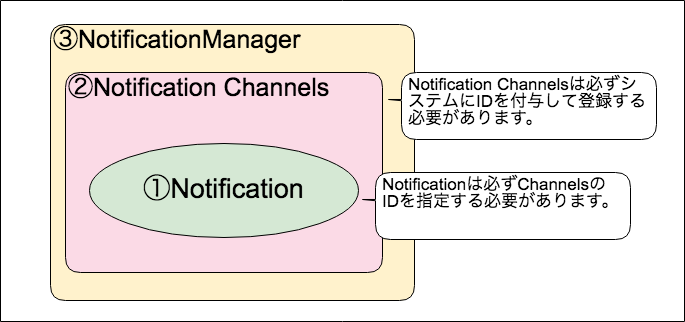
Channelsのイメージ
NotificationManagerに生成したChannelsをIDを登録します。Channelsを登録する際、IDを指定しておきます。そして、通知にはどのChannelsに所属するのか、NotificationのBuilderを生成するタイミングでIDで指定します。
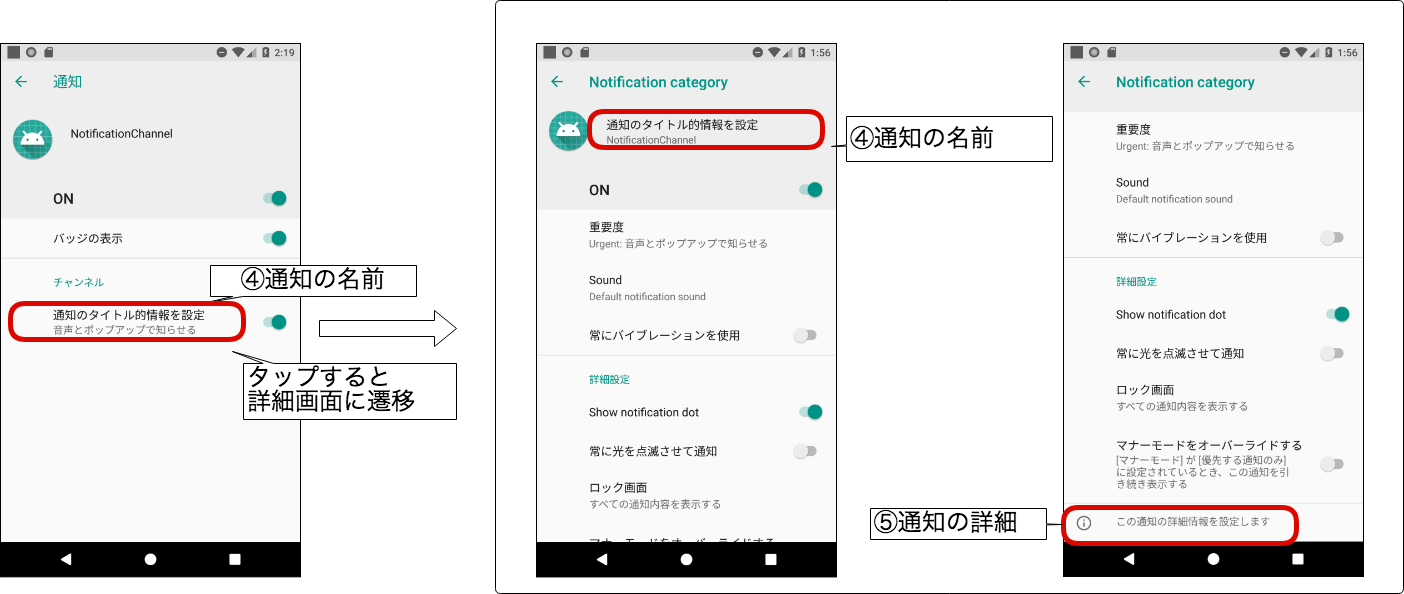
Channelsで設定した情報が反映する場所
Channelsを生成する際に設定する情報は通知の設定画面に反映されます。
下記の画面を表示するには「設定」⇢「アプリと通知」⇢「アプリ」⇢アプリをタップ⇢「通知」
コード
レイアウトのXML
<?xml version="1.0" encoding="utf-8"?>
<LinearLayout xmlns:android="http://schemas.android.com/apk/res/android"
    xmlns:app="http://schemas.android.com/apk/res-auto"
    xmlns:tools="http://schemas.android.com/tools"
    android:layout_width="match_parent"
    android:layout_height="match_parent"
    android:orientation="vertical"
    tools:context="jp.co.casareal.notificationchannel.MainActivity">


    <Button
        android:id="@+id/notifyButton"
        android:text="チャネル設定通知"
        android:layout_width="match_parent"
        android:layout_height="wrap_content" />

</LinearLayout>
Kotlinのコード
package jp.co.casareal.notificationchannel

import android.app.NotificationChannel
import android.app.NotificationManager
import android.content.Context
import android.os.Bundle
import android.support.v4.app.NotificationCompat
import android.support.v7.app.AppCompatActivity
import kotlinx.android.synthetic.main.activity_main.*


class MainActivity : AppCompatActivity() {

    override fun onCreate(savedInstanceState: Bundle?) {
        super.onCreate(savedInstanceState)
        setContentView(R.layout.activity_main)
    }

    override fun onResume() {
        super.onResume()

        notifyButton.setOnClickListener {

            val notificationManager = getSystemService(Context.NOTIFICATION_SERVICE) as NotificationManager

            // カテゴリー名(通知設定画面に表示される情報)
            val name = "通知のタイトル的情報を設定"
            // システムに登録するChannelのID
            val id = "casareal_chanel"
            // 通知の詳細情報(通知設定画面に表示される情報)
            val notifyDescription = "この通知の詳細情報を設定します"

            // Channelの取得と生成
            if (notificationManager.getNotificationChannel(id) == null) {
                val mChannel = NotificationChannel(id, name, NotificationManager.IMPORTANCE_HIGH)
                mChannel.apply {
                    description = notifyDescription
                }
                notificationManager.createNotificationChannel(mChannel)
            }

            val notification = NotificationCompat
                    .Builder(this, id)
                    .apply {
                        setSmallIcon(R.drawable.ic_launcher_background)
                        mContentTitle = "タイトルだよ"
                        mContentText = "内容だよ"
                    }.build()
            notificationManager.notify(1, notification)
        }
    }
}
コードの説明
③NotificationManagerの取得
初めにNotificationManagerをシステムのサービスから取得します。
val notificationManager = getSystemService(Context.NOTIFICATION_SERVICE) as NotificationManager
④通知の名前&⑤通知の詳細&IDの定義
通知の設定で表示する名前、詳細、ChannelsのIDを定義しておきます。
// カテゴリー名(通知設定画面に表示される情報)
val name = "通知のタイトル的情報を設定"
// システムに登録するChannelのID
val id = "casareal_chanel"
// 通知の詳細情報(通知設定画面に表示される情報)
val notifyDescription = "この通知の詳細情報を設定します"
②Notification Channelsの生成と登録
既にChannelsを登録しているかIDを指定して確認します。
未登録の場合は、Channelsを作成して登録します。
// Channelの取得と生成
if (notificationManager.getNotificationChannel(id) == null) {
    val mChannel = NotificationChannel(id, name, NotificationManager.IMPORTANCE_HIGH)
    mChannel.apply {
        description = notifyDescription
    }
    notificationManager.createNotificationChannel(mChannel)
}
①Notificationの生成
Notification.Builderクラスのコンストラクタの第2引数に、ChannelsのIDを指定することによりNotificationをChannelsに登録します。
val notification = NotificationCompat
        .Builder(this, id)
        .apply {
            setSmallIcon(R.drawable.ic_launcher_background)
            mContentTitle = "タイトルだよ"
            mContentText = "内容だよ"
        }.build()
まとめ
今回は最小限の実装で説明しました。
また、Oreoが前提での実装になっていますので、Oreoより前のバージョンに対応するには、SDKのバージョン毎に処理を分ける必要があります。
通知は奥が深そうなので、まだまだ調べ甲がありそうです。