検証環境
この記事の内容は、以下の環境で検証しています。
- Java:open jdk 1.8.0_152
- Kotlin 1.3.61
- Android Studio 3.5.3
- CompileSdkVersion:29
はじめに
Jatpackに含まれているData Binding(以降、データバインディングと表記)を利用するとグルーコードは減少します。
更に、双方向バインディングを行うことにより、リアクティブなプログラミングが可能になります。
しかし、データバインディングを深く理解するとより便利な記述ができるようになります。
この記事では、データバインディングの応用的な話であるBindingAdapterについて記述します。
データバインディングの基本動作
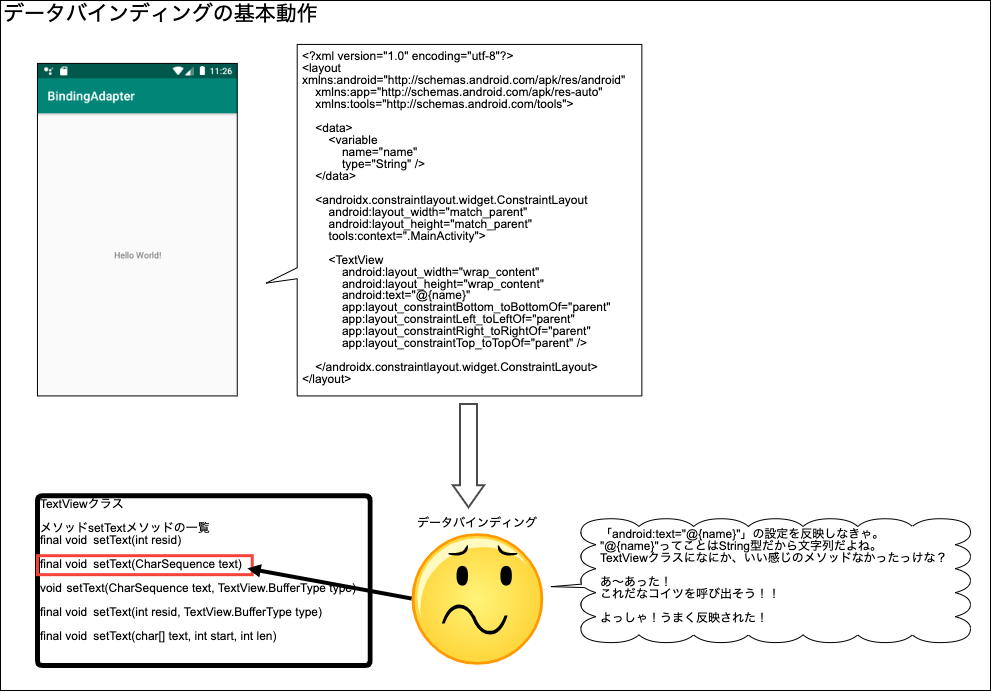
そもそも、データバインディングがどの様に動作しているか理解していなかったので、調べてみました。
公式サイトを今一度読み直してみると驚きの動きをしていました。
データバインディングはレイアウトの属性から適切なsetterメソッドを探し出します。
メソッド名と引数を手がかりに一致するメソッドを呼び出していたんです。
絵にしてみるとこんな感じでしょうか?
実はこのデータバインディングに対してカスタマイズができます。
ここからは、オリジナルの属性を作って、データバインディングで渡された値を使って、独自の処理を追加する話になります。
BindinAdapterを使ってみよう
オリジナルの属性の定義と独自の処理の実装を行う上で、大切になるのが @BindingAdapter アノテーションです。
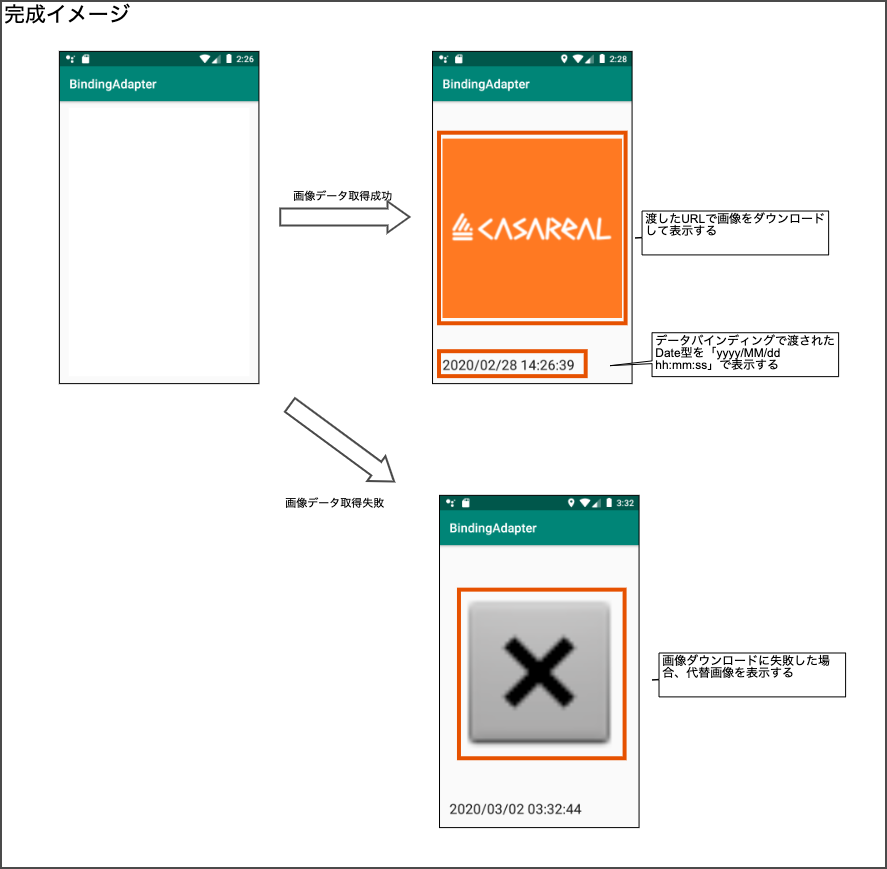
題材として以下を扱っていきます。
- データバインディングでDate型を渡された時にフォーマットして表示する
- データバインディングでURLを渡された時に、画像をサーバから取得し表示する。もし、取得に失敗した場合、代替の画像を表示する
最終的に下図のような動きをさせます。
メリット
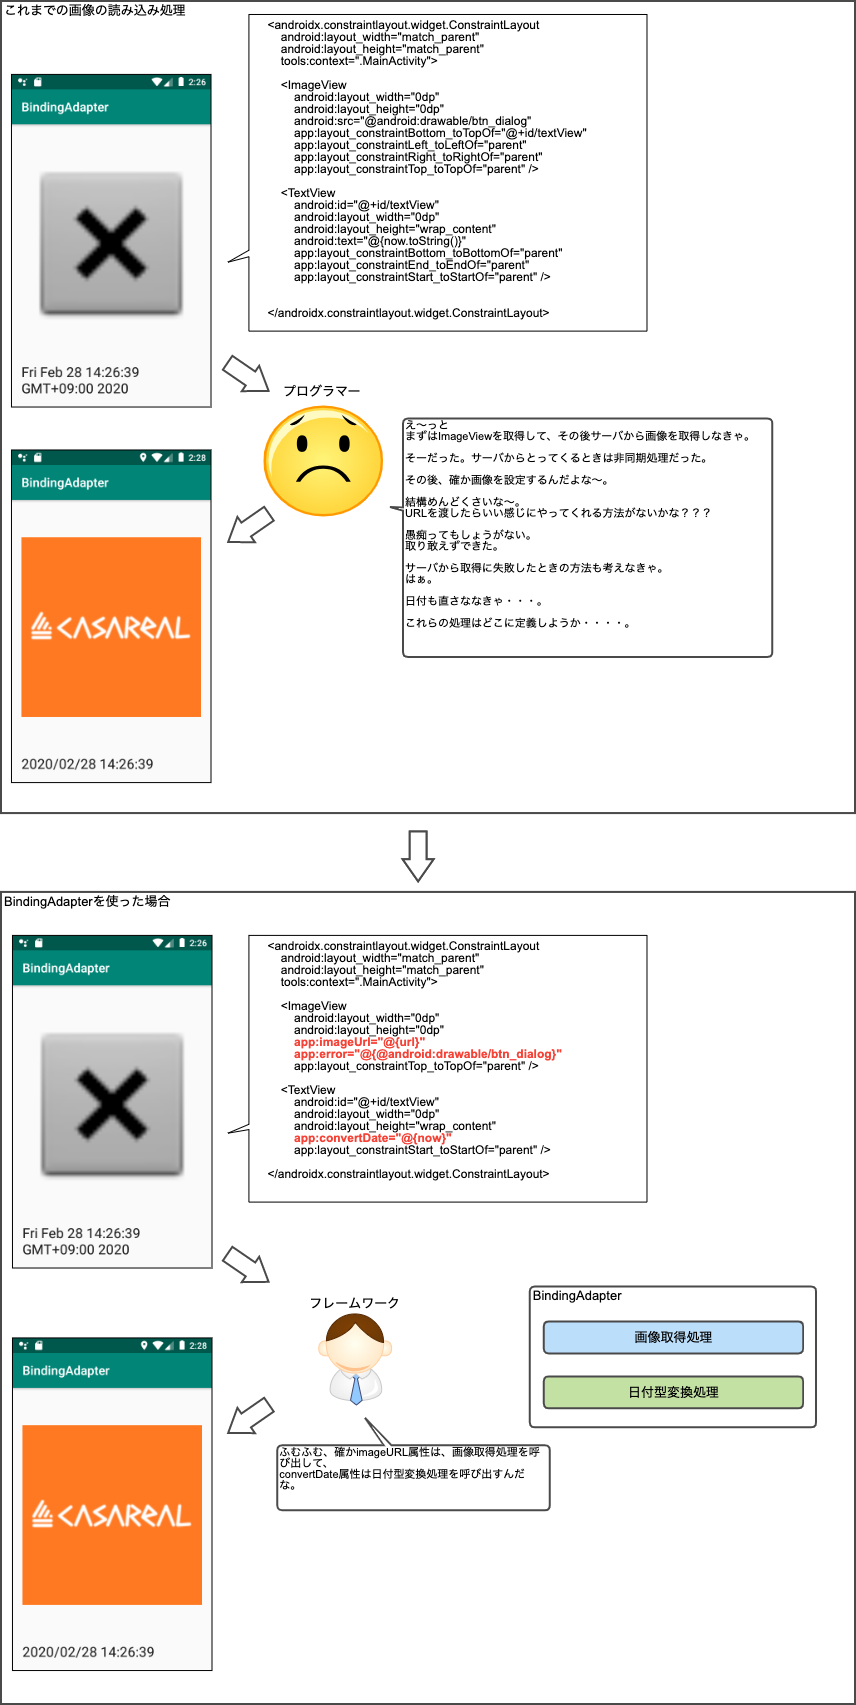
ここで思うこともあります。
わざわざオリジナルの属性を追加する意味はあるのでしょうか?
ActivityとかViewModelでやればいいじゃない!!と考えられなくもありません。
しかし、この様な汎用的な処理はどこに定義するか迷います。
良きところに定義出来たとしても、必要に応じて毎回処理を呼び出し、グルーコードを記述しなければなりません。
しかし、BindingAdapterを利用することにより、処理の呼び出しをフレームワークが適宜選択してくれます。
その分、グルーコードも減ります。
結果として、下図のようなメリットを受けられるわけです。
オリジナルの属性を作ろう
早速BindingAdapterを利用してみましょう。
build.gradle
おそらく、多くの方はデータバインディングするので、例のアレを追記すればいいんでしょ?って思っていると思います。
そうです。まずは、データバインディングを有効にしていきます。
android {
    ・・・省略・・・
    dataBinding {
        enabled = true
    }
}
ここで油断してはいけないことがあります。今回は**@BindingAdapter** アノテーションを利用します。
ということは、 kotlin-kapt プラグインも必要になります。
下記も追記しないと私のようにハマりますよ。
apply plugin: 'kotlin-kapt'
最後に、今回の例で画像はPicassoを使っているのでdependenciesに下記を追記しました。
implementation 'com.squareup.picasso:picasso:2.71828'
これで事前の準備が終わりました。
日付のフォーマット
ここから、 @BindingAdapter を付与したメソッドを定義します。
まずは、オブジェクトを宣言します。
オブジェクト名は任意です。
object BindingAdapters {

}
続いて、その中にメソッドを宣言します。
初めに、Date型からフォーマットして表示する処理のメソッドです。
@BindingAdapter("convertDate")
@JvmStatic
fun convertDate(view:TextView, date:Date){
   view.text = SimpleDateFormat("yyyy/MM/dd hh:mm:ss").format(date)
}
@BindingAdapter("convertDate") を見てみるとvalueとして convertDate を渡しています。
convertDate がオリジナルの属性となります。
実際のレイアウトファイルのコードでは以下のようになります。
<TextView
    android:id="@+id/textView"
    android:layout_width="0dp"
    android:layout_height="wrap_content"
    android:layout_marginStart="16dp"
    android:layout_marginLeft="16dp"
    android:layout_marginEnd="16dp"
    android:layout_marginRight="16dp"
    android:layout_marginBottom="16dp"
    app:convertDate="@{now}" ←ここが重要
    android:textAppearance="@style/TextAppearance.AppCompat.Large"
    app:layout_constraintBottom_toBottomOf="parent"
    app:layout_constraintEnd_toEndOf="parent"
    app:layout_constraintStart_toStartOf="parent" />
@BindingAdapterの直下に @JvmStatic アノテーションを付与しています。
@JvmStatic が無いと動作しないため、必ず付与してください。
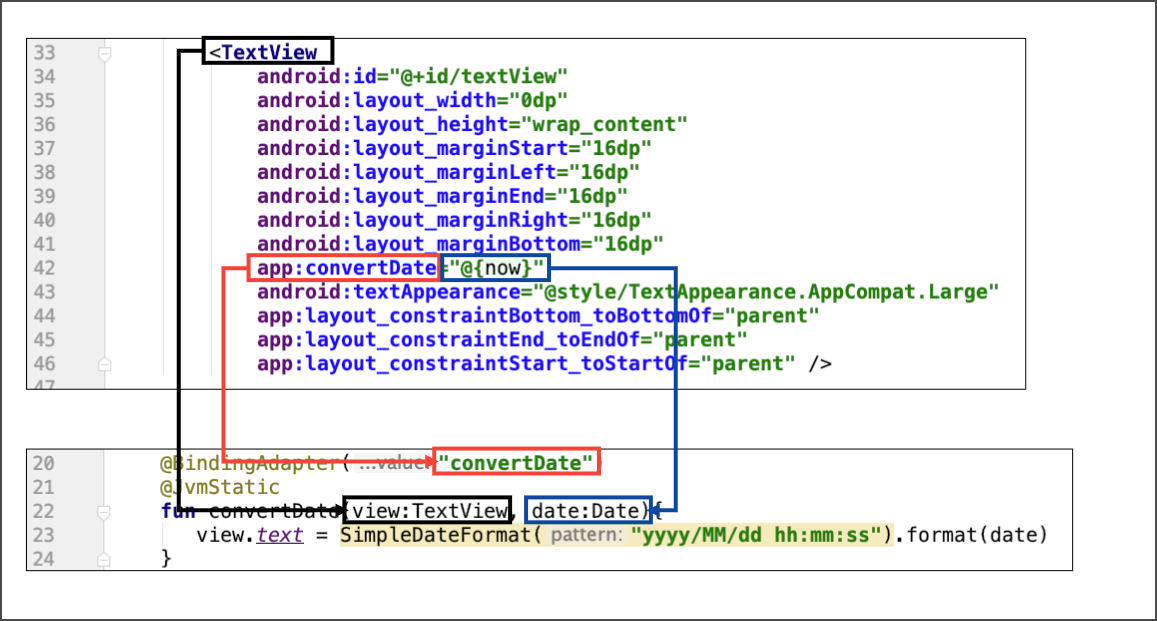
続いて、引数を見てみましょう。
view:TextView, date:Date となっています。
第一引数には、属性を付与したViewのオブジェクトが取得できます。今回はTextViewにしか付与しないのでTextView型で受け取っています。
第二引数には、属性に設定した値が格納されてきます。
今回だと、「@{url}」となっているので、urlに格納されている値がそのまま格納されます。
最後にメソッドの内容を確認します。
view.text = SimpleDateFormat("yyyy/MM/dd hh :mm :ss").format(date)
単純にDate型をフォーマットして、Textに設定しています。
メソッドのどの部分がレイアウトファイルのどの部分に影響しているかを下図にまとめました。
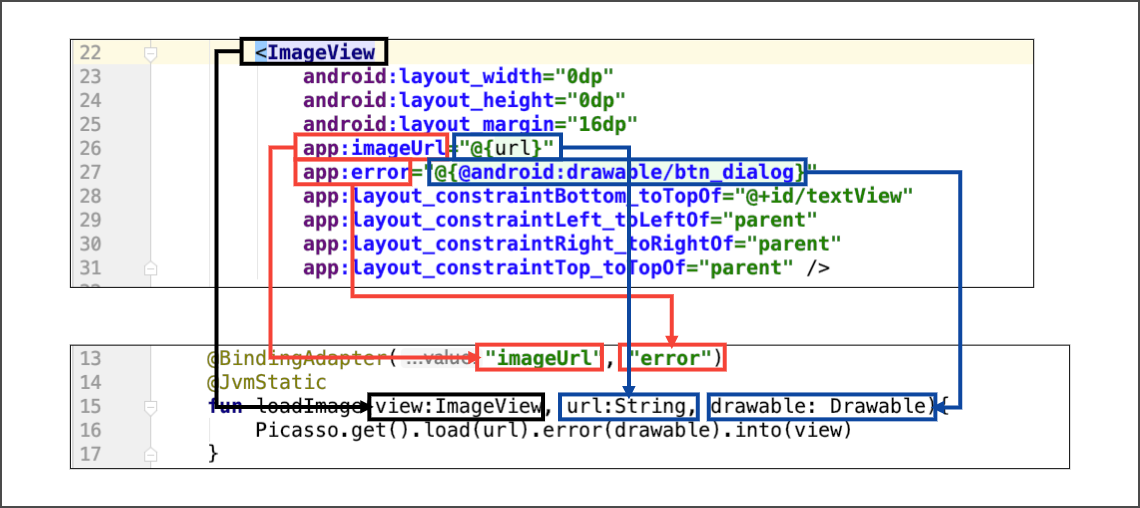
画像の表示
基本的なメソッドの定義方法は日付のフォーマットと同じです。
まずはメソッドの定義を確認してみます。
object BindingAdapters {

    @BindingAdapter("imageUrl", "error")
    @JvmStatic
    fun loadImage(view:ImageView, url:String, drawable: Drawable){
        Picasso.get().load(url).error(drawable).into(view)
    }
}
先ほどとの違いは@BindingAdapterアノテーションの値が2つになっています。
2つあると言うことはxmlでも2つオリジナル属性が生成されるということです。
imageUrl属性はURLを指します。
error属性は、画像のダウンロードに失敗したときの画像をしていします。
レイアウトのxmlを確認してみましょう。
<ImageView
    android:layout_width="0dp"
    android:layout_height="0dp"
    android:layout_margin="16dp"
    app:imageUrl="@{url}" ←ここが重要
    app:error="@{@android:drawable/btn_dialog}" ←ここが重要
    app:layout_constraintBottom_toTopOf="@+id/te
    app:layout_constraintLeft_toLeftOf="parent"
    app:layout_constraintRight_toRightOf="parent
    app:layout_constraintTop_toTopOf="parent" />
レイアウトファイルに2つのオリジナル属性が存在することがわかります。
更にerror属性にはDrawableのidが指定されています。
しかし、メソッドの引数では Drawable が指定されています。
これはデータバインディングがいい具合にDrawable型に変換してくれます。
めちゃくちゃ便利ですね。
今回はPicassoを使って画像を取得しています。失敗した場合の画像も同時に設定できるので、単純に便利です。
また、これまでの内容を図にまとめてみましたので、確認しておきます。
注意事項
最後に、重要な注意点を説明します。KotlinでBindingAdapterを定義するときは、必ず object をつかってください。companion objectでは動作しません。
すべてのソースコード
本記事で使用したサンプルコードの全容を載せておきます。
build.gradle
apply plugin: 'com.android.application'

apply plugin: 'kotlin-android'

apply plugin: 'kotlin-android-extensions'

apply plugin: 'kotlin-kapt'

android {
    compileSdkVersion 29
    buildToolsVersion "29.0.2"
    defaultConfig {
        applicationId "jp.co.casareal"
        minSdkVersion 14
        targetSdkVersion 29
        versionCode 1
        versionName "1.0"
        testInstrumentationRunner "androidx.test.runner.AndroidJUnitRunner"
    }
    buildTypes {
        release {
            minifyEnabled false
            proguardFiles getDefaultProguardFile('proguard-android-optimize.txt'), 'proguard-rules.pro'
        }
    }
    dataBinding {
        enabled = true
    }
}

dependencies {
    implementation fileTree(dir: 'libs', include: ['*.jar'])
    implementation "org.jetbrains.kotlin:kotlin-stdlib-jdk7:$kotlin_version"
    implementation 'androidx.appcompat:appcompat:1.1.0'
    implementation 'androidx.core:core-ktx:1.2.0'
    implementation 'androidx.constraintlayout:constraintlayout:1.1.3'
    testImplementation 'junit:junit:4.12'
    androidTestImplementation 'androidx.test.ext:junit:1.1.0'
    androidTestImplementation 'androidx.test.espresso:espresso-core:3.1.1'

    implementation 'com.squareup.picasso:picasso:2.71828'
}
レイアウトリソースファイル
<?xml version="1.0" encoding="utf-8"?>
<layout xmlns:android="http://schemas.android.com/apk/res/android"
    xmlns:app="http://schemas.android.com/apk/res-auto"
    xmlns:tools="http://schemas.android.com/tools">

    <data>

        <import type="jp.co.casareal.BindingAdapters"/>
        <variable
            name="url"
            type="String" />
        <variable
            name="now"
            type="java.util.Date" />
    </data>

    <androidx.constraintlayout.widget.ConstraintLayout
        android:layout_width="match_parent"
        android:layout_height="match_parent"
        tools:context=".MainActivity">

        <ImageView
            android:layout_width="0dp"
            android:layout_height="0dp"
            android:layout_margin="16dp"
            app:imageUrl="@{url}"
            app:error="@{@android:drawable/btn_dialog}"
            app:layout_constraintBottom_toTopOf="@+id/textView"
            app:layout_constraintLeft_toLeftOf="parent"
            app:layout_constraintRight_toRightOf="parent"
            app:layout_constraintTop_toTopOf="parent" />

        <TextView
            android:id="@+id/textView"
            android:layout_width="0dp"
            android:layout_height="wrap_content"
            android:layout_marginStart="16dp"
            android:layout_marginLeft="16dp"
            android:layout_marginEnd="16dp"
            android:layout_marginRight="16dp"
            android:layout_marginBottom="16dp"
            app:convertDate="@{now}"
            android:textAppearance="@style/TextAppearance.AppCompat.Large"
            app:layout_constraintBottom_toBottomOf="parent"
            app:layout_constraintEnd_toEndOf="parent"
            app:layout_constraintStart_toStartOf="parent" />

    </androidx.constraintlayout.widget.ConstraintLayout>
</layout>
objectクラス
package jp.co.casareal

import android.graphics.drawable.Drawable
import android.widget.ImageView
import android.widget.TextView
import androidx.databinding.BindingAdapter
import com.squareup.picasso.Picasso
import java.text.SimpleDateFormat
import java.util.*

object BindingAdapters {

    @BindingAdapter("imageUrl", "error")
    @JvmStatic
    fun loadImage(view:ImageView, url:String, drawable: Drawable){
        Picasso.get().load(url).error(drawable).into(view)
    }

    @BindingAdapter("convertDate")
    @JvmStatic
    fun convertDate(view:TextView, date:Date){
       view.text = SimpleDateFormat("yyyy/MM/dd hh:mm:ss").format(date)
    }
}
Activity
package jp.co.casareal

import android.os.Bundle
import androidx.appcompat.app.AppCompatActivity
import androidx.databinding.DataBindingUtil
import jp.co.casareal.databinding.ActivityMainBinding
import java.util.*

class MainActivity : AppCompatActivity() {

    override fun onCreate(savedInstanceState: Bundle?) {
        super.onCreate(savedInstanceState)
        val binding =
            DataBindingUtil.setContentView<ActivityMainBinding>(this, R.layout.activity_main)
        binding.url = "https://www.casareal.co.jp/common/images/logo01.png"
        binding.now = Date(System.currentTimeMillis())
        binding.lifecycleOwner = this
    }
}
まとめ
BindingAdapterをうまく利用すればグルーコードが減って、処理も1元管理しつつ再利用ができるので便利!!!
積極的に利用していきたいですね。