検証環境
この記事の内容は、以下の環境で検証しました。
- Intellij IDEA ULTIMATE 2018.2
- Kotlin 1.3.0
- Gradle Projectで作成
- GradleファイルはKotlinで記述(KotlinでDSL)
準備
詳細は下記の準備を参照してください。
https://qiita.com/naoi/items/8abf2cddfc2cb3802daa
Bridging blocking and non-blocking worlds
タイトルの意味的には、ブロックとブロックしていない世界の架け橋でしょうか。
ブロックが今回の主題になりそうです。
では、読み進めていきます。
The first example mixes non-blocking delay(...) and blocking Thread.sleep(...) in the same code. It is easy to get lost which one is blocking and which one is not. Let's be explicit about blocking using runBlocking coroutine builder:
意訳込みですが以下のような説明をしていますね。
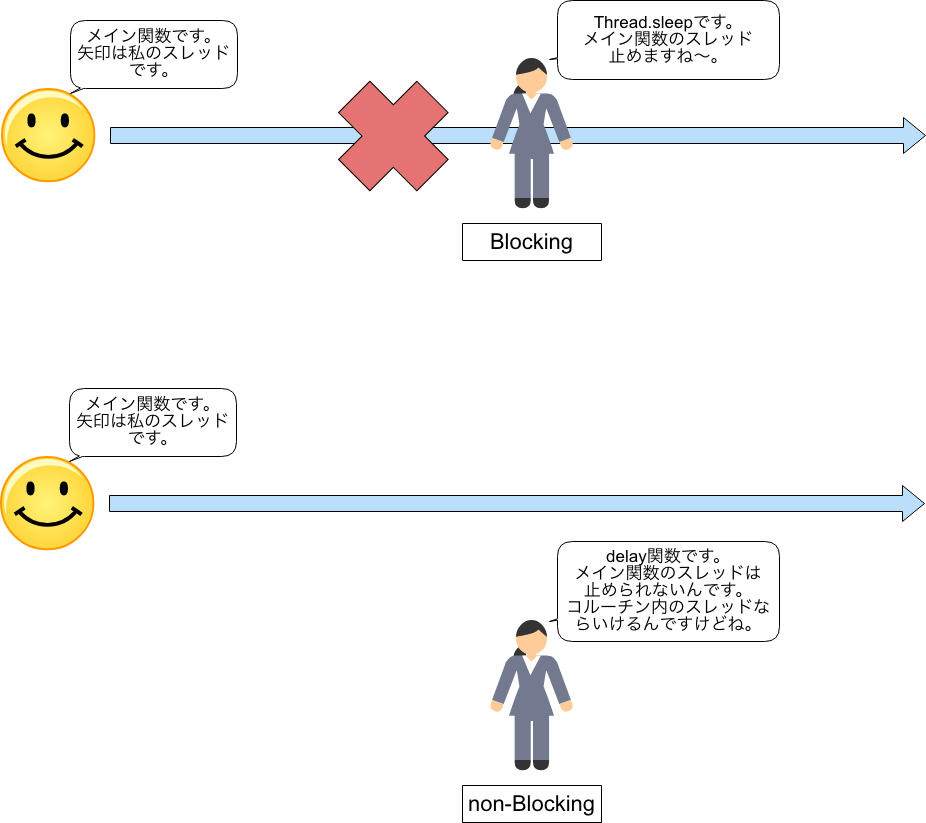
最初の例では non-blockingと blocking が同じコードに入り乱れていました。
delay関数はnon-blocking、Thread.sleepメソッドは blocking です。
片方はブロックしていて、片方はブロックしていません。
runBlockingを利用してコルーチンを構築するとnon-bloackingが明確になります。
要するに、下記のような動きなんですね。
新しいキーワードがでてきました。 runBlocking です。
non-blockingが明確になると説明されています。
サンプルコードもあるので試してみます。
公式サイトでは、下記のコードを実行してみようと行っています。
fun main() {
    GlobalScope.launch {
        delay(1000L)
        println("World!")
    }
    println("Hello,")
    runBlocking {
        delay(2000L)
    }
}
しかし、不明な点が多すぎるので、少し変えてみました。
fun main() {
    println(
        "main関数を実行しているスレッドはid:${Thread.currentThread().id}、name:${Thread.currentThread().name}" +
                "¥n で時間は${LocalTime.now()}"
    )

    GlobalScope.launch {
        println(
            "GlobalScope.launchを実行しているスレッドはid:${Thread.currentThread().id}、name:${Thread.currentThread().name}" +
                    "¥n で時間は${LocalTime.now()}"
        )

        delay(1000L)
        println("World!")
    }

    println("Hello,")

    runBlocking {
        println(
            "runBlockingを実行しているスレッドはid:${Thread.currentThread().id}、name:${Thread.currentThread().name}" +
                    "¥n で時間は${LocalTime.now()}"
        )
        delay(2000L)
    }
}
スレッドの情報を表示するようにしました。
では、実行結果をみてみます。
main関数を実行しているスレッドはid:1、name:main¥n で時間は13:13:06.328089
Hello,
GlobalScope.launchを実行しているスレッドはid:12、name:DefaultDispatcher-worker-1¥n で時間は13:13:06.426121
runBlockingを実行しているスレッドはid:1、name:main¥n で時間は13:13:06.477608
World!
実行結果をみて少しびっくりです。
runBlocking関数はmain関数のスレッドと同じスレッドで実行 されるんですね。
しかも、delay関数が呼び出せてる!!
runBlocking関数の定義を見てみます。
public fun <T> runBlocking(context: CoroutineContext = EmptyCoroutineContext, block: suspend CoroutineScope.() -> T): T {
〜省略〜
}
なるほど!!runBlocking関数そのものは、 suspend なるものがついていません。しかし、ラムダ式で実装した**block: suspend CoroutineScope.() -> T)**にsuspend がついています。
前回の記事でsuspendがついている関数でdelayは呼び出せることをいっていましたね。
しかも、実装の一部にこんな記述がありました。
public fun <T> runBlocking(context: CoroutineContext = EmptyCoroutineContext, block: suspend CoroutineScope.() -> T): T {
  〜省略〜
    val newContext = GlobalScope.newCoroutineContext(
        if (privateEventLoop) context + (eventLoop as ContinuationInterceptor) else context
    )
    val coroutine = BlockingCoroutine<T>(newContext, currentThread, eventLoop, privateEventLoop)
    coroutine.start(CoroutineStart.DEFAULT, coroutine, block)
    return coroutine.joinBlocking()
}
内部でcoroutineオブジェクトを生成して、引数に渡したラムダ式の処理を実行しているんです。
ということは、下記のように書き直して実行してみます。
fun main() {
    println(
        "main関数を実行しているスレッドはid:${Thread.currentThread().id}、name:${Thread.currentThread().name}" +
                "¥n で時間は${LocalTime.now()}"
    )

    GlobalScope.launch {
        println(
            "GlobalScope.launchを実行しているスレッドはid:${Thread.currentThread().id}、name:${Thread.currentThread().name}" +
                    "¥n で時間は${LocalTime.now()}"
        )

        delay(1000L)
        println("World!")
    }

    println("Hello,")

    runBlocking {
        println(
            "runBlockingを実行しているスレッドはid:${Thread.currentThread().id}、name:${Thread.currentThread().name}" +
                    "¥n で時間は${LocalTime.now()}"
        )
        delay(2000L)
    }

    println("bye bye")
}
runBlockingの直後に「bye bye」を表示してみます。
実行結果はこうなりました。
main関数を実行しているスレッドはid:1、name:main¥n で時間は13:36:28.362779
GlobalScope.launchを実行しているスレッドはid:12、name:DefaultDispatcher-worker-1¥n で時間は13:36:28.491613
Hello,
runBlockingを実行しているスレッドはid:1、name:main¥n で時間は13:36:28.525673
World!
bye bye
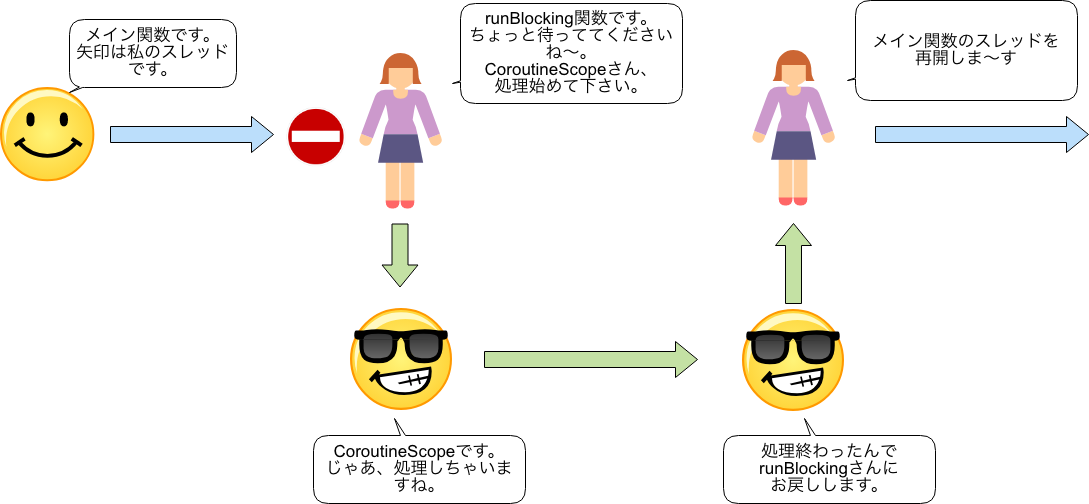
worldが表示されてから、bye byeが表示されています。要するに、delay関数で待機している間に、worldが表示され、runBlocking関数の実行が完了するとmain関数の次の処理に遷移するわけですね。
図で表すと下図のようになります。
それでは、続きを読み進めていきます。
The result is the same, but this code uses only non-blocking delay.
The main thread, that invokes runBlocking, blocks until the coroutine inside runBlocking completes.
意訳込みですが(以下略)
やっぱり、同じ結果になりますよね。だけど、今回は、delayだけで実現できています。
main関数のスレッドは、runBlocking関数を呼び出すと、runBlocking内で実行している処理が終わるまで待つんですよ。
終わるまで待つ。。。また、納得できない事が出てしまいました。
しかし、runBlocingの実装を確認すると簡単になっとくできちゃいました。
以下の部分をみてみます。
public fun <T> runBlocking(context: CoroutineContext = EmptyCoroutineContext, block: suspend CoroutineScope.() -> T): T {
    val coroutine = BlockingCoroutine<T>(newContext, currentThread, eventLoop, privateEventLoop)
    coroutine.start(CoroutineStart.DEFAULT, coroutine, block)
    return coroutine.joinBlocking()
}
return文でjoinBlockingメソッドを呼び出し、コルーチンの処理終了を待っています。
なるほど、これがmain関数がrunBlocking関数の引数に渡したラムダ式の処理を待つ部分にあたるんですね。
やっと、納得できました。
では、このブロック最後の説明を見ていきます。
This example can be also rewritten in a more idiomatic way, using runBlocking to wrap the execution of the main function:
意訳(以下略)
このサンプルコードは慣例的に以下のように書き換えます。runBlockingでmain関数をラップします。
実際にサンプルコードを見てみます。
fun main() = runBlocking<Unit> { // start main coroutine
    GlobalScope.launch { // launch new coroutine in background and continue
        delay(1000L)
        println("World!")
    }
    println("Hello,") // main coroutine continues here immediately
    delay(2000L)      // delaying for 2 seconds to keep JVM alive
}
なるほど、処理全体をrunBlockingで囲ってしまうんですね。
これなら、delay関数も呼び出せます。
まとめ
このブロックで理解できたことは以下のとおりです。
- main関数のスレッドをブロック(block:止める)関数とブロックできない(non-Blocking:止められない)関数について
- runBlocking関数の使い方と動き

