Blender 2.8, Python での3D動画作り、
今回は円周沿いカメラ移動と乱数色彩の素材指定と太陽光です。
動画はこちら
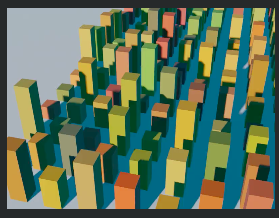
blender 2.8, python movie 1 sec. 360kB. camera motion along a circle.
100個くらい建物(単に直方体)作ると1秒で800px*600pxでも682kBになりました。
まだまだ色の指定と光の具合がうまくつかめません。
太陽光が届かない建物の影には空の青い色が反映されているのだろうなと考えてます。
ところで、良いプログラム(ソースコード)の条件。
自分が何度か書いて、忘れて、また見直して、再利用して、の経験で考える良いプログラムはこんな感じ。
◎適度にコメントが付いている
◎変数名は英語なりローマ字なり意味あるものになっている
◎後で変数(variable, parameter) を変更しやすいよう設定部分をまとめてある
◎(一時使用のような、不要なコメント行は消してある)
◎他の資料からコピーした部分は引用元を書く(数年でURL先では消えるが?)
(2024.5.1追記。Blender 4.1.1で動作するには、1箇所変更する必要あり
["BezierCircle"]を
["BézierCircle"]にすれば動作します。つまりeの上のアクサンテギュ)
# bpy_nh18 (random color, brown)2020/9/6日曜 (静止画茶色平板と、動画で茶色建物)
import bpy
import random

# ========= DELETE ALL mesh, light, camera, みな削除する2行 =========
for item in bpy.data.objects:
	bpy.data.objects.remove(item)


# ======================== add cubes, random resize , random color
for x in range(16):
    for y in range(16):
        bpy.ops.mesh.primitive_cube_add(size=2.0, location=(4*x-4, 5*y-5, 0.0))
        bpy.ops.transform.resize(value=(1.0, 1.0, (random.randint(2, 8))))
        obj = bpy.context.view_layer.objects.active
        mat = bpy.data.materials.new('Cube')
        r1=0.15+ 0.8*random.random()
        g1=0.07+ 0.3*random.random()
        b1=0.01+ 0.05*random.random()
        mat.diffuse_color = (r1, g1, b1, 0) #====== random BROWN COLOR
        obj.data.materials.append(mat)

# Add a plane for ground  ==================
bpy.ops.mesh.primitive_plane_add(size=200.0, align='WORLD', location=(0.0, 0.0, 0.0), rotation=(0.0, 0.0, 0.0) )
matp = bpy.data.materials.new('Plane')
matp.diffuse_color = (0.4, 0.2, 0.01, 0)
obj.data.materials.append(matp)

#  ==================
# world - surface - background (背景)
bpy.data.worlds["World"].node_tree.nodes["Background"].inputs[0].default_value = (0.01, 0.15, 0.25, 1)
bpy.data.worlds["World"].node_tree.nodes["Background"].inputs[1].default_value = 0.7

# ============== "light"
# create light datablock, set attributes
#light_data = bpy.data.lights.new(name="light_spot1", type='SPOT')
light_data = bpy.data.lights.new(name="light_spot1", type='SUN')
light_data.energy = 5
# create new object with our light datablock
light_object1 = bpy.data.objects.new(name="light_spot1", object_data=light_data)
# link light object
bpy.context.collection.objects.link(light_object1)
# make it active
bpy.context.view_layer.objects.active = light_object1
#change location
light_object1.location = (-3, -10, 50)
light_object1.delta_rotation_euler = (1.3, 0, -0.3) #ゼロゼロゼロで真下を向く。
# update scene, if needed
dg = bpy.context.evaluated_depsgraph_get()
dg.update()
# ================

#  ================== ================= camera movement

bpy.ops.curve.primitive_bezier_circle_add(enter_editmode=False, align='WORLD', location=(20, 20, 30))
bpy.context.object.scale[0] = 50
bpy.context.object.scale[1] = 50
bpy.ops.object.empty_add(type='CUBE', align='WORLD', location=(0,0,0))
bpy.ops.object.camera_add(enter_editmode=False, align='VIEW', location=(0,0,0), rotation=(0, 0, 0))

bpy.data.objects['Empty'].select_set(True)
bpy.data.objects['Camera'].select_set(True)

bpy.context.view_layer.objects.active = bpy.data.objects['Empty']
bpy.ops.object.parent_set(type='OBJECT')

bpy.data.objects['Camera'].select_set(False)
bpy.data.objects['Empty'].select_set(True)

bpy.ops.object.constraint_add(type='FOLLOW_PATH')
bpy.context.object.constraints["Follow Path"].target = bpy.data.objects["BezierCircle"]

bpy.context.object.constraints["Follow Path"].use_curve_follow = True
bpy.context.object.constraints["Follow Path"].use_fixed_location = True

bpy.data.objects['Empty'].select_set(False)
bpy.data.objects['Camera'].select_set(True)

bpy.ops.object.constraint_add(type='TRACK_TO')

#bpy.context.object.constraints["Track To"].target = bpy.data.objects["Cube.016"]
bpy.context.object.constraints["Track To"].target = bpy.data.objects["Cube.052"]
bpy.context.object.constraints["Track To"].up_axis = 'UP_Y'
bpy.context.object.constraints["Track To"].track_axis = 'TRACK_NEGATIVE_Z'  #5m00sec
#Camera Keyframe #(Insert keyframe to object's Offset Factor Python API - stack exchange)
bpy.data.objects['Camera'].select_set(False)
bpy.data.objects['Empty'].select_set(True)
bpy.context.scene.frame_current = 1
bpy.context.object.constraints["Follow Path"].offset_factor = 0
ob = bpy.context.object
# ob.constraints['Follow Path']
# bpy.data.objects['Empty'].constraints["Follow Path"]
# [bpy.data.objects['Empty'].constraints["Follow Path"]]
con = ob.constraints.get("Follow Path")
con.offset_factor = 0.0
con.keyframe_insert("offset_factor", frame=1)
con.offset_factor = 0.25
con.keyframe_insert("offset_factor", frame=8)
con.offset_factor = 0.50
con.keyframe_insert("offset_factor", frame=16)
con.offset_factor = 0.75
con.keyframe_insert("offset_factor", frame=23)
con.offset_factor = 0.99
con.keyframe_insert("offset_factor", frame=30)
# ==== END of camera movement