前のつづき
https://qiita.com/nannany/items/50a514fa56255811704e
踏み台サーバから接続するインスタンスの作成準備から始める。
bastion経由で操作したいインスタンス(targetインスタンス)作成
targetインスタンスを入れるVPCを整備
1. targetインスタンス用VPC作成
aws ec2 create-vpc --cidr-block 10.2.0.0/16
aws ec2 create-tags --resources vpc-0ed7b004702d6b31f --tags Key=Name,Value=target_cli
2. targetインスタンス用サブネット作成
aws ec2 create-subnet --vpc-id vpc-0ed7b004702d6b31f --cidr-block 10.2.0.0/24
aws ec2 create-tags --resources subnet-066876581dbfa4f88 --tags Key=Name,Value=target_subnet_cli
targetインスタンス作成(キーペアは前作ったものを使いまわす)
1. 秘密鍵(bastion_cli_key)をmy_bastionに転送
scp -i .ssh/bastion_cli_key.pem .ssh/bastion_cli_key.pem ec2-user@52.198.210.184:/home/ec2-user
2. 秘密鍵の権限を400にして、.ssh配下におさめる
ssh -i .ssh\bastion_cli_key.pem ec2-user@52.198.210.184
chmod 400 bastion_cli_key.pem
mv bastion_cli_key.pem .ssh
3. VPCどうしをピアリング接続し、その接続を承諾する
aws ec2 create-vpc-peering-connection --vpc-id vpc-0ed7b004702d6b31f --peer-vpc-id vpc-0074168dfa72a5826
aws ec2 accept-vpc-peering-connection --vpc-peering-connection-id pcx-094d895104a32cf4a
4. 各VPCのルートテーブルにて、相手のVPCへの通信をピアリング接続に紐づけるようにする
# bastion側のカスタムルートテーブルにピアリング接続へのルートを加える
aws ec2 create-route --route-table-id rtb-0362a010826fc18bc --destination-cidr-block 10.2.0.0/16 --vpc-peering-connection-id pcx-094d895104a32cf4a
# target側のメインルートテーブルにピアリング接続へのルートを加える
aws ec2 create-route --route-table-id rtb-02a9cca2b46dac9a2 --destination-cidr-block 10.1.0.0/16 --vpc-peering-connection-id pcx-094d895104a32cf4a
5. targetインスタンス用セキュリティグループ作成。22と10000番ポートにくるSSHのみ許可
aws ec2 create-security-group --group-name from_bastion_ssh --description "Security group for SSH access from bastion" --vpc-id vpc-0ed7b004702d6b31f
aws ec2 authorize-security-group-ingress --group-id sg-098ded7f7da9bc597 --protocol tcp --port 22 --source-group sg-04fa98bf54b2c3602
aws ec2 authorize-security-group-ingress --group-id sg-098ded7f7da9bc597 --protocol tcp --port 10000 --source-group sg-04fa98bf54b2c3602
6. targetのEC2インスタンス作成。無料枠のAMI(Amazonマシンイメージ)を選択
aws ec2 run-instances --image-id ami-0d7ed3ddb85b521a6 --count 1 --instance-type t2.micro --key-name bastion_cli_key --security-group-ids sg-098ded7f7da9bc597 --subnet-id subnet-066876581dbfa4f88
aws ec2 create-tags --resources i-04b09b50680736f5f --tags Key=Name,Value=my_target
7. bastion経由でtargetインスタンスに接続する
# クライアント端末のpowershellで実行
ssh -i .ssh\bastion_cli_key.pem ec2-user@52.198.210.184
# bastionで実行
ssh -i .ssh/bastion_cli_key.pem ec2-user@10.2.0.78
8. sshd_configを編集
cd /etc/ssh/
# sshd_configを退避
sudo cp sshd_config sshd_configbk
# sshd_configを編集
sudo vim sshd_config
差分はこんな感じ
< Port 22
---
> Port 10000
9. targetインスタンスを再起動
aws ec2 reboot-instances --instance-ids i-04b09b50680736f5f
10. 22番ポートでは接続できず、10000番ポートで接続できることを確認
[ec2-user@ip-10-1-0-184 ~]$ ssh -p 22 -i .ssh/bastion_cli_key.pem ec2-user@10.2.0.78
ssh: connect to host 10.2.0.78 port 22: Connection refused
[ec2-user@ip-10-1-0-184 ~]$ ssh -i .ssh/bastion_cli_key.pem -p 10000 ec2-user@10.2.0.78
Last login: Sun Jan 27 03:35:37 2019 from 10.1.0.184

       __|  __|_  )
       _|  (     /   Amazon Linux 2 AMI
      ___|\___|___|

https://aws.amazon.com/amazon-linux-2/
11. targetインスタンスに紐づくセキュリティグループから、22番ポートの通信許可を外す
aws ec2 revoke-security-group-ingress --group-id sg-098ded7f7da9bc597 --protocol tcp --port 22 --source-group sg-04fa98bf54b2c3602
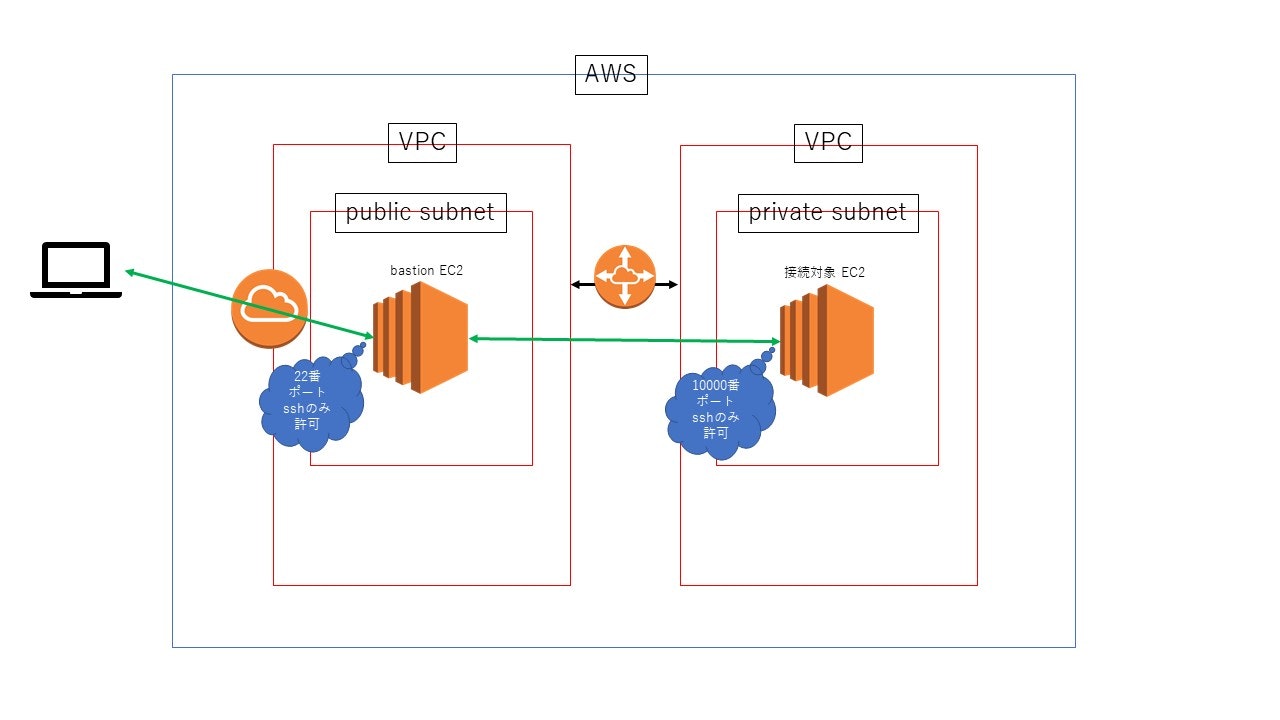
これで以下の構成が完成した。
疑問に思った点、つまずいた点
- EC2を起動するコマンドは?→
aws ec2 start-instances --instance-ids <instance_id> -
aws ec2 describe-instance-statusだと起動中のインスタンスしか表示されない - EC2を再起動するコマンドは?→
aws ec2 reboot-instances --instance-ids <instance_id>