RaspberryPi 用の U-boot をクロス開発します。
前記事
「RaspberryPi 用のクロスツールチェインを Ubuntu 上にビルド」
https://qiita.com/nanbuwks/items/e19887e6a66262d325ca
では RaspberryPi 用のクロスツールチェインを作成しました。
先の記事は「 Nayab Basha Sayed | Embedded Systems Developer」https://www.nayab.xyz/
の Web サイトに沿って作業しましたが、今回も同様に Nayab さんのサイトの
「Cross compiling U-boot bootloader for Raspberry Pi 3 Model B」
https://www.nayab.xyz/rpi3b-elinux/embedded-linux-rpi3-020-compile-uboot.html
などの説明をなぞっていきます。
環境
- 母艦 Ubuntu Linux 20.04 LTS AMD64 日本語版
- (2022/9/23追加 ) Ubuntu Linux 22.04 LTS AMD64 でも確認しました
- ターゲット Raspberry Pi 3 Model B
U-boot ダウンロード
$ cd ~/rpi3
$ git clone git://git.denx.de/u-boot.git
$ cd u-boot
U-boot のメイク
最初に掃除
$ make clean; make mrproper; make distclean
次に、クロス開発環境にターゲットのアーキテクチャを指示します。
RaspberryPi4 などの場合はそれ用に変更してください。
$ export CROSS_COMPILE=aarch64-rpi3-linux-gnu-
次に、U-bootのコンフィグレーションを選びます。
RaspberryPi3 の場合
$ make rpi_3_defconfig
RaspberryPi3+の場合
$ make rpi_3_b_plus_defconfig
RaspberryPi4の場合
$ make rpi_4_defconfig
make します。
$ make -j`nproc`
すぐに完了します。
(2022/09/23追記)
Ubuntu 22.04 で以下のエラーが出ました。
include/image.h:1254:12: fatal error: openssl/evp.h: そのようなファイルやディレクトリはありません
 1254 | #  include <openssl/evp.h>
      |            ^~~~~~~~~~~~~~~
以下で対応しました。
$ sudo apt install -y libssl-dev
チェック
$ ls
Kbuild       api        disk      include  u-boot              u-boot.srec
Kconfig      arch       doc       lib      u-boot-nodtb.bin    u-boot.sym
Licenses     board      drivers   net      u-boot.bin
MAINTAINERS  cmd        dts       post     u-boot.cfg
Makefile     common     env       scripts  u-boot.cfg.configs
README       config.mk  examples  test     u-boot.lds
System.map   configs    fs        tools    u-boot.map
u-boot バイナリができているので
$ file u-boot
とすると
u-boot: ELF 64-bit LSB executable, ARM aarch64, version 1 (SYSV), statically linked, with debug_info, not stripped
となり、できているみたいです。
動かしてみる
同じく Nayab さんのサイトの
「The boot sequence of Raspberry Pi 3 Model B」
https://www.nayab.xyz/rpi3b-elinux/embedded-linux-rpi3-030-boot-process.html
の通りやっていきます。
ブートに必要なファイルを揃える
「firmware/boot at master · raspberrypi/firmware · GitHub」
https://github.com/raspberrypi/firmware/tree/master/boot
から
- bootcode.bin
- start.elf
をダウンロードします。
$ mkdir -p ~/rpi3/sdCardFiles
$ cd ~/rpi3/sdCardFiles
として、このディレクトリに bootcode.bin および start.elf を格納します。また、前記事でビルドした u-boot.bin もコピーしてきて格納します。
$ vim config.txt
として、以下の内容のファイルを作ります。
arm_64bit=1
kernel=u-boot.bin
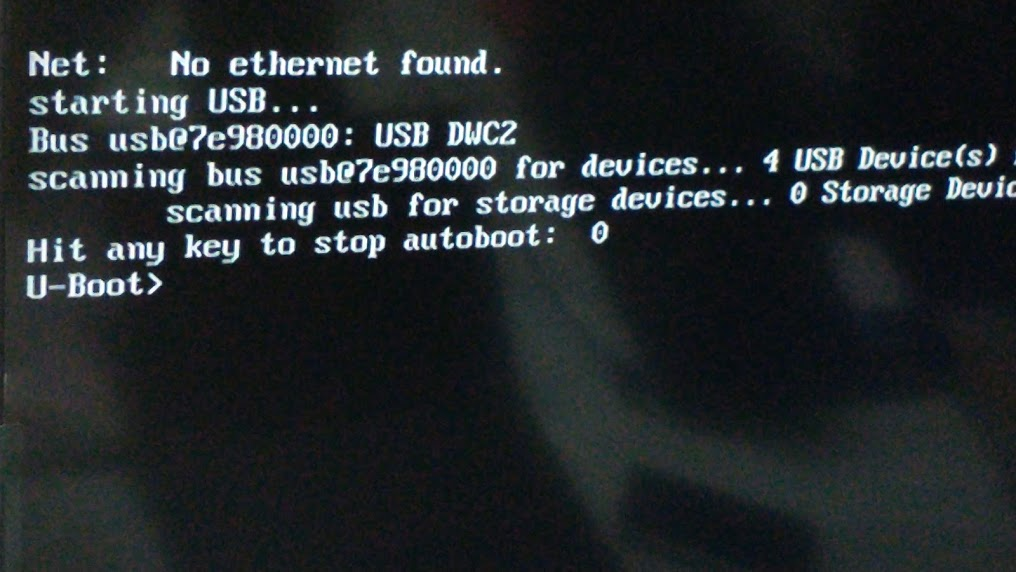
これらを、32GBytes の sdカードに書き込んで起動すると写真のようになりました。
起動してますが、U-boot コンソールはどこかな・・・ やっぱりちゃんとパーティション管理しないといけないのかな・・・(早合点)
boot パーティションに配置
同じく Nayab さんのサイトでは
First partition is of size 1GB, type fat32 with label boot. Create filesystem with mkfs.vfat.
Second partition is of size 512MB, type Linux with label rootfs. Create filesystem with mkfs.ext4.
The third partition is of remaining of the SD card storage with the type Linux
とあります。この通りやってみましょう。
32GBytes の SD カードを母艦に刺した後、まず umount しておきます。
$ sudo fdisk /dev/sdb
として、以下のようにパーティションを作成します。
コマンド (m でヘルプ): p
ディスク /dev/sdb: 14.86 GiB, 15931539456 バイト, 31116288 セクタ
Disk model: STORAGE DEVICE
単位: セクタ (1 * 512 = 512 バイト)
セクタサイズ (論理 / 物理): 512 バイト / 512 バイト
I/O サイズ (最小 / 推奨): 512 バイト / 512 バイト
ディスクラベルのタイプ: dos
ディスク識別子: 0x00000000

デバイス   起動 開始位置 最後から   セクタ サイズ Id タイプ
/dev/sdb1           8192 31116287 31108096  14.9G  c W95 FAT32 (LBA)
既存のパーティションを削除、改めて3つのパーティションを作成します。
コマンド (m でヘルプ): d
パーティション 1 を選択
パーティション 1 を削除しました。

コマンド (m でヘルプ): n
パーティションタイプ
   p   基本パーティション (0 プライマリ, 0 拡張, 4 空き)
   e   拡張領域 (論理パーティションが入ります)
選択 (既定値 p): p
パーティション番号 (1-4, 既定値 1):
最初のセクタ (2048-31116287, 既定値 2048):
Last sector, +/-sectors or +/-size{K,M,G,T,P} (2048-31116287, 既定値 31116287): +1G

新しいパーティション 1 をタイプ Linux、サイズ 1 GiB で作成しました。

コマンド (m でヘルプ): t
パーティション 1 を選択
16 進数コード (L で利用可能なコードを一覧表示します): c
パーティションのタイプを 'Linux' から 'W95 FAT32 (LBA)' に変更しました。

コマンド (m でヘルプ): n
パーティションタイプ
   p   基本パーティション (1 プライマリ, 0 拡張, 3 空き)
   e   拡張領域 (論理パーティションが入ります)
選択 (既定値 p): p
パーティション番号 (2-4, 既定値 2):
最初のセクタ (2099200-31116287, 既定値 2099200):
Last sector, +/-sectors or +/-size{K,M,G,T,P} (2099200-31116287, 既定値 31116287): +512M

新しいパーティション 2 をタイプ Linux、サイズ 512 MiB で作成しました。

コマンド (m でヘルプ): n
パーティションタイプ
   p   基本パーティション (2 プライマリ, 0 拡張, 2 空き)
   e   拡張領域 (論理パーティションが入ります)
選択 (既定値 p): p
パーティション番号 (3,4, 既定値 3): 3
最初のセクタ (3147776-31116287, 既定値 3147776):
Last sector, +/-sectors or +/-size{K,M,G,T,P} (3147776-31116287, 既定値 31116287):

新しいパーティション 3 をタイプ Linux、サイズ 13.3 GiB で作成しました。
確認して問題なければ書き込みます。
コマンド (m でヘルプ): p
ディスク /dev/sdb: 14.86 GiB, 15931539456 バイト, 31116288 セクタ
Disk model: STORAGE DEVICE
単位: セクタ (1 * 512 = 512 バイト)
セクタサイズ (論理 / 物理): 512 バイト / 512 バイト
I/O サイズ (最小 / 推奨): 512 バイト / 512 バイト
ディスクラベルのタイプ: dos
ディスク識別子: 0x00000000

デバイス   起動 開始位置 最後から   セクタ サイズ Id タイプ
/dev/sdb1           2048  2099199  2097152     1G  c W95 FAT32 (LBA)
/dev/sdb2        2099200  3147775  1048576   512M 83 Linux
/dev/sdb3        3147776 31116287 27968512  13.3G 83 Linux

コマンド (m でヘルプ): w
パーティション情報が変更されました。
ioctl() を呼び出してパーティション情報を再読み込みします。
ディスクを同期しています。
フォーマットします
$ mkfs.vfat /dev/sdb1
mkfs.fat 4.1 (2017-01-24)
mkfs.vfat: unable to open /dev/sdb1: Permission denied
nanbuwks@nanbuwks-ThinkPad-X230:~/rpi3/sdCardFiles$ sudo mkfs.vfat /dev/sdb1
mkfs.fat 4.1 (2017-01-24)
$ sudo mkfs.ext4 /dev/sdb2
mke2fs 1.45.5 (07-Jan-2020)
Creating filesystem with 131072 4k blocks and 32768 inodes
Filesystem UUID: 4b359a72-a791-4e50-8f1a-fda3ff2ad1f7
Superblock backups stored on blocks:
	32768, 98304

Allocating group tables: done
Writing inode tables: done
Creating journal (4096 blocks): done
Writing superblocks and filesystem accounting information: done

$ sudo mkfs.ext4 /dev/sdb3
mke2fs 1.45.5 (07-Jan-2020)
Creating filesystem with 3496064 4k blocks and 874832 inodes
Filesystem UUID: 94042e5a-6928-4717-9402-6762864d31ee
Superblock backups stored on blocks:
	32768, 98304, 163840, 229376, 294912, 819200, 884736, 1605632, 2654208

Allocating group tables: done
Writing inode tables: done
Creating journal (16384 blocks): done
Writing superblocks and filesystem accounting information: done
ボリュームラベルを設定します。
$ sudo mlabel -i /dev/sdb1 ::boot
$ sudo e2label /dev/sdb2 rootfs
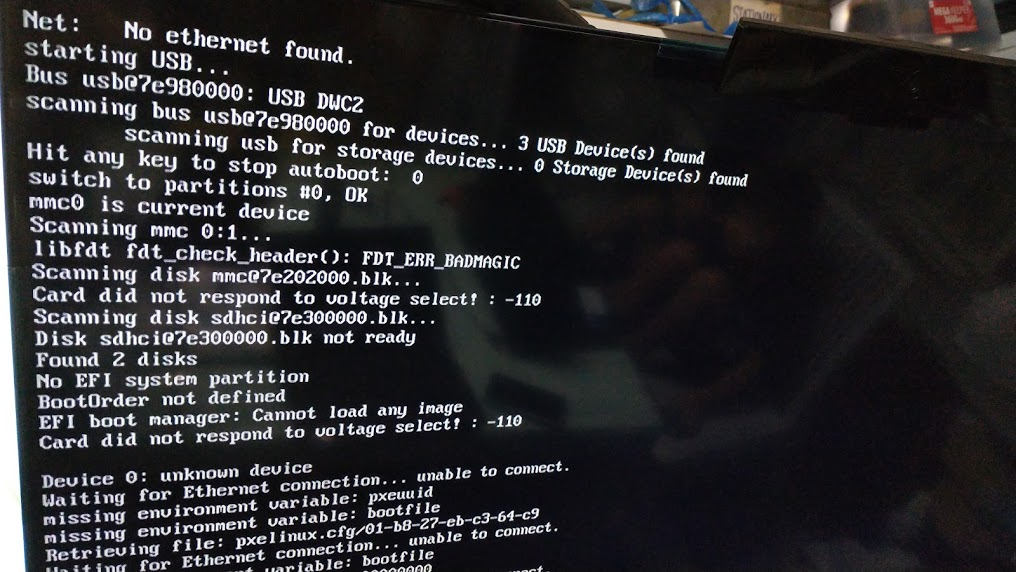
一度母艦から sd カードを取り外し、再度取り付けして BOOT 領域に4つのファイルをコピー。RaspberryPi に接続して起動・・・状況は変わりません。
よく読むと、
Note: You need to press any key within 3 seconds after board powered up to enter into U-boot console.
とありました。なあんだ。
キーボードを取り付けて、起動時にキーを押して見ると希望のコンソールが出てきました。