環境
Ubuntu 14.04 LTS(いまさら)
これを AWS で動かしています。
ドメイン名をつけた既存の Web サイト が Apache2 上で動作しています。
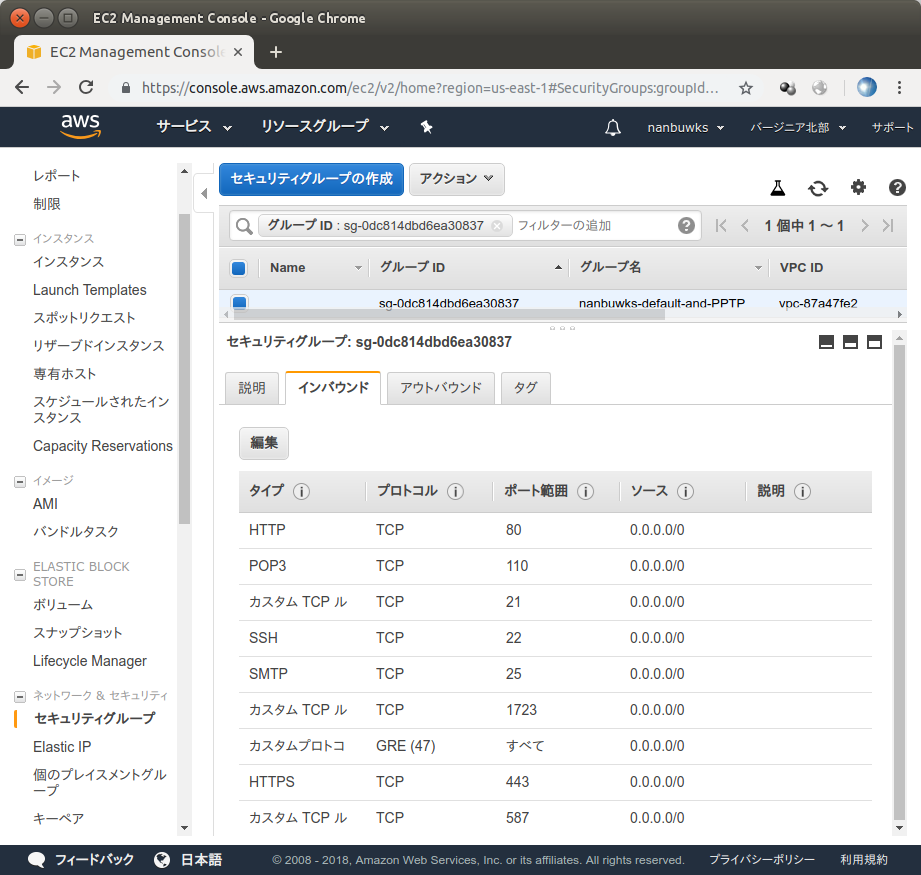
セキュリティグループの設定
TCP 443 ポートを開けます。
設定
サーバに ssh でログインし、root権限になって /etc/apache2 内を設定します。
ubuntu@www:~$ sudo bash
root@www:/mnt/xvdf/home/ubuntu# cd /etc/apache2
root@www:/etc/apache2# ls
apache2.conf    conf-enabled  magic           ports.conf
conf-available  envvars       mods-available  sites-available
conf.d          httpd.conf    mods-enabled    sites-enabled
なんとなくそれらしいports.confを確認してみます。
root@www:/etc/apache2# cat ports.conf
# If you just change the port or add more ports here, you will likely also
# have to change the VirtualHost statement in
# /etc/apache2/sites-enabled/000-default
# This is also true if you have upgraded from before 2.2.9-3 (i.e. from
# Debian etch). See /usr/share/doc/apache2.2-common/NEWS.Debian.gz and
# README.Debian.gz

NameVirtualHost *:80
Listen 80

<IfModule mod_ssl.c>
    # If you add NameVirtualHost *:443 here, you will also have to change
    # the VirtualHost statement in /etc/apache2/sites-available/default-ssl
    # to <VirtualHost *:443>
    # Server Name Indication for SSL named virtual hosts is currently not
    # supported by MSIE on Windows XP.
    Listen 443
</IfModule>

<IfModule mod_gnutls.c>
    Listen 443
</IfModule>
mod_ssl.cが必要らしいです。
root@www:/etc/apache2# ls mods-enabled/
access_compat.load    autoindex.conf  mime.conf         rewrite.load
alias.conf            autoindex.load  mime.load         setenvif.conf
alias.load            cgi.load        mpm_prefork.conf  setenvif.load
auth_basic.load       deflate.conf    mpm_prefork.load  status.conf
authn_core.load       deflate.load    negotiation.conf  status.load
authn_file.load       dir.conf        negotiation.load  userdir.conf
authz_core.load       dir.load        php5.conf         userdir.load
authz_groupfile.load  env.load        php5.load
authz_host.load       filter.load     reqtimeout.conf
authz_user.load       include.load    reqtimeout.load
root@www:/etc/apache2# ls mods-available/
access_compat.load    dialup.load               proxy_balancer.conf
actions.conf          dir.conf                  proxy_balancer.load
actions.load          dir.load                  proxy.conf
alias.conf            disk_cache.conf           proxy_connect.load
alias.load            disk_cache.load           proxy_express.load
allowmethods.load     dump_io.load              proxy_fcgi.load
asis.load             echo.load                 proxy_fdpass.load
auth_basic.load       env.load                  proxy_ftp.conf
auth_digest.load      expires.load              proxy_ftp.load
auth_form.load        ext_filter.load           proxy_html.load
authn_alias.load      file_cache.load           proxy_http.load
authn_anon.load       filter.load               proxy.load
authn_core.load       headers.load              proxy_scgi.load
authn_dbd.load        heartbeat.load            proxy_wstunnel.load
authn_dbm.load        heartmonitor.load         ratelimit.load
authn_default.load    ident.load                reflector.load
authn_file.load       imagemap.load             remoteip.load
authn_socache.load    include.load              reqtimeout.conf
authnz_ldap.load      info.conf                 reqtimeout.load
authz_core.load       info.load                 request.load
authz_dbd.load        lbmethod_bybusyness.load  rewrite.load
authz_dbm.load        lbmethod_byrequests.load  sed.load
authz_default.load    lbmethod_bytraffic.load   session_cookie.load
authz_groupfile.load  lbmethod_heartbeat.load   session_crypto.load
authz_host.load       ldap.conf                 session_dbd.load
authz_owner.load      ldap.load                 session.load
authz_user.load       log_debug.load            setenvif.conf
autoindex.conf        log_forensic.load         setenvif.load
autoindex.load        lua.load                  slotmem_plain.load
buffer.load           macro.load                slotmem_shm.load
cache_disk.conf       mem_cache.conf            socache_dbm.load
cache_disk.load       mem_cache.load            socache_memcache.load
cache.load            mime.conf                 socache_shmcb.load
cache_socache.load    mime.load                 speling.load
cern_meta.load        mime_magic.conf           ssl.conf
cgid.conf             mime_magic.load           ssl.load
cgid.load             mpm_event.conf            status.conf
cgi.load              mpm_event.load            status.load
charset_lite.load     mpm_prefork.conf          substitute.load
data.load             mpm_prefork.load          suexec.load
dav_fs.conf           mpm_worker.conf           unique_id.load
dav_fs.load           mpm_worker.load           userdir.conf
dav.load              negotiation.conf          userdir.load
dav_lock.load         negotiation.load          usertrack.load
dbd.load              php5.conf                 version.load
deflate.conf          php5.load                 vhost_alias.load
deflate.load          proxy_ajp.load            xml2enc.load
sslモジュールは available になっているようなので有効にします。
root@www:/etc/apache2# a2enmod ssl
Enabling module ssl.
See /usr/share/doc/apache2/README.Debian.gz on how to configure SSL and create self-signed certificates.
To activate the new configuration, you need to run:
  service apache2 restart
apache2を再起動します。
root@www:/etc/apache2# a2enmod ssl2
ERROR: Module ssl2 does not exist!
root@www:/etc/apache2# service apache2 restart
 * Restarting web server apache2                                               [fail]
 * The apache2 configtest failed.
Output of config test was:
AH00526: Syntax error on line 43 of /etc/apache2/mods-enabled/ssl.conf:
SSLSessionCache: 'shmcb' session cache not supported (known names: ). Maybe you need to load the appropriate socache module (mod_socache_shmcb?).
Action 'configtest' failed.
The Apache error log may have more information.
エラー出ました。ここの設定ファイルは太古の昔からひきついだものなので、それも直す必要があります。mod_socache_shmcbを入れろとあるのでそうします。
root@www:/etc/apache2# a2enmod socache_shmcb
Enabling module socache_shmcb.
To activate the new configuration, you need to run:
  service apache2 restart
再度apache2を再起動。
root@www:/etc/apache2# a2enmod socache_shmcb
Enabling module socache_shmcb.
To activate the new configuration, you need to run:
  service apache2 restart
root@www:/etc/apache2# service apache2 restart
 * Restarting web server apache2                                               [fail]
 * The apache2 configtest failed.
Output of config test was:
AH00526: Syntax error on line 49 of /etc/apache2/mods-enabled/ssl.conf:
Invalid command 'SSLMutex', perhaps misspelled or defined by a module not included in the server configuration
Action 'configtest' failed.
The Apache error log may have more information.
今度は /etc/apache2/mods-enabled/ssl.conf を編集して、
SSLMutex file:${APACHE_RUN_DIR}/ssl_mutex
の箇所を
Mutex default ssl-cache
とします。
root@www:/etc/apache2# service apache2 restart
 * Restarting web server apache2
AH00548: NameVirtualHost has no effect and will be removed in the next release /etc/apache2/ports.conf:8
                                                                               [ OK ]
動きました。これで、https://をつけてサイトにアクセスすると、証明書エラーが出ます。なので次に証明書をインストールします。
letsencrypt
16.04 だと apt-get で入るそうですが、14.04だと
root@www:/etc/apache2# apt-get install letsencrypt python-letsencrypt-apache
Reading package lists... Done
Building dependency tree
Reading state information... Done
E: Unable to locate package letsencrypt
E: Unable to locate package python-letsencrypt-apache
無いみたいなので
# apt-get install software-properties-common
# add-apt-repository ppa:certbot/certbot
# apt-get update
# apt-get install python-certbot-apache
としてインストールします。
実行します。
root@www:/etc/apache2# letsencrypt --apache
Saving debug log to /var/log/letsencrypt/letsencrypt.log
Plugins selected: Authenticator apache, Installer apache
Enter email address (used for urgent renewal and security notices) (Enter 'c' to
cancel): nanbuwks+letsencrypt@nanbu.com

- - - - - - - - - - - - - - - - - - - - - - - - - - - - - - - - - - - - - - - -
Please read the Terms of Service at
https://letsencrypt.org/documents/LE-SA-v1.2-November-15-2017.pdf. You must
agree in order to register with the ACME server at
https://acme-v02.api.letsencrypt.org/directory
- - - - - - - - - - - - - - - - - - - - - - - - - - - - - - - - - - - - - - - -
(A)gree/(C)ancel: a

- - - - - - - - - - - - - - - - - - - - - - - - - - - - - - - - - - - - - - - -
Would you be willing to share your email address with the Electronic Frontier
Foundation, a founding partner of the Let's Encrypt project and the non-profit
organization that develops Certbot? We'd like to send you email about our work
encrypting the web, EFF news, campaigns, and ways to support digital freedom.
- - - - - - - - - - - - - - - - - - - - - - - - - - - - - - - - - - - - - - - -
(Y)es/(N)o: Y

Which names would you like to activate HTTPS for?
- - - - - - - - - - - - - - - - - - - - - - - - - - - - - - - - - - - - - - - -
1: www.example.net
2: www.example.com
3: www.example.org
4: www.nanbu.com
- - - - - - - - - - - - - - - - - - - - - - - - - - - - - - - - - - - - - - - -
Select the appropriate numbers separated by commas and/or spaces, or leave input
blank to select all options shown (Enter 'c' to cancel): 4
Obtaining a new certificate
Performing the following challenges:
http-01 challenge for www.nanbu.com
Waiting for verification...
Cleaning up challenges
Created an SSL vhost at /etc/apache2/sites-available/nanbu-le-ssl.conf
Deploying Certificate to VirtualHost /etc/apache2/sites-available/nanbu-le-ssl.conf
Enabling available site: /etc/apache2/sites-available/nanbu-le-ssl.conf

Please choose whether or not to redirect HTTP traffic to HTTPS, removing HTTP access.
- - - - - - - - - - - - - - - - - - - - - - - - - - - - - - - - - - - - - - - -
1: No redirect - Make no further changes to the webserver configuration.
2: Redirect - Make all requests redirect to secure HTTPS access. Choose this for
new sites, or if you're confident your site works on HTTPS. You can undo this
change by editing your web server's configuration.
- - - - - - - - - - - - - - - - - - - - - - - - - - - - - - - - - - - - - - - -
Select the appropriate number [1-2] then [enter] (press 'c' to cancel): 1

- - - - - - - - - - - - - - - - - - - - - - - - - - - - - - - - - - - - - - - -
Congratulations! You have successfully enabled https://www.nanbu.com

You should test your configuration at:
https://www.ssllabs.com/ssltest/analyze.html?d=www.nanbu.com
- - - - - - - - - - - - - - - - - - - - - - - - - - - - - - - - - - - - - - - -

IMPORTANT NOTES:
 - Congratulations! Your certificate and chain have been saved at:
   /etc/letsencrypt/live/www.nanbu.com/fullchain.pem
   Your key file has been saved at:
   /etc/letsencrypt/live/www.nanbu.com/privkey.pem
   Your cert will expire on 2019-03-02. To obtain a new or tweaked
   version of this certificate in the future, simply run certbot again
   with the "certonly" option. To non-interactively renew *all* of
   your certificates, run "certbot renew"
 - Your account credentials have been saved in your Certbot
   configuration directory at /etc/letsencrypt. You should make a
   secure backup of this folder now. This configuration directory will
   also contain certificates and private keys obtained by Certbot so
   making regular backups of this folder is ideal.
 - If you like Certbot, please consider supporting our work by:

   Donating to ISRG / Let's Encrypt:   https://letsencrypt.org/donate
   Donating to EFF:                    https://eff.org/donate-le

root@www:/etc/apache2#
このあと、https://をつけてサイトにアクセスすると無事閲覧できました。
おまけ ACM (AWS Certificate Manager)
無料で使えるということで、試してみました。
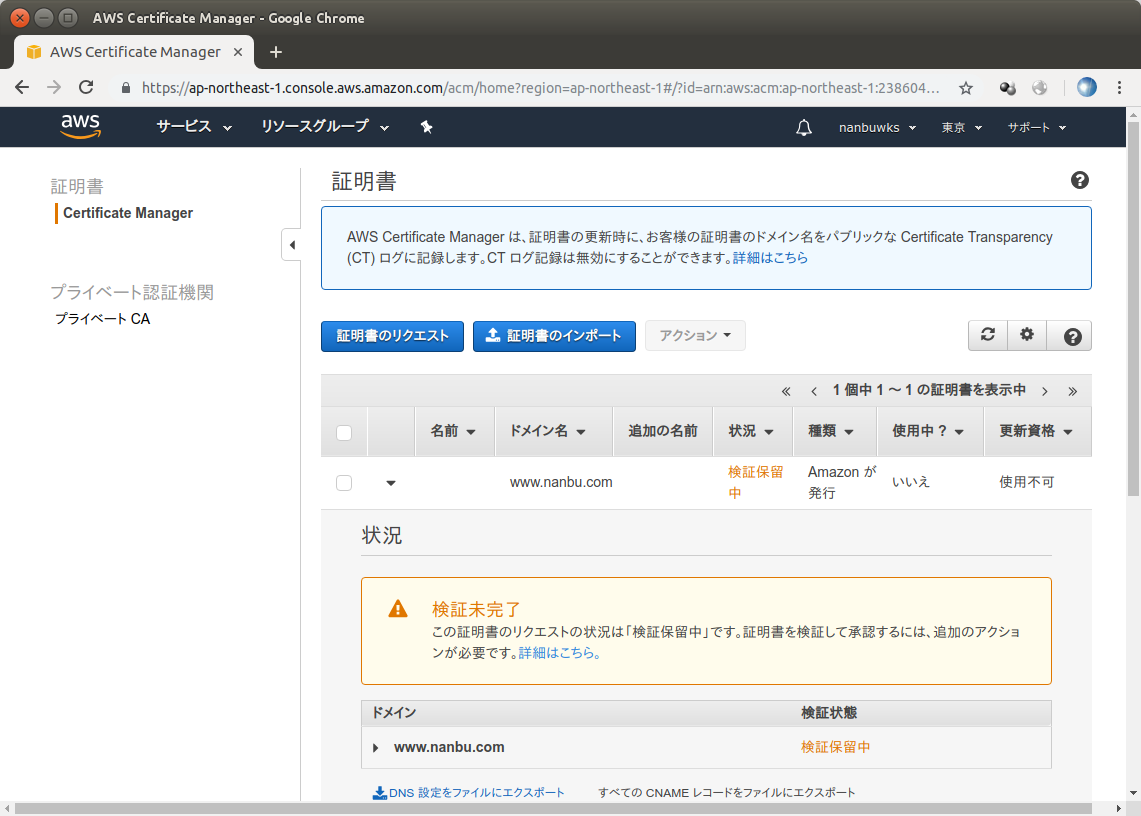
DNS認証を選び、証明書発行作業をします。
しばらく以下のようになっているので待ちます。
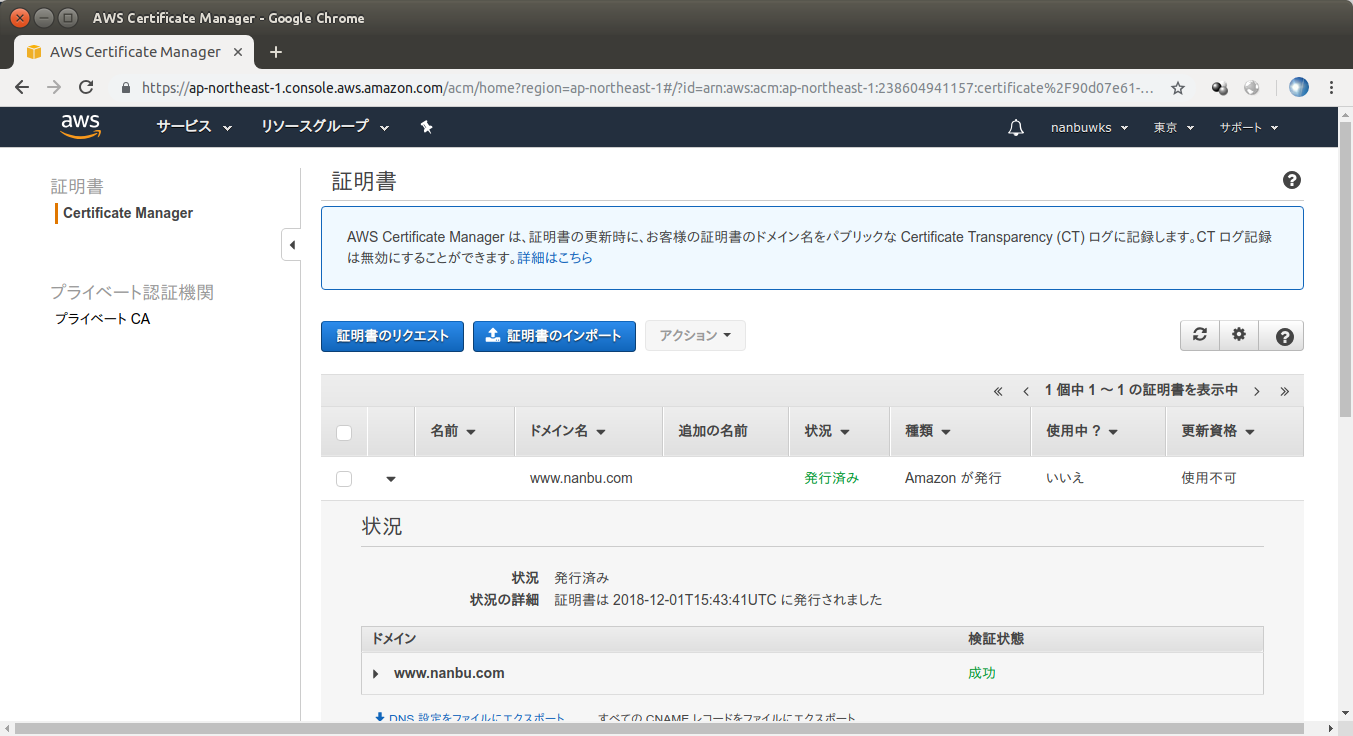
一晩たったら、以下のようになりました。
これをサーバにロードして設定しようかな? と思いましたが、ファイル出力はできないらしく、ELB とかでしか使う方法がないみたいです。ELB導入してもいいのですがもっとプレーンな設定をやりたいと思い、表題のやりかたに変更しました。


