BLEアプリ(2)
Nordic UART Service に接続するAndroidアプリとして、
nRF UART 2.0
https://play.google.com/store/apps/details?id=com.nordicsemi.nrfUARTv2&hl=ja
があります。このソースはこちら
Android-nRF-UART
https://github.com/NordicPlayground/Android-nRF-UART
にあります。
ライセンスは3条項BSDライセンスなので、このアプリを基にして自分のアプリ作成もできますね。
準備
ダウロードしたZIPファイルを解凍し、自分のアプリの名前にディレクトリ名を変更します。
$ unzip Android-nRF-UART-master.zip
$ mv Android-nRF-UART-master Android-nRF-UART-test
旧い環境の設定が残っていてめんどくさいことになるので、競合しそうなファイルを削除します。
$ cd Android-nRF-UART-test/
$ ls
LICENSE  README.md  app  build.gradle  gradle  gradlew  gradlew.bat  import-summary.txt  local.properties  nRFUART_GoogleAPI_Android4.3+.iml  settings.gradle
$ rm -rf build.gradle gladle gradlew gradlew.bat import-summary.txt local.properties nRFUART_GoogleAPI_Android4.3+.iml settings.gradle gradle
プロジェクトフォルダ内は以下のものだけにします。
$ ls
LICENSE  README.md  app
Android Studio を起動し、File-OpenでAndroid-nRF-UART-test/appを選びます。
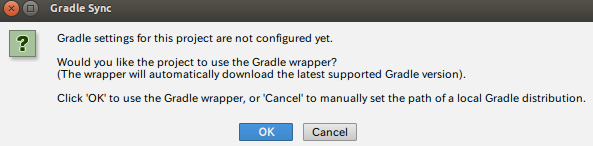
OKを押して進めます。
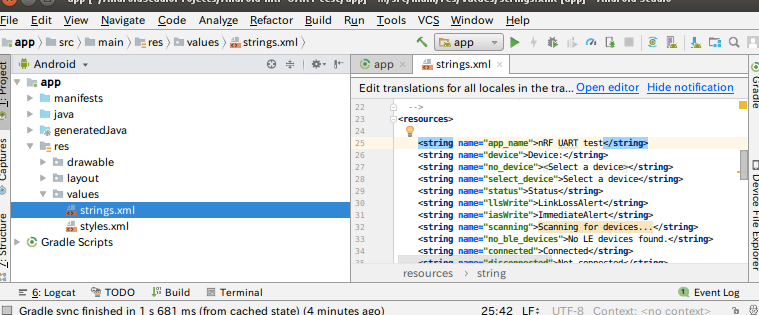
エラー出ますが対処は後として、先にアプリ名を設定しておきます。
app - src - res - values - strings.xml をクリックして該当箇所を書き換えます。
Gradle関連バージョンの調整
旧い環境のプロジェクトを引き継ぐ場合は、GradleやAndroid Pluginのバージョンなどを適切に設定します。
cf., 僕たちはいつまでこんな楽しいAndroid Studio設定をし続けるのか? Android Studio 3.x時代の設定不足解消メモ
https://qiita.com/riversun/items/78353cb2b3a8c7aa97a5
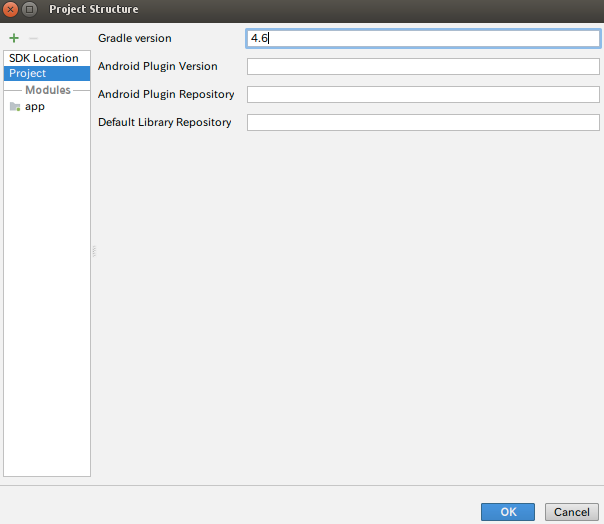
File- Project Structure - Project を押すと、以下のようになっています。
以下を参照し、
https://developer.android.com/studio/releases/gradle-plugin.html
https://developer.android.com/studio/releases/build-tools
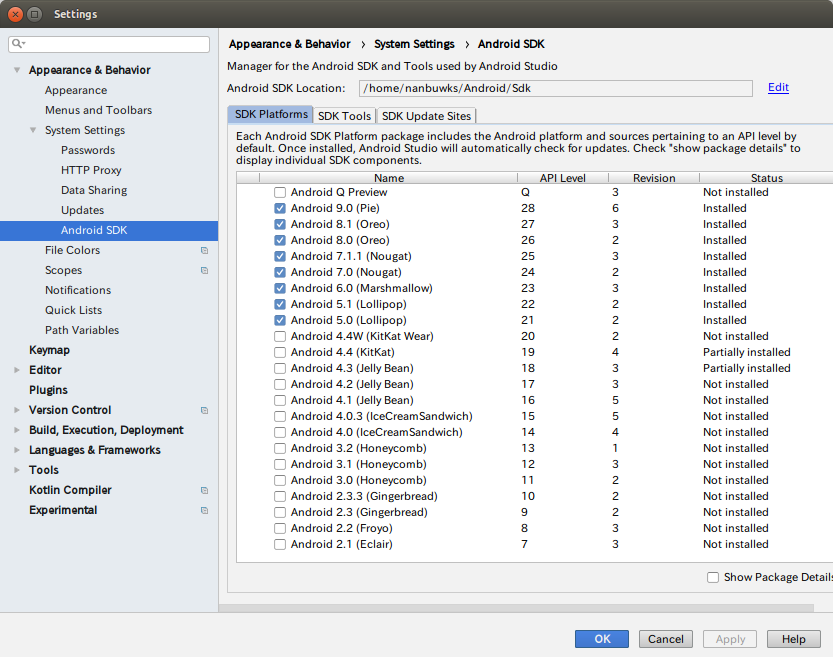
Gradle バージョン 4.6 + Android Plugin バージョン 3.2.1 + SDK Build Tools バージョン 28.0.3 + compileSdkVersion 26 の組み合わせでいくととにします。
なお、どの表記がどういう意味を持っているかについては
「夜でもアッサム AndroidのcompileSdkVersionとかbuildToolsVersionとか」
を読んで判断の助けにしました。
http://assam-at-night.blogspot.com/2015/05/androidcompilesdkversionbuildtoolsversi.html
以下のように設定します。
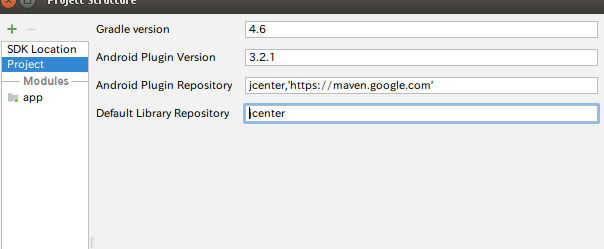
Supplied String module notation '3.2.1' is invalid. Example notations: 'org.gradle:gradle-core:2.2', 'org.mockito:mockito-core:1.9.5:javadoc'.
Open File
というエラーが出ているので、
「Open File」を押して、
build.gradleを表示します。以下のようになっています。
apply plugin: 'com.android.application'
android {
    compileSdkVersion 18
    buildToolsVersion "23.0.0"

    defaultConfig {
        applicationId "com.nordicsemi.nrfUARTv2"
        minSdkVersion 18
        targetSdkVersion 18
    }


    buildTypes {
        release {
            minifyEnabled false
            proguardFiles getDefaultProguardFile('proguard-android.txt'), 'proguard-rules.txt'
        }
    }
}

dependencies {
    compile 'com.android.support:support-v4:23.0.0'
}
buildscript {
    dependencies {
        classpath '3.2.1'
    }
    repositories {
        jcenter()
        maven { url 'https://maven.google.com' }
    }
}
allprojects {
    repositories {
        jcenter()
    }
}
以下のように変更します。
buildscript {
    dependencies {
        classpath 'com.android.tools.build:gradle:3.2.1'
    }
また、
compileSdkVersion や targetSdkVersion , minSdkVersion が 18 となっています。これは
によると該当は Android4.3 で、相当旧いですね。当初の予定どおり、compileSdkVersion 26 とします。また、buildToolsVersion "28.0.3"にするために以下のように変更します。
android {
    compileSdkVersion 26
    buildToolsVersion "28.0.3"
build.gradle の修正
allprojectsについても変更します。
AAPT2 (Android Asset Packaging Tool 2) ツールが Google's Maven repository で配布されるようになったことに伴っての変更です。
allprojects {
    repositories {
        google()
        jcenter()
    }
}
Build - Make Projectします。
Lint found fatal errors while assembling a release target.

To proceed, either fix the issues identified by lint, or modify your build script as follows:
...
android {
    lintOptions {
        checkReleaseBuilds false
        // Or, if you prefer, you can continue to check for errors in release builds,
        // but continue the build even when errors are found:
        abortOnError false
    }
}
...
と出ます。lint はコード検査ツールですが、今回はメッセージ通り、lint エラーを無視するように build.gradle に追記します。
android {
   lintOptions {
        checkReleaseBuilds false
        abortOnError false
    }
・・・
更に Build- Make Project とすると、
Configuration 'compile' is obsolete and has been replaced with 'implementation' and 'api'.
と出ます。GradleのJavaプラグインにて「compile」の依存関係は廃止となることを受けてのことだそうです。implementationに変更するのが良いそうです。
build.gradle の
dependencies {
    compile 'com.android.support:support-v4:23.0.0'
}
を
dependencies {
    implementation 'com.android.support:support-v4:23.0.0'
}
とする。
結果、build.gradle は最終的にこうなりました。
apply plugin: 'com.android.application'
android {
    lintOptions {
        checkReleaseBuilds false
        abortOnError false
    }
    compileSdkVersion 26
    buildToolsVersion "28.0.3"

    defaultConfig {
        applicationId "com.nordicsemi.nrfUARTv2"
        minSdkVersion 18
        targetSdkVersion 18
    }


    buildTypes {
        release {
            minifyEnabled false
            proguardFiles getDefaultProguardFile('proguard-android.txt'), 'proguard-rules.txt'
        }
    }
}

dependencies {
    implementation 'com.android.support:support-v4:23.0.0'
}
buildscript {
    dependencies {
        classpath 'com.android.tools.build:gradle:3.2.1'
    }
    repositories {
        jcenter()
        maven { url 'https://maven.google.com' }
    }
}
allprojects {
    repositories {
        google()
        jcenter()
    }
}
AndroidManifest.xml の修正
Build - Make Project とすると、
The minSdk version should not be declared in the android manifest file. You can move the version from the manifest to the defaultConfig in the build.gradle file.
と出るので
app-manifests-AndroidManifest.xmlを開き、
<manifest xmlns:android="http://schemas.android.com/apk/res/android"
    package="com.nordicsemi.nrfUARTv2"
    android:versionCode="43"
    android:versionName="2.0" >

    <uses-sdk
        android:minSdkVersion="18"
        android:targetSdkVersion="18" />
    <uses-permission android:name="android.permission.BLUETOOTH" />
    <uses-permission android:name="android.permission.BLUETOOTH_ADMIN" />
・・・
を以下のように直します。
<manifest xmlns:android="http://schemas.android.com/apk/res/android"
    package="com.nordicsemi.nrfUARTv2"
    android:versionCode="43"
    android:versionName="2.0" >

    <uses-permission android:name="android.permission.BLUETOOTH" />
    <uses-permission android:name="android.permission.BLUETOOTH_ADMIN" />
・・・
RUN
Run-Run 'app' で、接続するとアプリが実行されます。
なお、
Installation failed with message Failed to establish session.
と出たことがありました。
その場合、 “Build, Execution, Deployment” の下の、”Instant Run”の画面で、
Enable Instant Run to hot swap code/resource changes on deploy(default enabled).
のチェックを外して、OKをクリックしたら動作しました。
apkファイル作る
Build - Make Module 'app' とすると app/build/outputs/apk/debug に app-debug.apk が生成されます。
なお、この apk ファイルインストールしようとしても、
「アプリはインストールされていません」と出ることがありました。
その場合、
~/.android/中の
debug.keystore
debug.keystore.lock
を削除したら動くようになりました。
改造する
元々の Android-nRF-UART は以下のような動作をします。
- テキスト入力した一行をSend ボタンを押すと BLE デバイスに送信
- BLE デバイスから受信したデータを画面にテキスト表示
これを、以下のように直します。
- テキスト入力エリアを削除し、Send ボタンを押すと定形データ (今回は "UDLRABUD" )を送る
- BLEデバイスから受信したデータを( Byte列 )をカンマ区切り数値形式で表示
Send ボタンを押すと定形データを送る
まず、main.xml 中にある sendTextを削除します。
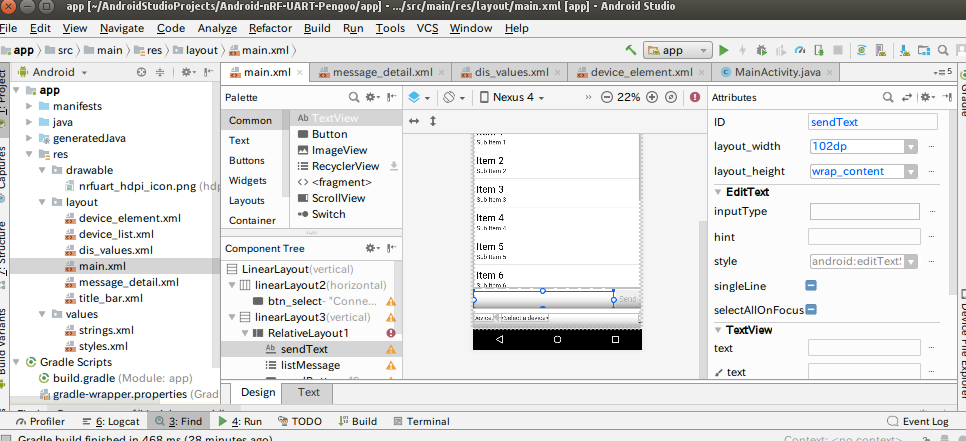
次に、app-java-MainActivity中の以下の箇所を修正します。
        btnSend.setOnClickListener(new View.OnClickListener() {
            @Override
            public void onClick(View v) {
//            	EditText editText = (EditText) findViewById(R.id.sendText);
//            	String message = editText.getText().toString();
        	String message = "UDLRABUD";
            	message = "timedemo";
            	byte[] value;
				try {
					//send data to
更に、MainActivity中で sendText で検索して出てきた行をコメントアウトします。
また、edtMessage で検索して出てきた行もコメントアウトします。
受信したデータを( Byte列 )をカンマ区切り数値形式で表示
app-java-MainActivity中の
if (action.equals(UartService.ACTION_DATA_AVAILABLE))
箇所を修正します。
          //*********************//
            if (action.equals(UartService.ACTION_DATA_AVAILABLE)) {

                 final byte[] txValue = intent.getByteArrayExtra(UartService.EXTRA_DATA);
                 runOnUiThread(new Runnable() {
                     public void run() {
                         try {
                             if (txValue != null && txValue.length > 0) {
                                 StringBuilder text = new StringBuilder();
                                 for (byte d : txValue) {
//                                     text.append(String.format("X%02X,", d));   // Hexadecimal
                                     text.append(String.format("%d,", d));    // Decimal
                                 }
                                 String currentDateTimeString = DateFormat.getTimeInstance().format(new Date());
                                 listAdapter.add("[" + currentDateTimeString + "] RX: " + text);
                                 messageListView.smoothScrollToPosition(listAdapter.getCount() - 1);
                             }
                         } catch (Exception e) {
                             Log.e(TAG, e.toString());
                         }
                     }
                 });
             }
           //*********************//