Bluetooth の QR コードリーダーをつなぐ実験です。
IoT ぽい感じで、 GUI ではなく CUI で完結するやりかたを調べてみました。
環境
- Linux環境
PC上の Ubuntu Linux と、Raspberry Pi 上の Raspbian で実験しました。
- QRコードリーダー
DENSO WAVE の SE1 という機種です。
DENSO WAVE SE1

- QR コードリーダー
- Bluetooth Specification Ver. 2.1+EDR 準拠
- 単3電池2本で動作
- SPP と、HID キーボードいずれかで動作します。
QRコードリーダー側での接続設定が必要
DENSO WAVE SE1 を試しているときにハマったポイントです。
PC側からペアリングできるのかなーと思って操作していましたが、うまく反応しませんでした。
新規PCとかに接続する場合はQRコードリーダー側で都度接続設定をしないといけないみたいです。
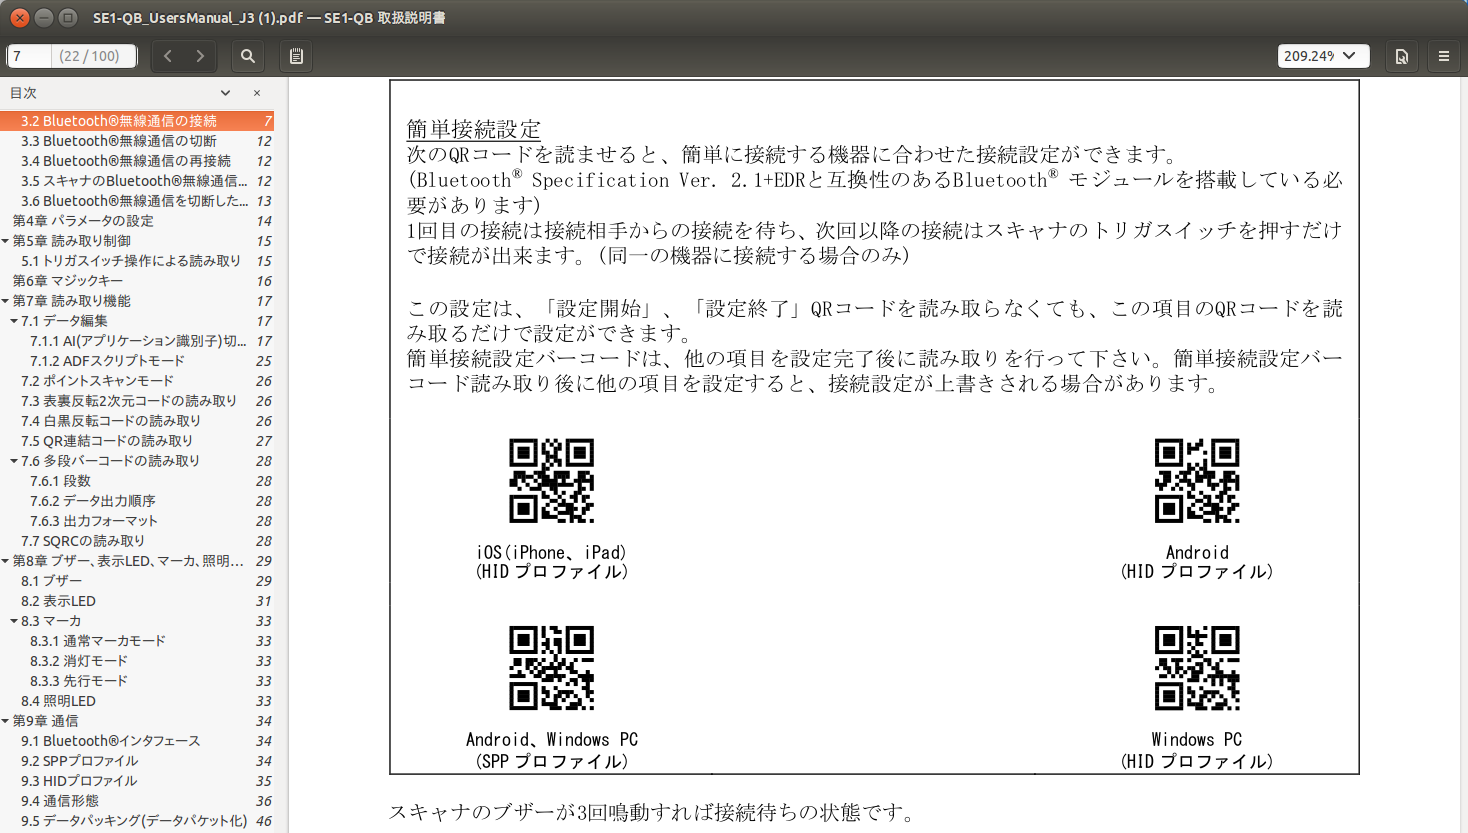
- SE1の電源OFF
- SE1の電源ON
- 簡単接続設定のQRコードをSE1に読ませる
- Linux側でCONNECTコマンド発行
という順序で操作すると、確実にペアリングできるようになりました。
PC 上の Ubuntu でやってみる
環境:
Ubuntu 16.04 (AMD64)
まず、bluetoothctlを立ち上げます。
$ bluetoothctl
Agent registered
[bluetooth]# list
Controller F4:B7:E2:CC:7B:BD LATITUDE [default]
bluetoothctlの操作コンソールに移行します。
show で自分のPCのインターフェースが見えます。
[bluetooth]# show
Controller F4:B7:E2:CC:7B:BD
	Name: LATITUDE
	Alias: LATITUDE
	Class: 0x000c010c
	Powered: yes
	Discoverable: no
	Pairable: yes
	UUID: Headset AG                (00001112-0000-1000-8000-00805f9b34fb)
	UUID: Generic Attribute Profile (00001801-0000-1000-8000-00805f9b34fb)
	UUID: A/V Remote Control        (0000110e-0000-1000-8000-00805f9b34fb)
	UUID: Generic Access Profile    (00001800-0000-1000-8000-00805f9b34fb)
	UUID: PnP Information           (00001200-0000-1000-8000-00805f9b34fb)
	UUID: A/V Remote Control Target (0000110c-0000-1000-8000-00805f9b34fb)
	UUID: Audio Source              (0000110a-0000-1000-8000-00805f9b34fb)
	UUID: Audio Sink                (0000110b-0000-1000-8000-00805f9b34fb)
	Modalias: usb:v1D6Bp0246d052B
	Discovering: no
scan on でbluetoothデバイスを捜索。
[bluetooth]# scan on
Discovery started
[CHG] Controller F4:B7:E2:CC:7B:BD Discovering: yes
[NEW] Device B0:B4:48:12:47:66 SE1QxB-400527
[CHG] Device B0:B4:48:12:47:66 TxPower: 5
検出できました。SE1Q・・・というのがSE1です。
このまま放っておくとずっと捜索し続けるので scan off で止めます。
[bluetooth]# scan off
[CHG] Device B0:B4:48:12:47:66 TxPower is nil
[CHG] Device B0:B4:48:12:47:66 RSSI is nil
Discovery stopped
[CHG] Controller F4:B7:E2:CC:7B:BD Discovering: no
pair コマンドでアドレスを指定してペアリングします。
[bluetooth]# pair B0:B4:48:12:47:66
Attempting to pair with B0:B4:48:12:47:66
[CHG] Device B0:B4:48:12:47:66 Connected: yes
[CHG] Device B0:B4:48:12:47:66 Modalias: bluetooth:v076Dp0001d0100
[CHG] Device B0:B4:48:12:47:66 UUIDs: 00001124-0000-1000-8000-00805f9b34fb
[CHG] Device B0:B4:48:12:47:66 UUIDs: 00001200-0000-1000-8000-00805f9b34fb
[CHG] Device B0:B4:48:12:47:66 ServicesResolved: yes
[CHG] Device B0:B4:48:12:47:66 Paired: yes
Pairing successful
[CHG] Device B0:B4:48:12:47:66 ServicesResolved: no
[CHG] Device B0:B4:48:12:47:66 Connected: no
うまくペアリングできたので接続します。
[bluetooth]# connect B0:B4:48:12:47:66
Attempting to connect to B0:B4:48:12:47:66
[CHG] Device B0:B4:48:12:47:66 Connected: yes
Connection successful
[CHG] Device B0:B4:48:12:47:66 ServicesResolved: yes
[SE1QxB-400527]# 001875
Invalid command in menu main: 001875

Use "help" for a list of available commands in a menu.
Use "menu <submenu>" if you want to enter any submenu.
Use "back" if you want to return to menu main.
[SE1QxB-400527]#
接続テスト
以下のQRコードをSE1に読ませてみて、うまくPCにデータが伝わるかどうか、試してみます。
中身は、数字で 0123456 です。

これを読ませると・・・
$ 0123456
0123456: コマンドが見つかりません
キーボードから入力したように動きました。
RaspberryPi
これも同様にやっていきます。
pi@raspberrypi:~ $ bluetoothctl
[bluetooth]# list
[bluetooth]# exit
あれ。sudoつけてやってみたらうまくいきました。
pi@raspberrypi:~ $ sudo bluetoothctl
[NEW] Controller B8:27:EB:71:8C:37 raspberrypi [default]
[NEW] Device B0:B4:48:12:47:66 SE1QxB-400527
[bluetooth]# list
Controller B8:27:EB:71:8C:37 raspberrypi [default]
[bluetooth]# show
Controller B8:27:EB:71:8C:37
	Name: raspberrypi
	Alias: raspberrypi
	Class: 0x000000
	Powered: yes
	Discoverable: no
	Pairable: yes
	UUID: Generic Attribute Profile (00001801-0000-1000-8000-00805f9b34fb)
	UUID: A/V Remote Control        (0000110e-0000-1000-8000-00805f9b34fb)
	UUID: PnP Information           (00001200-0000-1000-8000-00805f9b34fb)
	UUID: Generic Access Profile    (00001800-0000-1000-8000-00805f9b34fb)
	UUID: A/V Remote Control Target (0000110c-0000-1000-8000-00805f9b34fb)
	Modalias: usb:v1D6Bp0246d052B
	Discovering: no
既にSE1QxB-400527はリストアップされているので接続します。
[bluetooth]# pair B0:B4:48:12:47:66
Attempting to pair with B0:B4:48:12:47:66
Failed to pair: org.bluez.Error.AlreadyExists
[bluetooth]# connect B0:B4:48:12:47:66
Attempting to connect to B0:B4:48:12:47:66
[CHG] Device B0:B4:48:12:47:66 Connected: yes
Connection successful
[CHG] Device B0:B4:48:12:47:66 ServicesResolved: yes
[SE1QxB-400527]#
Keyboard としての認識を確認する
dmesgしてみると、
・
・
・

[   10.383511] Bluetooth: BNEP filters: protocol multicast
[   10.383532] Bluetooth: BNEP socket layer initialized
[ 1922.303380] Bluetooth: HIDP (Human Interface Emulation) ver 1.2
[ 1922.303411] Bluetooth: HIDP socket layer initialized
[ 1922.483858] hid-generic 0005:076D:0001.0001: unknown main item tag 0x0
[ 1922.484431] input: SE1QxB-400527 as /devices/platform/soc/3f201000.serial/tty/ttyAMA0/hci0/hci0:12/0005:076D:0001.0001/input/input0
[ 1922.487594] hid-generic 0005:076D:0001.0001: input,hidraw0: BLUETOOTH HID v1.00 Keyboard [SE1QxB-400527] on b8:27:eb:71:8c:37
[78901.269606] hid-generic 0005:076D:0001.0002: unknown main item tag 0x0
[78901.270093] input: SE1QxB-400527 as /devices/platform/soc/3f201000.serial/tty/ttyAMA0/hci0/hci0:12/0005:076D:0001.0002/input/input1
[78901.277922] hid-generic 0005:076D:0001.0002: input,hidraw0: BLUETOOTH HID v1.00 Keyboard [SE1QxB-400527] on b8:27:eb:71:8c:37
pi@raspberrypi:~ $
Keyboardとして認識しているみたいですね。
$ ls /dev/input
event0  mice
とあり、/dev/input/event0 に接続しているのがわかります。
Python で QRコード を受信するプログラムを作る
キーボードとして入力されるので、そのままでは物理コンソールの標準入力としてデータが流れてきます。しかしながらIoTっぽくするので、物理コンソールが無くてもデータを取得しなければなりません。
https://python-evdev.readthedocs.io/en/latest/tutorial.html#reading-events
ここを参考にして、どのような信号が /dev/input/event0 に流れてきているかを調べる以下のプログラムを作りました。
言語は、Python3 です。
# coding: utf-8
import evdev
from select import select

DEVICE = "/dev/input/event0"
dev = evdev.InputDevice(DEVICE)
print(dev)
for event in dev.read_loop():
  if event.type == evdev.ecodes.EV_KEY:
     print(event.type,event.value,event.code,evdev.ecodes.KEY[event.code])
先のテストと同様に、以下のQRコードを読ませてみました。
実行結果です
device /dev/input/event0, name "SE1QxB-400527", phys "b8:27:eb:71:8c:37"
1 1 69 KEY_NUMLOCK
1 0 69 KEY_NUMLOCK
1 1 11 KEY_0
1 0 11 KEY_0
1 1 2 KEY_1
1 0 2 KEY_1
1 1 3 KEY_2
1 0 3 KEY_2
1 1 4 KEY_3
1 0 4 KEY_3
1 1 5 KEY_4
1 0 5 KEY_4
1 1 6 KEY_5
1 0 6 KEY_5
1 1 7 KEY_6
1 0 7 KEY_6
1 1 28 KEY_ENTER
1 0 28 KEY_ENTER
1 1 69 KEY_NUMLOCK
1 0 69 KEY_NUMLOCK
これを見ると、キーコードとして押して離すという動作がペアとなり、その動作が
- NUMLOCKキー
- 0キー
- 1キー
- 2キー
- 3キー
- 4キー
- 5キー
- 6キー
- エンターキー
- NUMLOCKキー
の順番で操作模擬されていることがわかります。
ということで先のプログラムに手を加えて、数字キーが押されたら該当する数字文字を、エンターが押されたら改行を出力するプログラムを作成しました。
今回は、数字のみ必要だったので数字以外のキーが押された場合は、無視しています。
import evdev
from select import select
from keymap import keys
# from keymap import keys

DEVICE = "/dev/input/event0"
dev = evdev.InputDevice(DEVICE)
# print(dev)
for event in dev.read_loop():
  if event.type == evdev.ecodes.EV_KEY:
    if event.value == 1:
      if event.code == 28: # Enter
        print()
        break
      else:
        # print(evdev.ecodes.KEY[event.code])
        print(keys[event.code],end='')
どの信号がどの数字に対応しているかについては、
https://qiita.com/teraken_/items/0e8c5b31567f966773b6
「ラズパイにつないだテンキーボードをタクトスイッチ代わりにpythonで使えるようにする(メモ)」
を参考に、keymap.pyという名前でキーマップを作成し、読みこむようにしました。
keys = {
 11: "0",
 2: "1",
 3: "2",
 4: "3",
 5: "4",
 6: "5",
 7: "6",
 8: "7",
 9: "8",
 10: "9",
 69: ""
}
$ python3 densowavese1.py
0123456
無事データが取得できました。