はじめに
最近流行りの ChatGPT くん。
そんな彼の API が公開されたと聞いたので早速 LINEBot で作ってみた。
この記事でできること
ChatGPT との会話を LINE上でできる Bot が作れる。
サーバーを使用しなくても、PC上で動かせる。
対応しているPythonのバージョン
この記事で書くコードは以下のバージョンを想定して書いてあるよ。
これより下のバージョンでは動かないから注意してね。
Python のアップデートはするんだよ。
- 3.8
- 3.9
- 3.10
- 3.11
さっそく作っていく
1. ChatGPT で使用するAPI keyの取得
OpenAI のサイトから API key を発行する。
アカウントを作ってない人は新規作成
https://platform.openai.com/account/api-keys
Create new secret key で作成できるよ。
生成時しかコピー出来ないっぽいので、どこかにメモしておいてね。
2. LINE公式アカウントの作成
これが結構ややこしくて、LINEBot で使用する際の設定方法など過去に書いたので、これを参考にしてね。
https://qiita.com/nanato12/items/25e2db9461bb6ac2b8c5
3. ngrok のインストール
今回はサーバーが不要で、ローカルのPC上で動かすのでngrokを使用するよ。
↓の公式サイトからアカウントを作成してね。
作成すると、インストール方法の画面に移動するので、それを見て使えるようにしてね。
https://dashboard.ngrok.com/get-started/setup
4. さて、コードを書きましょう
1 ~ 3 まで終わったら、ようやくコードを書いていくよ。
最初にディレクトリ構成だけ書いておくよ。
.
├── app
│   ├── __init__.py
│   └── gpt
│       ├── client.py
│       ├── constants.py
│       └── message.py
├── main.py
├── requirements.txt
└── .env
作成するのは7ファイルだけ!
requirements.txt
これは使用するパッケージを一覧で書くだけのファイルだよ。
flask==2.2.3
openai==0.27.2
python-dotenv==1.0.0
line-bot-sdk==2.4.2
パッケージはインストールしておくんだよ。
pip install -r requirements.txt
.env
これは環境変数を書いておくファイルだよ。
ChatGPT で使用する API key や LINEBot を使用するためのアクセストークンやチャンネルシークレットを書いておくよ。
↓の値はサンプルなので、自分が発行した値に書き換えてね。
# ChatGPT のAPI key
CHATGPT_API_KEY=sk-YFXXXXXXXXXXXXXXXXXXXX

# LINE公式アカウントのチャンネルシークレット
LINE_CHANNEL_SECRET=44b25f9xxxxxxxxxxxxxxxxxxxxxxx

# LINE公式アカウントのアクセストークン
LINE_CHANNEL_ACCESS_TOKEN=jowcSHZ2JxxxxxxxxxxxxxxxxxxxxxxxxxxxxxxxxxxxxxxXbswdB04t89/1O/w1cDnyilFU=
app/gpt/constants.py
これは定数を書いておくファイルだよ。
ChatGPT の API を使用する説明が公式サイトに載ってたので、それを見たよ。
https://platform.openai.com/docs/guides/chat/introduction
role や model ってのがあるらしいので、とりあえず定義したよ。
from enum import Enum


class Role(Enum):
    SYSTEM = "system"
    USER = "user"
    ASSISTANT = "assistant"


class Model(Enum):
    GPT35TURBO = "gpt-3.5-turbo"
app/gpt/message.py
これは、chatGPT の API で使用するメッセージオブジェクトだよ。
公式サイトにあった
{"role": "system", "content": "You are a helpful assistant."},
{"role": "user", "content": "Who won the world series in 2020?"},
{"role": "assistant", "content": "The Los Angeles Dodgers won the World Series in 2020."},
{"role": "user", "content": "Where was it played?"}
のようなメッセージを作成するだけのクラスだよ。
from __future__ import annotations

from dataclasses import dataclass
from typing import Dict

from app.gpt.constants import Role


@dataclass
class Message:
    role: Role
    content: str

    def to_dict(self) -> Dict[str, str]:
        return {"role": self.role.value, "content": self.content}

    @classmethod
    def from_dict(cls, message: Dict[str, str]) -> Message:
        return cls(role=Role(message["role"]), content=message["content"])
app/gpt/client.py
これは実際に chatGPT の API を使用するクラスだよ。
from dataclasses import dataclass, field
from os import environ
from typing import List

import openai
from openai.openai_object import OpenAIObject

from app.gpt.constants import Model
from app.gpt.message import Message


@dataclass
class ChatGPTClient:
    model: Model
    messages: List[Message] = field(default_factory=list)

    def __post_init__(self) -> None:
        if not (key := environ.get("CHATGPT_API_KEY")):
            raise Exception(
                "ChatGPT api key is not set as an environment variable"
            )
        openai.api_key = key

    def add_message(self, message: Message) -> None:
        self.messages.append(message)

    def create(self) -> OpenAIObject:
        res = openai.ChatCompletion.create(
            model=self.model.value,
            messages=[m.to_dict() for m in self.messages],
        )
        self.add_message(Message.from_dict(res["choices"][0]["message"]))
        return res
app/__init__.py
これは Flask のアプリケーションのコードだよ。
主に LINEBot の処理が書かれているよ。
from os import environ
from typing import Dict

from dotenv import load_dotenv
from flask import Flask, abort, request
from linebot import LineBotApi, WebhookHandler
from linebot.exceptions import InvalidSignatureError
from linebot.models import MessageEvent, Source, TextMessage, TextSendMessage

from app.gpt.client import ChatGPTClient
from app.gpt.constants import Model, Role
from app.gpt.message import Message

load_dotenv(".env", verbose=True)

app = Flask(__name__)

if not (access_token := environ.get("LINE_CHANNEL_ACCESS_TOKEN")):
    raise Exception("access token is not set as an environment variable")

if not (channel_secret := environ.get("LINE_CHANNEL_SECRET")):
    raise Exception("channel secret is not set as an environment variable")

line_bot_api = LineBotApi(access_token)
handler = WebhookHandler(channel_secret)

chatgpt_instance_map: Dict[str, ChatGPTClient] = {}


@app.route("/callback", methods=["POST"])
def callback() -> str:
    signature = request.headers["X-Line-Signature"]

    body = request.get_data(as_text=True)
    app.logger.info("Request body: " + body)

    try:
        handler.handle(body, signature)
    except InvalidSignatureError:
        abort(400)

    return "OK"


@handler.add(MessageEvent, message=TextMessage)
def handle_message(event: MessageEvent) -> None:
    text_message: TextMessage = event.message
    source: Source = event.source
    user_id: str = source.user_id

    if (gpt_client := chatgpt_instance_map.get(user_id)) is None:
        gpt_client = ChatGPTClient(model=Model.GPT35TURBO)

    gpt_client.add_message(
        message=Message(role=Role.USER, content=text_message.text)
    )
    res = gpt_client.create()
    chatgpt_instance_map[user_id] = gpt_client

    res_text: str = res["choices"][0]["message"]["content"]

    line_bot_api.reply_message(
        event.reply_token, TextSendMessage(text=res_text.strip())
    )
main.py
あとは実際にFlaskアプリを動かすためだけのコードだね。
ポートは 3000 で、デバッグは True にしてるよ。
from app import app

if __name__ == "__main__":
    app.run(host="0.0.0.0", port=3000, debug=True)
実際に動かす
作ったので早速動かそう〜〜!!!
まずは Flask の起動だね。
python main.py
 * Serving Flask app 'app'
 * Debug mode: on
WARNING: This is a development server. Do not use it in a production deployment. Use a production WSGI server instead.
 * Running on all addresses (0.0.0.0)
 * Running on http://127.0.0.1:3000
 * Running on http://10.8.3.4:3000
Press CTRL+C to quit
 * Restarting with stat
 * Debugger is active!
 * Debugger PIN: 117-868-752
こんな感じに表示されればOKだね。
Flask を起動したまま、別タブで ngrok を起動するよ。
ngrok http 3000
ngrok by @inconshreveable                                                                                                                                                      (Ctrl+C to quit)

Session Status                online
Account                       ななといつ (Plan: Free)
Update                        update available (version 2.3.41, Ctrl-U to update)
Version                       2.3.40
Region                        United States (us)
Web Interface                 http://127.0.0.1:4040
Forwarding                    http://ccd5-194-195-89-90.ngrok.io -> http://localhost:3000
Forwarding                    https://ccd5-194-195-89-90.ngrok.io -> http://localhost:3000

Connections                   ttl     opn     rt1     rt5     p50     p90
                              0       0       0.00    0.00    0.00    0.00
こんな感じに表示されればOK
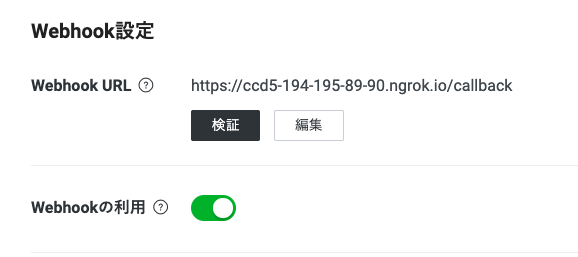
Forwarding の https の方のリンクをコピーして、LINEBot の Webhook URL に設定するよ。
https://developers.line.biz/console/
コンソールから対象のアカウントを選んで設定してね。
エンドポイントが /callback だから今回の場合はこうなるよ。
「検証」ボタンを押して「成功」と表示されればOKだよ。
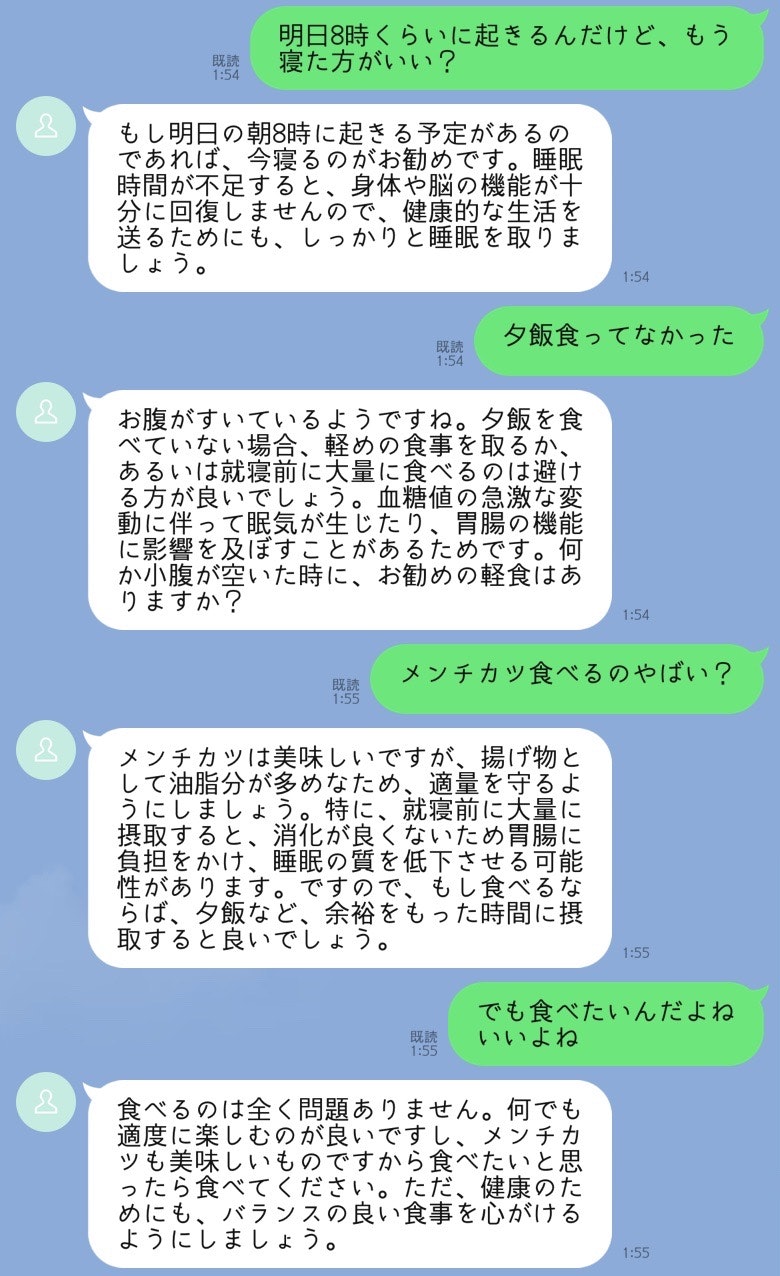
さぁ、LINEを開いて会話してみよう!!
ChatGPT くん、優しい。
今回書いたコードはGitHubに公開してるよ
v1.0 のタグが今回書いたコードだよ。
https://github.com/nanato12/chatgpt-linebot-python/tree/v1.0
日々メンテしていくので、 develop ブランチが最新になっているよ。
https://github.com/nanato12/chatgpt-linebot-python
最後に
以上が、ChatGPT の LINEBot を作成する方法でした。
サクッと書いたので多分不具合や考慮出来てない点があると思います。
エラーが出たり、不足部分があればこの記事のコメントやGitHubのissueを作っていただければと思います。
また、Pythonについての情報共有ができるLINEのオープンチャットを運営しています。
現時点での参加人数は1300人ほど。
完全匿名で参加できるので、よろしければぜひ。
オープンチャット「Python」


