はじめに
Node.jsをベースとしたAPIを作ろうとしたときに、REST APIとGraphQLを同時に生やしたいと思ったので、その流れについて記事にしようと思います。
この記事の目標
NestJSでREST APIとGraphQLが同時に動くサーバを作成する
構成
- データベース:PlanetScale
- ORM:Prisma
- フレームワーク:NestJS
REST APIの実装
最初にREST APIを作成し、その次にGraphQLを作成します。
NestJSでプロジェクトを作成
Prismaの利用を前提としたNestJSの公式チュートリアルがあるので、やっておくと理解しやすいですが、
やや説明不足&実装不足でこのままだと動かないので、以下の記事も参考にすると良いでしょう。
まず、NestJS CLIを使ってプロジェクトを作成します。
わざわざグローバルインストールする必要はないのでnpxで作ります。
npx @nestjs/cli new プロジェクト名
するとプロジェクト名に設定した名前のフォルダが生成されます。
シェル上で、使用したいパケージマネージャを選択するプロンプトが表示されるので、好きなものを選択してください。今回はyarnを選びます。
? Which package manager would you ❤️  to use? (Use arrow keys)
  npm
> yarn
  pnpm
選ぶとインストールがいずれ完了します。
完了したら、
cd プロジェクト名
yarn start
でNestJSが起動することを確認してみましょう。
http://localhost:3000 にアクセスすると、Hello World!と表示されているはずです。
ちなみに、
yarn start:dev
とすると変更監視モードで起動できます。コードの変更をすぐに確認したいときは、こちらで起動し続けると便利です。
GitHubにリポジトリを作成
ここまで来たら、GitHubに接続しましょう。
package.jsonの内容を自分に合わせて書き換えて、GitHubにPublishしました。
Prismaを導入する
Prisma CLIを開発環境にインストールします。
yarn add -D prisma
Prisma Clientをインストールします。
yarn add @prisma/client
Prismaを初期化します。
yarn prisma init
.envファイルが作られますが、現時点で.gitignoreに.envが指定されていません。
セキュリティ上問題があるので、.envを追加してください。
.env
ここまで終わったら、データベースを接続していきます。
PlanetScaleを用意
この辺の記事を参考にして、PlanetScaleプロジェクトを作成してください。
作成できたら、Branchesタブからmainブランチを選択し、Connectボタンを押して、接続情報を表示してください。
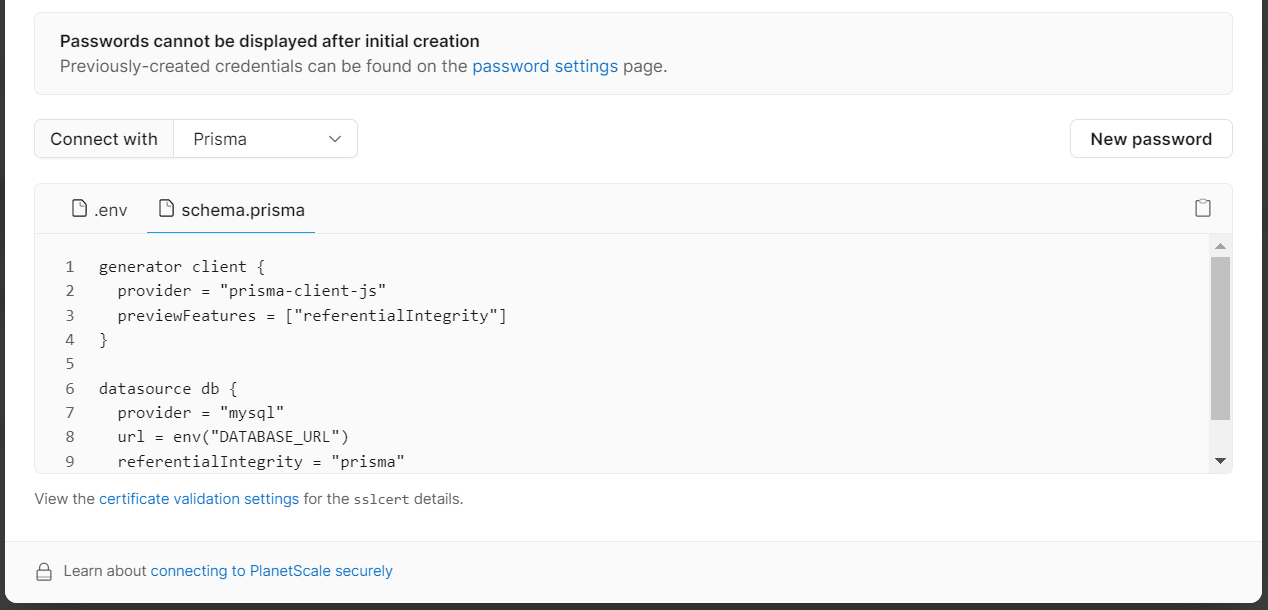
「Connect with」でPrismaを選択すると、.envとschema.prismaが表示されます。
.envはプロジェクトルートに、schema.prismaはprismaディレクトリに既に作成されているので、表示された内容でファイルを書き換えてください。
Prismaでデータベーステーブルを作成する
Prisma Migrateでデータベースのテーブルを作っていきます。
Prismaの公式チュートリアルも参考にしてください。
先ほど書き換えたschema.prismaに、データベースのデータモデルを追加します。
generator client {
  provider = "prisma-client-js"
  previewFeatures = ["referentialIntegrity"]
}

datasource db {
  provider = "mysql"
  url      = env("DATABASE_URL")
  referentialIntegrity = "prisma"
}

model User {
  id    Int     @default(autoincrement()) @id
  email String  @unique
  name  String?
  posts Post[]
}

model Post {
  id        Int      @default(autoincrement()) @id
  title     String
  content   String?
  published Boolean? @default(false)
  author    User?    @relation(fields: [authorId], references: [id])
  authorId  Int?
}
Prismaのスキーマは独自記法なので、意味不明だと思います。以下の公式リファレンスを適宜参照してください。
簡単な説明だけすると、modelの後に書いたもの(Post、Profile、User)がそれぞれテーブルになります。
波括弧の中で定義しているのは雑に言えばカラムです。
@〇〇(@idなど)となっているものはカラムに対する設定です。後ろに括弧を付けると、引数のようにオプションの値を受け取ることができます。
@@〇〇(@@indexなど)となっているものはテーブルに対する設定です。
IntやStringとなっている部分はカラムの型です。デフォルトはNOT NULLです。?を付けるとNULLABLEになります。
リレーションを張る場合は、モデル自体を示すもの(例えばauthor)と、それに紐づくidを示すもの(例えばauthorId)が必要です。今回はauthorがUserモデルを指し、設定で@relation(fields: [authorId], references: [id])とすることで、authorIdとUser.idが紐づいていることを表しています。詳しくは以下を参照してください。
posts Post[]のような感じで、一対多を表すこともできます。
多対多については以下を参照してください。
ここまでできたら早速PlanetScaleにテーブル定義を反映させてみましょう。
yarn prisma db push
PlanetScaleでmainブランチを選択し、Schemaタブを開くと、先ほど定義したスキーマがSQLに変換されて表示されているはずです。
NestJSのサービスを構成
PrismaとNestJSを繋げるために、srcディレクトリ内にprisma.service.tsを作ってください。
import { INestApplication, Injectable, OnModuleInit } from '@nestjs/common';
import { PrismaClient } from '@prisma/client';

@Injectable()
export class PrismaService extends PrismaClient implements OnModuleInit {
  async onModuleInit() {
    await this.$connect();
  }

  async enableShutdownHooks(app: INestApplication) {
    this.$on('beforeExit', async () => {
      await app.close();
    });
  }
}
@Injectable()という見慣れない書き方が出てきたと思いますが、これはデコレータと言います。Pythonとかだと馴染みある機能だと思いますが、JavaScriptではまだ実験的な機能のようです。詳しく知りたい方は以下を参照してください。
NestJSではデコレータを利用した書き方がたくさん出てきます。
デコレータは、後ろに続くメソッドやプロパティをラップできます。そのおかげで、シンプルなコードで強力な機能が使えるようになるわけです。
さて、次にモデルごとに便利な操作関数を作りましょう。
src/user.service.tsとsrc/post.service.tsを作ります。
import { Injectable } from '@nestjs/common';
import { PrismaService } from './prisma.service';
import { User, Prisma } from '@prisma/client';

@Injectable()
export class UserService {
  constructor(private prisma: PrismaService) {}

  async user(
    userWhereUniqueInput: Prisma.UserWhereUniqueInput,
  ): Promise<User | null> {
    return this.prisma.user.findUnique({
      where: userWhereUniqueInput,
      include: {
        posts: true,
      },
    });
  }

  async users(params: {
    skip?: number;
    take?: number;
    cursor?: Prisma.UserWhereUniqueInput;
    where?: Prisma.UserWhereInput;
    orderBy?: Prisma.UserOrderByWithRelationInput;
  }): Promise<User[]> {
    const { skip, take, cursor, where, orderBy } = params;
    return this.prisma.user.findMany({
      skip,
      take,
      cursor,
      where,
      orderBy,
      include: {
        posts: true,
      },
    });
  }

  async createUser(data: Prisma.UserCreateInput): Promise<User> {
    return this.prisma.user.create({
      data,
      include: {
        posts: true,
      },
    });
  }

  async updateUser(params: {
    where: Prisma.UserWhereUniqueInput;
    data: Prisma.UserUpdateInput;
  }): Promise<User> {
    const { where, data } = params;
    return this.prisma.user.update({
      data,
      where,
    });
  }

  async deleteUser(where: Prisma.UserWhereUniqueInput): Promise<User> {
    return this.prisma.user.delete({
      where,
    });
  }
}
import { Injectable } from '@nestjs/common';
import { PrismaService } from './prisma.service';
import { Post, Prisma } from '@prisma/client';

@Injectable()
export class PostService {
  constructor(private prisma: PrismaService) {}

  async post(
    postWhereUniqueInput: Prisma.PostWhereUniqueInput,
  ): Promise<Post | null> {
    return this.prisma.post.findUnique({
      where: postWhereUniqueInput,
      include: {
        author: true,
      },
    });
  }

  async posts(params: {
    skip?: number;
    take?: number;
    cursor?: Prisma.PostWhereUniqueInput;
    where?: Prisma.PostWhereInput;
    orderBy?: Prisma.PostOrderByWithRelationInput;
  }): Promise<Post[]> {
    const { skip, take, cursor, where, orderBy } = params;
    return this.prisma.post.findMany({
      skip,
      take,
      cursor,
      where,
      orderBy,
      include: {
        author: true,
      },
    });
  }

  async createPost(data: Prisma.PostCreateInput): Promise<Post> {
    return this.prisma.post.create({
      data,
      include: {
        author: true,
      },
    });
  }

  async updatePost(params: {
    where: Prisma.PostWhereUniqueInput;
    data: Prisma.PostUpdateInput;
  }): Promise<Post> {
    const { data, where } = params;
    return this.prisma.post.update({
      data,
      where,
      include: {
        author: true,
      },
    });
  }

  async deletePost(where: Prisma.PostWhereUniqueInput): Promise<Post> {
    return this.prisma.post.delete({
      where,
    });
  }
}
include: { posts: true }やinclude: { author: true }というのは、リレーションクエリの設定です。デフォルトではリレーションするデータを取得することはできないので、明示的に指定する必要があります。
後述するGraphQLでもこのサービスを再利用するので重要です。
具体的には、リレーションクエリを指定しないと以下のようなレスポンスになります。(後述する動作確認の段階まで進むと実行できるようになります。)
curl http://localhost:3000/post/1
{"id":1,"title":"titleTest","content":"contentTest","published":true,"authorId":1}
リレーションクエリを指定すると以下のようになります。
curl http://localhost:3000/post/1
{"id":1,"title":"titleTest","content":"contentTest","published":true,"authorId":1,"author":{"id":1,"email":"test.jp","name":"namosuke"}}
NestJSのコントローラを構成
最後に、コントローラを書いて、APIのエンドポイントと便利関数を繋げます。
import {
  Controller,
  Get,
  Param,
  Post,
  Body,
  Put,
  Delete,
} from '@nestjs/common';
import { UserService } from './user.service';
import { PostService } from './post.service';
import { User as UserModel, Post as PostModel } from '@prisma/client';

@Controller()
export class AppController {
  constructor(
    private readonly userService: UserService,
    private readonly postService: PostService,
  ) {}

  @Get('post/:id')
  async getPostById(@Param('id') id: string): Promise<PostModel> {
    return this.postService.post({ id: Number(id) });
  }

  @Get('feed')
  async getPublishedPosts(): Promise<PostModel[]> {
    return this.postService.posts({
      where: { published: true },
    });
  }

  @Get('filtered-posts/:searchString')
  async getFilteredPosts(
    @Param('searchString') searchString: string,
  ): Promise<PostModel[]> {
    return this.postService.posts({
      where: {
        OR: [
          {
            title: { contains: searchString },
          },
          {
            content: { contains: searchString },
          },
        ],
      },
    });
  }

  @Post('post')
  async createDraft(
    @Body() postData: { title: string; content?: string; authorEmail: string },
  ): Promise<PostModel> {
    const { title, content, authorEmail } = postData;
    return this.postService.createPost({
      title,
      content,
      author: {
        connect: { email: authorEmail },
      },
    });
  }

  @Post('user')
  async signupUser(
    @Body() userData: { name?: string; email: string },
  ): Promise<UserModel> {
    return this.userService.createUser(userData);
  }

  @Put('publish/:id')
  async publishPost(@Param('id') id: string): Promise<PostModel> {
    return this.postService.updatePost({
      where: { id: Number(id) },
      data: { published: true },
    });
  }

  @Delete('post/:id')
  async deletePost(@Param('id') id: string): Promise<PostModel> {
    return this.postService.deletePost({ id: Number(id) });
  }
}
GETリクエストの場合は@Get('post/:id')みたいなデコレータでエンドポイントから受け取るパラメータを指定して、@Param('id')に流すみたいなそんな感じですね。
POSTリクエストの場合は@Postから@Body() postData: { title: string; content?: string; authorEmail: string }みたいにして受け取ります。
ちなみに、@Paramも@Bodyも中身はString型になります。
公式チュートリアルはここで終わりですが、このままだとエラーが出るので以下のようにsrc/app.module.tsを書き換えて修正します。
providersにサービスを追加しています。
import { Module } from '@nestjs/common';
import { AppController } from './app.controller';
import { AppService } from './app.service';
import { PrismaService } from './prisma.service';
import { UserService } from './user.service';
import { PostService } from './post.service';

@Module({
  imports: [],
  controllers: [AppController],
  providers: [AppService, PrismaService, UserService, PostService],
})
export class AppModule {}
ここまで書けばREST APIの実装は終わりです。
REST APIの動作確認
動作確認方法は以下に詳しく書かれています。
yarn startしたら http://localhost:3000 にサーバが立つので、curlとか使って動作するか試してみてください。
実行例
curl -XPOST -d 'name=test3&email=test3@test.jp' http://localhost:3000/user
{"id":4,"email":"test3@test.jp","name":"test3","posts":[]}

curl -XPOST -d 'title=niceTitle&content=niceContent&authorEmail=test3@test.jp' http://localhost:3000/post
{"id":3,"title":"niceTitle","content":"niceContent","published":false,"authorId":4,"author":{"id":4,"email":"test3@test.jp","name":"test3"}}

curl -XPUT http://localhost:3000/publish/3
{"id":3,"title":"niceTitle","content":"niceContent","published":true,"authorId":4,"author":{"id":4,"email":"test3@test.jp","name":"test3"}}

curl http://localhost:3000/feed
[{"id":1,"title":"titleTest","content":"contentTest","published":true,"authorId":1,"author":{"id":1,"email":"test.jp","name":"namosuke"}},{"id":2,"title":"はろー","content":"コンテンツ","published":true,"authorId":3,"author":{"id":3,"email":"test@test.com","name":"test"}},{"id":3,"title":"niceTitle","content":"niceContent","published":true,"authorId":4,"author":{"id":4,"email":"test3@test.jp","name":"test3"}}]
Prisma Studioの利用
データベースの中身をいじりたいときはPrisma Studioを使うと楽ちんです。機能がシンプルになったphpMyAdminみたいなイメージです。
yarn prisma studio
と入力すると、 http://localhost:5555 でPrisma Studioが立ち上がります。
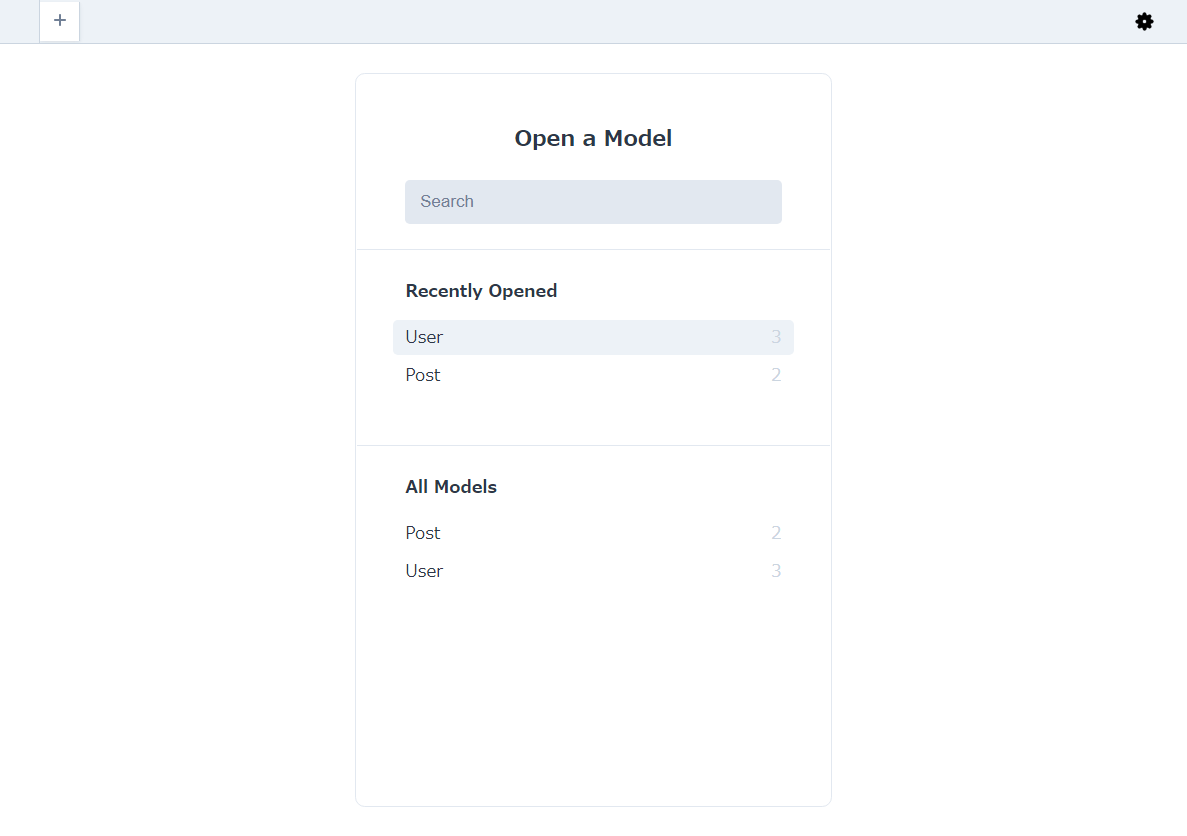

データの簡単な追加、修正はここでやれば良さそうです。
シードの利用
開発していると、初期データとして同じレコードを一度に投入したくなることがあります。
そんなときは、Prismaを利用してシードスクリプトを作成すると便利です。
APIドキュメントを自動生成
NestJSにはOpenAPI形式のドキュメントを扱うフレームワークSwaggerを利用して、APIドキュメントを自動生成してくれる機能があります。
まずは必要なパッケージをインストールしましょう。
yarn add @nestjs/swagger
次に、src/main.tsでSwaggerを初期化します。
import { NestFactory } from '@nestjs/core';
import { SwaggerModule, DocumentBuilder } from '@nestjs/swagger';
import { AppModule } from './app.module';

async function bootstrap() {
  const app = await NestFactory.create(AppModule);

  const config = new DocumentBuilder()
    .setTitle('ユーザ投稿API')
    .setDescription('ユーザが投稿できるAPIです')
    .setVersion('1.0')
    .build();
  const document = SwaggerModule.createDocument(app, config);
  SwaggerModule.setup('api', app, document);

  await app.listen(3000);
}
bootstrap();
あとはyarn startするだけで、 http://localhost:3000/api に自動的にSwaggerのドキュメントページが立ち上がります。
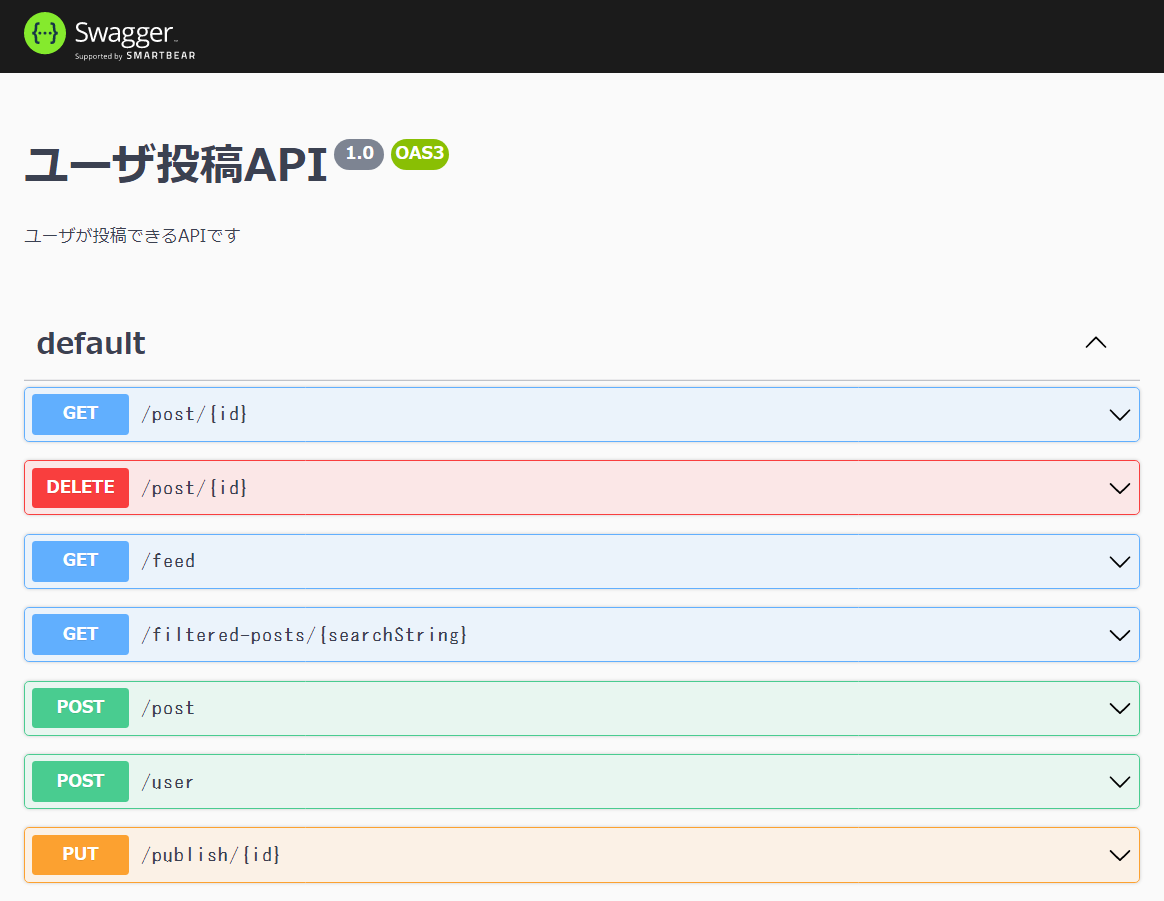
ドキュメント内で実際にAPIを実行してみることもできます。

ドメインルートにドキュメントを設置したい場合は
SwaggerModule.setup('api', app, document);
となっている部分を
SwaggerModule.setup('', app, document);
に変えることで、 http://localhost:3000 で表示できるようになります。
ちなみに、OpenAPIのJSONでの定義ファイルは http://localhost:3000/api-json からダウンロードできます。
同様にYAMLでの定義ファイルは http://localhost:3000/api-yaml からダウンロードできます。
(ドキュメントをドメインルートに設置している場合はそれぞれ http://localhost:3000/-json 、 http://localhost:3000/-yaml からダウンロードできます。)
GraphQLの実装
GraphQLはREST APIの進化版のようなものです。一つの処理のために何度もAPIを呼んだり、実際にAPIを呼ぶまでレスポンスの形式がわからなかったりといった苦痛を解消してくれます。詳しくは以下を参照してください。
ここからは以下を参考にしていきます。
必要なパッケージをインストールしていきます。
yarn add @nestjs/graphql @nestjs/apollo graphql apollo-server-express
GraphQLの開発では、コードからスキーマを生成するコードファーストと、スキーマからコードを生成するスキーマファーストという2つのアプローチがあります。
どちらにせよ処理に必要なコードを書かないといけないので、コードファーストのほうが良いと思います。コードファーストで進めます。
NestJSのモジュールを構成
AppModuleに色々追加していきます。
import { Module } from '@nestjs/common';
import { GraphQLModule } from '@nestjs/graphql';
import { ApolloDriver, ApolloDriverConfig } from '@nestjs/apollo';
import { AppController } from './app.controller';
import { AppService } from './app.service';
import { PrismaService } from './prisma.service';
import { UserService } from './user.service';
import { UserResolver } from './user.resolver';
import { PostService } from './post.service';
import { PostResolver } from './post.resolver';
import { join } from 'path';

@Module({
  imports: [
    GraphQLModule.forRoot<ApolloDriverConfig>({
      driver: ApolloDriver,
      autoSchemaFile: join(process.cwd(), 'src/schema.gql'),
    }),
  ],
  controllers: [AppController],
  providers: [
    AppService,
    PrismaService,
    UserService,
    UserResolver,
    PostService,
    PostResolver,
  ],
})
export class AppModule {}
NestJSのモデルを構成
続いて、GraphQLのスキーマとして必要な型を設定していきます。
src/user.model.tsとsrc/post.model.tsを作ります。
import { Field, ID, ObjectType } from '@nestjs/graphql';
import { Post } from 'src/post.model';

@ObjectType()
export class User {
  @Field((type) => ID)
  id: number;
  @Field()
  email: string;
  @Field({ nullable: true })
  name: string | null;
  @Field((type) => [Post], { nullable: true })
  posts: Post[] | null;
}
import { Field, ID, ObjectType } from '@nestjs/graphql';
import { User } from 'src/user.model';

@ObjectType()
export class Post {
  @Field((type) => ID)
  id: number;
  @Field()
  title: string;
  @Field({ nullable: true })
  content?: string;
  @Field()
  published: boolean;
  @Field((type) => User, { nullable: true })
  author?: User;
}
型を使うために相互に参照し合っているのが面白いですね。
@Fieldには、曖昧さを無くすためにGraphQLの型を指定できます。例えばTypeScriptの型: numberではIntなのかFloatなのかIDなのかわからないので、明示的に指定してあげましょう。
記述する際にはprisma/schema.prismaを見ながら書くと楽です。prisma/schema.prismaからモデルを自動生成してくれる非公式パッケージ(prisma-nestjs-graphql)もあるようですが、動作に不安があるので手書きのほうが安心だと思います。
NestJSのリゾルバを構成
いよいよGraphQL版のコントローラみたいなやつ、リゾルバを書いていきます。
ここに書かれたメソッドが、そのままGraphQLから呼び出せるようになります。
src/user.resolver.tsとsrc/post.resolver.tsを作成します。
import { Args, Mutation, Query, Resolver } from '@nestjs/graphql';
import { UserService } from 'src/user.service';
import { User } from './user.model';

@Resolver(() => User)
export class UserResolver {
  constructor(private userService: UserService) {}

  @Query(() => [User])
  async users() {
    return this.userService.users({});
  }

  @Query(() => User)
  async user(@Args('id') id: number) {
    return this.userService.user({ id });
  }

  @Mutation(() => User)
  async createPost(@Args('email') email: string, @Args('name') name: string) {
    return this.userService.createUser({ email, name });
  }
}
import {
  Args,
  Mutation,
  Parent,
  Query,
  ResolveField,
  Resolver,
} from '@nestjs/graphql';
import { PostService } from 'src/post.service';
import { UserService } from './user.service';
import { Post } from './post.model';

@Resolver(() => Post)
export class PostResolver {
  constructor(
    private postService: PostService,
    private userService: UserService,
  ) {}

  @Query(() => [Post])
  async posts() {
    return this.postService.posts({});
  }

  @Query(() => Post)
  async post(@Args('id') id: number) {
    return this.postService.post({ id });
  }

  @Mutation(() => Post)
  async createPost(
    @Args('title') title: string,
    @Args('content') content: string,
  ) {
    return this.postService.createPost({ title, content });
  }

  @ResolveField()
  async author(@Parent() post: Post) {
    return this.userService.user({ id: post.author.id });
  }
}
REST APIを作成するときに作ったサービスをそのまま使っています。
サービスに作った便利関数をREST APIでもGraphQLでも使えるわけですね。
ちなみに、@ResolveField()という部分では、入れ子にしてデータを深掘って取得できるフィールドを指定しています。
これが無いと、REST APIで取得できる以上のデータが取得できず、せっかくのGraphQLの強みが活かせません。
例えば今回はpostのリゾルバにauthorを指定しているので、特定の投稿から著者を取得し、さらに著者の持つ全ての投稿を同時に取得できるようになります。
@ResolveField()を設定しなかった場合:
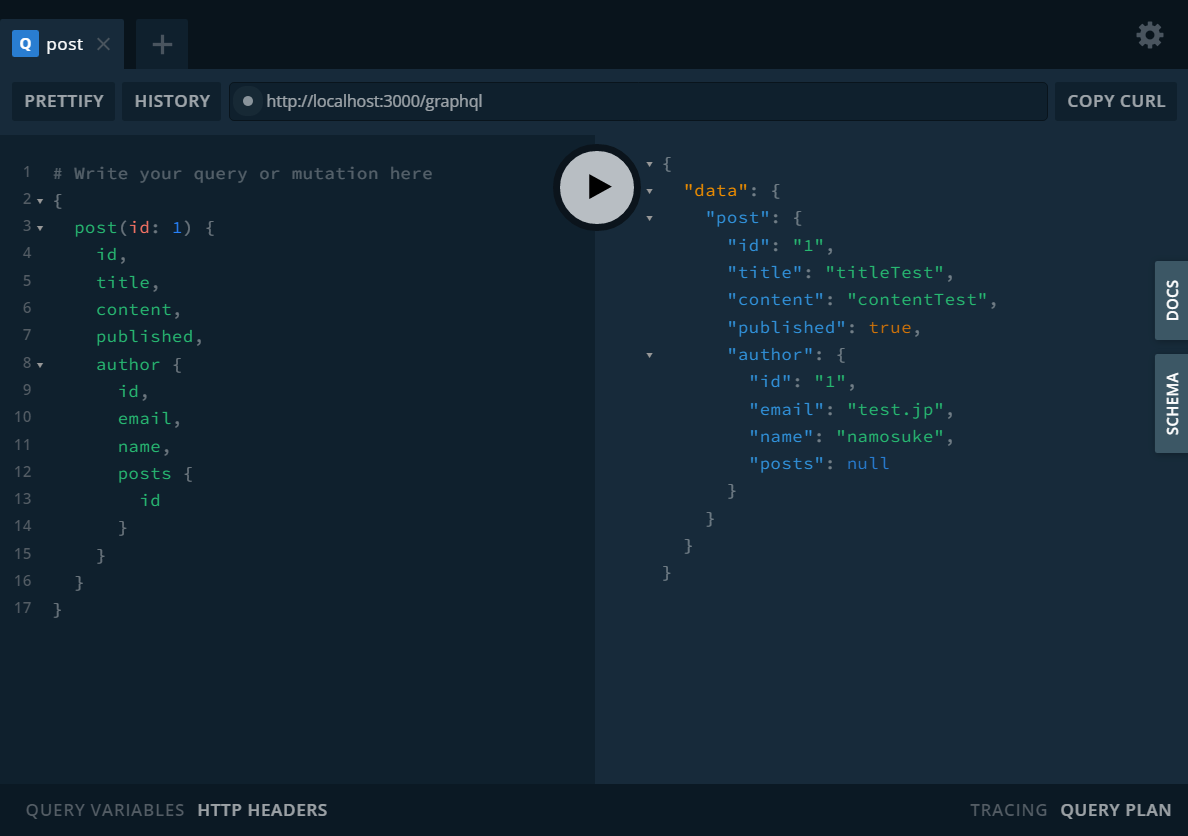
@ResolveField()を設定した場合:

GraphQLの動作確認
これでおしまい!
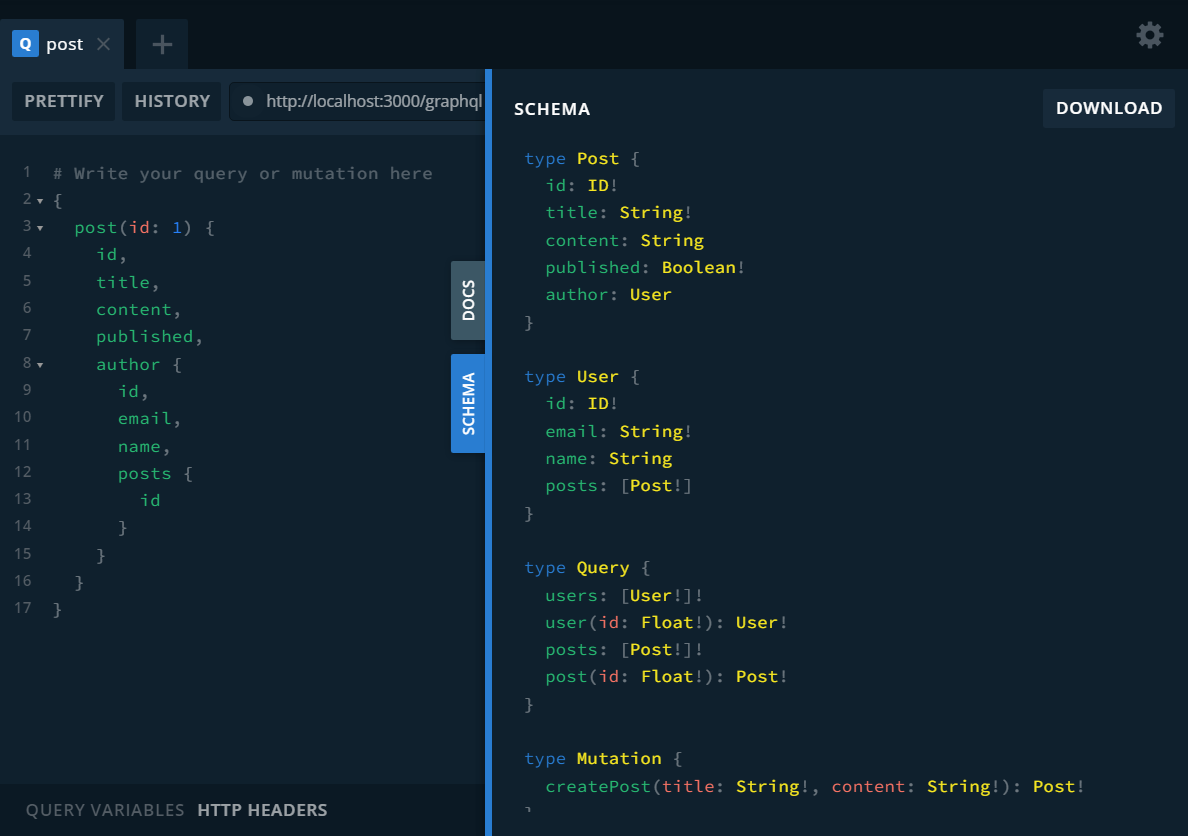
yarn start:devしたあとに http://localhost:3000/graphql を開いてplaygroundを確認してみましょう。
スキーマを確認したり…
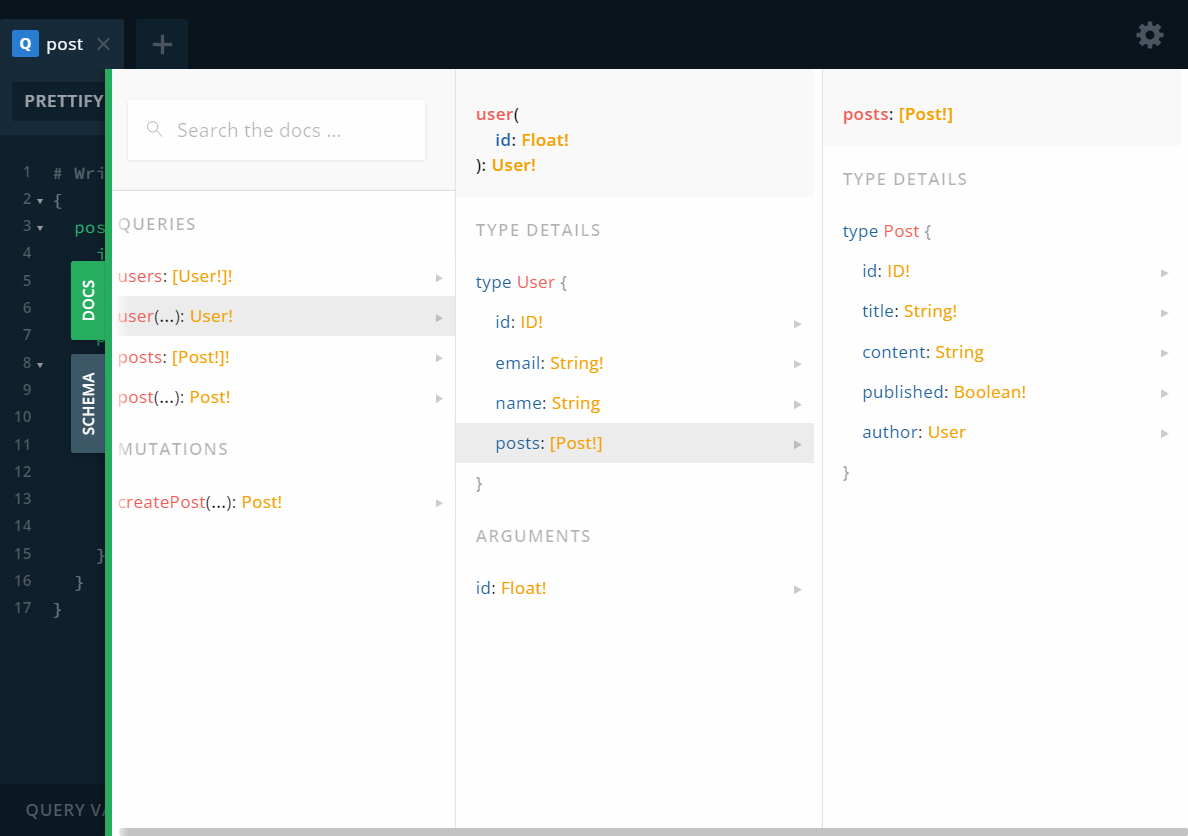
自動生成されたdocsを確認したり…
クエリを投げてみたり…
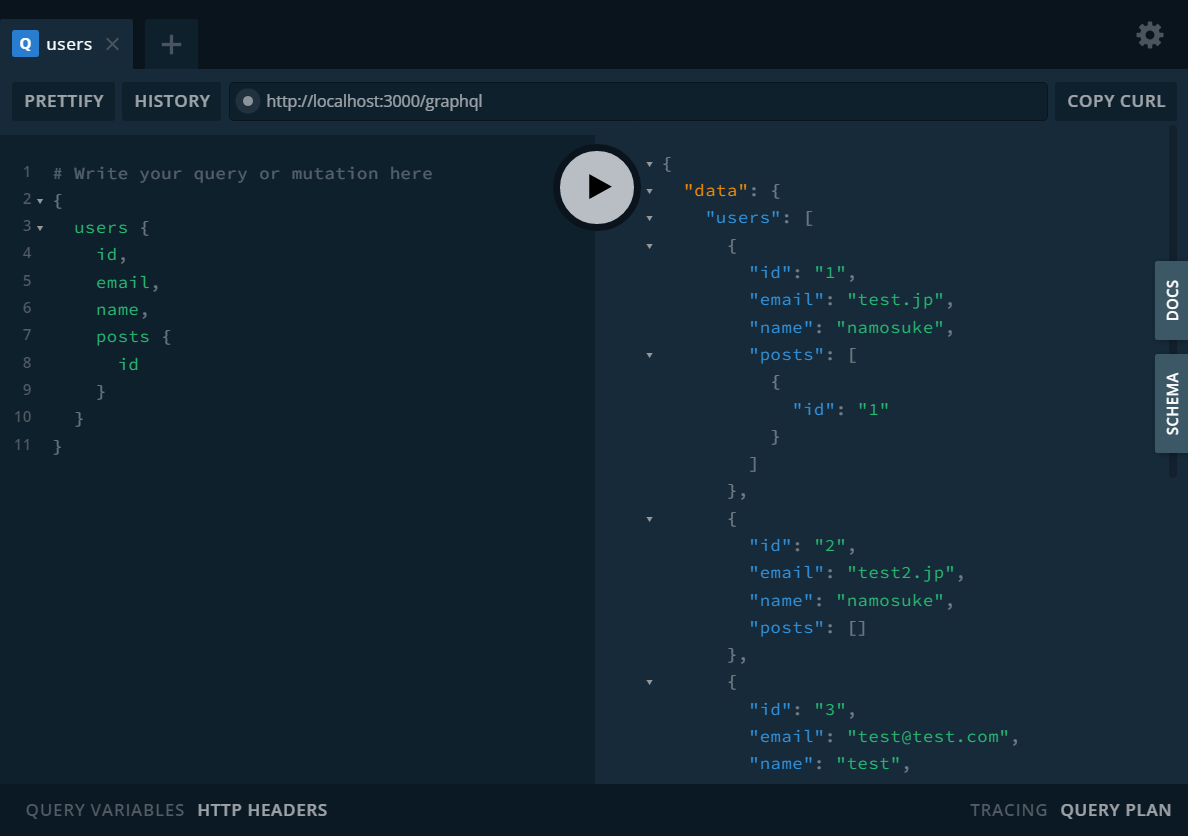
大丈夫そうですね!ばっちりです!