CentOS Stream 9 上に、WEBサーバーインフラ (Nginx, Docker, PostgreSQL, Keycloak, GitHub Actions) を構築する。
1. 基本システム構成
- VM: VMware workstation pro
- OS: CentOS Stream 9 (Minimal)
- Webサーバー: Nginx (ホストOS, リバースプロキシ)
- コンテナ: Docker + Docker Compose
- DB: PostgreSQL 14 (コンテナ)
- SSO: Keycloak (コンテナ)
- CI/CD: GitHub Actions
2. 詳細手順
前提: CentOS Stream 9 Minimal Install済み。
2.1 初期セットアップ
2.1.1 サーバー初期設定
🌟CONN_NAME="enp0s3"はVMWAREの内容に合わせる
🌟IP_ADDR="192.168.1.100/24"はVMWAREの初期IPに内容に合わせる
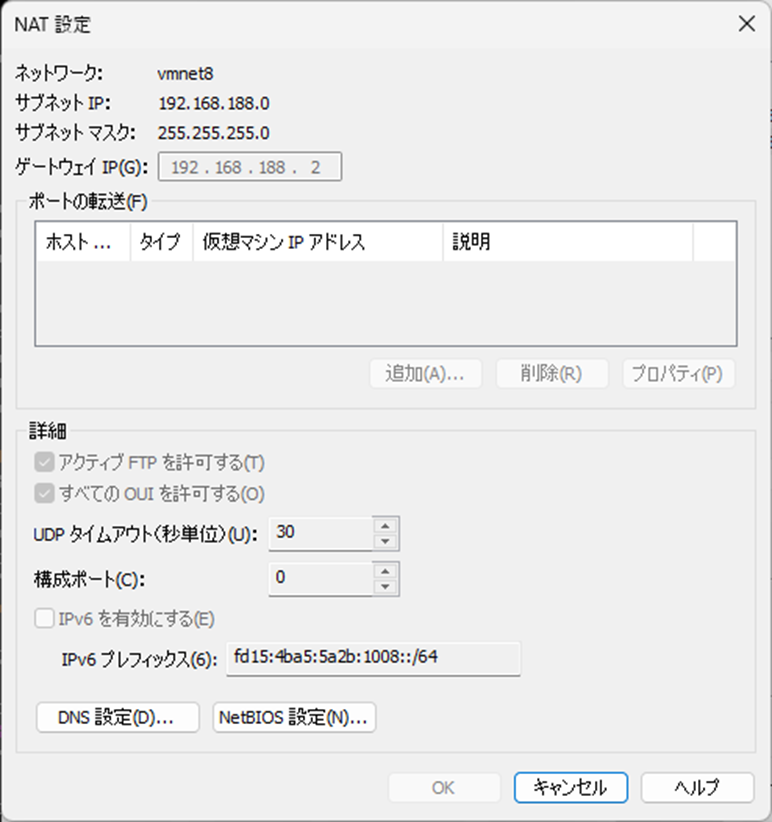
🌟GATEWAY="192.168.1.1"はVMWAREの仮想ネットワークエディタのNAT設定画面でゲートウェイを確認し設定
# Timezone設定 (例: Tokyo)
sudo timedatectl set-timezone Asia/Tokyo
timedatectl

# Hostname設定
sudo hostnamectl set-hostname attendance-prod-sv01
echo "127.0.0.1   $(hostname)" | sudo tee -a /etc/hosts
hostnamectl

ip a
# 設定 (環境に合わせて変更)
CONN_NAME="enp0s3"
IP_ADDR="192.168.1.100/24"
GATEWAY="192.168.1.1"
DNS1="8.8.8.8"
DNS2="1.1.1.1"
sudo nmcli con mod "${CONN_NAME}" ipv4.method manual ipv4.addresses ${IP_ADDR} ipv4.gateway ${GATEWAY} ipv4.dns "${DNS1} ${DNS2}"
sudo nmcli con down "${CONN_NAME}" && sudo nmcli con up "${CONN_NAME}"
# 確認
ip a show ${CONN_NAME}; ip route; cat /etc/resolv.conf; ping -c 1 google.com
2.1.2 必須パッケージインストール
sudo dnf update -y
sudo dnf install -y epel-release
sudo dnf update -y # EPEL反映
sudo dnf install -y vim wget curl git policycoreutils-python-utils setools-console bash-completion chrony
sudo systemctl enable --now chronyd
chronyc sources # 時刻同期確認
2.1.3 運用ユーザー作成とsudo権限付与
# ユーザー作成
sudo useradd deployer
sudo passwd deployer

# sudo権限付与 (wheelグループ)
sudo usermod -aG wheel deployer
2.1.4 SSHセキュリティ強化
# クライアント側で鍵生成
ssh-keygen -t ed25519

# サーバー側: deployerユーザーに公開鍵登録
sudo mkdir -p /home/deployer/.ssh && sudo chmod 700 /home/deployer/.ssh
# 公開鍵 (~/.ssh/id_ed25519.pub) の内容を authorized_keys に追記
sudo tee /home/deployer/.ssh/authorized_keys > /dev/null << 'EOF'
ssh-ed25519 ~~~~~~~~~~~~~
EOF
sudo chmod 600 /home/deployer/.ssh/authorized_keys
sudo chown -R deployer:deployer /home/deployer/.ssh
# または ssh-copy-id deployer@<server-ip> をクライアントから実行

# sshd設定変更 (/etc/ssh/sshd_config)
sudo cp /etc/ssh/sshd_config /etc/ssh/sshd_config.bak
sudo sed -i -e 's/^#*PermitRootLogin.*/PermitRootLogin no/' \
        -e 's/^#*PasswordAuthentication.*/PasswordAuthentication no/' \
        -e 's/^#*PubkeyAuthentication.*/PubkeyAuthentication yes/' \
        -e 's/^#*ChallengeResponseAuthentication.*/ChallengeResponseAuthentication no/' \
        /etc/ssh/sshd_config
# AllowUsers deployer を追記 (必要に応じて)
echo "AllowUsers deployer" | sudo tee -a /etc/ssh/sshd_config
# Port, ClientAliveInterval/CountMax も確認・調整

# sshd 設定反映と確認
sudo sshd -t && sudo systemctl restart sshd
# 別ターミナルから接続テスト (鍵認証OK, root/パスワードNG)
2.2 セキュリティ基盤構築
2.2.1 SELinux (enforcing維持)
sestatus # enforcing確認
# 問題発生時は ausearch -m avc でログ確認、audit2allow でポリシー作成
# Dockerボリューム: Composeファイルで :z or :Z オプション検討
2.2.2 firewalld設定
sudo systemctl enable --now firewalld
# 必要なポート/サービス開放 (SSH, HTTP, HTTPS)
sudo firewall-cmd --permanent --add-service=ssh --add-service=http --add-service=https
# (SSHポート変更時: --remove-service=ssh; --add-port=<port>/tcp)
sudo firewall-cmd --reload && sudo firewall-cmd --list-all
# 注意: Dockerは独自iptablesルールを管理
2.2.3 fail2ban (ブルートフォース対策)
sudo dnf install -y fail2ban fail2ban-firewalld
sudo cp /etc/fail2ban/jail.conf /etc/fail2ban/jail.local
sudo sed -i '/^\[sshd\]$/,/^\[/ s/enabled = .*/enabled = true/' /etc/fail2ban/jail.local
# jail.local で bantime, findtime, maxretry, banaction=firewallcmd-ipset 確認・調整

sudo systemctl enable --now fail2ban
sudo fail2ban-client status sshd
# BAN確認: sudo firewall-cmd --list-rich-rules
2.2.4 dnf-automatic (自動セキュリティアップデート)
sudo dnf install -y dnf-automatic
sudo sed -i -e "s/^apply_updates = .*/apply_updates = yes/" \
        -e "s/^update_cmd = .*/update_cmd = security/" \
        /etc/dnf/automatic.conf

sudo systemctl enable --now dnf-automatic.timer
# 注意: 自動適用リスク考慮。ステージングテスト/通知のみも検討。
2.3 Docker環境構築
2.3.1 Docker/Docker Compose インストール (公式リポジトリ)
sudo dnf config-manager --add-repo https://download.docker.com/linux/centos/docker-ce.repo
sudo dnf install -y docker-ce docker-ce-cli containerd.io docker-buildx-plugin docker-compose-plugin
sudo systemctl enable --now docker

# deployerユーザーをdockerグループに追加
sudo usermod -aG docker deployer
newgrp docker # グループ変更反映 (または再ログイン)

# 確認
docker version && docker compose version && docker run hello-world
2.3.2 Dockerデーモン設定強化 (/etc/docker/daemon.json)
sudo mkdir -p /etc/docker
sudo tee /etc/docker/daemon.json > /dev/null << 'EOF'
{
  "log-driver": "json-file",
  "log-opts": {
    "max-size": "10m",
    "max-file": "3"
  },
  "iptables": true,
  "live-restore": true,
  "userns-remap": "default",
  "no-new-privileges": true
}
EOF
# 注意: userns-remap はセキュリティ向上に有効だがボリューム権限等で問題発生可能性あり。要テスト。
sudo systemctl restart docker
2.3.3 Dockerネットワーク
# 推奨: アプリごとにカスタムブリッジネットワーク作成 (Composeファイル内定義)
2.3.4 イメージ管理とセキュリティスキャン
-
管理: version tag指定, 軽量base image, multi-stage build, 非root実行 (
USER命令)。 -
Scan: CI/CD (Trivy/Grype) 及び定期スキャン。レジストリ機能活用。
# GitHub Actions例 (Trivy)
- uses: aquasecurity/trivy-action@master
  with:
    image-ref: 'your-image:tag'
    format: 'table'
    exit-code: '1'
    ignore-unfixed: true
    vuln-type: 'os,library'
    severity: 'CRITICAL,HIGH'
2.4 Nginxリバースプロキシ設定 (ホストOS)
2.4.1 Nginxインストールと基本設定
sudo dnf install -y nginx
sudo systemctl enable --now nginx

# SELinux: Nginx -> コンテナ接続許可
sudo setsebool -P httpd_can_network_connect 1

# サイト設定ファイル作成 (例: /etc/nginx/conf.d/attendance.conf)
sudo tee /etc/nginx/conf.d/attendance.conf > /dev/null << 'EOF'
server {
    listen 80;
    listen [::]:80;
    server_name attendance.example.com; # 要変更

    access_log /var/log/nginx/attendance.access.log;
    error_log /var/log/nginx/attendance.error.log warn; # warnレベル以上

    location / {
        proxy_pass http://127.0.0.1:8080; # Appコンテナポート (要確認)
        proxy_set_header Host $host;
        proxy_set_header X-Real-IP $remote_addr;
        proxy_set_header X-Forwarded-For $proxy_add_x_forwarded_for;
        proxy_set_header X-Forwarded-Proto $scheme;
        proxy_connect_timeout       60s;
        proxy_send_timeout          60s;
        proxy_read_timeout          60s;
    }
}
EOF
sudo nginx -t && sudo systemctl reload nginx
2.4.2 Let's Encrypt (Certbot) によるHTTPS設定
sudo dnf install -y certbot python3-certbot-nginx
sudo certbot --nginx -d attendance.example.com --agree-tos --email your@email.com --no-eff-email --redirect # 要変更, 非対話例
# 自動更新タイマー確認/テスト: systemctl list-timers | grep certbot; sudo certbot renew --dry-run

# Nginx設定確認 (Certbotが更新)
# セキュリティヘッダー追加推奨 (/etc/nginx/conf.d/attendance.conf server 443 ブロック内)
# add_header Strict-Transport-Security "max-age=31536000; includeSubDomains" always;
# add_header X-Content-Type-Options nosniff always;
# add_header X-Frame-Options SAMEORIGIN always;
# add_header Referrer-Policy "strict-origin-when-cross-origin" always;

sudo nginx -t && sudo systemctl reload nginx
# ブラウザで https://attendance.example.com アクセス確認
2.4.3 WebSocketサポート (必要な場合)
# location ブロック内に追加
proxy_http_version 1.1;
proxy_set_header Upgrade $http_upgrade;
proxy_set_header Connection "upgrade";
proxy_read_timeout 86400; # 必要に応じて延長
sudo nginx -t && sudo systemctl reload nginx
2.4.4 キャッシュとパフォーマンス最適化
# Gzip圧縮 (/etc/nginx/nginx.conf httpブロック)
# gzip on; gzip_vary on; gzip_proxied any; gzip_comp_level 6; gzip_types ...;

# 静的ファイルキャッシュ (/etc/nginx/conf.d/attendance.conf server 443 ブロック)
# location ~* \.(?:css|js|jpg|jpeg|gif|png|ico|svg|woff|woff2)$ { expires 1M; access_log off; add_header Cache-Control "public"; }

# プロキシキャッシュ (動的コンテンツ向け、注意)
# sudo mkdir -p /var/cache/nginx/proxy_cache && sudo chown nginx:nginx /var/cache/nginx/proxy_cache && sudo chmod 700 /var/cache/nginx/proxy_cache
# nginx.conf httpブロック: proxy_cache_path ... keys_zone=app_cache:10m ...;
# attendance.conf locationブロック: proxy_cache app_cache; proxy_cache_valid 200 10m; proxy_cache_key ...; add_header X-Proxy-Cache $upstream_cache_status;
sudo nginx -t && sudo systemctl reload nginx
# レスポンスヘッダー確認 (curl -I, DevTools)
2.4.5 WAF機能 (ModSecurity, オプション)
- Install: ソースビルド or クラウドWAF/外部サービス検討。
-
Config:
modsecurity on;, OWASP CRS導入、SecRuleEngine DetectionOnly->On。誤検知対応。
# sudo nginx -t && sudo systemctl reload nginx # 設定後
2.5 PostgreSQL構築 (Docker Compose)
2.5.1 Compose定義例 (docker-compose.yml)
# (3.2 完全版構成例を参照)
services:
  postgres:
    image: postgres:14-alpine
    container_name: postgres_db
    environment:
      POSTGRES_DB: attendance_db
      POSTGRES_USER: attendance_user
      POSTGRES_PASSWORD_FILE: /run/secrets/db_app_password # Secrets推奨
      KC_DB_NAME: keycloak_db
      KC_DB_USER: keycloak_user
      KC_DB_PASSWORD_FILE: /run/secrets/db_kc_password   # Secrets推奨
      PGDATA: /var/lib/postgresql/data/pgdata
    volumes:
      - postgres_data:/var/lib/postgresql/data/pgdata # データ永続化
      - ./postgres-init:/docker-entrypoint-initdb.d  # Keycloak用DB/User作成スクリプト (要作成・chmod +x)
      - ./my-postgres.conf:/etc/postgresql/postgresql.conf # チューニング用 (要作成)
    command: postgres -c config_file=/etc/postgresql/postgresql.conf
    networks: [backend_network]
    restart: unless-stopped
    healthcheck: { test: ["CMD-SHELL", "pg_isready -U $$POSTGRES_USER -d $$POSTGRES_DB"], interval: 10s, timeout: 5s, retries: 5 }
    secrets: [db_app_password, db_kc_password]
# ... volumes, networks, secrets 定義 ...
secrets:
  db_app_password: { file: ./secrets/db_app_password.txt } # 要事前作成・chmod 600
  db_kc_password: { file: ./secrets/db_kc_password.txt }  # 要事前作成・chmod 600
2.5.2 データベースとユーザー作成
- Compose定義と初期化スクリプトでApp/Keycloak用DB/User自動作成。
- 手動追加:
docker compose exec postgres psql -U postgres
2.5.3 バックアップ/リストア
# バックアップ (cron推奨, ホストから実行)
TIMESTAMP=$(date +%Y%m%d_%H%M%S)
BACKUP_DIR="/path/to/backups/postgres" && mkdir -p ${BACKUP_DIR}
docker compose exec -T postgres pg_dump -U attendance_user -d attendance_db > "${BACKUP_DIR}/attendance_db_${TIMESTAMP}.sql"
docker compose exec -T postgres pg_dump -U keycloak_user -d keycloak_db > "${BACKUP_DIR}/keycloak_db_${TIMESTAMP}.sql"
# find ${BACKUP_DIR} -name "*.sql" -mtime +7 -delete # 古いファイル削除例
# 推奨: 外部ストレージ (S3等) へ転送

# リストア (ホストから実行, 要注意)
# DB再作成: docker compose exec postgres psql -U postgres -c "DROP DATABASE IF EXISTS attendance_db; CREATE DATABASE attendance_db OWNER attendance_user;"
cat "${BACKUP_DIR}/attendance_db_YYYYMMDD_HHMMSS.sql" | docker compose exec -T postgres psql -U attendance_user -d attendance_db
2.5.4 パフォーマンスチューニング (./my-postgres.conf)
-
shared_buffers,work_mem,maintenance_work_mem,effective_cache_size, checkpoint関連などをサーバーリソースに合わせて調整。 - Composeファイルで
volumesとcommandを上記(2.5.1)の通り設定。 - 再起動:
docker compose down && docker compose up -d - 確認:
docker compose exec postgres psql -U postgres -c "SHOW <param>;"
2.6 Keycloak SSO構築 (Docker Compose)
2.6.1 Compose定義例 (docker-compose.yml)
# (3.2 完全版構成例を参照)
services:
  keycloak:
    image: quay.io/keycloak/keycloak:24.0 # version指定推奨
    container_name: keycloak_sso
    environment:
      KC_DB: postgres
      KC_DB_URL_HOST: postgres
      KC_DB_URL_DATABASE: ${KC_DB_NAME:-keycloak_db}
      KC_DB_USERNAME: ${KC_DB_USER:-keycloak_user}
      KC_DB_PASSWORD_FILE: /run/secrets/db_kc_password # Secrets推奨
      KC_HOSTNAME_STRICT: "true" # 本番推奨
      KC_HOSTNAME_STRICT_HTTPS: "true"
      KC_PROXY: edge # リバプロ経由
      KC_HOSTNAME_URL: https://attendance.example.com/auth # Nginx locationに合わせる
      KC_HOSTNAME_ADMIN_URL: https://attendance.example.com/auth
      KEYCLOAK_ADMIN: admin
      KEYCLOAK_ADMIN_PASSWORD_FILE: /run/secrets/keycloak_admin_password # Secrets推奨
      # KC_JAVA_OPTS: "-Xms64m -Xmx512m" # メモリ調整
    ports: ["127.0.0.1:8180:8080"] # Nginxアクセス用 (内部8080)
    networks: [backend_network]
    depends_on: { postgres: { condition: service_healthy }}
    restart: unless-stopped
    secrets: [db_kc_password, keycloak_admin_password]
# ... secrets 定義 ...
secrets:
  keycloak_admin_password: { file: ./secrets/keycloak_admin_password.txt } # 要事前作成・chmod 600
-
Nginx設定:
location /auth/ { proxy_pass http://127.0.0.1:8180/auth/; ... }(ヘッダー設定含む)。
2.6.2 レルム、クライアント、ロール設定 (管理コンソール)
-
https://attendance.example.com/auth/にadminでログイン。 - 新規レルム作成 (例:
AttendanceApp)。 - クライアント作成:
Client ID(例:attendance-web-app),Client type: OpenID Connect,Capability config(Client auth: On, Standard flow),Login settings(Root URL, Valid redirect URIs, Web origins) をアプリに合わせて設定。 -
CredentialsタブでClient secretを取得、アプリ側に設定。 - ロール作成 (Realm/Client roles): 例:
employee,manager,admin。 - ユーザー作成 (
Users), パスワード設定 (Credentials), ロール割り当て (Role mapping)。
2.6.3 PostgreSQL連携
- Compose定義の
KC_DB_*で自動設定。起動ログと管理コンソールアクセスで確認。
2.6.4 SSO設定とセキュリティポリシー (管理コンソール)
- Realm settings: Login, Email, Themes。
- Authentication: Password Policy, Required Actions, Bindings (OTP等)。
- Sessions: 各種タイムアウト設定。
- Tokens: Lifespan設定 (Access Tokenは短め)。
2.7 監視・ロギング基盤 (EFK + Prometheus/Grafana)
2.7.1 EFK Stack デプロイ (Compose定義例)
# (3.2 完全版構成例を参照)
services:
  elasticsearch:
    image: docker.elastic.co/elasticsearch/elasticsearch:8.13.4
    # ... (environment, volumes, networks, ports: ["127.0.0.1:9200:9200"]) ...
    environment: { discovery.type: single-node, bootstrap.memory_lock: 'true', "ES_JAVA_OPTS": "-Xms1g -Xmx1g", xpack.security.enabled: "true" } # メモリ調整, セキュリティ有効推奨
    ulimits: { memlock: { soft: -1, hard: -1 }}
    volumes: [es_data:/usr/share/elasticsearch/data]
    networks: [monitoring_network]
    restart: unless-stopped

  kibana:
    image: docker.elastic.co/kibana/kibana:8.13.4
    # ... (environment, volumes, networks, ports: ["127.0.0.1:5601:5601"]) ...
    environment: { ELASTICSEARCH_HOSTS: 'http://elasticsearch:9200', SERVER_BASEPATH: /kibana, SERVER_PUBLICBASEURL: https://attendance.example.com/kibana } # 要Elasticsearch認証情報 if security enabled
    ports: ["127.0.0.1:5601:5601"]
    networks: [monitoring_network, backend_network]
    depends_on: [elasticsearch]
    restart: unless-stopped

  fluentd:
    image: fluent/fluentd:v1.16-1
    # ... (environment, volumes, networks) ...
    volumes: ["./fluentd/conf:/fluentd/etc", "/var/lib/docker/containers:/fluentd/log/containers:ro", "fluentd_buffer:/fluentd/buffer"]
    networks: [monitoring_network]
    depends_on: [elasticsearch]
    restart: unless-stopped
# ... volumes, networks 定義 ...
volumes:
  es_data: { driver: local }
  fluentd_buffer: { driver: local }
networks:
  monitoring_network: { driver: bridge }
-
Fluentd設定 (
./fluentd/conf/fluent.conf): Dockerログ収集->パース->ES出力設定。 -
Nginx設定:
location /kibana/ { proxy_pass http://127.0.0.1:5601/; ... }。 -
手順:
vm.max_map_count=262144設定 (sudo sysctl -w ..., 永続化/etc/sysctl.conf) →docker compose up -d→ Nginxリロード → Kibana (/kibana/) アクセス・Index確認。
2.7.2 Prometheus/Grafana 設定 (Compose定義例)
# (3.2 完全版構成例を参照)
services:
  prometheus:
    image: prom/prometheus:v2.51.2
    # ... (volumes, command, networks, ports: ["127.0.0.1:9090:9090"]) ...
    volumes: ["./prometheus:/etc/prometheus", "prometheus_data:/prometheus"]
    command: ["--config.file=/etc/prometheus/prometheus.yml", ...] # web.external-url, web.route-prefix=/
    ports: ["127.0.0.1:9090:9090"]
    networks: [monitoring_network]
    restart: unless-stopped

  grafana:
    image: grafana/grafana:10.4.2
    # ... (volumes, environment, networks, ports: ["127.0.0.1:3000:3000"], secrets) ...
    volumes: [grafana_data:/var/lib/grafana]
    environment: { GF_SECURITY_ADMIN_PASSWORD_FILE: /run/secrets/grafana_admin_password, GF_SERVER_ROOT_URL: https://attendance.example.com/grafana, GF_SERVER_SERVE_FROM_SUB_PATH: "true" }
    ports: ["127.0.0.1:3000:3000"]
    networks: [monitoring_network, backend_network]
    restart: unless-stopped
    secrets: [grafana_admin_password]

  node-exporter: # ホストメトリクス
    image: prom/node-exporter:v1.7.0
    # ... (volumes, command, ports: ["127.0.0.1:9100:9100"], networks, pid: host) ...
    volumes: ["/proc:/host/proc:ro", "/sys:/host/sys:ro", "/:/rootfs:ro"]
    command: ["--path.procfs=/host/proc", ...]
    ports: ["127.0.0.1:9100:9100"]
    networks: [monitoring_network]
    pid: host
    restart: unless-stopped

  cadvisor: # コンテナメトリクス
    image: gcr.io/cadvisor/cadvisor:v0.49.1
    # ... (volumes, ports: ["127.0.0.1:8081:8080"], networks, privileged: true, devices) ...
    volumes: ["/:/rootfs:ro", "/var/run:/var/run:rw", "/sys:/sys:ro", "/var/lib/docker/:/var/lib/docker:ro"]
    ports: ["127.0.0.1:8081:8080"] # 内部8080
    networks: [monitoring_network]
    privileged: true # 注意
    devices: ["/dev/kmsg:/dev/kmsg"]
    restart: unless-stopped

# ... volumes, secrets 定義 ...
volumes:
  prometheus_data: { driver: local }
  grafana_data: { driver: local }
secrets:
  grafana_admin_password: { file: ./secrets/grafana_admin_password.txt } # 要事前作成・chmod 600
-
Prometheus設定 (
./prometheus/prometheus.yml):scrape_configsでnode-exporter:9100,cadvisor:8080等を指定。 -
Nginx設定:
location /grafana/ { proxy_pass http://127.0.0.1:3000/; ... },location /prometheus/ { proxy_pass http://127.0.0.1:9090/; ... }。 -
手順:
docker compose up -d→ Nginxリロード → Grafana (/grafana/) アクセス・ログイン・データソース(Prometheus:http://prometheus:9090)追加・ダッシュボード設定 → Prometheus UI (/prometheus/) Targets確認。
2.7.3 アラート設定 (Alertmanager)
-
Compose定義追加:
# (3.2 完全版構成例を参照) services: alertmanager: image: prom/alertmanager:v0.27.0 # ... (volumes, command, networks, ports: ["127.0.0.1:9093:9093"]) ... volumes: ["./alertmanager:/etc/alertmanager", "alertmanager_data:/alertmanager"] command: ["--config.file=/etc/alertmanager/alertmanager.yml", ...] # web.external-url, web.route-prefix=/ ports: ["127.0.0.1:9093:9093"] networks: [monitoring_network] restart: unless-stopped # ... volumes 定義 ... volumes: alertmanager_data: { driver: local } -
Alertmanager設定 (
./alertmanager/alertmanager.yml):global,route,receivers(Slack/Email等) 設定。 -
Prometheus設定 (
prometheus.yml) 更新:alerting,rule_filesセクション追加。 -
アラートルールファイル (
./prometheus/alert.rules.yml): CPU, Memory, Disk等のルール定義。 -
Nginx設定:
location /alertmanager/ { proxy_pass http://127.0.0.1:9093/; ... }。 -
再起動・確認:
docker compose up -d→ Nginxリロード → Prometheus UI (/alerts)、Alertmanager UI (/alertmanager/) 確認 → アラートテスト、通知確認。
2.7.4 ログローテーション
-
Docker:
daemon.jsonor Composeloggingで設定済。 -
Host OS:
logrotate。 - EFK: Elasticsearchは ILM (Index Lifecycle Management) で管理推奨。
2.8 CI/CD環境統合 (GitHub Actions)
2.8.1 GitHub Actions セルフホストランナー設定 (必要な場合)
- GitHub
Settings->Actions->Runners->New self-hosted runnerで手順確認。 - サーバーでランナーDL・設定・サービス登録 (
./config.sh,sudo ./svc.sh install deployer,sudo ./svc.sh start)。 - GitHub側でランナー状態確認。
2.8.2 デプロイ自動化ワークフロー (.github/workflows/deploy.yml)
name: Deploy Production

on:
  push: { branches: [main] }

jobs:
  build-deploy:
    runs-on: self-hosted # or ubuntu-latest
    environment: production
    steps:
      - uses: actions/checkout@v4
      - uses: docker/setup-buildx-action@v3
      - name: Login to Docker Registry # if private
        uses: docker/login-action@v3
        with: { username: ${{ secrets.DOCKER_USERNAME }}, password: ${{ secrets.DOCKER_TOKEN }} }

      # (Option) Run tests: run: docker compose run --rm app your-test-command

      # Build & Scan image (Trivy example)
      - uses: docker/build-push-action@v5
        id: build # Save metadata
        with: { context: ., file: ./Dockerfile, push: false, tags: 'myapp/attendance:${{ github.sha }}', load: true }
      - uses: aquasecurity/trivy-action@master
        with: { image-ref: 'myapp/attendance:${{ github.sha }}', format: table, exit-code: '1', ignore-unfixed: true, vuln-type: 'os,library', severity: 'CRITICAL,HIGH' }

      # Push image
      - uses: docker/build-push-action@v5
        with: { context: ., file: ./Dockerfile, push: true, tags: '${{ secrets.DOCKER_USERNAME }}/attendance-app:${{ github.sha }},${{ secrets.DOCKER_USERNAME }}/attendance-app:latest' }

      # Deploy via SSH
      - uses: appleboy/ssh-action@master
        with:
          host: ${{ secrets.PROD_HOST }}
          username: ${{ secrets.PROD_USERNAME }} # deployer
          key: ${{ secrets.PROD_SSH_KEY }}
          port: ${{ secrets.PROD_SSH_PORT || 22 }}
          script: |
            cd /path/to/docker-compose/project
            # docker login ... # if needed on server
            export IMAGE_TAG=${{ github.sha }} # Set env var for compose
            docker compose -f docker-compose.yml -f docker-compose.prod.yml pull app # Example using multiple compose files
            docker compose -f docker-compose.yml -f docker-compose.prod.yml up -d --remove-orphans app
            # docker image prune -f # Optional cleanup
-
GitHub Secrets:
DOCKER_USERNAME,DOCKER_TOKEN,PROD_HOST,PROD_USERNAME,PROD_SSH_KEY,PROD_SSH_PORT。 - デプロイスクリプトは要調整 (DBマイグレーション等)。
2.8.3 ブルー/グリーンデプロイメント (高度なオプション)
- Concept: Blue(現)/Green(新)環境 + Nginx切替。
-
Nginx:
upstream+mapor 設定ファイル変更でproxy_pass切替。 - CI/CD: Greenデプロイ -> Test -> Nginx reload -> Blue停止。
- 注意: DBスキーマ変更、セッション管理。複雑。
3. 成果物例 (詳細は元の手順書参照)
-
3.1 主要設定ファイル:
sshd_config,jail.local,automatic.conf,daemon.json,nginx.conf,attendance.conf,init-keycloak-db.sh,my-postgres.conf,fluent.conf,prometheus.yml,alert.rules.yml,alertmanager.yml,deploy.yml。 - 3.2 Docker-compose.yml: 全サービス(app, db, sso, elk, prom, grafana, exporters)統合定義。
- 3.3 チェックリスト: 初期設定〜運用までの網羅的確認項目。
- 3.4 トラブルシューティング: 一般的な問題の原因特定・対処法。
- 3.5 バックアップ/リカバリ: 対象データと手順、リストアテストの重要性。
- 3.6 セキュリティ監査: 定期監査項目と手順。
4. 特記事項 (要約、詳細は元の手順書参照)
- 4.1 高可用性: LB, 複数インスタンス, DBレプリ/Failover, Keycloakクラスタ, 共有ストレージ。
- 4.2 パフォーマンス: サイジング, 各コンポーネントチューニング, キャッシュ, 非同期, 最適化。
- 4.3 セキュリティ: 最小権限, 最新化, アクセス制御, WAF, 脆弱性管理, 監査。
- 4.4 運用保守: 文書化, 変更管理, 監視, 定期Update/監査/テスト, 自動化。
免責事項: 本手順書はガイドラインであり、完全性・セキュリティ・パフォーマンスを保証しません。十分なテストと自己責任での利用をお願いします。専門家への相談も検討してください。# CentOS Stream 9 本番環境レベル WEBアプリケーションサーバー構築手順書 (ベテラン向け)
目的
CentOS Stream 9 上に、勤怠管理アプリケーション用WEBサーバーインフラ (Nginx, Docker, PostgreSQL, Keycloak, GitHub Actions) を構築する。
1. 基本システム構成
- OS: CentOS Stream 9 (Minimal)
- Webサーバー: Nginx (ホストOS, リバースプロキシ)
- コンテナ: Docker + Docker Compose
- DB: PostgreSQL 14 (コンテナ)
- SSO: Keycloak (コンテナ)
- CI/CD: GitHub Actions
2. 詳細手順
前提: CentOS Stream 9 Minimal Install済み。root または sudo 権限で作業。
2.1 初期セットアップ
2.1.1 サーバー初期設定
# Timezone設定 (例: Tokyo)
sudo timedatectl set-timezone Asia/Tokyo
timedatectl

# Hostname設定 (例: attendance-prod-sv01)
sudo hostnamectl set-hostname attendance-prod-sv01
echo "127.0.0.1   $(hostname)" | sudo tee -a /etc/hosts
hostnamectl

# Network設定 (静的IP例, nmcli)
# インターフェース名確認 (例: enp0s3)
ip a
# 設定 (環境に合わせて変更)
CONN_NAME="enp0s3"
IP_ADDR="192.168.1.100/24"
GATEWAY="192.168.1.1"
DNS1="8.8.8.8"
DNS2="1.1.1.1"
sudo nmcli con mod "${CONN_NAME}" ipv4.method manual ipv4.addresses ${IP_ADDR} ipv4.gateway ${GATEWAY} ipv4.dns "${DNS1} ${DNS2}"
sudo nmcli con down "${CONN_NAME}" && sudo nmcli con up "${CONN_NAME}"
# 確認
ip a show ${CONN_NAME}; ip route; cat /etc/resolv.conf; ping -c 1 google.com
2.1.2 必須パッケージインストール
sudo dnf update -y
sudo dnf install -y epel-release
sudo dnf update -y # EPEL反映
sudo dnf install -y vim wget curl git policycoreutils-python-utils setools-console bash-completion chrony
sudo systemctl enable --now chronyd
chronyc sources # 時刻同期確認
2.1.3 運用ユーザー作成とsudo権限付与
# ユーザー作成 (例: deployer)
sudo useradd deployer
sudo passwd deployer

# sudo権限付与 (wheelグループ)
sudo usermod -aG wheel deployer
# /etc/sudoers で %wheel ALL=(ALL) ALL が有効か確認 (visudo -c, grep)
# deployer で sudo 実行確認 (別ターミナル推奨)
2.1.4 SSHセキュリティ強化
# クライアント側で鍵生成 (未実施の場合)
# ssh-keygen -t ed25519

# サーバー側: deployerユーザーに公開鍵登録
sudo mkdir -p /home/deployer/.ssh && sudo chmod 700 /home/deployer/.ssh
# 公開鍵 (~/.ssh/id_ed25519.pub) の内容を authorized_keys に追記
sudo tee /home/deployer/.ssh/authorized_keys > /dev/null << 'EOF'
ssh-ed25519 AAAAC3NzaC1lZDI1NTE5... your_email@example.com
EOF
sudo chmod 600 /home/deployer/.ssh/authorized_keys
sudo chown -R deployer:deployer /home/deployer/.ssh
# または ssh-copy-id deployer@<server-ip> をクライアントから実行

# sshd設定変更 (/etc/ssh/sshd_config)
sudo cp /etc/ssh/sshd_config /etc/ssh/sshd_config.bak
sudo sed -i -e 's/^#*PermitRootLogin.*/PermitRootLogin no/' \
        -e 's/^#*PasswordAuthentication.*/PasswordAuthentication no/' \
        -e 's/^#*PubkeyAuthentication.*/PubkeyAuthentication yes/' \
        -e 's/^#*ChallengeResponseAuthentication.*/ChallengeResponseAuthentication no/' \
        /etc/ssh/sshd_config
# AllowUsers deployer を追記 (必要に応じて)
echo "AllowUsers deployer" | sudo tee -a /etc/ssh/sshd_config
# Port, ClientAliveInterval/CountMax も確認・調整

# sshd 設定反映と確認
sudo sshd -t && sudo systemctl restart sshd
# 別ターミナルから接続テスト (鍵認証OK, root/パスワードNG)
2.2 セキュリティ基盤構築
2.2.1 SELinux (enforcing維持)
sestatus # enforcing確認
# 問題発生時は ausearch -m avc でログ確認、audit2allow でポリシー作成
# Dockerボリューム: Composeファイルで :z or :Z オプション検討
2.2.2 firewalld設定
sudo systemctl enable --now firewalld
# 必要なポート/サービス開放 (SSH, HTTP, HTTPS)
sudo firewall-cmd --permanent --add-service=ssh --add-service=http --add-service=https
# (SSHポート変更時: --remove-service=ssh; --add-port=<port>/tcp)
sudo firewall-cmd --reload && sudo firewall-cmd --list-all
# 注意: Dockerは独自iptablesルールを管理
2.2.3 fail2ban (ブルートフォース対策)
sudo dnf install -y fail2ban fail2ban-firewalld
sudo cp /etc/fail2ban/jail.conf /etc/fail2ban/jail.local
sudo sed -i '/^\[sshd\]$/,/^\[/ s/enabled = .*/enabled = true/' /etc/fail2ban/jail.local
# jail.local で bantime, findtime, maxretry, banaction=firewallcmd-ipset 確認・調整

sudo systemctl enable --now fail2ban
sudo fail2ban-client status sshd
# BAN確認: sudo firewall-cmd --list-rich-rules
2.2.4 dnf-automatic (自動セキュリティアップデート)
sudo dnf install -y dnf-automatic
sudo sed -i -e "s/^apply_updates = .*/apply_updates = yes/" \
        -e "s/^update_cmd = .*/update_cmd = security/" \
        /etc/dnf/automatic.conf

sudo systemctl enable --now dnf-automatic.timer
# 注意: 自動適用リスク考慮。ステージングテスト/通知のみも検討。
2.3 Docker環境構築
2.3.1 Docker/Docker Compose インストール (公式リポジトリ)
sudo dnf config-manager --add-repo https://download.docker.com/linux/centos/docker-ce.repo
sudo dnf install -y docker-ce docker-ce-cli containerd.io docker-buildx-plugin docker-compose-plugin
sudo systemctl enable --now docker

# deployerユーザーをdockerグループに追加
sudo usermod -aG docker deployer
newgrp docker # グループ変更反映 (または再ログイン)

# 確認
docker version && docker compose version && docker run hello-world
2.3.2 Dockerデーモン設定強化 (/etc/docker/daemon.json)
sudo mkdir -p /etc/docker
sudo tee /etc/docker/daemon.json > /dev/null << 'EOF'
{
  "log-driver": "json-file",
  "log-opts": {
    "max-size": "10m",
    "max-file": "3"
  },
  "iptables": true,
  "live-restore": true,
  "userns-remap": "default",
  "no-new-privileges": true
}
EOF
# 注意: userns-remap はセキュリティ向上に有効だがボリューム権限等で問題発生可能性あり。要テスト。
sudo systemctl restart docker
2.3.3 Dockerネットワーク
# 推奨: アプリごとにカスタムブリッジネットワーク作成 (Composeファイル内定義)
2.3.4 イメージ管理とセキュリティスキャン
-
管理: version tag指定, 軽量base image, multi-stage build, 非root実行 (
USER命令)。 -
Scan: CI/CD (Trivy/Grype) 及び定期スキャン。レジストリ機能活用。
# GitHub Actions例 (Trivy)
- uses: aquasecurity/trivy-action@master
  with:
    image-ref: 'your-image:tag'
    format: 'table'
    exit-code: '1'
    ignore-unfixed: true
    vuln-type: 'os,library'
    severity: 'CRITICAL,HIGH'
2.4 Nginxリバースプロキシ設定 (ホストOS)
2.4.1 Nginxインストールと基本設定
sudo dnf install -y nginx
sudo systemctl enable --now nginx

# SELinux: Nginx -> コンテナ接続許可
sudo setsebool -P httpd_can_network_connect 1

# サイト設定ファイル作成 (例: /etc/nginx/conf.d/attendance.conf)
sudo tee /etc/nginx/conf.d/attendance.conf > /dev/null << 'EOF'
server {
    listen 80;
    listen [::]:80;
    server_name attendance.example.com; # 要変更

    access_log /var/log/nginx/attendance.access.log;
    error_log /var/log/nginx/attendance.error.log warn; # warnレベル以上

    location / {
        proxy_pass http://127.0.0.1:8080; # Appコンテナポート (要確認)
        proxy_set_header Host $host;
        proxy_set_header X-Real-IP $remote_addr;
        proxy_set_header X-Forwarded-For $proxy_add_x_forwarded_for;
        proxy_set_header X-Forwarded-Proto $scheme;
        proxy_connect_timeout       60s;
        proxy_send_timeout          60s;
        proxy_read_timeout          60s;
    }
}
EOF
sudo nginx -t && sudo systemctl reload nginx
2.4.2 Let's Encrypt (Certbot) によるHTTPS設定
sudo dnf install -y certbot python3-certbot-nginx
sudo certbot --nginx -d attendance.example.com --agree-tos --email your@email.com --no-eff-email --redirect # 要変更, 非対話例
# 自動更新タイマー確認/テスト: systemctl list-timers | grep certbot; sudo certbot renew --dry-run

# Nginx設定確認 (Certbotが更新)
# セキュリティヘッダー追加推奨 (/etc/nginx/conf.d/attendance.conf server 443 ブロック内)
# add_header Strict-Transport-Security "max-age=31536000; includeSubDomains" always;
# add_header X-Content-Type-Options nosniff always;
# add_header X-Frame-Options SAMEORIGIN always;
# add_header Referrer-Policy "strict-origin-when-cross-origin" always;

sudo nginx -t && sudo systemctl reload nginx
# ブラウザで https://attendance.example.com アクセス確認
2.4.3 WebSocketサポート (必要な場合)
# location ブロック内に追加
proxy_http_version 1.1;
proxy_set_header Upgrade $http_upgrade;
proxy_set_header Connection "upgrade";
proxy_read_timeout 86400; # 必要に応じて延長
sudo nginx -t && sudo systemctl reload nginx
2.4.4 キャッシュとパフォーマンス最適化
# Gzip圧縮 (/etc/nginx/nginx.conf httpブロック)
# gzip on; gzip_vary on; gzip_proxied any; gzip_comp_level 6; gzip_types ...;

# 静的ファイルキャッシュ (/etc/nginx/conf.d/attendance.conf server 443 ブロック)
# location ~* \.(?:css|js|jpg|jpeg|gif|png|ico|svg|woff|woff2)$ { expires 1M; access_log off; add_header Cache-Control "public"; }

# プロキシキャッシュ (動的コンテンツ向け、注意)
# sudo mkdir -p /var/cache/nginx/proxy_cache && sudo chown nginx:nginx /var/cache/nginx/proxy_cache && sudo chmod 700 /var/cache/nginx/proxy_cache
# nginx.conf httpブロック: proxy_cache_path ... keys_zone=app_cache:10m ...;
# attendance.conf locationブロック: proxy_cache app_cache; proxy_cache_valid 200 10m; proxy_cache_key ...; add_header X-Proxy-Cache $upstream_cache_status;
sudo nginx -t && sudo systemctl reload nginx
# レスポンスヘッダー確認 (curl -I, DevTools)
2.4.5 WAF機能 (ModSecurity, オプション)
- Install: ソースビルド or クラウドWAF/外部サービス検討。
-
Config:
modsecurity on;, OWASP CRS導入、SecRuleEngine DetectionOnly->On。誤検知対応。
# sudo nginx -t && sudo systemctl reload nginx # 設定後
2.5 PostgreSQL構築 (Docker Compose)
2.5.1 Compose定義例 (docker-compose.yml)
# (3.2 完全版構成例を参照)
services:
  postgres:
    image: postgres:14-alpine
    container_name: postgres_db
    environment:
      POSTGRES_DB: attendance_db
      POSTGRES_USER: attendance_user
      POSTGRES_PASSWORD_FILE: /run/secrets/db_app_password # Secrets推奨
      KC_DB_NAME: keycloak_db
      KC_DB_USER: keycloak_user
      KC_DB_PASSWORD_FILE: /run/secrets/db_kc_password   # Secrets推奨
      PGDATA: /var/lib/postgresql/data/pgdata
    volumes:
      - postgres_data:/var/lib/postgresql/data/pgdata # データ永続化
      - ./postgres-init:/docker-entrypoint-initdb.d  # Keycloak用DB/User作成スクリプト (要作成・chmod +x)
      - ./my-postgres.conf:/etc/postgresql/postgresql.conf # チューニング用 (要作成)
    command: postgres -c config_file=/etc/postgresql/postgresql.conf
    networks: [backend_network]
    restart: unless-stopped
    healthcheck: { test: ["CMD-SHELL", "pg_isready -U $$POSTGRES_USER -d $$POSTGRES_DB"], interval: 10s, timeout: 5s, retries: 5 }
    secrets: [db_app_password, db_kc_password]
# ... volumes, networks, secrets 定義 ...
secrets:
  db_app_password: { file: ./secrets/db_app_password.txt } # 要事前作成・chmod 600
  db_kc_password: { file: ./secrets/db_kc_password.txt }  # 要事前作成・chmod 600
2.5.2 データベースとユーザー作成
- Compose定義と初期化スクリプトでApp/Keycloak用DB/User自動作成。
- 手動追加:
docker compose exec postgres psql -U postgres
2.5.3 バックアップ/リストア
# バックアップ (cron推奨, ホストから実行)
TIMESTAMP=$(date +%Y%m%d_%H%M%S)
BACKUP_DIR="/path/to/backups/postgres" && mkdir -p ${BACKUP_DIR}
docker compose exec -T postgres pg_dump -U attendance_user -d attendance_db > "${BACKUP_DIR}/attendance_db_${TIMESTAMP}.sql"
docker compose exec -T postgres pg_dump -U keycloak_user -d keycloak_db > "${BACKUP_DIR}/keycloak_db_${TIMESTAMP}.sql"
# find ${BACKUP_DIR} -name "*.sql" -mtime +7 -delete # 古いファイル削除例
# 推奨: 外部ストレージ (S3等) へ転送

# リストア (ホストから実行, 要注意)
# DB再作成: docker compose exec postgres psql -U postgres -c "DROP DATABASE IF EXISTS attendance_db; CREATE DATABASE attendance_db OWNER attendance_user;"
cat "${BACKUP_DIR}/attendance_db_YYYYMMDD_HHMMSS.sql" | docker compose exec -T postgres psql -U attendance_user -d attendance_db
2.5.4 パフォーマンスチューニング (./my-postgres.conf)
-
shared_buffers,work_mem,maintenance_work_mem,effective_cache_size, checkpoint関連などをサーバーリソースに合わせて調整。 - Composeファイルで
volumesとcommandを上記(2.5.1)の通り設定。 - 再起動:
docker compose down && docker compose up -d - 確認:
docker compose exec postgres psql -U postgres -c "SHOW <param>;"
2.6 Keycloak SSO構築 (Docker Compose)
2.6.1 Compose定義例 (docker-compose.yml)
# (3.2 完全版構成例を参照)
services:
  keycloak:
    image: quay.io/keycloak/keycloak:24.0 # version指定推奨
    container_name: keycloak_sso
    environment:
      KC_DB: postgres
      KC_DB_URL_HOST: postgres
      KC_DB_URL_DATABASE: ${KC_DB_NAME:-keycloak_db}
      KC_DB_USERNAME: ${KC_DB_USER:-keycloak_user}
      KC_DB_PASSWORD_FILE: /run/secrets/db_kc_password # Secrets推奨
      KC_HOSTNAME_STRICT: "true" # 本番推奨
      KC_HOSTNAME_STRICT_HTTPS: "true"
      KC_PROXY: edge # リバプロ経由
      KC_HOSTNAME_URL: https://attendance.example.com/auth # Nginx locationに合わせる
      KC_HOSTNAME_ADMIN_URL: https://attendance.example.com/auth
      KEYCLOAK_ADMIN: admin
      KEYCLOAK_ADMIN_PASSWORD_FILE: /run/secrets/keycloak_admin_password # Secrets推奨
      # KC_JAVA_OPTS: "-Xms64m -Xmx512m" # メモリ調整
    ports: ["127.0.0.1:8180:8080"] # Nginxアクセス用 (内部8080)
    networks: [backend_network]
    depends_on: { postgres: { condition: service_healthy }}
    restart: unless-stopped
    secrets: [db_kc_password, keycloak_admin_password]
# ... secrets 定義 ...
secrets:
  keycloak_admin_password: { file: ./secrets/keycloak_admin_password.txt } # 要事前作成・chmod 600
-
Nginx設定:
location /auth/ { proxy_pass http://127.0.0.1:8180/auth/; ... }(ヘッダー設定含む)。
2.6.2 レルム、クライアント、ロール設定 (管理コンソール)
-
https://attendance.example.com/auth/にadminでログイン。 - 新規レルム作成 (例:
AttendanceApp)。 - クライアント作成:
Client ID(例:attendance-web-app),Client type: OpenID Connect,Capability config(Client auth: On, Standard flow),Login settings(Root URL, Valid redirect URIs, Web origins) をアプリに合わせて設定。 -
CredentialsタブでClient secretを取得、アプリ側に設定。 - ロール作成 (Realm/Client roles): 例:
employee,manager,admin。 - ユーザー作成 (
Users), パスワード設定 (Credentials), ロール割り当て (Role mapping)。
2.6.3 PostgreSQL連携
- Compose定義の
KC_DB_*で自動設定。起動ログと管理コンソールアクセスで確認。
2.6.4 SSO設定とセキュリティポリシー (管理コンソール)
- Realm settings: Login, Email, Themes。
- Authentication: Password Policy, Required Actions, Bindings (OTP等)。
- Sessions: 各種タイムアウト設定。
- Tokens: Lifespan設定 (Access Tokenは短め)。
2.7 監視・ロギング基盤 (EFK + Prometheus/Grafana)
2.7.1 EFK Stack デプロイ (Compose定義例)
# (3.2 完全版構成例を参照)
services:
  elasticsearch:
    image: docker.elastic.co/elasticsearch/elasticsearch:8.13.4
    # ... (environment, volumes, networks, ports: ["127.0.0.1:9200:9200"]) ...
    environment: { discovery.type: single-node, bootstrap.memory_lock: 'true', "ES_JAVA_OPTS": "-Xms1g -Xmx1g", xpack.security.enabled: "true" } # メモリ調整, セキュリティ有効推奨
    ulimits: { memlock: { soft: -1, hard: -1 }}
    volumes: [es_data:/usr/share/elasticsearch/data]
    networks: [monitoring_network]
    restart: unless-stopped

  kibana:
    image: docker.elastic.co/kibana/kibana:8.13.4
    # ... (environment, volumes, networks, ports: ["127.0.0.1:5601:5601"]) ...
    environment: { ELASTICSEARCH_HOSTS: 'http://elasticsearch:9200', SERVER_BASEPATH: /kibana, SERVER_PUBLICBASEURL: https://attendance.example.com/kibana } # 要Elasticsearch認証情報 if security enabled
    ports: ["127.0.0.1:5601:5601"]
    networks: [monitoring_network, backend_network]
    depends_on: [elasticsearch]
    restart: unless-stopped

  fluentd:
    image: fluent/fluentd:v1.16-1
    # ... (environment, volumes, networks) ...
    volumes: ["./fluentd/conf:/fluentd/etc", "/var/lib/docker/containers:/fluentd/log/containers:ro", "fluentd_buffer:/fluentd/buffer"]
    networks: [monitoring_network]
    depends_on: [elasticsearch]
    restart: unless-stopped
# ... volumes, networks 定義 ...
volumes:
  es_data: { driver: local }
  fluentd_buffer: { driver: local }
networks:
  monitoring_network: { driver: bridge }
-
Fluentd設定 (
./fluentd/conf/fluent.conf): Dockerログ収集->パース->ES出力設定。 -
Nginx設定:
location /kibana/ { proxy_pass http://127.0.0.1:5601/; ... }。 -
手順:
vm.max_map_count=262144設定 (sudo sysctl -w ..., 永続化/etc/sysctl.conf) →docker compose up -d→ Nginxリロード → Kibana (/kibana/) アクセス・Index確認。
2.7.2 Prometheus/Grafana 設定 (Compose定義例)
# (3.2 完全版構成例を参照)
services:
  prometheus:
    image: prom/prometheus:v2.51.2
    # ... (volumes, command, networks, ports: ["127.0.0.1:9090:9090"]) ...
    volumes: ["./prometheus:/etc/prometheus", "prometheus_data:/prometheus"]
    command: ["--config.file=/etc/prometheus/prometheus.yml", ...] # web.external-url, web.route-prefix=/
    ports: ["127.0.0.1:9090:9090"]
    networks: [monitoring_network]
    restart: unless-stopped

  grafana:
    image: grafana/grafana:10.4.2
    # ... (volumes, environment, networks, ports: ["127.0.0.1:3000:3000"], secrets) ...
    volumes: [grafana_data:/var/lib/grafana]
    environment: { GF_SECURITY_ADMIN_PASSWORD_FILE: /run/secrets/grafana_admin_password, GF_SERVER_ROOT_URL: https://attendance.example.com/grafana, GF_SERVER_SERVE_FROM_SUB_PATH: "true" }
    ports: ["127.0.0.1:3000:3000"]
    networks: [monitoring_network, backend_network]
    restart: unless-stopped
    secrets: [grafana_admin_password]

  node-exporter: # ホストメトリクス
    image: prom/node-exporter:v1.7.0
    # ... (volumes, command, ports: ["127.0.0.1:9100:9100"], networks, pid: host) ...
    volumes: ["/proc:/host/proc:ro", "/sys:/host/sys:ro", "/:/rootfs:ro"]
    command: ["--path.procfs=/host/proc", ...]
    ports: ["127.0.0.1:9100:9100"]
    networks: [monitoring_network]
    pid: host
    restart: unless-stopped

  cadvisor: # コンテナメトリクス
    image: gcr.io/cadvisor/cadvisor:v0.49.1
    # ... (volumes, ports: ["127.0.0.1:8081:8080"], networks, privileged: true, devices) ...
    volumes: ["/:/rootfs:ro", "/var/run:/var/run:rw", "/sys:/sys:ro", "/var/lib/docker/:/var/lib/docker:ro"]
    ports: ["127.0.0.1:8081:8080"] # 内部8080
    networks: [monitoring_network]
    privileged: true # 注意
    devices: ["/dev/kmsg:/dev/kmsg"]
    restart: unless-stopped

# ... volumes, secrets 定義 ...
volumes:
  prometheus_data: { driver: local }
  grafana_data: { driver: local }
secrets:
  grafana_admin_password: { file: ./secrets/grafana_admin_password.txt } # 要事前作成・chmod 600
-
Prometheus設定 (
./prometheus/prometheus.yml):scrape_configsでnode-exporter:9100,cadvisor:8080等を指定。 -
Nginx設定:
location /grafana/ { proxy_pass http://127.0.0.1:3000/; ... },location /prometheus/ { proxy_pass http://127.0.0.1:9090/; ... }。 -
手順:
docker compose up -d→ Nginxリロード → Grafana (/grafana/) アクセス・ログイン・データソース(Prometheus:http://prometheus:9090)追加・ダッシュボード設定 → Prometheus UI (/prometheus/) Targets確認。
2.7.3 アラート設定 (Alertmanager)
-
Compose定義追加:
# (3.2 完全版構成例を参照) services: alertmanager: image: prom/alertmanager:v0.27.0 # ... (volumes, command, networks, ports: ["127.0.0.1:9093:9093"]) ... volumes: ["./alertmanager:/etc/alertmanager", "alertmanager_data:/alertmanager"] command: ["--config.file=/etc/alertmanager/alertmanager.yml", ...] # web.external-url, web.route-prefix=/ ports: ["127.0.0.1:9093:9093"] networks: [monitoring_network] restart: unless-stopped # ... volumes 定義 ... volumes: alertmanager_data: { driver: local } -
Alertmanager設定 (
./alertmanager/alertmanager.yml):global,route,receivers(Slack/Email等) 設定。 -
Prometheus設定 (
prometheus.yml) 更新:alerting,rule_filesセクション追加。 -
アラートルールファイル (
./prometheus/alert.rules.yml): CPU, Memory, Disk等のルール定義。 -
Nginx設定:
location /alertmanager/ { proxy_pass http://127.0.0.1:9093/; ... }。 -
再起動・確認:
docker compose up -d→ Nginxリロード → Prometheus UI (/alerts)、Alertmanager UI (/alertmanager/) 確認 → アラートテスト、通知確認。
2.7.4 ログローテーション
-
Docker:
daemon.jsonor Composeloggingで設定済。 -
Host OS:
logrotate。 - EFK: Elasticsearchは ILM (Index Lifecycle Management) で管理推奨。
2.8 CI/CD環境統合 (GitHub Actions)
2.8.1 GitHub Actions セルフホストランナー設定 (必要な場合)
- GitHub
Settings->Actions->Runners->New self-hosted runnerで手順確認。 - サーバーでランナーDL・設定・サービス登録 (
./config.sh,sudo ./svc.sh install deployer,sudo ./svc.sh start)。 - GitHub側でランナー状態確認。
2.8.2 デプロイ自動化ワークフロー (.github/workflows/deploy.yml)
name: Deploy Production

on:
  push: { branches: [main] }

jobs:
  build-deploy:
    runs-on: self-hosted # or ubuntu-latest
    environment: production
    steps:
      - uses: actions/checkout@v4
      - uses: docker/setup-buildx-action@v3
      - name: Login to Docker Registry # if private
        uses: docker/login-action@v3
        with: { username: ${{ secrets.DOCKER_USERNAME }}, password: ${{ secrets.DOCKER_TOKEN }} }

      # (Option) Run tests: run: docker compose run --rm app your-test-command

      # Build & Scan image (Trivy example)
      - uses: docker/build-push-action@v5
        id: build # Save metadata
        with: { context: ., file: ./Dockerfile, push: false, tags: 'myapp/attendance:${{ github.sha }}', load: true }
      - uses: aquasecurity/trivy-action@master
        with: { image-ref: 'myapp/attendance:${{ github.sha }}', format: table, exit-code: '1', ignore-unfixed: true, vuln-type: 'os,library', severity: 'CRITICAL,HIGH' }

      # Push image
      - uses: docker/build-push-action@v5
        with: { context: ., file: ./Dockerfile, push: true, tags: '${{ secrets.DOCKER_USERNAME }}/attendance-app:${{ github.sha }},${{ secrets.DOCKER_USERNAME }}/attendance-app:latest' }

      # Deploy via SSH
      - uses: appleboy/ssh-action@master
        with:
          host: ${{ secrets.PROD_HOST }}
          username: ${{ secrets.PROD_USERNAME }} # deployer
          key: ${{ secrets.PROD_SSH_KEY }}
          port: ${{ secrets.PROD_SSH_PORT || 22 }}
          script: |
            cd /path/to/docker-compose/project
            # docker login ... # if needed on server
            export IMAGE_TAG=${{ github.sha }} # Set env var for compose
            docker compose -f docker-compose.yml -f docker-compose.prod.yml pull app # Example using multiple compose files
            docker compose -f docker-compose.yml -f docker-compose.prod.yml up -d --remove-orphans app
            # docker image prune -f # Optional cleanup
-
GitHub Secrets:
DOCKER_USERNAME,DOCKER_TOKEN,PROD_HOST,PROD_USERNAME,PROD_SSH_KEY,PROD_SSH_PORT。 - デプロイスクリプトは要調整 (DBマイグレーション等)。
2.8.3 ブルー/グリーンデプロイメント (高度なオプション)
- Concept: Blue(現)/Green(新)環境 + Nginx切替。
-
Nginx:
upstream+mapor 設定ファイル変更でproxy_pass切替。 - CI/CD: Greenデプロイ -> Test -> Nginx reload -> Blue停止。
- 注意: DBスキーマ変更、セッション管理。複雑。
3. 成果物例 (詳細は元の手順書参照)
-
3.1 主要設定ファイル:
sshd_config,jail.local,automatic.conf,daemon.json,nginx.conf,attendance.conf,init-keycloak-db.sh,my-postgres.conf,fluent.conf,prometheus.yml,alert.rules.yml,alertmanager.yml,deploy.yml。 - 3.2 Docker-compose.yml: 全サービス(app, db, sso, elk, prom, grafana, exporters)統合定義。
- 3.3 チェックリスト: 初期設定〜運用までの網羅的確認項目。
- 3.4 トラブルシューティング: 一般的な問題の原因特定・対処法。
- 3.5 バックアップ/リカバリ: 対象データと手順、リストアテストの重要性。
- 3.6 セキュリティ監査: 定期監査項目と手順。
4. 特記事項 (要約、詳細は元の手順書参照)
- 4.1 高可用性: LB, 複数インスタンス, DBレプリ/Failover, Keycloakクラスタ, 共有ストレージ。
- 4.2 パフォーマンス: サイジング, 各コンポーネントチューニング, キャッシュ, 非同期, 最適化。
- 4.3 セキュリティ: 最小権限, 最新化, アクセス制御, WAF, 脆弱性管理, 監査。
- 4.4 運用保守: 文書化, 変更管理, 監視, 定期Update/監査/テスト, 自動化。
免責事項: 本手順書はガイドラインであり、完全性・セキュリティ・パフォーマンスを保証しません。十分なテストと自己責任での利用をお願いします。専門家への相談も検討してください。