はじめに
前回の記事では、AdonisJSの全体像(主にMVC)を触りながらざっくりと説明しました。
Edge.jsというテンプレートエンジンを使って画面表示をしたのですが、今回はInertia.jsとVuejsで画面表示をしていきたいと思います。
※Inertia.jsを使ったことがないのと、フロントエンドにはあまり明るくないので温かい目で読んで頂ければと思います![]()
Inertia.jsとは?
公式によると
Inertia is a new approach to building classic server-driven web apps. We call it the modern monolith.
Inertia allows you to create fully client-side rendered, single-page apps, without the complexity that comes with modern SPAs. It does this by leveraging existing server-side patterns that you already love.
Inertia has no client-side routing, nor does it require an API. Simply build controllers and page views like you've always done!イナーシャは、古典的なサーバー駆動型のウェブ・アプリケーションを構築するための新しいアプローチだ。私たちはこれを現代のモノリスと呼んでいます。
Inertiaを使えば、最新のSPAのような複雑さを伴うことなく、完全にクライアントサイドでレンダリングされたシングルページのアプリを作成することができます。これは、あなたがすでに気に入っている既存のサーバサイドパターンを活用することで実現します。
とあります。
SPA(シングルページアプリケーションを作る際には、
- バックエンドをLaravelやExpressなど
-
フロントエンドをVueやReactなど
で実装することが多く、AdonisJSのEdge.jsやLaravelのBladeなどのテンプレートエンジンを使うことは少ないと思います。
そして、それぞれ開発する中でバックエンドとフロントエンドを繋ぎこみすることになるかと思いますが、これには以下のような作業が発生するかと思います。
- バックエンドでAPIを作成する
- フロントエンドでAPIを使ってデータを取得/登録する
そしてこの作業には以下のようなことを考慮する必要がありますが、Inertia.JSを使うとこれらを解決することが出来ます。
- APIのIFの設計と実装(エンドポイント・リクエスト/レスポンスなど):バックエンドで取得したデータをそのままフロントエンドに渡すように出来る。これにより、API IFの設計が不要になり設計工数が削減でき、フロントエンドもAPIを意識する必要がなくなります
- フロントエンドとバックエンド間のデータフォーマット統一:バックエンドで取得したデータをそのままフロントエンドに渡すように出来るので、お互いのフォーマットのずれが起きにくくなります
- バックエンドとフロントエンドで重複するロジック(バリデーションなど):バックエンドにバリデーションを集約し、フロントエンドに返すことで2重にチェック処理を実装する手間やチェック内容の乖離を防ぐことが出来ます
- フロントエンドのルーティング実装が不要:テンプレートエンジンを使っていた時のように、フロントエンドのルートファイルが不要になります
つまり、テンプレートエンジンを使うことによるメリットである設計・実装削減が可能であり、その上で任意のフロントエンドフレームワークを利用することが出来る柔軟性、を実現するための橋渡し的な役割をするのがInertia.JSということです。
Inertia.JSはJavascriptのフレームワークではなく、SPAを構築するためのライブラリやツール的な位置づけらしいです
やってみる
では、実際にやってみます。
今回は、
- 書籍一覧画面の作成
-
書籍登録画面の作成
までやってみます。
プロジェクトの作成
まず、Inertiaのプロジェクトを作成していきます。
今回は、
- DB:PostgreSQL
- 認証:セッション
- フロントエンド:Vue3
-
SSR(サーバーサイドレンダリング)
を選択して進めていきます。
npm init adonisjs@latest adonis-inertia-sample

> create-adonisjs adonis-inertia-sample


     _       _             _         _ ____
    / \   __| | ___  _ __ (_)___    | / ___|
   / _ \ / _` |/ _ \| '_ \| / __|_  | \___ \
  / ___ \ (_| | (_) | | | | \__ \ |_| |___) |
 /_/   \_\__,_|\___/|_| |_|_|___/\___/|____/


> Which starter kit would you like to use ...  Press <ENTER> to select
  Slim Starter Kit A lean AdonisJS application with just the framework core
  Web Starter Kit Everything you need to build a server render app
  API Starter Kit AdonisJS app tailored for creating JSON APIs
> Inertia Starter Kit Inertia app with a frontend framework of your choice
> Which starter kit would you like to use · Inertia Starter Kit
> Which authentication guard you want to use ...  Press <ENTER> to select
> Session Authenticate users using cookies and session
  Access Token Authenticate clients using API tokens
  Basic Auth Authenticate users using HTTP Basic Auth
  Skip I want to configure the Auth package manually
> Which authentication guard you want to use · session
> Which database driver you want to use ...  Press <ENTER> to select
> SQLite
  LibSQL
  MySQL
  PostgreSQL
  MS SQL
  Skip I want to configure Lucid manually
> Which database driver you want to use · postgres
> Which frontend adapter you want to use with Inertia ...  Press <ENTER> to select
> Vue 3
  React
  Svelte
  Solid.js
  Skip I want to configure Interia manually
> Which frontend adapter you want to use with Inertia · vue
> Do you want to setup server-side rendering with Inertia (y/N) · true
> Download starter kit (981 ms)
  Downloaded "github:adonisjs/inertia-starter-kit"
> Install packages (1.42 min)
  Packages installed using "npm"
> Prepare application (3.4 s)
  Application ready
> Configure Lucid (13 s)
  Lucid configured to use "postgres" database
> Configure Auth (7.82 s)
  Auth configured to use "session" guard
> Configure Inertia (23 s)
  Inertia configured

╭──────────────────────────────────────────────────────────────────╮
│    Your AdonisJS project has been created successfully!          │
│──────────────────────────────────────────────────────────────────│
│                                                                  │
│    > cd adonis-inertia-sample                                    │
│    > npm run dev                                                 │
│    > Open http://localhost:3333                                  │
│    >                                                             │
│    > Have any questions?                                         │
│    > Join our Discord server - https://discord.gg/vDcEjq6        │
│                                                                  │
╰──────────────────────────────────────────────────────────────────╯
これでAdonisJS・Vue3・Inertia.jsのプロジェクトが出来ました!簡単!!!
この段階でhttp://localhost:3333/にアクセスすると、以下のような画面が表示されるはずです。

次にPostgreSQL DBコンテナを用意するのですが、そちらについては前回の記事で紹介したこちらをご確認ください。
書籍一覧画面の作成
では、ここから実際に実装していきます。
まずは書籍一覧画面を作っていきます。
書籍モデルの作成
まず、書籍モデルと書籍テーブルを作成していきます。
node ace make:model -m Book
テーブルに書籍名と金額のカラムを追加します。
import { BaseSchema } from '@adonisjs/lucid/schema'

export default class extends BaseSchema {
  protected tableName = 'books'

  async up() {
    this.schema.createTable(this.tableName, (table) => {
      table.increments('id')
+     table.string('name')
+     table.integer('price')

      table.timestamp('created_at')
      table.timestamp('updated_at')
    })
  }

  async down() {
    this.schema.dropTable(this.tableName)
  }
}
修正したらマイグレーションを実行してテーブルを作ります。
node ace migration:status
┌────────────────────────────────────────────────────────┬───────────┬─────────┬───────────┐
│  Name                                                  │  Status   │  Batch  │  Message  │
├────────────────────────────────────────────────────────┼───────────┼─────────┼───────────┤
│  database/migrations/1744614574415_create_users_table  │  pending  │  NA     │           │
├────────────────────────────────────────────────────────┼───────────┼─────────┼───────────┤
│  database/migrations/1744616672145_create_books_table  │  pending  │  NA     │           │
└────────────────────────────────────────────────────────┴───────────┴─────────┴───────────┘

node ace migration:run
❯ migrated database/migrations/1744614574415_create_users_table
❯ migrated database/migrations/1744616672145_create_books_table

Migrated in 180 ms

node ace migration:status
┌────────────────────────────────────────────────────────┬─────────────┬─────────┬───────────┐
│  Name                                                  │  Status     │  Batch  │  Message  │
├────────────────────────────────────────────────────────┼─────────────┼─────────┼───────────┤
│  database/migrations/1744614574415_create_users_table  │  completed  │  1      │           │
├────────────────────────────────────────────────────────┼─────────────┼─────────┼───────────┤
│  database/migrations/1744616672145_create_books_table  │  completed  │  1      │           │
└────────────────────────────────────────────────────────┴─────────────┴─────────┴───────────┘
カラムを追加したので、併せてモデルも修正します
import { DateTime } from 'luxon'
import { BaseModel, column } from '@adonisjs/lucid/orm'

export default class Book extends BaseModel {
  @column({ isPrimary: true })
  declare id: number

+ @column()
+ declare name: string

+ @column()
+ declare price: number

  @column.dateTime({ autoCreate: true })
  declare createdAt: DateTime

  @column.dateTime({ autoCreate: true, autoUpdate: true })
  declare updatedAt: DateTime
}
書籍データの作成
次にテストデータをいくつか入れてみましょう。FactoryとSeederを使って入れていきます。
まず、Factoryを作ります。
node ace make:factory books
DONE:    create database/factories/book_factory.ts
import Factory from '@adonisjs/lucid/factories'
import Book from '#models/book'

export const BookFactory = Factory.define(Book, ({ faker }) => {
  return {
    name: faker.book.title(),
    price: faker.number.int({ min: 500, max: 10000 }),
  }
}).build()
次にSeederを作ります。
今回は10データ入れてみます。
node ace make:seeder books
DONE:    create database/seeders/book_seeder.ts
import { BaseSeeder } from '@adonisjs/lucid/seeders'
import { BookFactory } from '#database/factories/book_factory'

export default class extends BaseSeeder {
  async run() {
    await BookFactory.createMany(10)
  }
}
ちゃんと10データ入ってますね![]()
node ace db:seed

app=# select * from books;
 id |        name         | price |         created_at         |         updated_at
----+---------------------+-------+----------------------------+----------------------------
  1 | The Pickwick Papers |  8145 | 2025-04-16 01:26:20.81+00  | 2025-04-16 01:26:20.811+00
  2 | The Idiot           |  3370 | 2025-04-16 01:26:20.842+00 | 2025-04-16 01:26:20.843+00
  3 | Dune                |   624 | 2025-04-16 01:26:20.847+00 | 2025-04-16 01:26:20.847+00
  4 | David Copperfield   |  7453 | 2025-04-16 01:26:20.85+00  | 2025-04-16 01:26:20.85+00
  5 | Herzog              |  5920 | 2025-04-16 01:26:20.854+00 | 2025-04-16 01:26:20.855+00
  6 | Things Fall Apart   |  3210 | 2025-04-16 01:26:20.858+00 | 2025-04-16 01:26:20.858+00
  7 | Wuthering Heights   |  4297 | 2025-04-16 01:26:20.861+00 | 2025-04-16 01:26:20.861+00
  8 | The Waste Land      |  9524 | 2025-04-16 01:26:20.864+00 | 2025-04-16 01:26:20.864+00
  9 | The Alchemist       |  6757 | 2025-04-16 01:26:20.868+00 | 2025-04-16 01:26:20.868+00
 10 | The Maltese Falcon  |  9329 | 2025-04-16 01:26:20.872+00 | 2025-04-16 01:26:20.872+00
(10 rows)
書籍コントローラーの作成
書籍コントローラーを作成して、一覧用のメソッドを追加します。
node ace make:controller books
DONE:    create app/controllers/books_controller.ts
import type { HttpContext } from '@adonisjs/core/http'
import Book from '#models/book';

export default class BooksController {
  public async index({ inertia }: HttpContext) {
    const books = await Book.index()
    return inertia.render('books/index', { books })
  }
}
書籍モデルに一覧取得メソッドを追加
次にDBから一覧取得するメソッドを書籍モデルに追加します。
import { DateTime } from 'luxon'
import { BaseModel, column } from '@adonisjs/lucid/orm'

export default class Book extends BaseModel {
  @column({ isPrimary: true })
  declare id: number

  @column()
  declare name: string

  @column()
  declare price: number

  @column.dateTime({ autoCreate: true })
  declare createdAt: DateTime

  @column.dateTime({ autoCreate: true, autoUpdate: true })
  declare updatedAt: DateTime

+ static async index() {
+   const books = await this.all()
+   return books
+ }
}
書籍一覧画面へのルートを追加
次に書籍一覧のルートを追加します。
+const BooksController = () => import('#controllers/books_controller')

import router from '@adonisjs/core/services/router'
router.on('/').renderInertia('home')
+router.get('books', [BooksController, 'index']).as('books.index')
一覧画面表示を追加
最後に一覧画面表示用のVueファイルを作成します。
<template>
  <div class="container">
    <h1>書籍一覧</h1>

    <table class="table mt-4">
      <thead>
        <tr>
          <th>タイトル</th>
          <th>価格</th>
        </tr>
      </thead>
      <tbody>
        <tr v-for="book in books" :key="book.id">
          <td>{{ book.name }}</td>
          <td>{{ book.price }}</td>
        </tr>
      </tbody>
    </table>
  </div>
</template>
<script setup lang="ts">
import { InferPageProps } from '@adonisjs/inertia/types'
import type BooksController from '#controllers/books_controller'

defineProps<{
  books: InferPageProps<typeof BooksController, 'index'>['books']
}>()
</script>
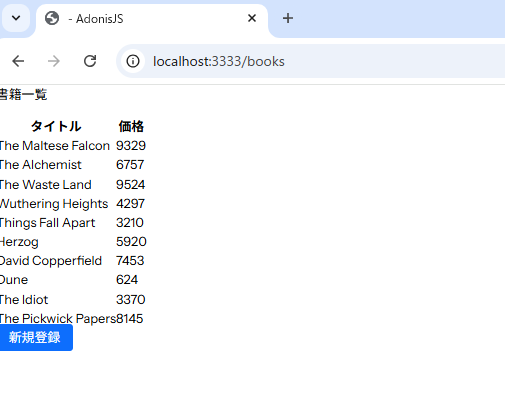
では、画面にアクセスしてみましょう。
DBの書籍データが表示されましたね![]()

書籍登録画面の作成
次は登録画面を作っていきます。
また、
- 一覧画面から登録画面への導線
- 登録完了時に一覧画面へ遷移して登録完了メッセージを表示
も併せてやってみます。
書籍コントローラーに登録用のメソッドを追加
- 登録画面表示処理
- 登録処理
のメソッドをそれぞれ追加します。
import type { HttpContext } from '@adonisjs/core/http'
import Book from '#models/book';
import { createBookValidator } from '#validators/book'

export default class BooksController {
  // 一覧画面表示
  public async index({ inertia }: HttpContext) {
    const books = await Book.index()
    return inertia.render('books/index', { books })
  }

+  // 登録画面表示
+  public async create({ inertia }: HttpContext) {
+    return inertia.render('books/create')
+  }
+
+  // 登録処理
+  public async store({ request, response, session }: HttpContext) {
+    const data = request.only(['name', 'price'])
+    const validatedData = await createBookValidator.validate(data)
+    await Book.register(validatedData)
+
+    session.flash('success', '書籍登録が完了しました。')
+
+    return response.redirect().toRoute('books.index')
+  }
}
バリデーションの追加
登録処理用のバリデーションを追加します。
node ace make:validator books
DONE:    create app/validators/book.ts
import vine from '@vinejs/vine'

/**
 * Validates the book's creation action
 */
export const createBookValidator = vine.compile(
  vine.object({
    name: vine.string().minLength(1).maxLength(255),
    price: vine.number().range([500, 10000]),
  })
)
ルートの修正
登録画面用のルートを追加します
/*
|--------------------------------------------------------------------------
| Routes file
|--------------------------------------------------------------------------
|
| The routes file is used for defining the HTTP routes.
|
*/

const BooksController = () => import('#controllers/books_controller')

import router from '@adonisjs/core/services/router'
router.on('/').renderInertia('home')
router.get('books', [BooksController, 'index']).as('books.index')
+router.get('books/create', [BooksController, 'create']).as('books.create')
+router.post('books/store', [BooksController, 'store'])
書籍モデルに登録処理を追加
import { DateTime } from 'luxon'
import { BaseModel, column } from '@adonisjs/lucid/orm'

+interface CreateParams {
+  name: string
+  price: number
+}

export default class Book extends BaseModel {
  @column({ isPrimary: true })
  declare id: number

  @column()
  declare name: string

  @column()
  declare price: number

  @column.dateTime({ autoCreate: true })
  declare createdAt: DateTime

  @column.dateTime({ autoCreate: true, autoUpdate: true })
  declare updatedAt: DateTime

  static async index() {
    const books = await this.all()
    return books
  }

+ static async register(params: CreateParams) {
+   return await this.create(params)
+ }
}
登録画面の追加
最後に画面表示を修正します。
まず、登録画面を追加します。
<template>
  <div class="container">
    <h1>書籍登録</h1>

    <form @submit.prevent="submit">
      <div class="mb-3">
        <label class="form-label">タイトル</label>
        <input
          v-model="form.name"
          type="text"
          class="form-control"
          required
        >
        <div v-if="errors?.name" class="invalid-feedback">
          {{ errors.name }}
        </div>
      </div>
      <div class="mb-3">
        <label class="form-label">価格</label>
        <input
          v-model="form.price"
          type="text"
          class="form-control"
          required
        >
        <div v-if="errors?.price" class="invalid-feedback">
          {{ errors.price }}
        </div>
      </div>
      <button type="submit" class="btn btn-primary">登録</button>
    </form>
  </div>
</template>
<script setup lang="ts">
import { reactive } from 'vue'
import { router } from '@inertiajs/vue3'
defineProps({
  errors: Object
});

const form = reactive({
  name: null,
  price: null,
})
function submit() {
  router.post('store', form)
}
</script>
<style scoped>
.btn-primary {
  background-color: #0d6efd;
  border-color: #0d6efd;
  color: white;
  padding: 0.5rem 1rem;
  border-radius: 0.25rem;
  text-decoration: none;
}

.btn-primary:hover {
  background-color: #0b5ed7;
  border-color: #0a58ca;
}
</style>
フラッシュメッセージ用にinertiaの設定ファイルを修正します。
  sharedData: {
+    flash: (ctx) => ctx.inertia.always(() => {
+      return {
+        success: ctx.session.flashMessages.get('success'),
+        error: ctx.session.flashMessages.get('error'),
+      }
+    }),
  },
一覧画面から登録画面への導線を追加し、フラッシュメッセージの表示も追加します。
<template>
  <div class="container">
    <h1>書籍一覧</h1>
+    <div v-if="$page.props.flash.success" class="alert alert-success" role="alert">
+      {{ $page.props.flash.success }}
+    </div>
    <table class="table mt-4">
      <thead>
        <tr>
          <th>タイトル</th>
          <th>価格</th>
        </tr>
      </thead>
      <tbody>
        <tr v-for="book in books" :key="book.id">
          <td>{{ book.name }}</td>
          <td>{{ book.price }}</td>
        </tr>
      </tbody>
    </table>
+    <Link
+      href="/books/create"
+      class="btn btn-primary"
+    >
+      新規登録
+    </Link>

  </div>
</template>
<script setup lang="ts">
import { InferPageProps } from '@adonisjs/inertia/types'
+import { Link } from '@inertiajs/vue3'

defineProps<{
  books: InferPageProps<typeof BooksController, 'index'>['books']
}>()
</script>

+<style scoped>
+.btn-primary {
+  background-color: #0d6efd;
+  border-color: #0d6efd;
+  color: white;
+  padding: 0.5rem 1rem;
+  border-radius: 0.25rem;
+  text-decoration: none;
+}
+
+.btn-primary:hover {
+  background-color: #0b5ed7;
+  border-color: #0a58ca;
+}
+
+.alert {
+  margin: 1rem 0;
+  padding: 1rem;
+  border-radius: 4px;
+}
+
+.alert-success {
+  background-color: #d4edda;
+  border-color: #c3e6cb;
+  color: #155724;
+}
+</style>
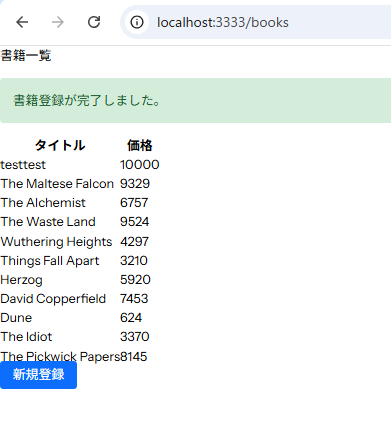
では、最後に画面を見てみましょう!
- 一覧画面から登録画面への遷移
- 登録画面の表示
- 入力内容に問題がある場合、エラーメッセージを表示
- 登録が完了すると、一覧画面に遷移し成功のフラッシュメッセージを表示
まで出来ましたね![]()

おわりに
今回はAdonisJSとVue.jsとInertiaを使って、ユーザ画面をSPAで作成しました。
思ったよりは、簡単にInertiaを取り入れることが出来ました![]()