- 記事のお引越しを考えてるので近々非公開にするかもしれないです…
- ChArUco マーカーボードで位置推定 も参考になるかもしれないです
- (この記事のコードめちゃくちゃ雑です・・・悪しからず・・・)
はじめに
- ArUcoマーカーってカメラの自己位置推定に便利な気がしてたんですが、探してもいいサンプルがなくて詰まったのでメモ
- (もっといい書き方あれば教えてほしいです、、、)
- コード、素材、カメラパラメータ等はここに置いてます ⇨ https://github.com/naruya/aruco
環境
- python3.7
素材
- shisa.mp4
出力
理論的な
-
この方の記事がわかりやすかったです
-
カメラの外部パラメータ( $R$ と $T$ )は以下を満たす
- c: カメラ( 画像 )座標系
- w: 世界座標系
\begin{bmatrix}
X_c \\
Y_c \\
Z_c
\end{bmatrix}
= R
\begin{bmatrix}
X_w \\
Y_w \\
Z_w
\end{bmatrix}
+ T
- 世界座標系でのカメラの座標 $O_w$ を求めるには、まず $R^{-1} = R^\top$ を使って、
\begin{bmatrix}
X_w \\
Y_w \\
Z_w
\end{bmatrix}
=
R^\top
\begin{pmatrix}
\begin{bmatrix}
X_c \\
Y_c \\
Z_c
\end{bmatrix}
- T
\end{pmatrix}
- 次に、$O_w$ はカメラ座標系では原点なので、上の式に $ \begin{bmatrix} X_c \ Y_c \ Z_c \end{bmatrix}^\top = \begin{bmatrix} 0 \ 0 \ 0 \end{bmatrix}^\top $ を代入して、
O_w =
\begin{bmatrix}
O^x_w \\
O^y_w \\
O^z_w
\end{bmatrix}
=
R^\top
\begin{pmatrix}
- T
\end{pmatrix}
- また、カメラの正面向き $vz_w$ ( $ vz_c = \begin{bmatrix} 0 \ 0 \ 1 \end{bmatrix}^\top $ )は、カメラ座標 $ \begin{bmatrix} X_c \ Y_c \ Z_c \end{bmatrix}^\top = \begin{bmatrix} 0 \ 0 \ 1 \end{bmatrix}^\top$ を考えることで、
vz_w =
R^\top
\begin{pmatrix}
\begin{bmatrix}
0 \\
0 \\
1
\end{bmatrix}
- T
\end{pmatrix}
- O_w
=
R^\top
\begin{bmatrix}
0 \\
0 \\
1
\end{bmatrix}
- 他のカメラの向き $vx_w$ ( $vx_c = \begin{bmatrix} 1 \ 0 \ 0 \end{bmatrix}^\top $: カメラ右向き)、 $vy_w$ ( $vy_c = \begin{bmatrix} 0 \ 1 \ 0 \end{bmatrix}^\top $: カメラ下向き) も同様
注意ポイント
- 座標系の取り方の微妙な違い(どっちも右手座標系&それはそう感はあるけど一応)
- 世界座標系(アルコマーカーの座標系):
- マーカー自体がxy平面上にあって、右がx軸正、上がy軸正、マーカー上空がz軸正
- カメラ座標系(OpenCVのカメラ画像に対する座標系):
- 画像右がx軸正、画像下がy軸正、画像奥がz軸正
- 世界座標系(アルコマーカーの座標系):
- え、カメラの歪みとか使わずにRとTで世界座標系での位置求めちゃっていいの?と思ったけどたぶんRとTはカメラの歪みとか考慮して求められてるし問題ない気がしている(とりあえず経験的には実用上問題ない)
コード
1. 準備
import cv2
import numpy as np
import matplotlib.pyplot as plt
from skvideo.io import vread
import moviepy.editor as mpy
from tqdm import tqdm
from mpl_toolkits.mplot3d import axes3d, Axes3D

def npy_to_gif(npy, filename):
    clip = mpy.ImageSequenceClip(list(npy), fps=10)
    clip.write_gif(filename)

vid = vread("src/shisa.mp4")
print(vid.shape)
(524, 1920, 1080, 3)
2. アルコマーカー
aruco_dict = cv2.aruco.getPredefinedDictionary(cv2.aruco.DICT_4X4_50)
aruco = cv2.aruco.drawMarker(aruco_dict, 0, 256)
cv2.imwrite("aruco.png", aruco)

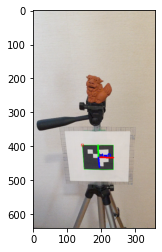
- これを印刷して脚立に貼り付けました
3. カメラの設定
- Google Pixel3 の録画モード、倍率1、で撮りました
marker_length = 0.07 # [m] ### 注意!
mtx = np.load("camera/mtx.npy")
dist = np.load("camera/dist.npy")
4. メイン
- 画像をリサイズすると
xyzやrpyの値(スケール?)も変わるので注意してください - rpy(roll pitch yaw)はplotには使わないですが一応
XYZ = []
RPY = []
V_x = []
V_y = []
V_z = []

for frame in vid[:500:25]:  # 全部処理すると重いので…
    frame = frame[...,::-1]  # BGR2RGB
    corners, ids, _ = cv2.aruco.detectMarkers(frame, aruco_dict)

    if len(corners) == 0:
        continue

    rvec, tvec, _ = cv2.aruco.estimatePoseSingleMarkers(corners, marker_length, mtx, dist)

    R = cv2.Rodrigues(rvec)[0]  # 回転ベクトル -> 回転行列
    R_T = R.T
    T = tvec[0].T

    xyz = np.dot(R_T, - T).squeeze()
    XYZ.append(xyz)

    rpy = np.deg2rad(cv2.RQDecomp3x3(R_T)[0])
    RPY.append(rpy)

    V_x.append(np.dot(R_T, np.array([1,0,0])))
    V_y.append(np.dot(R_T, np.array([0,1,0])))
    V_z.append(np.dot(R_T, np.array([0,0,1])))

    # ---- 描画
    cv2.aruco.drawDetectedMarkers(frame, corners, ids, (0,255,255))
    cv2.aruco.drawAxis(frame, mtx, dist, rvec, tvec, marker_length/2)
    cv2.imshow('frame', frame)
    cv2.waitKey(1)
    # ----

cv2.destroyAllWindows()
- こんな感じ
- ちなみに
rpyは、-
cv2.RQDecomp3x3()を使う方法 -
cv2.decomposeProjectionMatrix()を使う方法 -
arctan()やらarcsin()
-
- を使う方法などなどありそう(後述)
5. カメラ位置の描画
def plot_all_frames(elev=90, azim=270):
    frames = []

    for t in tqdm(range(len(XYZ))):
        fig = plt.figure(figsize=(4,3))
        ax = Axes3D(fig)
        ax.view_init(elev=elev, azim=azim)
        ax.set_xlim(-2, 2); ax.set_ylim(-2, 2); ax.set_zlim(-2, 2)
        ax.set_xlabel("x"); ax.set_ylabel("y"); ax.set_zlabel("z")

        x, y, z = XYZ[t]
        ux, vx, wx = V_x[t]
        uy, vy, wy = V_y[t]
        uz, vz, wz = V_z[t]

        # draw marker
        ax.scatter(0, 0, 0, color="k")
        ax.quiver(0, 0, 0, 1, 0, 0, length=1, color="r")
        ax.quiver(0, 0, 0, 0, 1, 0, length=1, color="g")
        ax.quiver(0, 0, 0, 0, 0, 1, length=1, color="b")
        ax.plot([-1,1,1,-1,-1], [-1,-1,1,1,-1], [0,0,0,0,0], color="k", linestyle=":")

        # draw camera
        ax.quiver(x, y, z, ux, vx, wx, length=0.5, color="r")
        ax.quiver(x, y, z, uy, vy, wy, length=0.5, color="g")
        ax.quiver(x, y, z, uz, vz, wz, length=0.5, color="b")

        # save for animation
        fig.canvas.draw()
        frames.append(np.array(fig.canvas.renderer.buffer_rgba()))
        plt.close()

    return frames
frames = plot_all_frames(elev=105, azim=270)
npy_to_gif(frames, "src/sample1.gif")

frames = plot_all_frames(elev=165, azim=270)
npy_to_gif(frames, "src/sample2.gif")
デフォルトの向き
ax.quiver(x, y, z, 1,0,0, length=0.5, color="r")
ax.quiver(x, y, z, 0,1,0, length=0.5, color="g")
ax.quiver(x, y, z, 0,0,1, length=0.5, color="b")
- ってやると、
- アルコマーカー使った回転ベクトル/回転行列は、⇧からの回転(の逆変換)を求めてくれてる
-
R.Tとかする必要あるので - (どっちが逆と言われるべきなのかはよくわからない)
-
おまけ
roll pitch yaw を求める他の方法
rpy = np.deg2rad(cv2.RQDecomp3x3(R_T)[0])
print(rpy)

# Tはなんでもいい & この用途だとあんまよくない方法だと思う
rpy = cv2.decomposeProjectionMatrix(np.hstack([R_T, -T]))[6]  # [0~5]は使わない
rpy = np.deg2rad(rpy.squeeze())
print(rpy)

r = np.arctan2(-R_T[2][1], R_T[2][2])
p = np.arcsin(R_T[2][0])
y = np.arctan2(-R_T[1][0], R_T[0][0])
rpy = - np.array([r, p, y])
print(rpy)
- 全部同じ
- 以上、回転行列 ⇨ 回転ベクトルでした
roll pitch yaw と回転行列の関係
def eulerAnglesToRotationMatrix(euler):
    R_x = np.array([[                1,                 0,                 0],
                    [                0,  np.cos(euler[0]), -np.sin(euler[0])],
                    [                0,  np.sin(euler[0]),  np.cos(euler[0])]])
    R_y = np.array([[ np.cos(euler[1]),                 0,  np.sin(euler[1])],
                    [ 0,                                1,                 0],
                    [-np.sin(euler[1]),                 0,  np.cos(euler[1])]])
    R_z = np.array([[ np.cos(euler[2]), -np.sin(euler[2]),                 0],
                    [ np.sin(euler[2]),  np.cos(euler[2]),                 0],
                    [                0,                 0,                 1]])
    R = np.dot(R_z, np.dot(R_y, R_x))
    return R

diff = eulerAnglesToRotationMatrix(rpy) - R_T
print(diff.astype(np.float16))

from scipy.spatial.transform import Rotation
diff = Rotation.from_euler('xyz', rpy).as_matrix() - R_T
print(diff.astype(np.float16))
- (diff は 0)
-
eulerAnglesToRotationMatrix()を使えば回転行列になる(戻せる)- それぞれの成分の回転行列の積
-
eulerAnglesToRotationMatrix()をscipyでやったverが2個目 - 以上、回転ベクトル ⇨ 回転行列の変換でした
以上!
よければLGTMを~