はじめに
SI業務で「ESET PROTECT」を利用した経験から、レポート機能を使用したPCの管理方法をまとめました。
概要
「ESET PROTECT」では任意の情報同士で比較することが困難な場合があります。
例えば、PCにインストールされているESETバージョンやコンピューター名、最終接続日を1つの表にまとめることが出来ません。
そのため、私はこれらの情報を1つの表にまとめるシステムを開発しました。
このシステムでは、「ESET PROTECT」のレポートスケジュール機能とGASのスケジュール機能を使用し、最新の表を定期的に作成することが可能です。
「ESET PROTECT」でのレポート作成
作成する一覧表に使用するデータは、「ESET PROTECT」のレポート機能で取得します。レポート機能とは、ESETのインストールしているクライアントから収集した情報やセキュリティ管理ツールの情報を基にレポートを作成する機能です。
作成するレポート一覧
今回作成する一覧表に必要なレポートを以下に示します。
| No | レポート名 | 大項目 | 小項目 |
|---|---|---|---|
| 1 | 検出エンジン | コンピューター | コンピューター名 |
| 検出エンジン | データベースのバージョン | ||
| 2 | 最終検査日表 | コンピューター | コンピューター名 |
| 検査 | ユーザー | ||
| 検査 | 完了時間 | ||
| 3 | 最終接続日 | コンピューター | コンピューター名 |
| コンピューター | 前回の接続 | ||
| コンピューター | セキュリティ製品バージョン | ||
| 4 | OS情報 | コンピューター | コンピューター名 |
| OSエディション | OS名 | ||
| OSエディション | OSバージョン | ||
| 5 | アドレス情報 | コンピューター | コンピューター名 |
| ネットワークIPアドレス | MACアドレス | ||
| ネットワークIPアドレス | アダプタIPアドレス |
※レポート名は任意に決めていただいて構いません。
また、新しいデータを追加したい場合は、最初のカラムにコンピューター名を入れた状態でレポートを作成してください。
レポート作成方法
例として、「検出エンジン」のレポートの作成方法を示します。
-
「ESET PROTECT」にログインします。
-
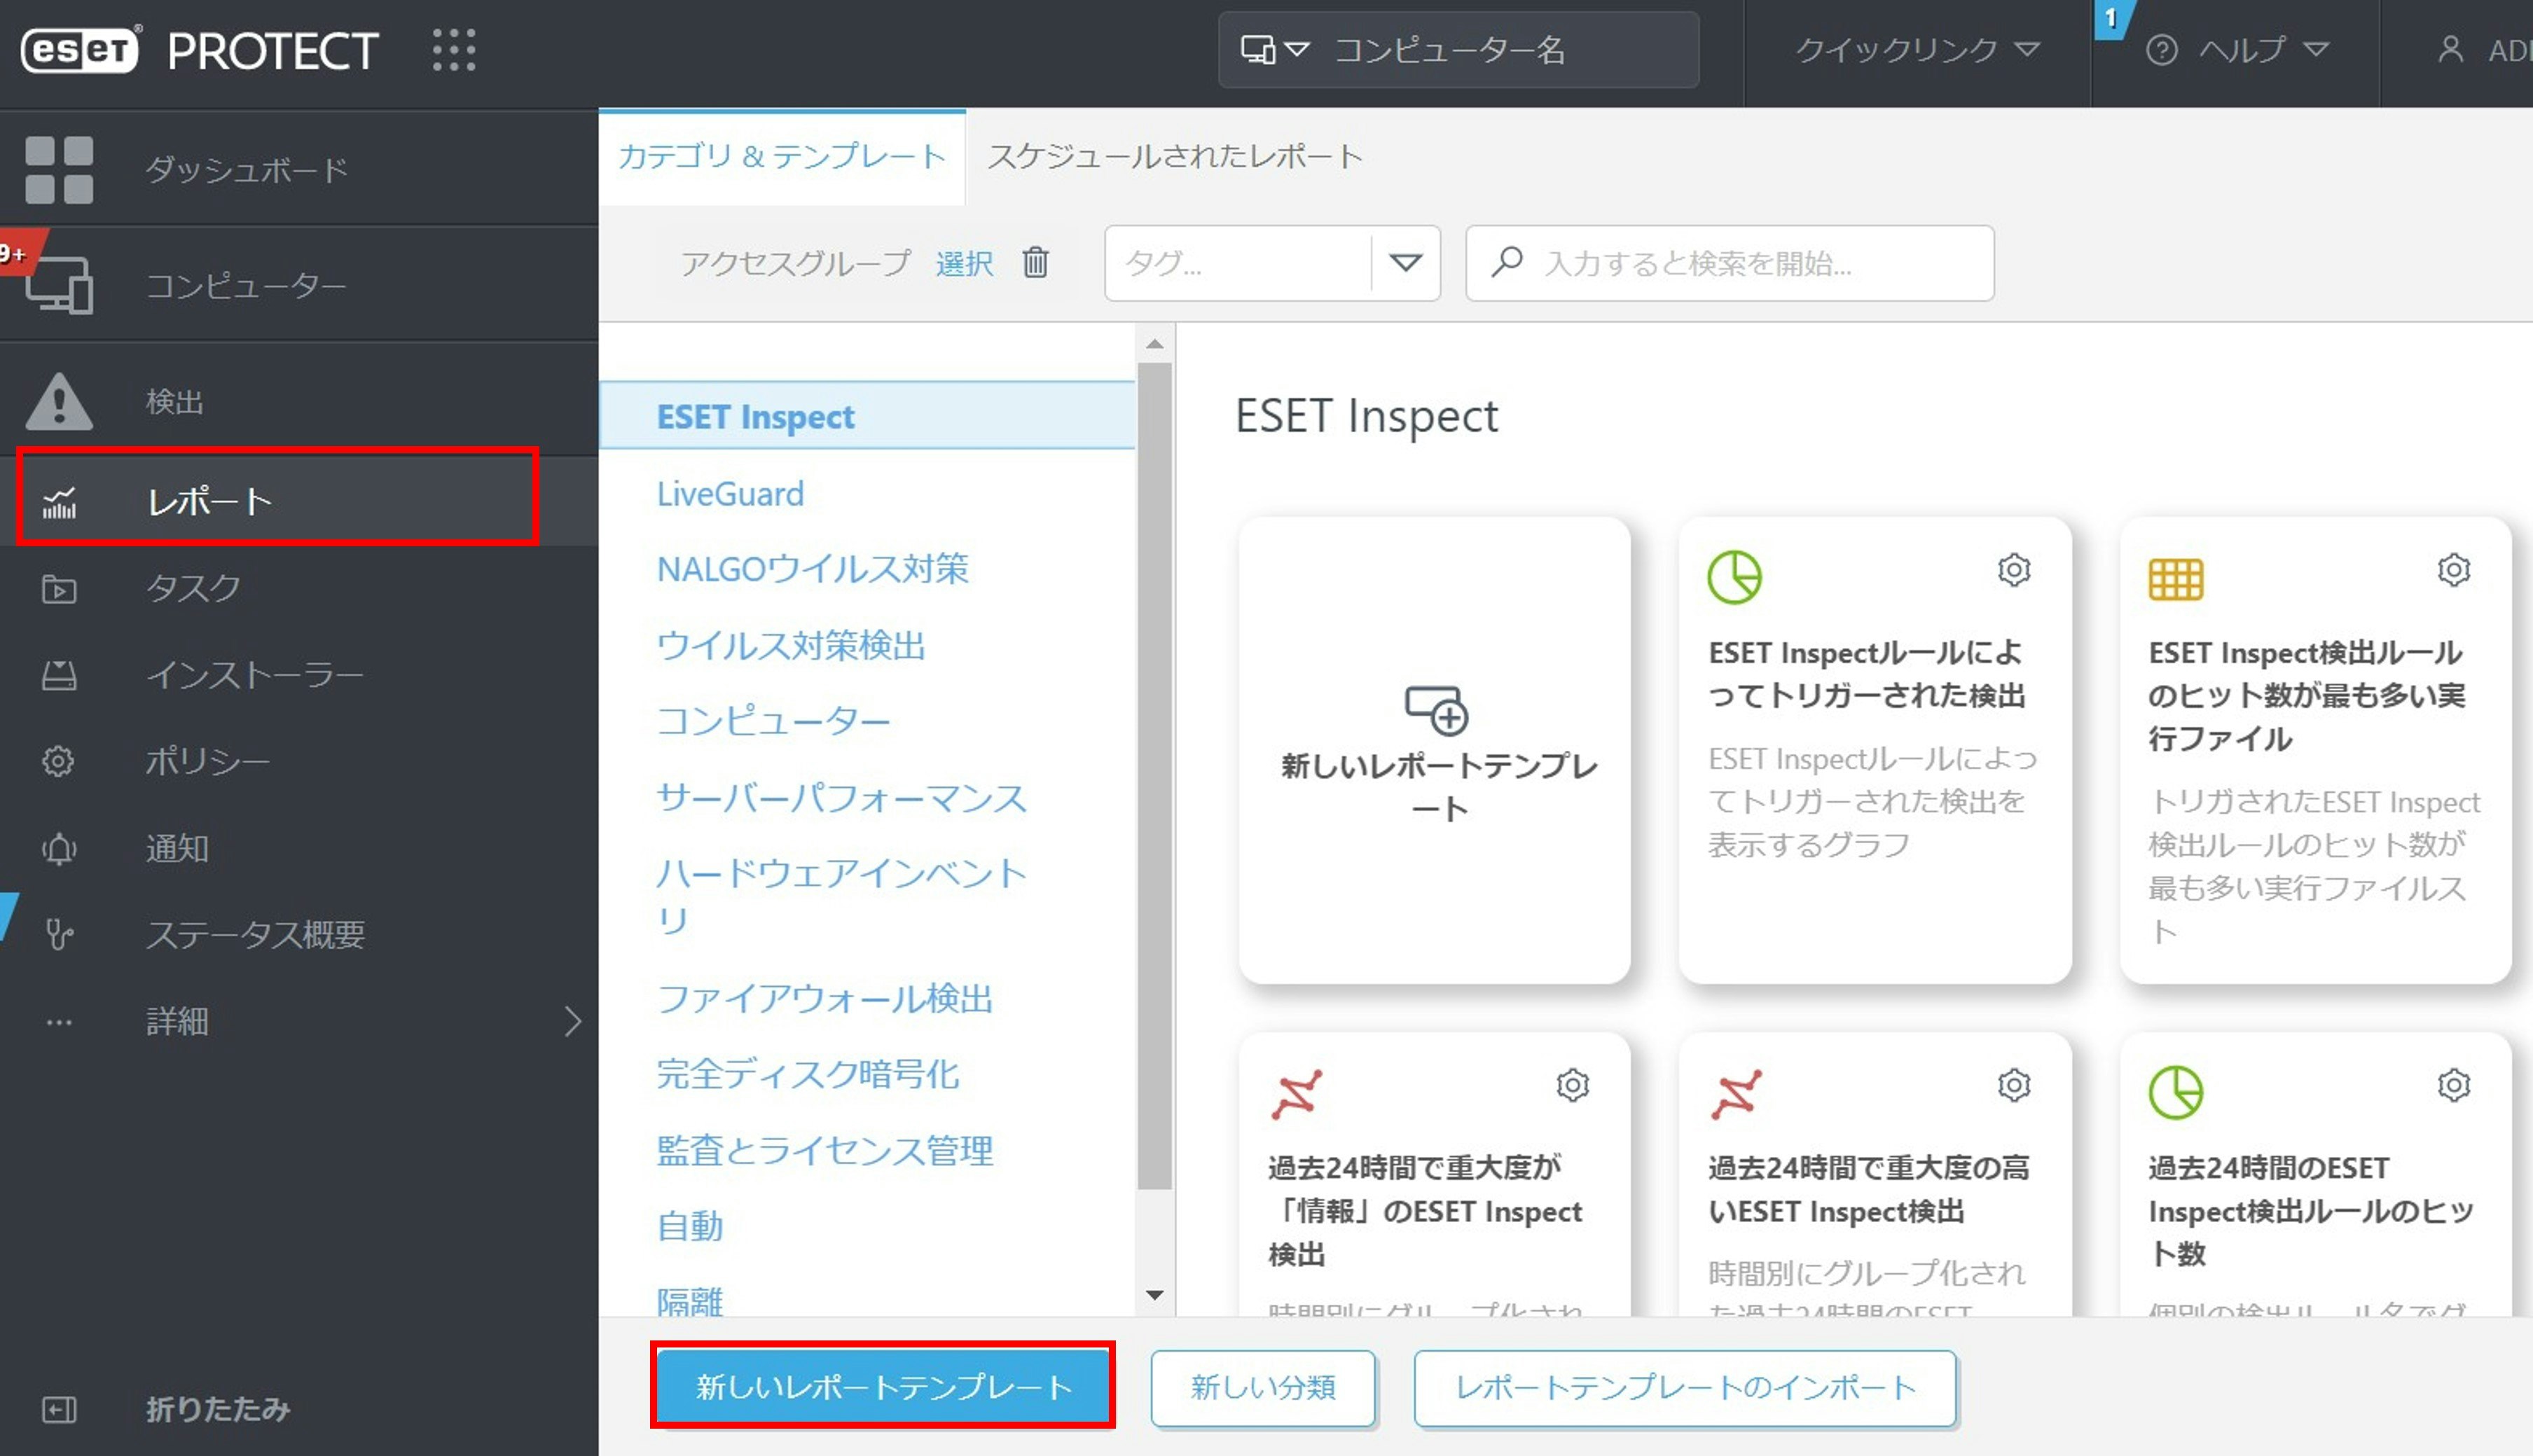
画面左側にあるメニューバーの「レポート」をクリックし、「新しいレポートのテンプレート」をクリックします。
-
名前を任意の名前に変更してください。また、カテゴリも任意のカテゴリを選択してください。
ここでは例として名前は「検出エンジン」、カテゴリは「監視とライセンス管理」にします。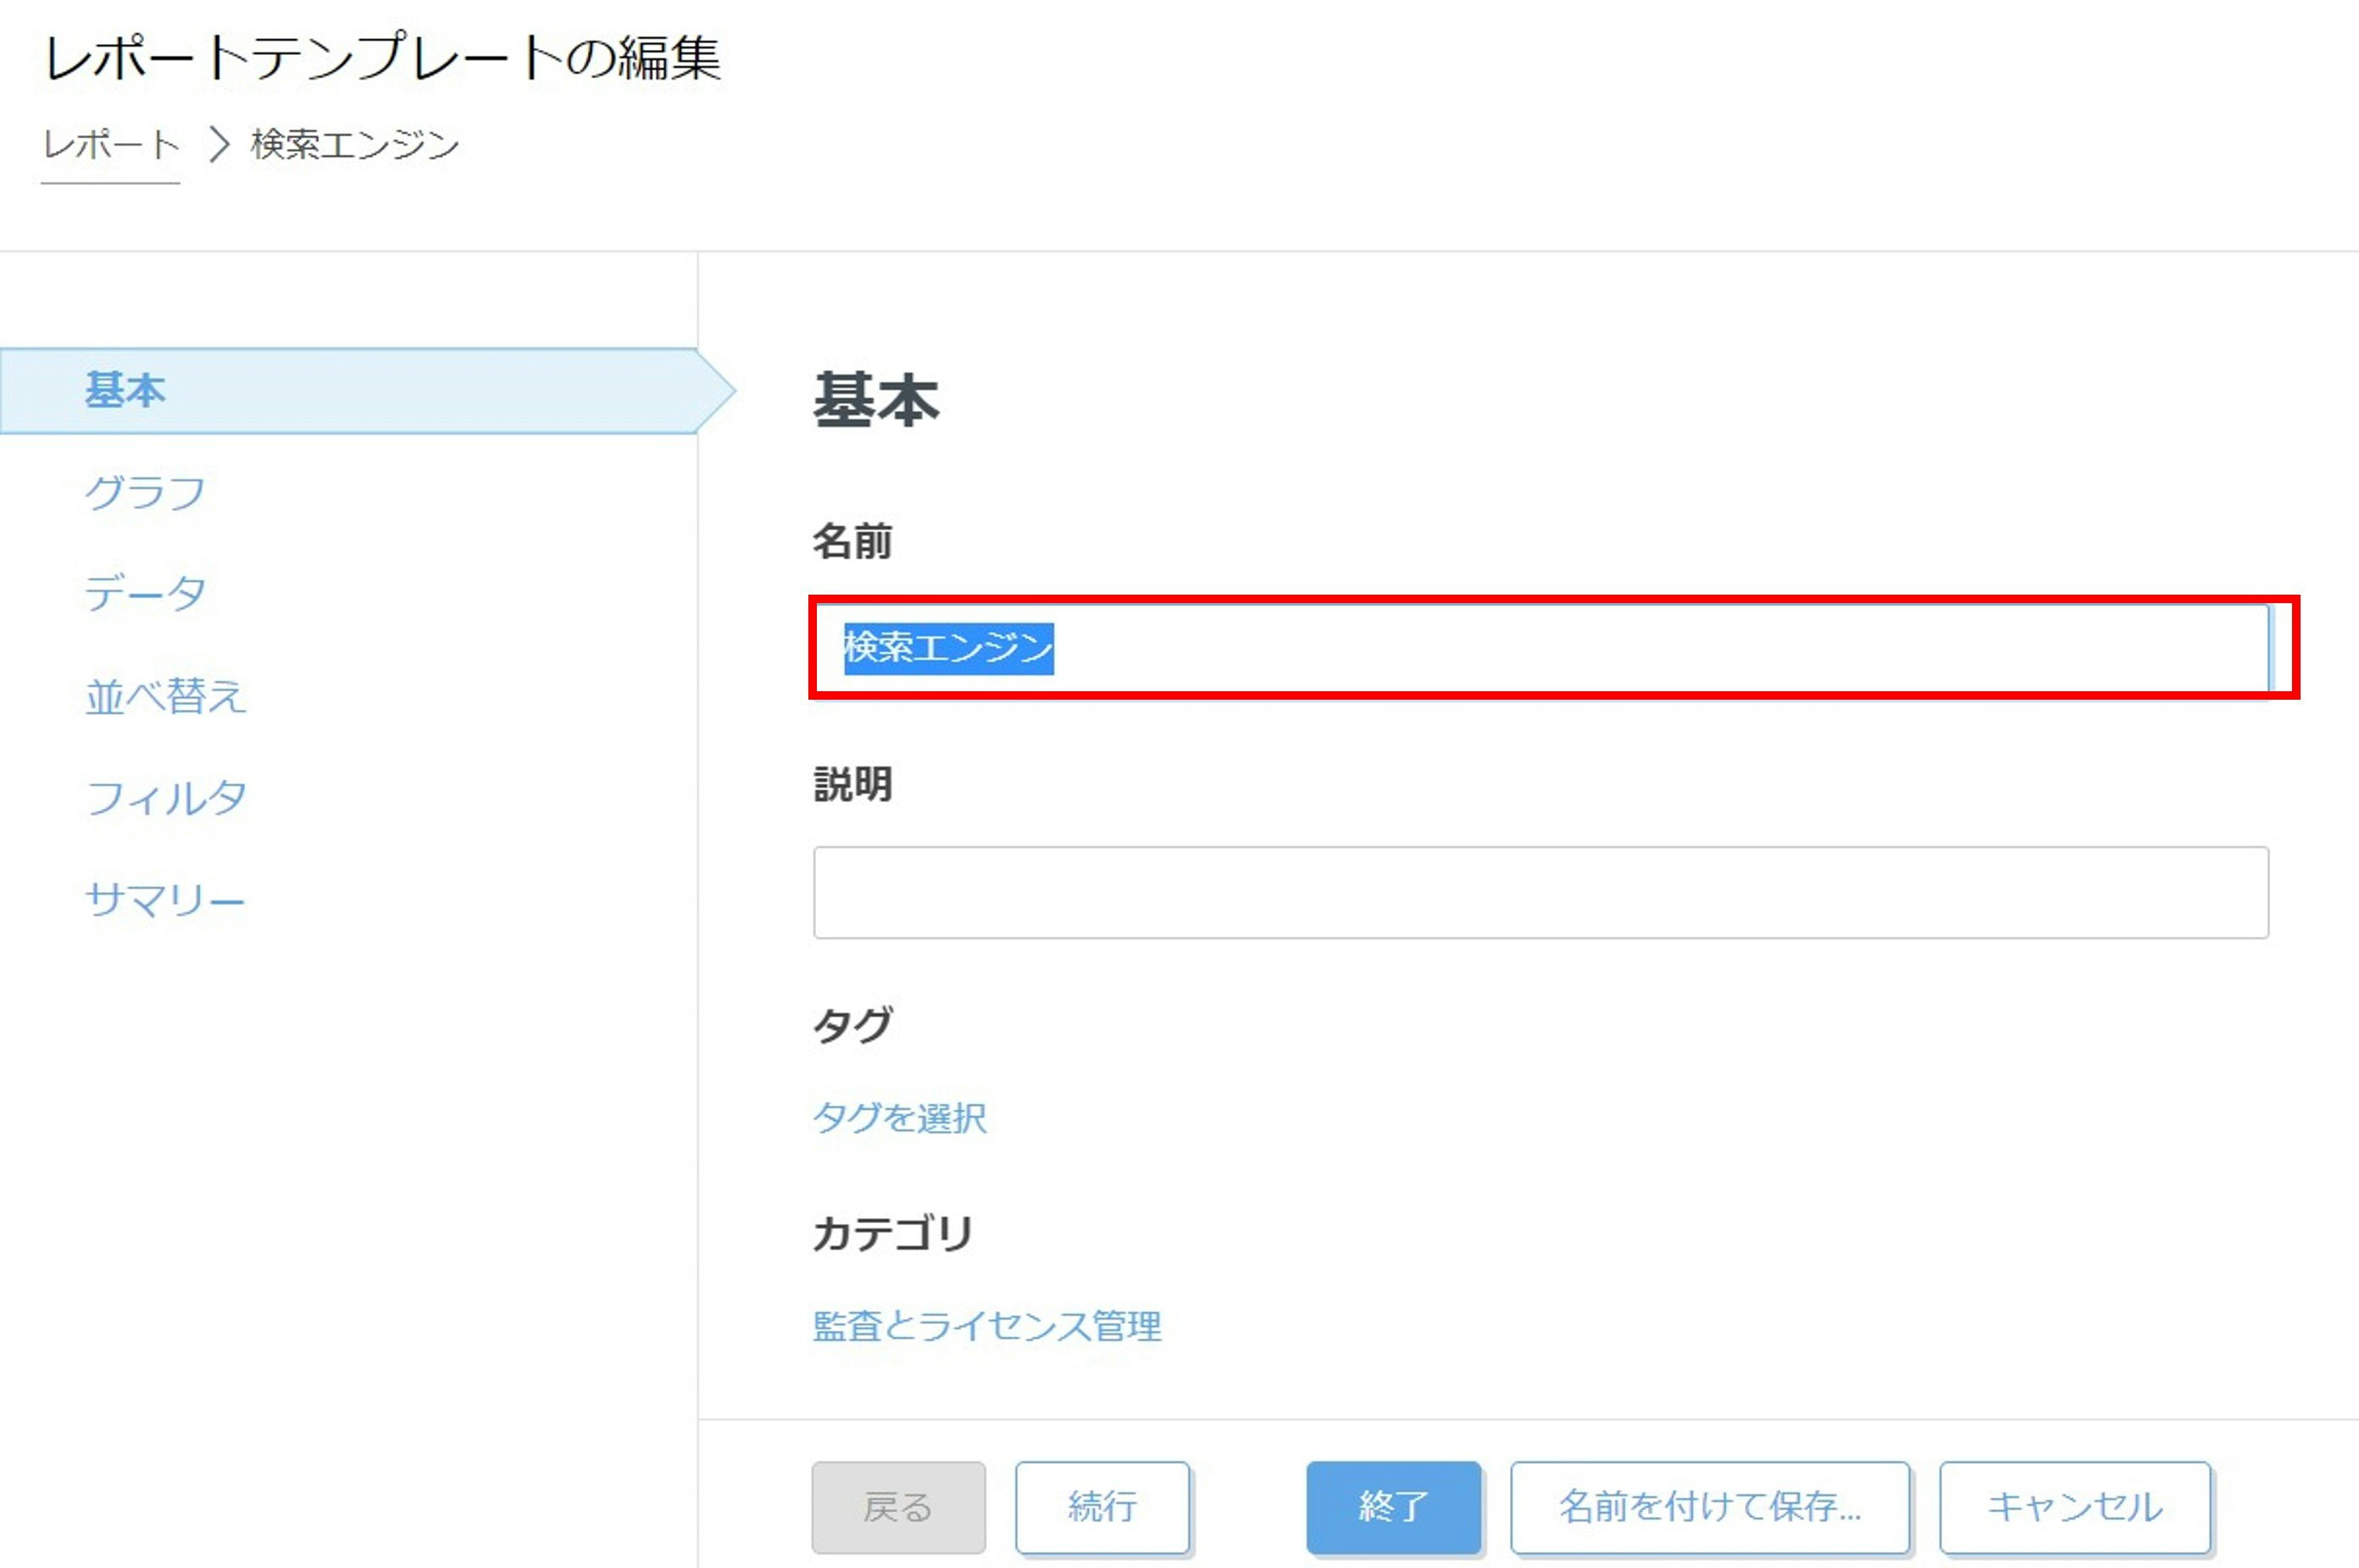
-
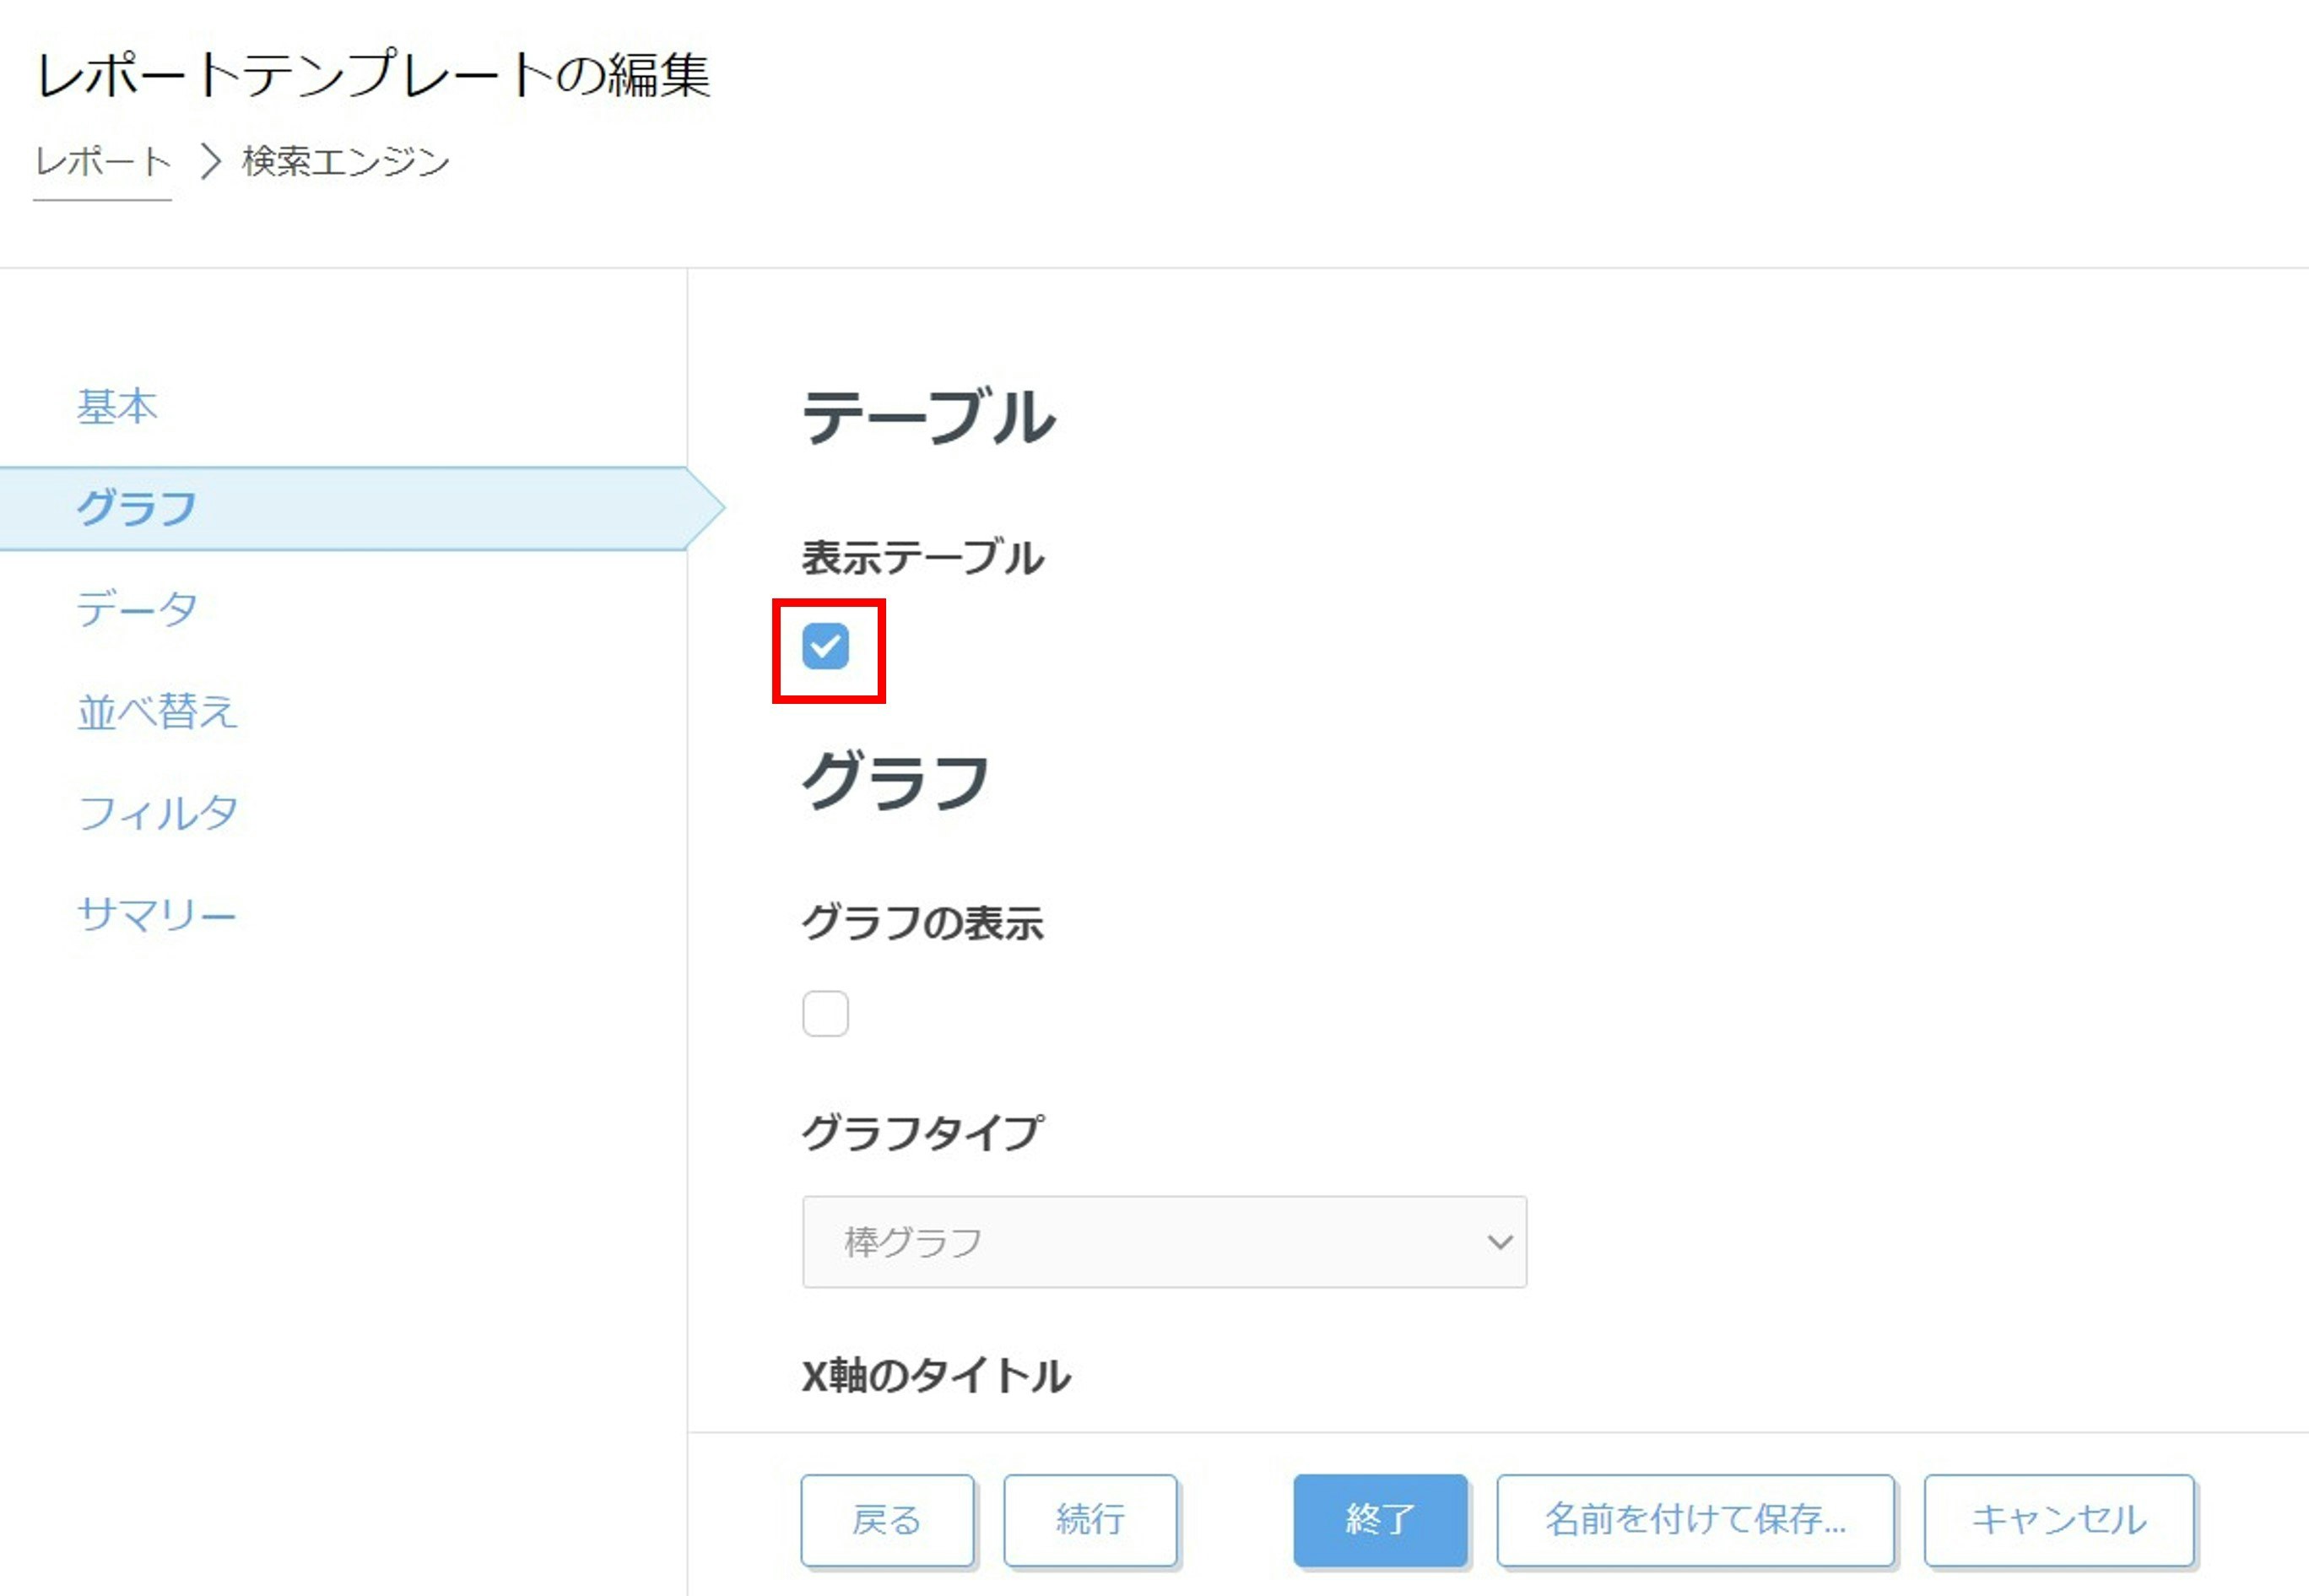
「グラフ」をクリックし、「表示テーブル」にチェックします。
-
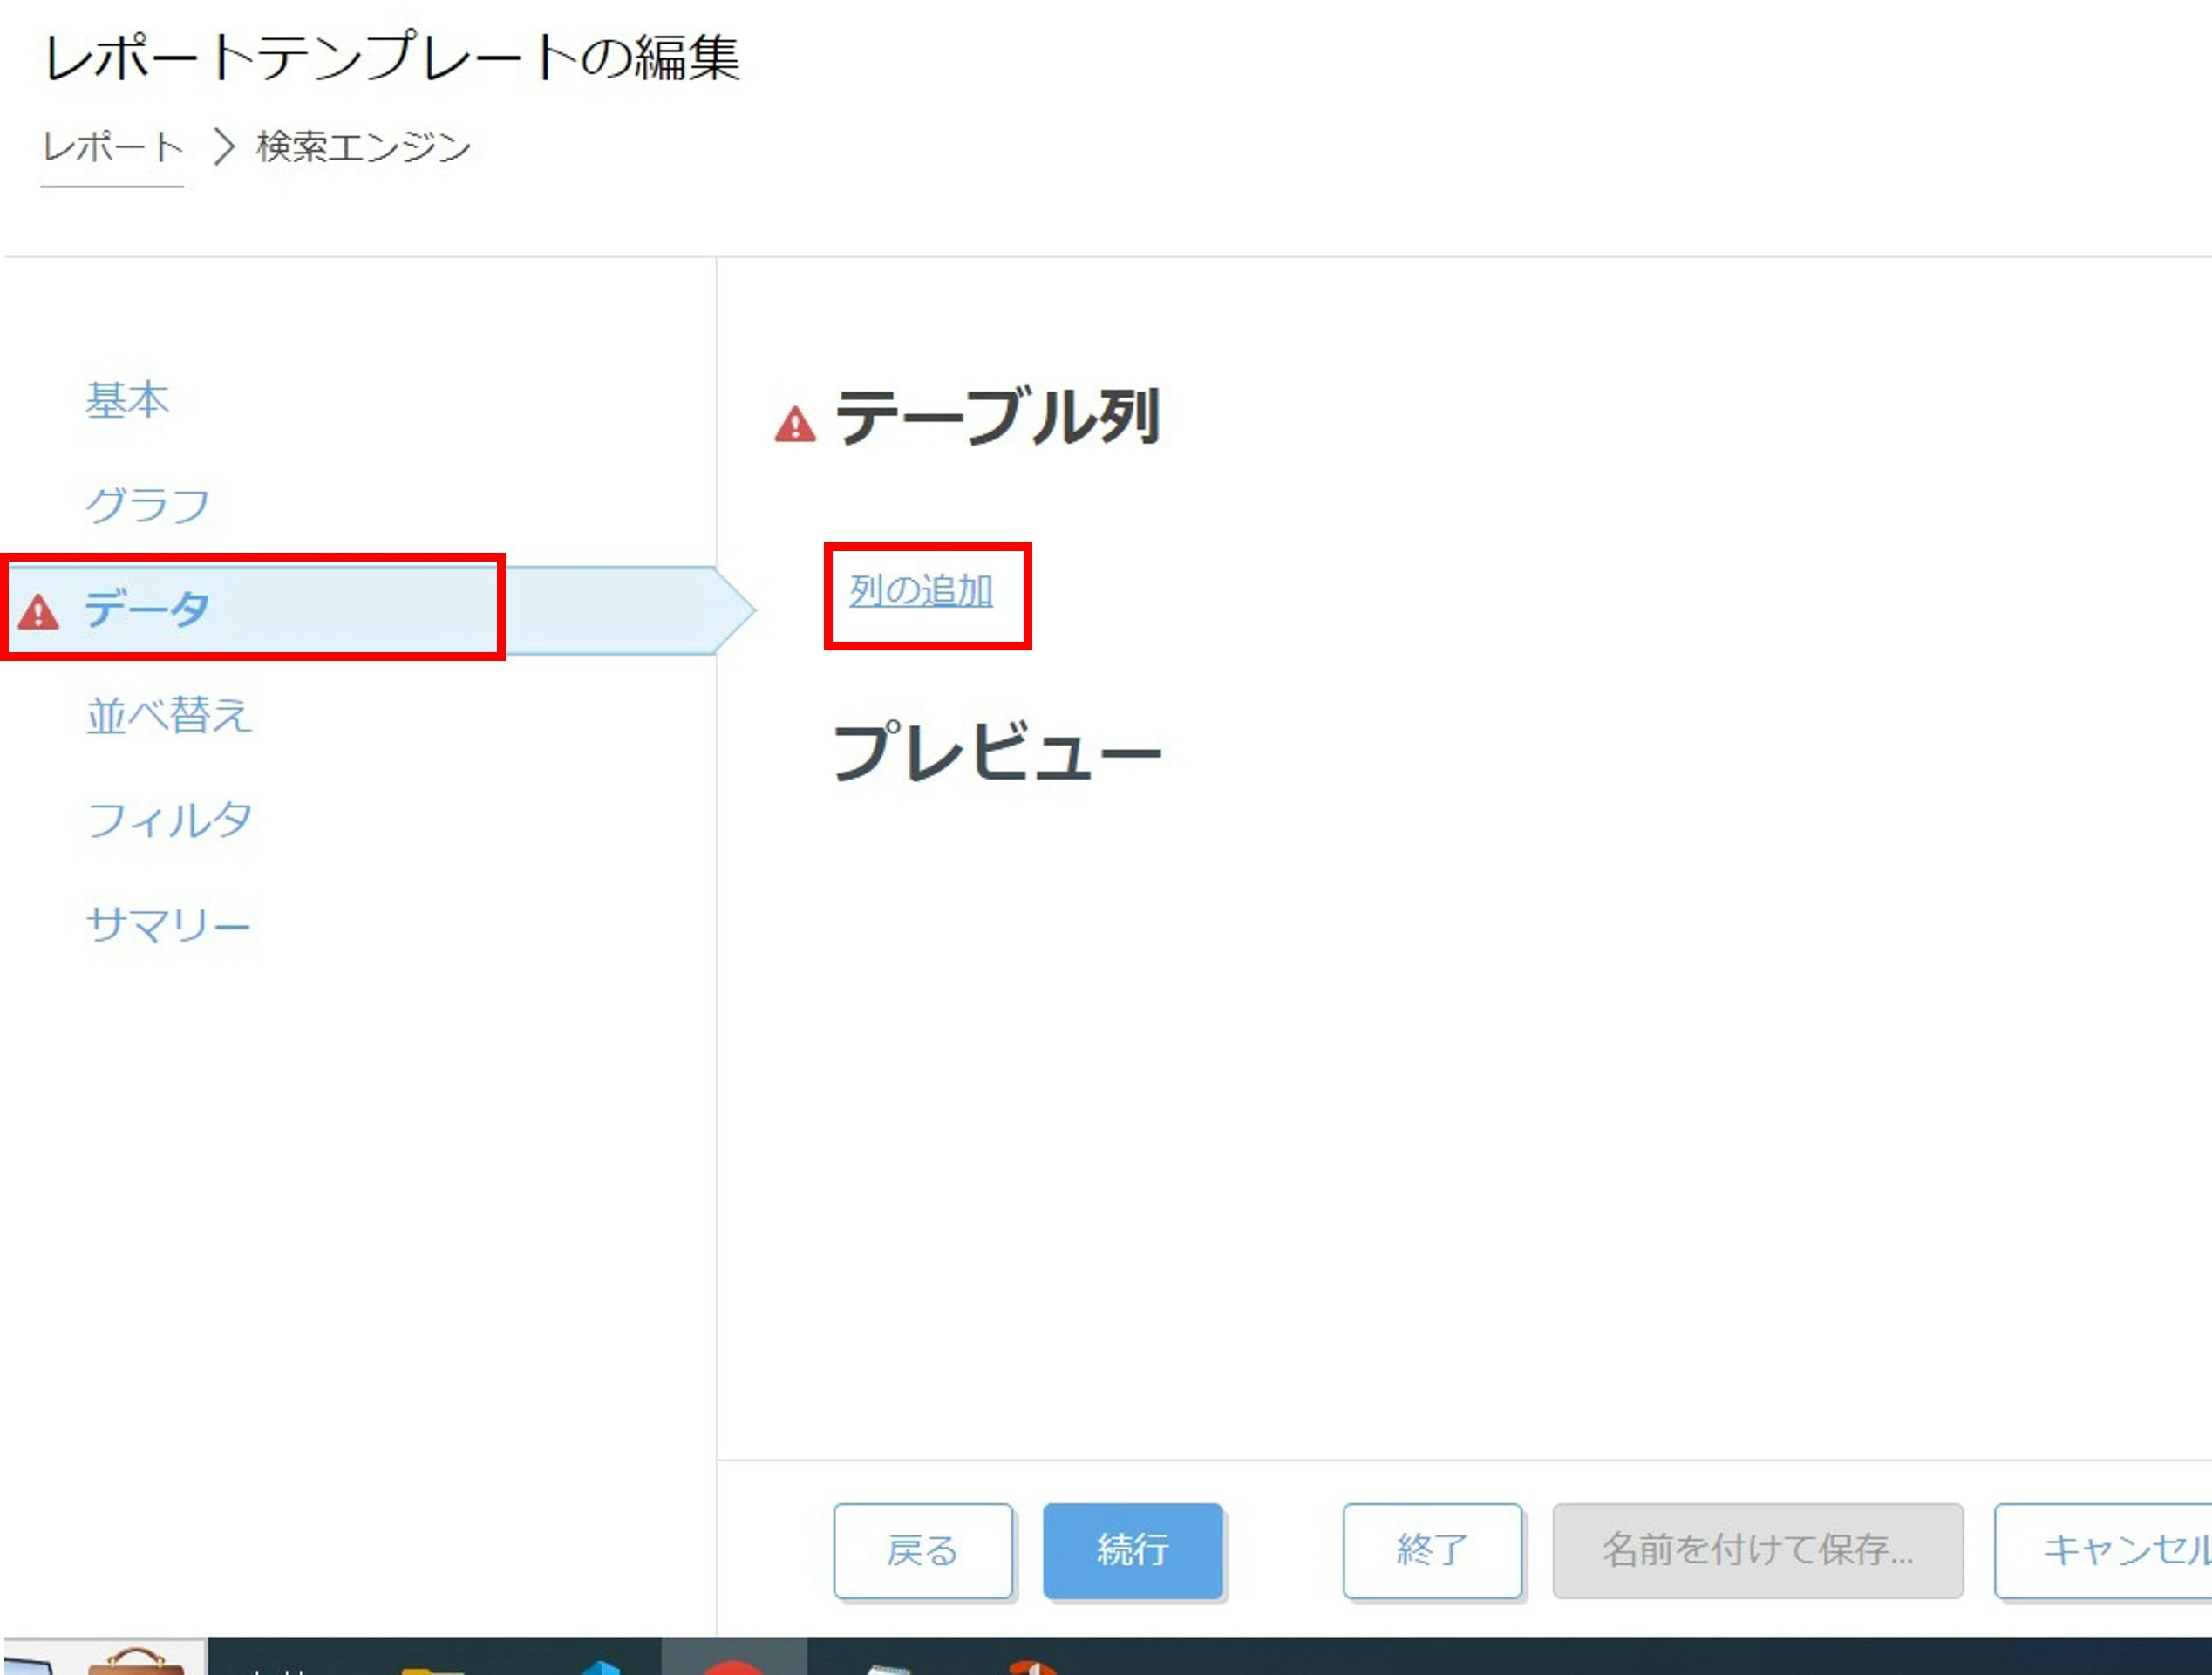
「データ」をクリックし、「列の追加」から使用するデータを追加します。
-
検索欄に「コンピューター」と入れ「コンピューター名」を検索して「OK」ボタンで追加します。
同様に、「データベースのバージョン」も検索して追加します。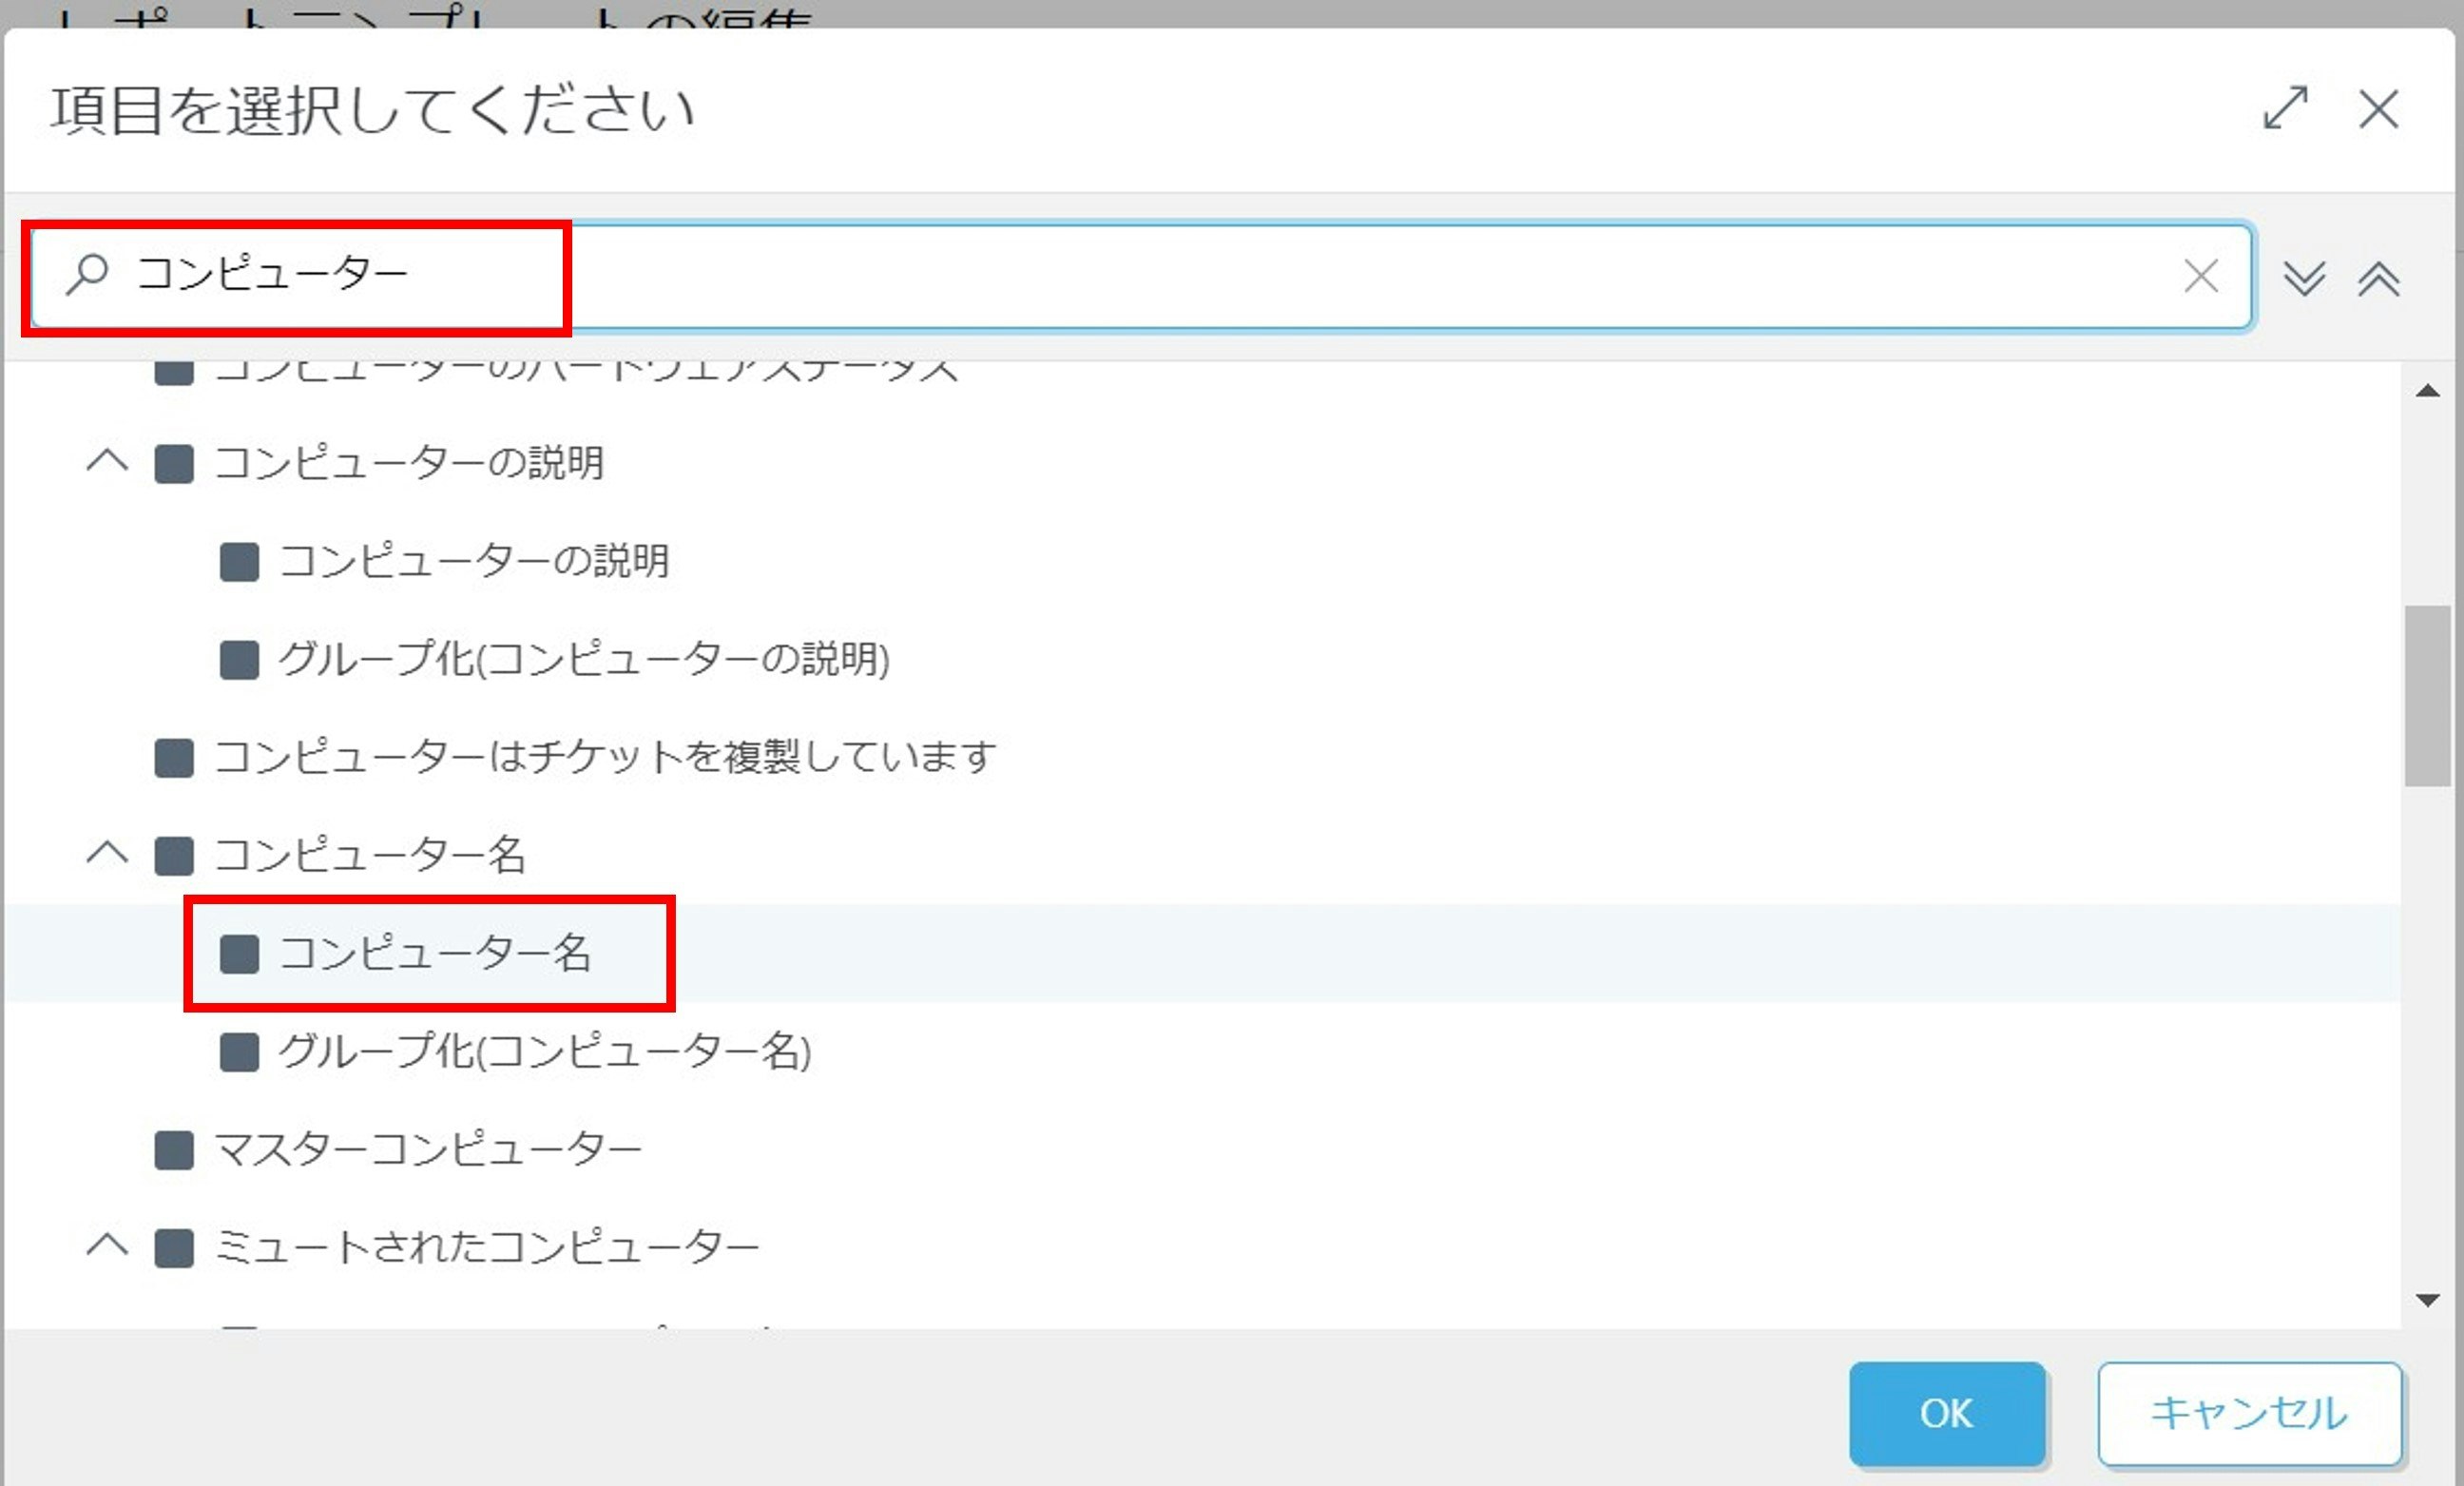
-
「終了」をクリックし、レポートテンプレートを保存します。
レポートのスケジュール配信方法
「ESET PROTECT」からメールで定期的にレポートを送るように設定します。
-
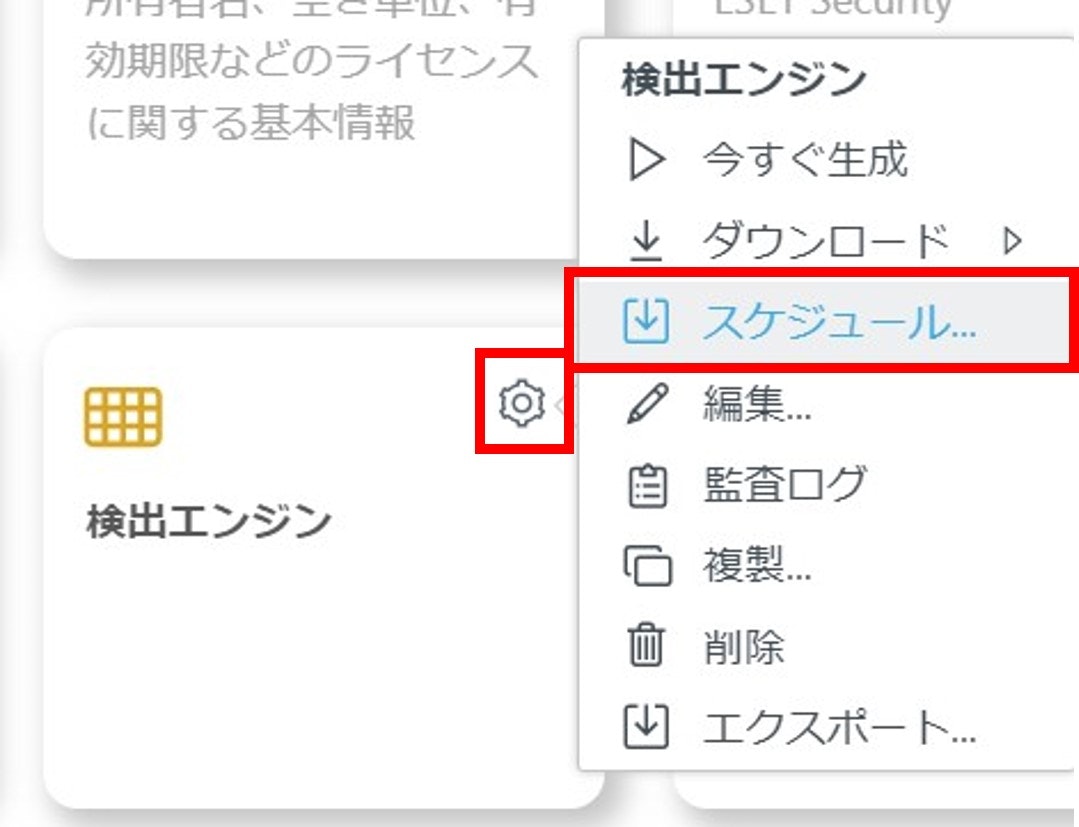
送信したいレポートの歯車マークをクリックしてください。その後、「スケジュール」をクリックします。
-
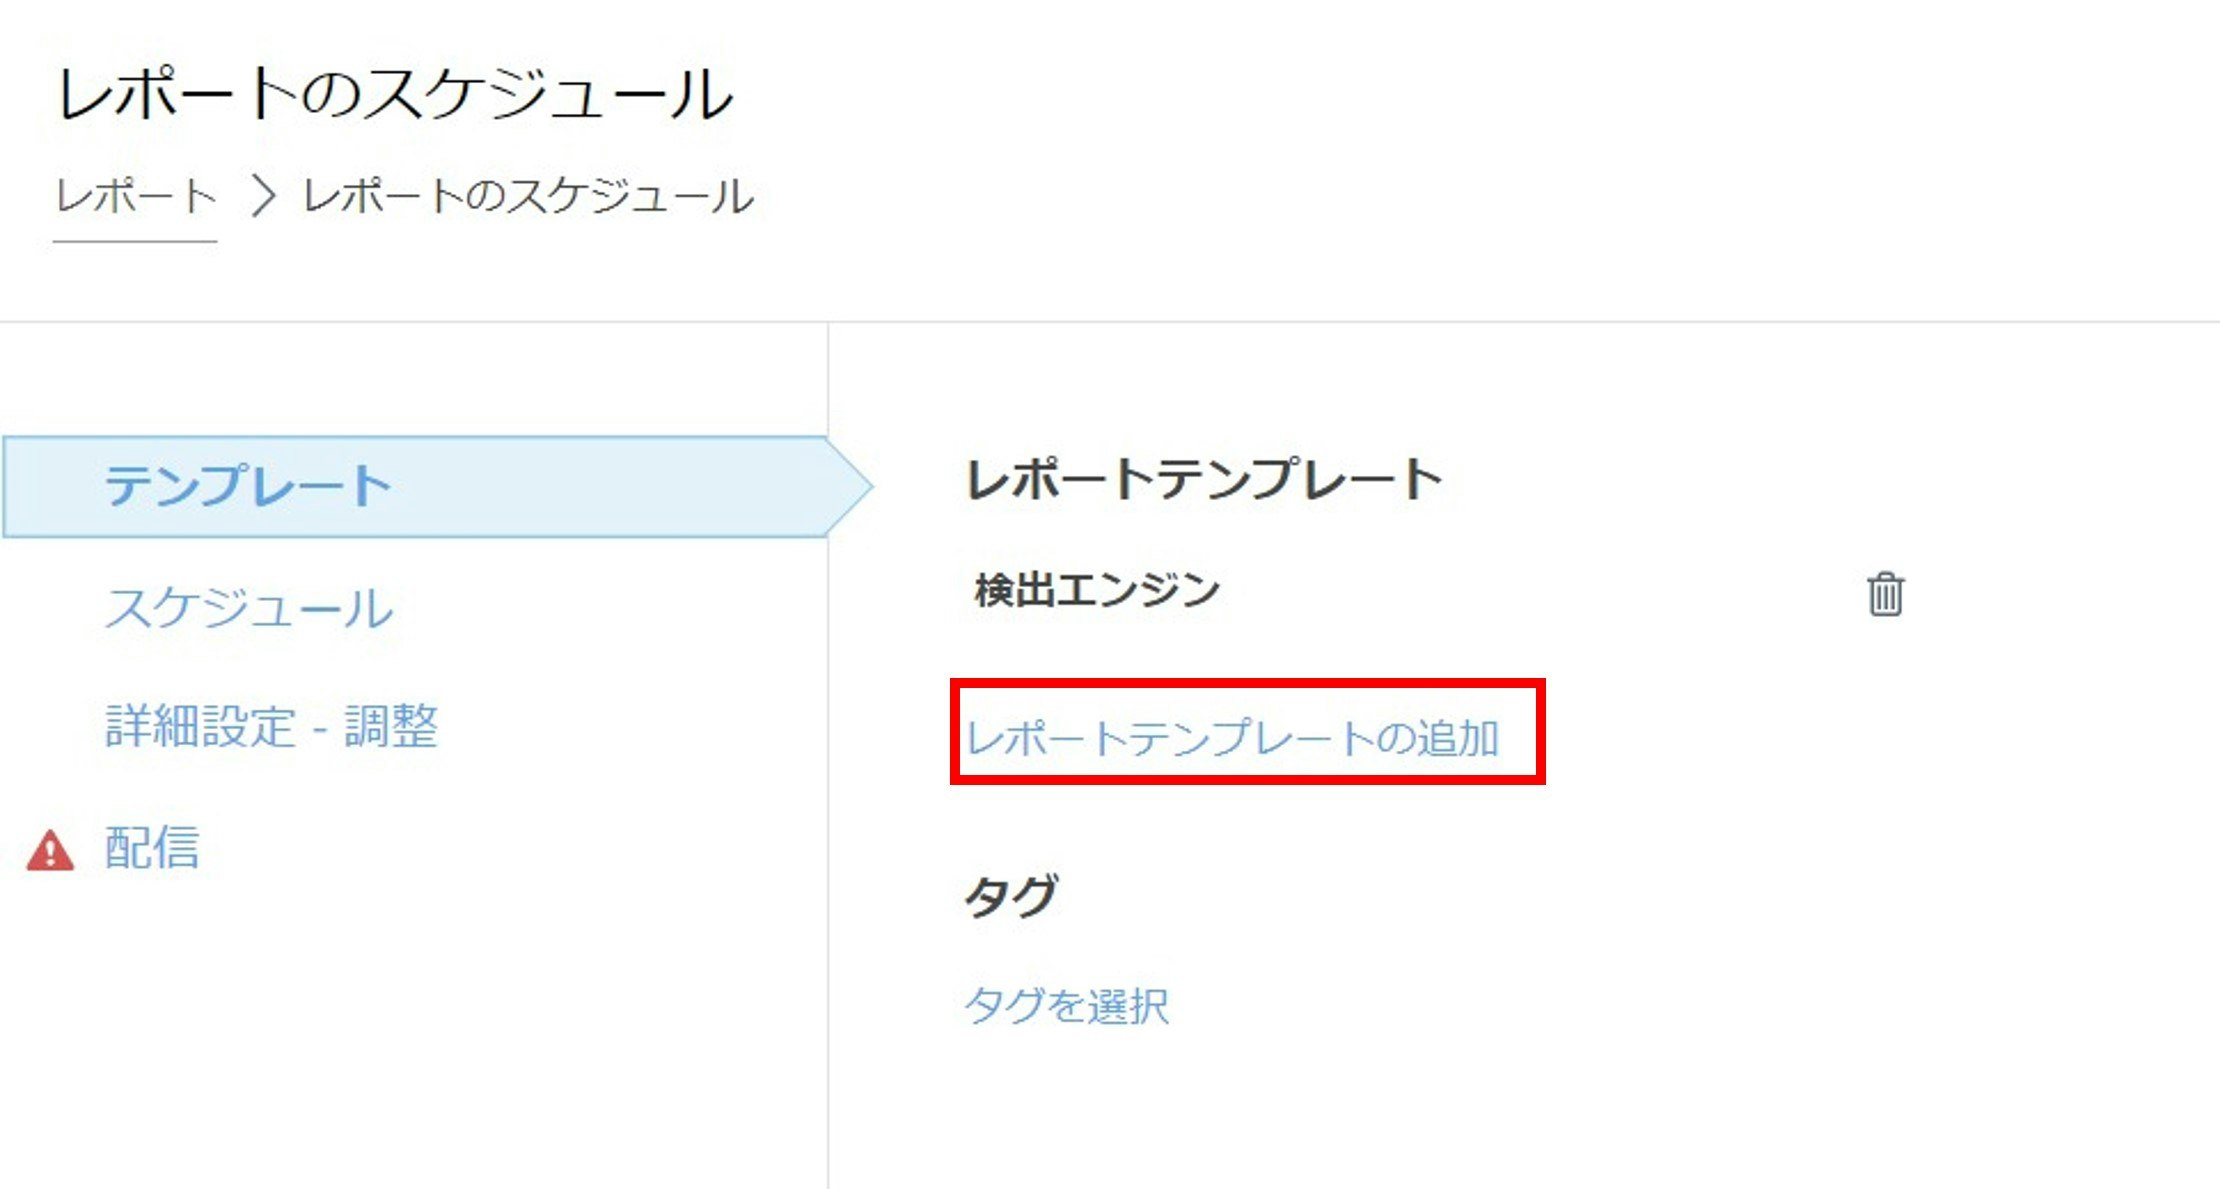
「レポートテンプレートの追加」をクリックしてください。
-
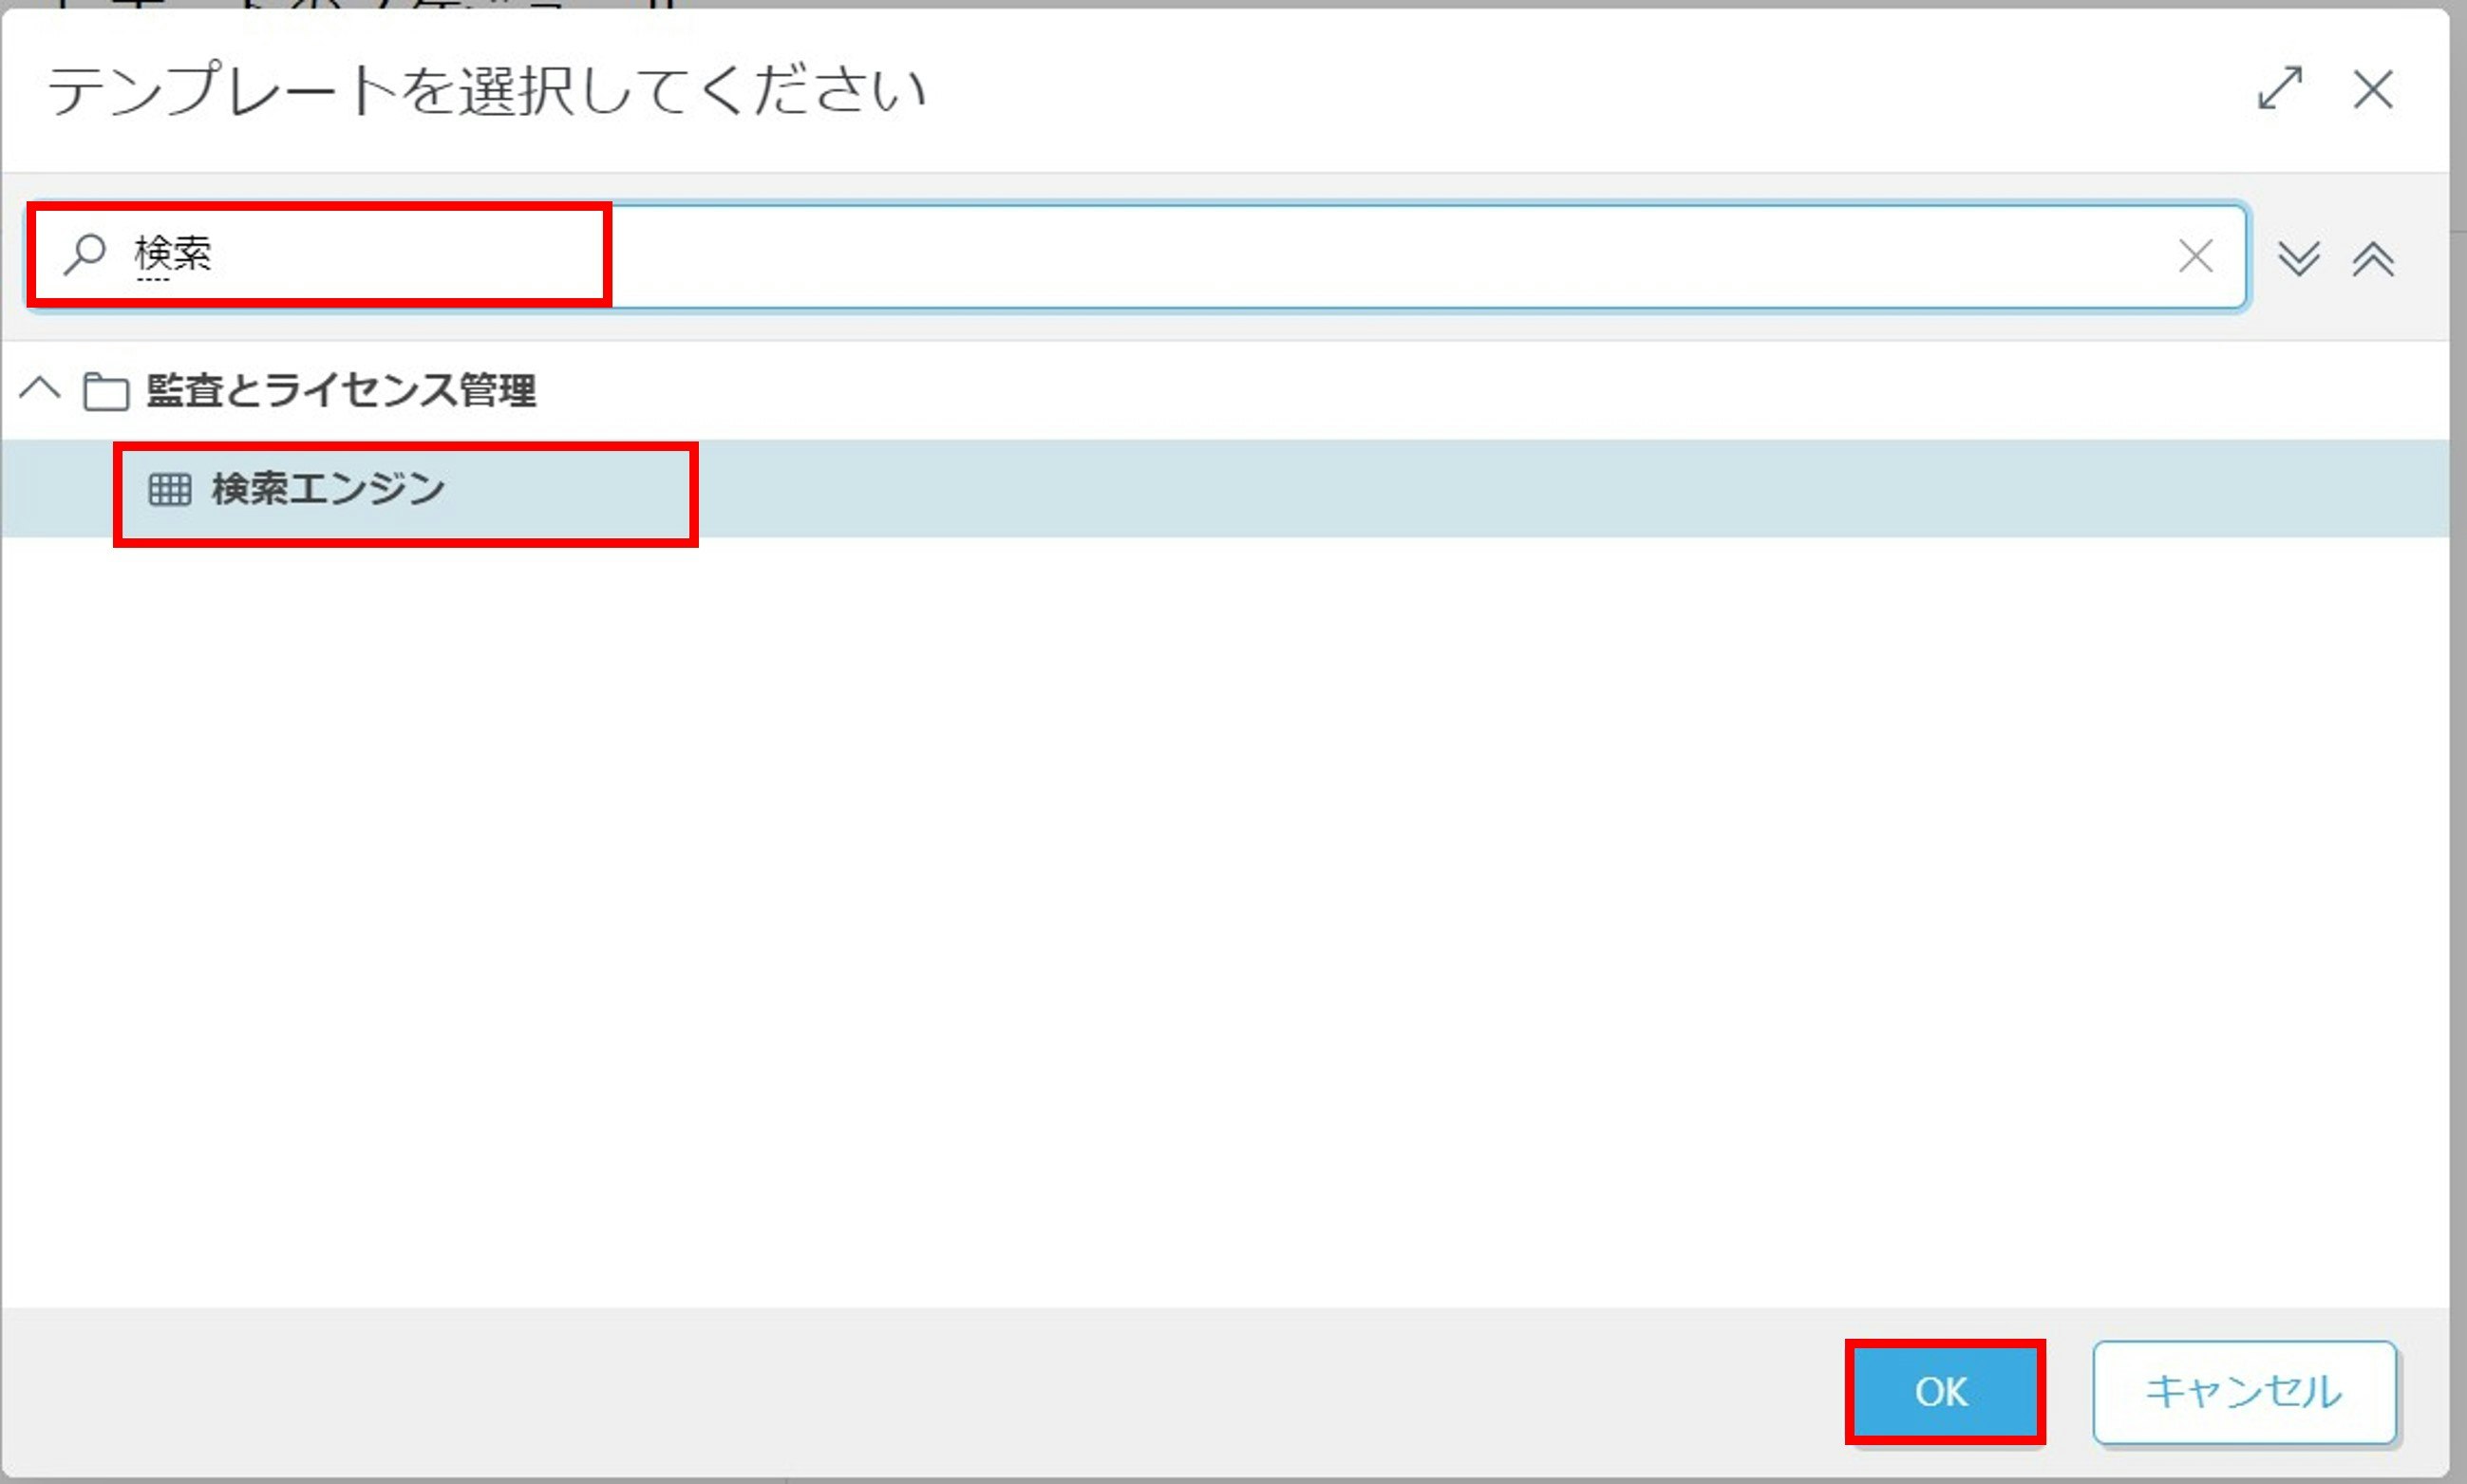
下記の画面に遷移したら、今回作成したレポート名を検索欄に入れ「OK」をクリックして追加してください。
-
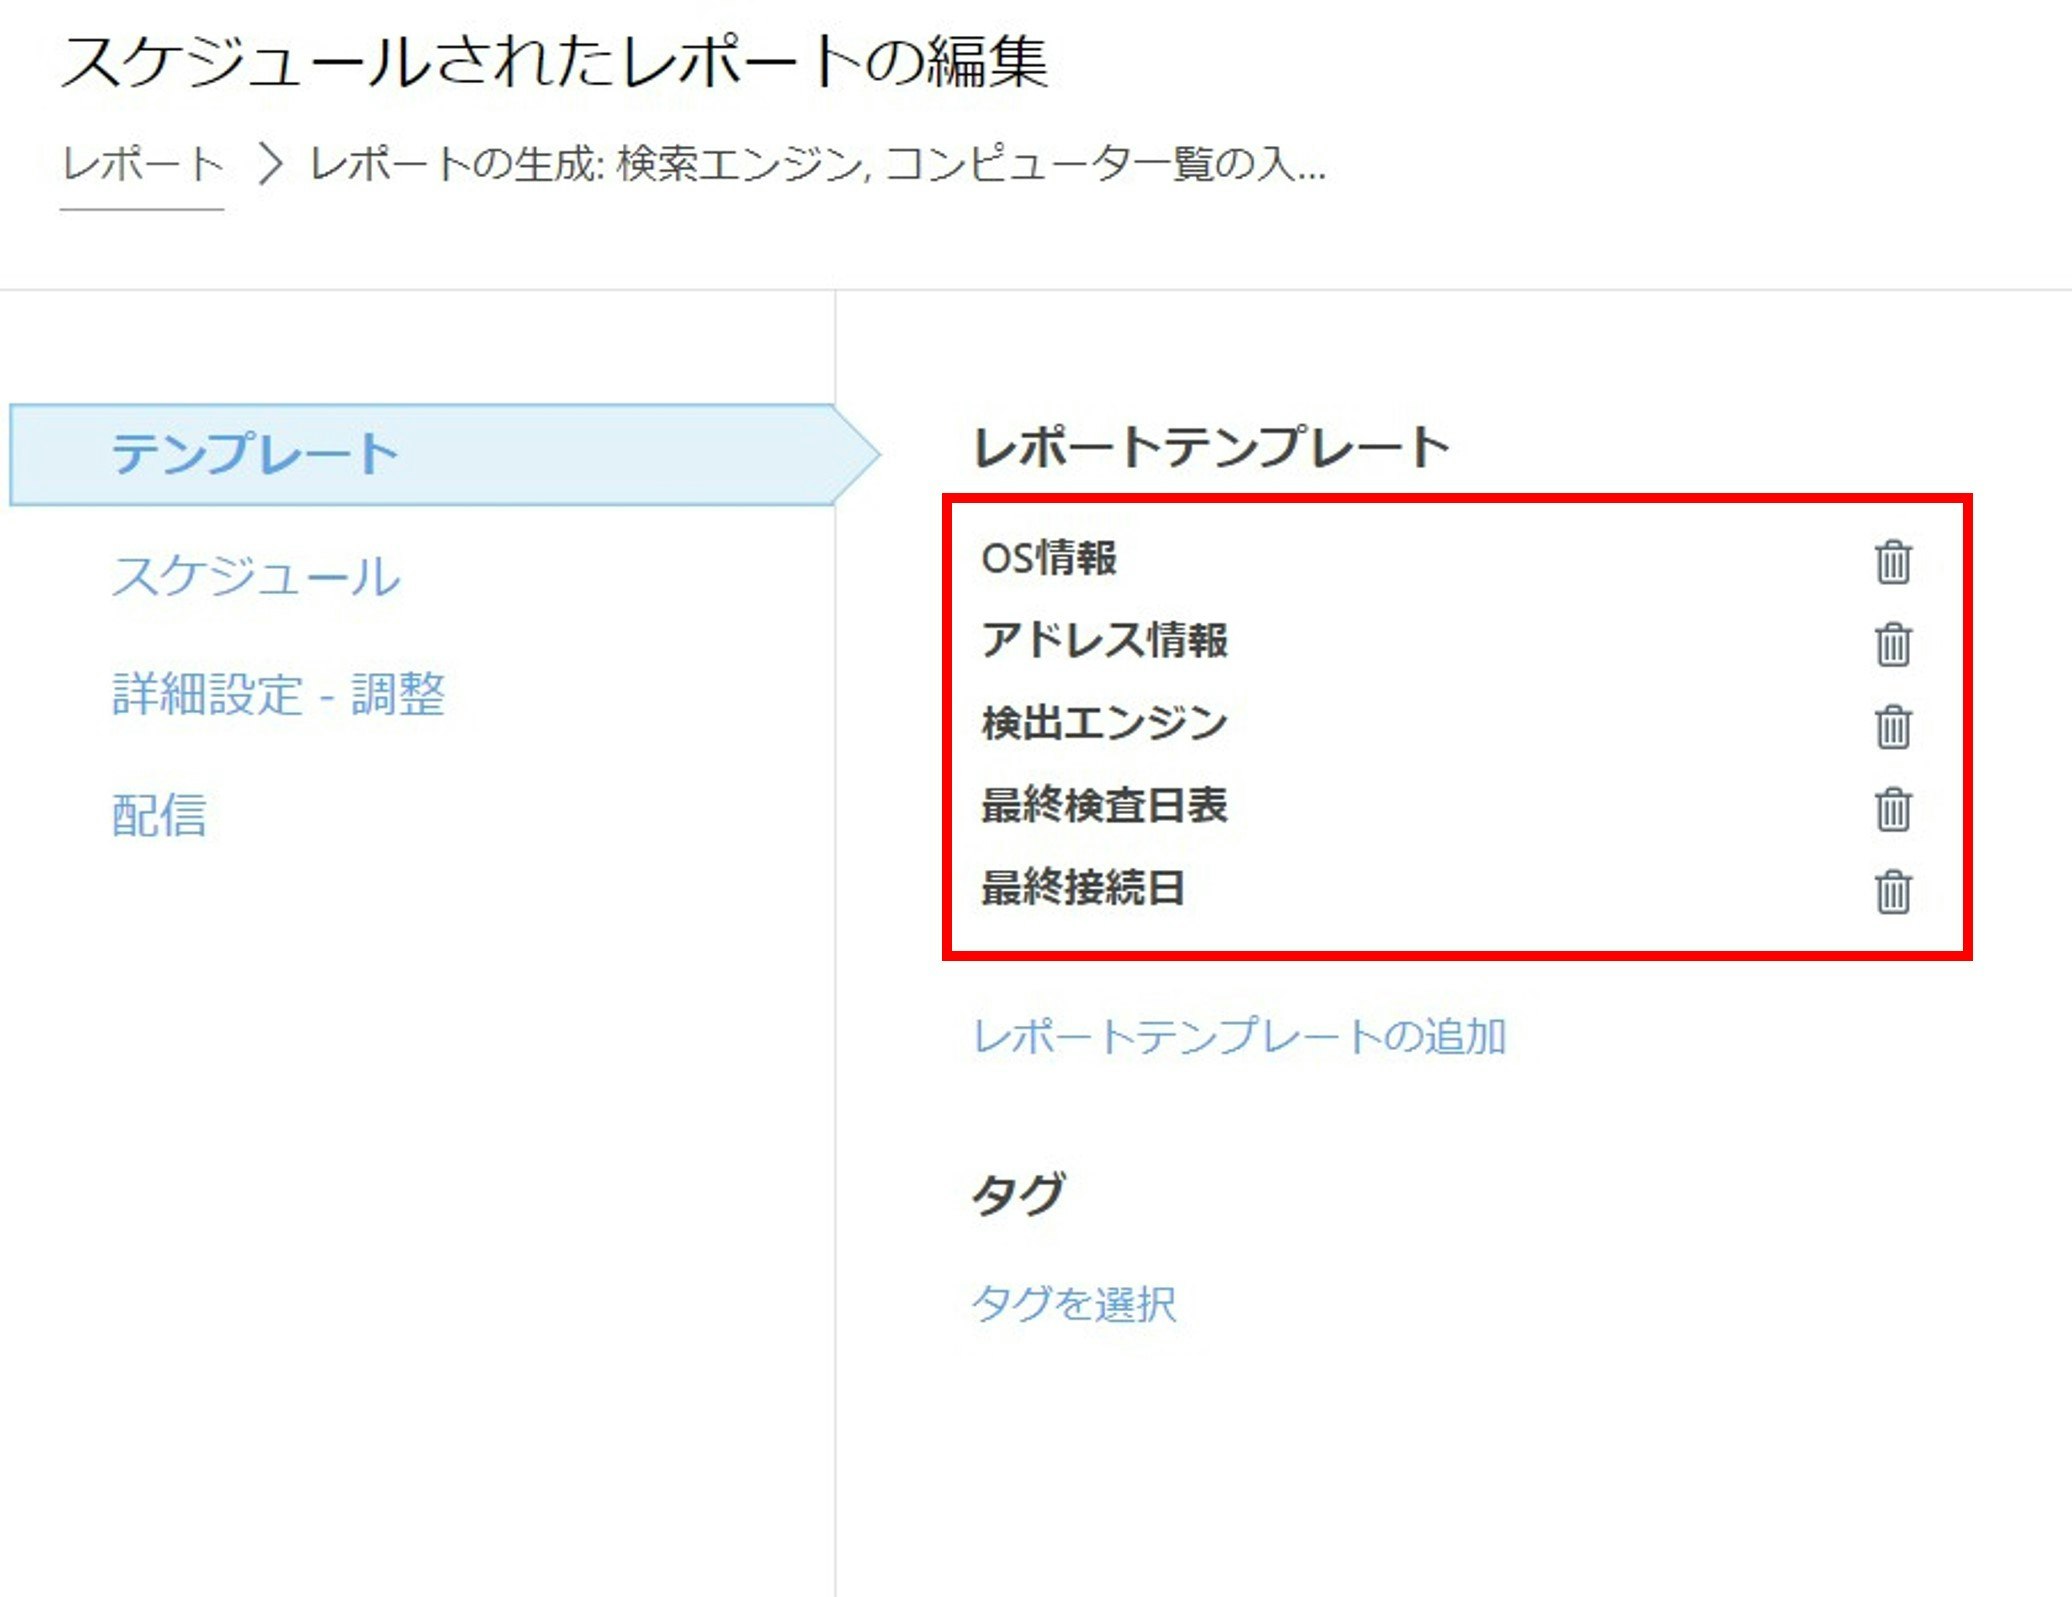
作成したレポートをすべて追加すると、下の画像のようになります。
-
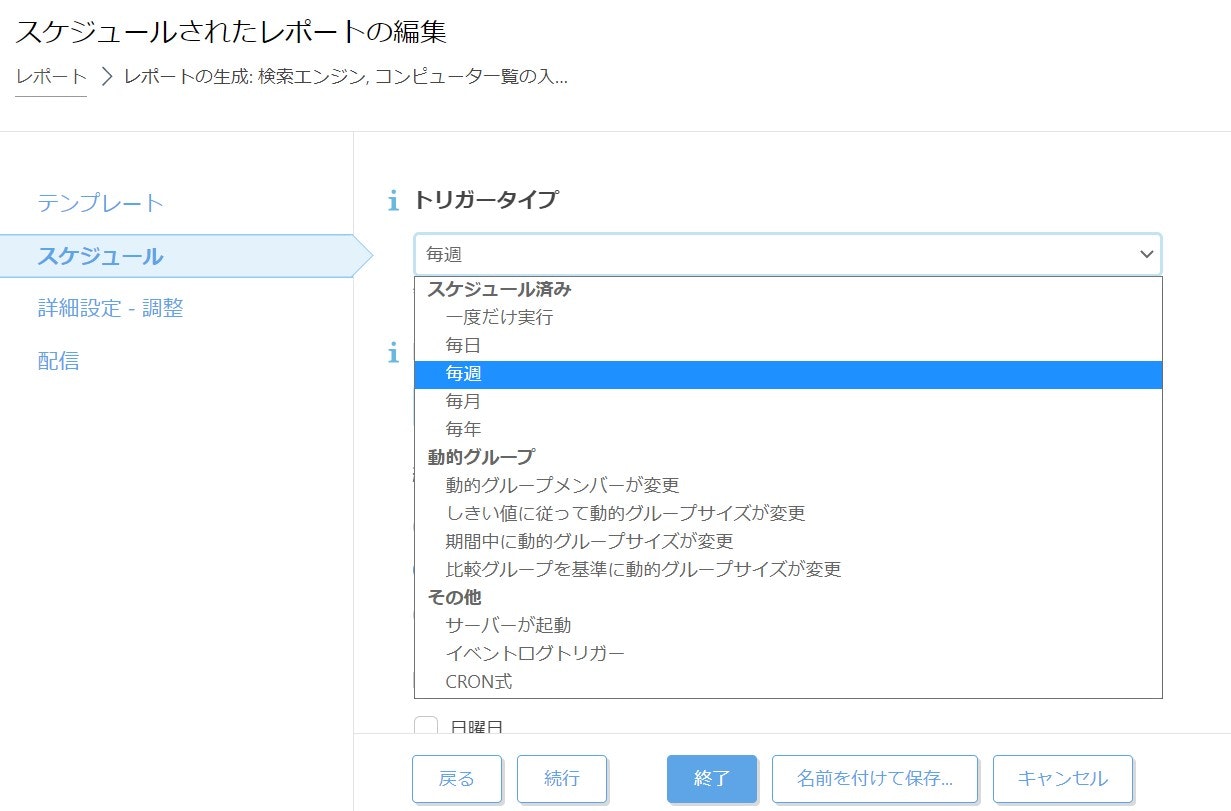
毎週送信するように設定するため、「トリガータイプ」を「毎週」に変更してください。
-
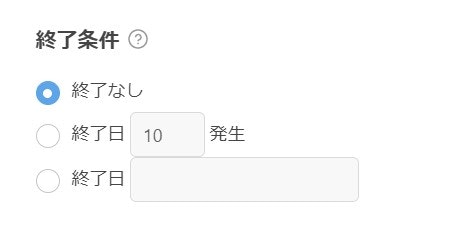
「終了条件」は「終了なし」に設定しましょう。
-
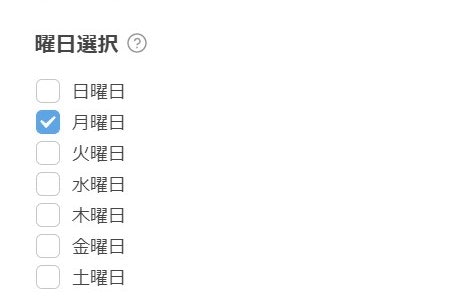
この例では、月曜日に送信されるように設定します。
-
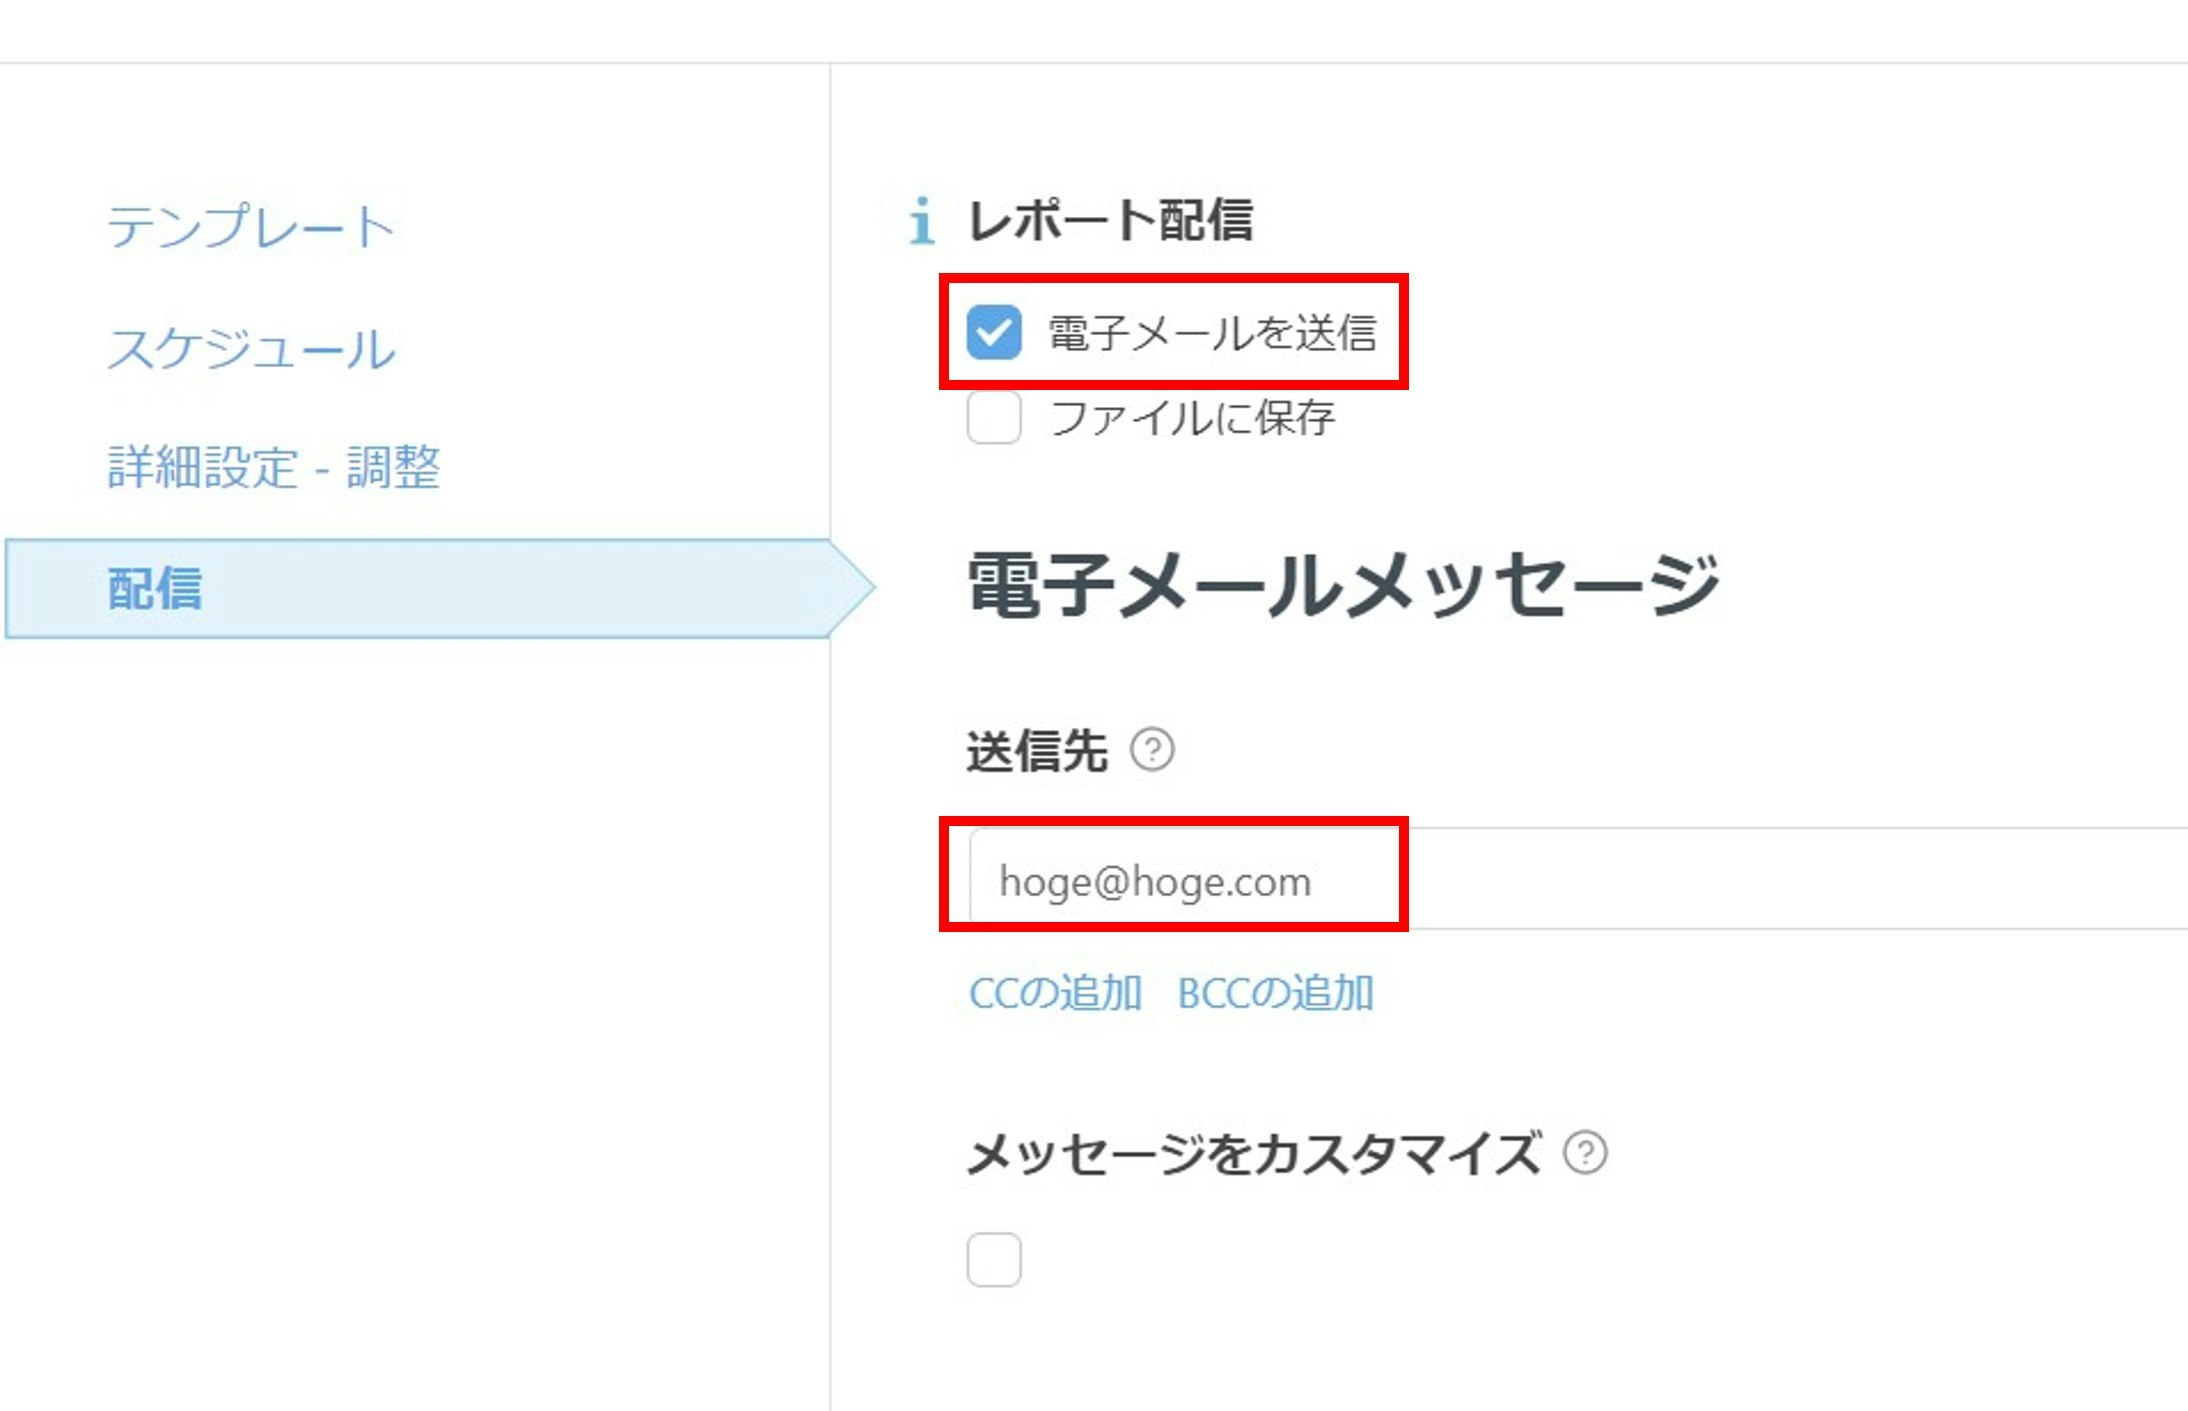
「レポート配信」の「電子メールを送信」にチェックをいれ、送信先のGmailアドレスに設定してください。
-
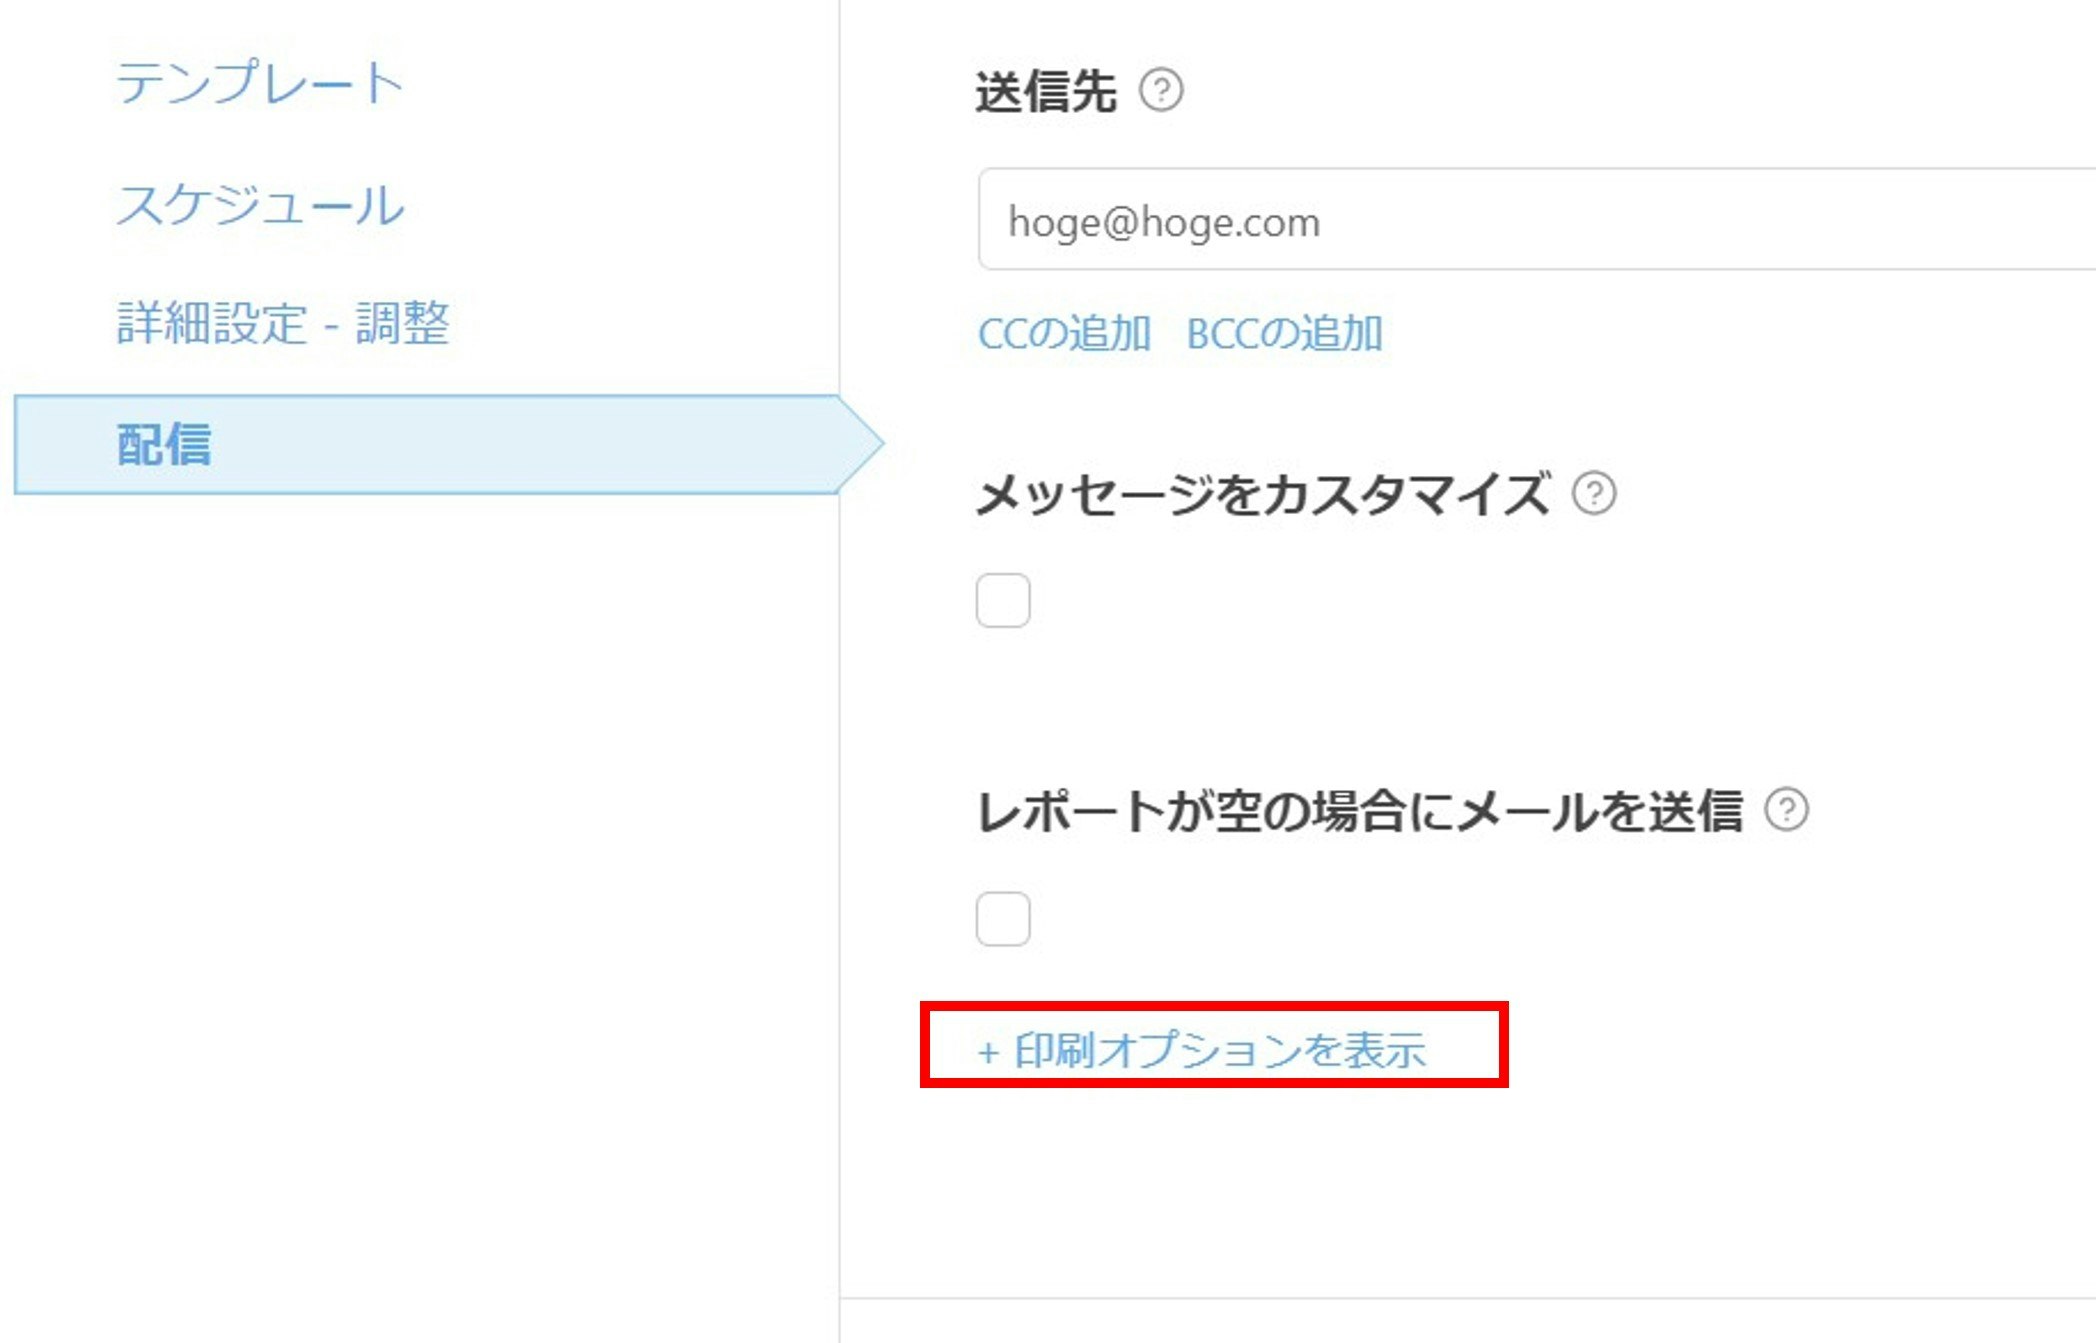
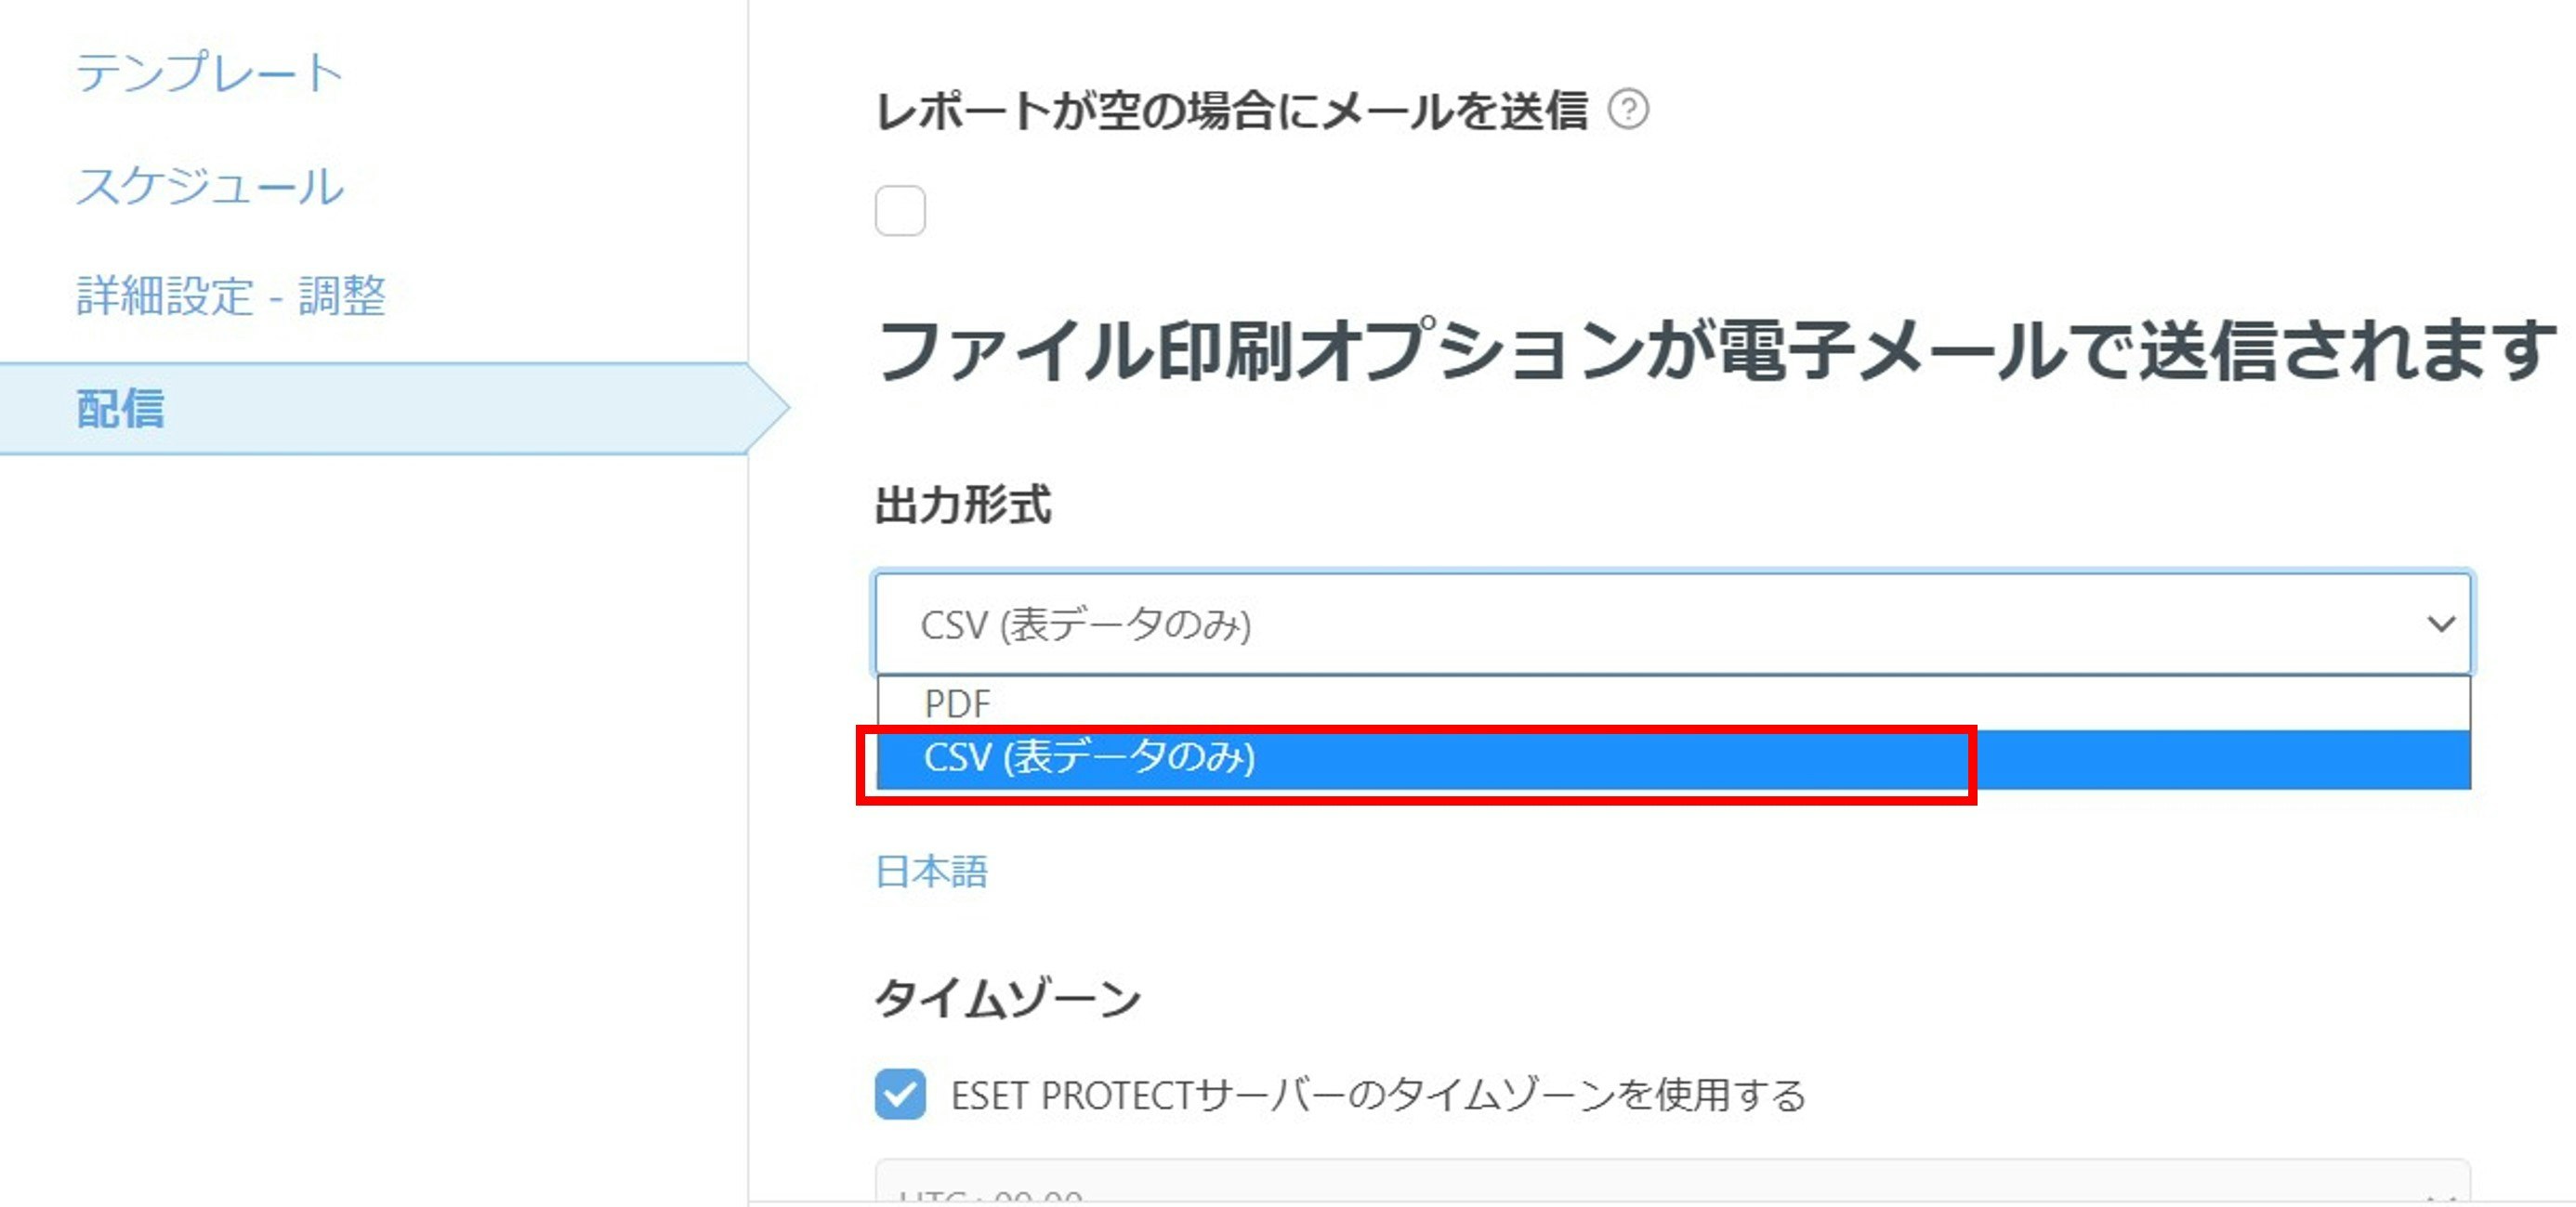
「+印刷オプションを表示」をクリックし、出力形式をCSV(表データのみ)に変更してください。「終了」をクリックして保存します。
レポートの集計方法
作成したレポートの集計を行います。
※レポートには同じコンピューター名を持つ行が存在してしまっています。
これはESETの再インストール時に、過去のバージョンが残っているためです。
したがって、レポートの集計をするスクリプトはコンピューター名が重複しているデータのうち、最新のものを取得しするように処理をしています。
レポートの集計処理の実装
手順は以下です。
-
メール送信先のGoogleアカウントのドライブを開きます。
空のスプレッドシートを作成します。 -
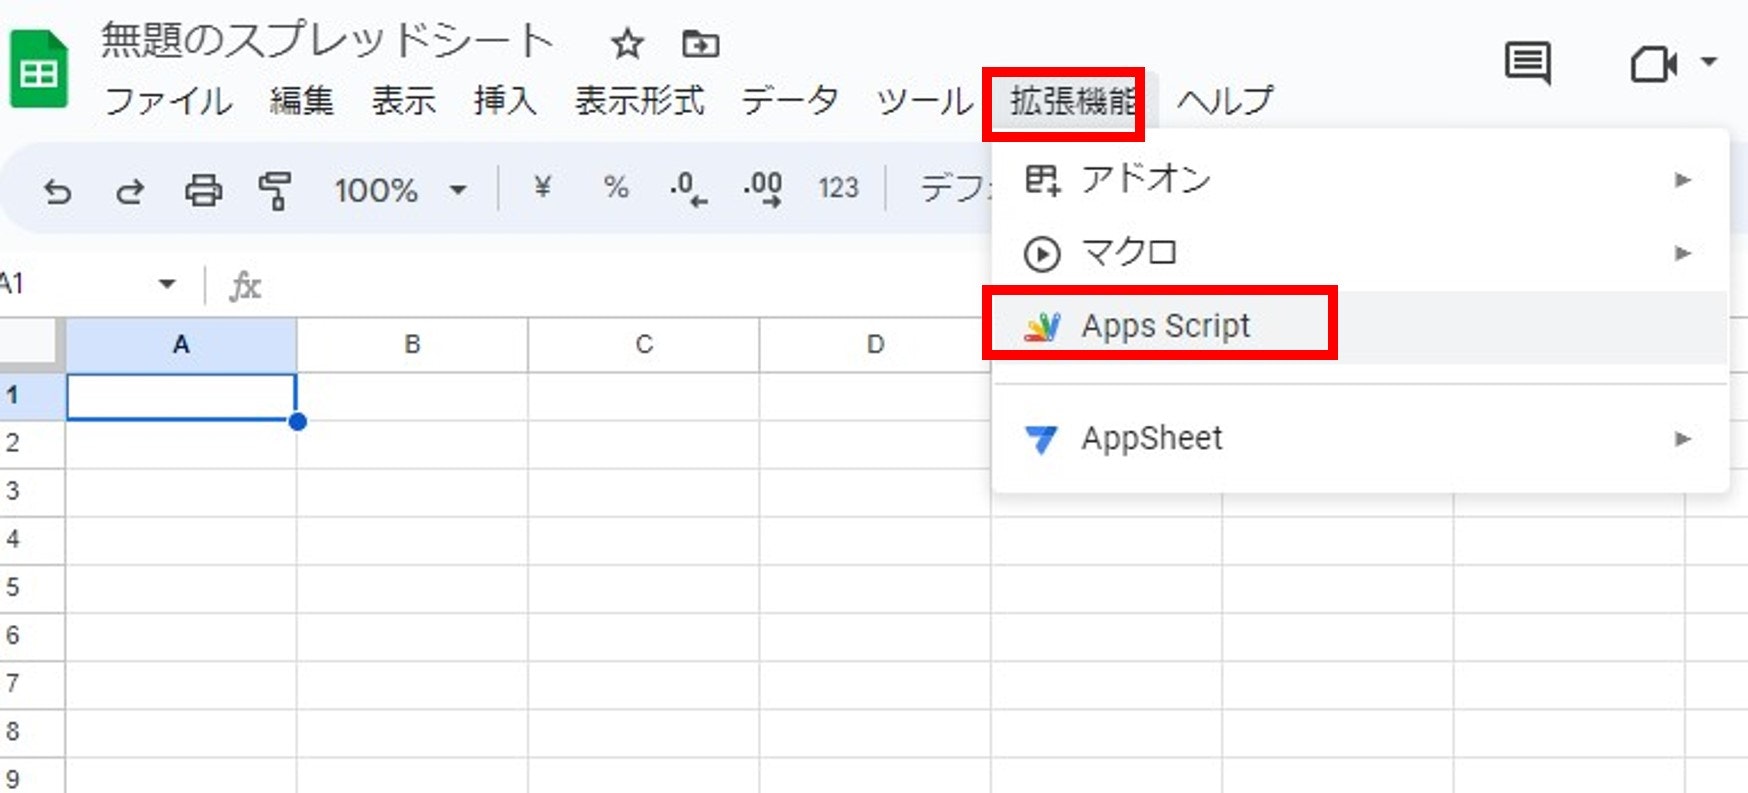
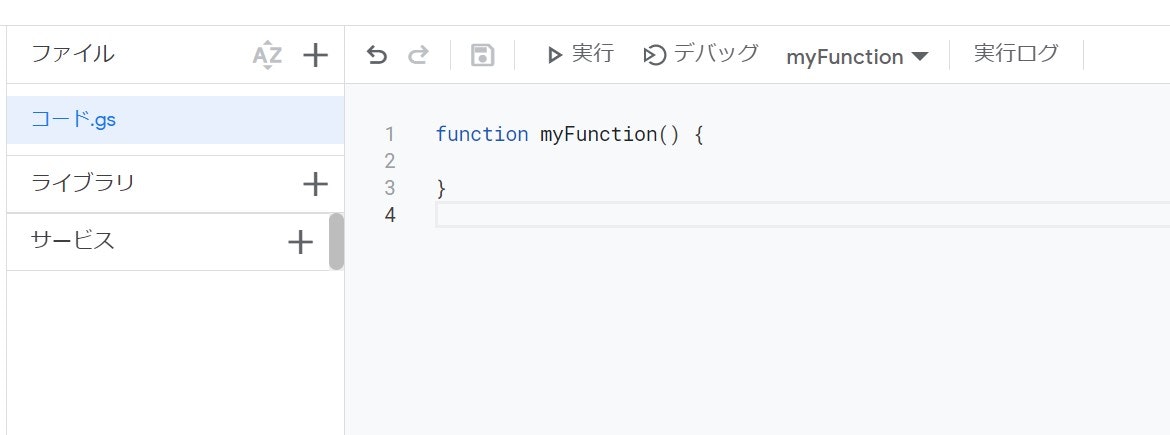
スプレッドシートの「拡張機能」、「Apps Script」の順でクリックしてApps Scriptを起動します。
-
「コード.gs」の
function myFunction()...を下記のコードに書き換えてください。
- SPREADSHEET_ISはご自身のApps Scriptを作成しているスプレッドシートIDを指定してください。
- DRIVE_FOLDER_IDはご自身のCSVを保存するGoogleドライブフォルダのIDを指定してください。
- {Your ESET server email address} はご自身のESETサーバーに設定済みの送信元アドレスを指定してください。
// スプレッドシートIDの指定
const SPREADSHEET_IS = "******************************";
// CSVを保存するGoogleドライブフォルダのID
const DRIVE_FOLDER_ID = "******************************";
// 本日の日付を取得
const today = new Date();
//本日の日付を取得
const day = today.getFullYear() + "/" + (today.getMonth()+1) + "/" + today.getDate();
// 検索条件
const query = 'is:unread from:{Your ESET server email address} after:'+ day;


function readCsv(data) {
  const lines = data.split('\n');
  const report = lines.map(line => line.split(';'));
  // データの空欄があった時に空のデータを入れる
  const headers = report[0];
  for(let i = report.length; i < headers.length; i++){
    report.push("");
  }
  return report;
}


function getLatestComputerInfo(report) {
  const pcNameReportDict = {};
  const len = report[0].length;

  for (let row of report.slice(1)) {
    const pcName = row[0];

    if (len === 2) {
      const item = row[1];
      if (!pcNameReportDict.hasOwnProperty(pcName)) {
        pcNameReportDict[pcName] = item;
      } else {
        if (item === '' || pcNameReportDict[pcName] === '') continue;

        if (parseInt(pcNameReportDict[pcName].split('(')[0]) > parseInt(item.split('(')[0])) {
          continue;
        } else {
          pcNameReportDict[pcName] = item;
        }
      }
    } else if (len === 3) {
      const item1 = row[1];
      const item2 = row[2];
      if (!pcNameReportDict.hasOwnProperty(pcName)) {
        pcNameReportDict[pcName] = [item1, item2];
      } else {
        if (item1 === '' || item2 === '' || pcNameReportDict[pcName].length === 0) continue;

        if (pcNameReportDict[pcName][0] === '') {
          pcNameReportDict[pcName][0] = item1;
        }

        if (pcNameReportDict[pcName][1] === '') {
          pcNameReportDict[pcName][1] = item2;
        } else {
          if (pcNameReportDict[pcName][1] > item2) {
            continue;
          } else {
            pcNameReportDict[pcName] = [item1, item2];
          }
        }
      }
    }
  }
  const newReport = [report[0]];
  if (len === 2) {
    for (let key in pcNameReportDict) {
      newReport.push([key, pcNameReportDict[key]]);
    }
  } else if (len === 3) {
    for (let key in pcNameReportDict) {
      newReport.push([key, pcNameReportDict[key][0], pcNameReportDict[key][1]]);
    }
  }
  return newReport;
}


// ファイル名を指定してGoogleドライブからCSVファイルを取得する
function getCSVFileByName(fileName) {
  const files = DriveApp.getFilesByName(fileName);
  if (files.hasNext()) {
    return files.next();
  }
  return null;
}


function mergeReports(report1, report2){
  const headers = [...report1[0], ...report2[0].slice(1)];
  const rows = {};

  report1.slice(1).forEach(row => {
    const newRow = new Array(report2[0].length - 1).fill('');
    rows[row[0]] = [...row, ...newRow];
  });

  report2.slice(1).forEach(row => {
    if(rows.hasOwnProperty(row[0])){
      rows[row[0]] = [...rows[row[0]].slice(0, report1[0].length), ...row.slice(1)];
    }else{
      const newRow = new Array(report1[0].length - 1).fill('');
      rows[row[0]] =[row[0], ...newRow, ...row.slice(1)];
    }
  });
  const result = [headers, ...Object.values(rows)];
  return result;
}


function myFunction() {
  const threads = GmailApp.search(query);
  const messages = GmailApp.getMessagesForThreads(threads);

  // メールを既読にする
  for (thread in threads) {threads[thread].markRead()}

  let i = 0;
  for(const message of messages){
    for(const msg of message){
      const attachments = msg.getAttachments();
      for(const attachment of attachments){
        if(attachment.getContentType() === 'text/csv'){
          // CSVをGoogleドライブに保存
          const file = DriveApp.getFolderById(DRIVE_FOLDER_ID).createFile(attachment);

          // CSVデータを取得
          const reportFile = getCSVFileByName(file.getName());
          const report_Data = reportFile.getBlob().getDataAsString('UTF-8');
          const report = getLatestComputerInfo(readCsv(report_Data))
          if (report) {
              if (i === 0) {
                baseReport = report;
                i = 1;
              } else {
                baseReport = mergeReports(baseReport, report)
              }
            } else {
              console.error(`The file ${reportName} does not exist.`);
            }
          // 一時ファイルの削除
          file.setTrashed(true)
        }
      }
      // 結果を現在のスプレッドシートに書き込む
      const sheet = SpreadsheetApp.getActiveSpreadsheet().getActiveSheet();
      sheet.getRange(1, 1, baseReport.length, baseReport[0].length).setValues(baseReport);
    }
  }
}
処理のスケジュール実行方法
処理をスケジュールする手順は以下の通りです。
-
作成したGASのスクリプト画面にアクセスします。
-
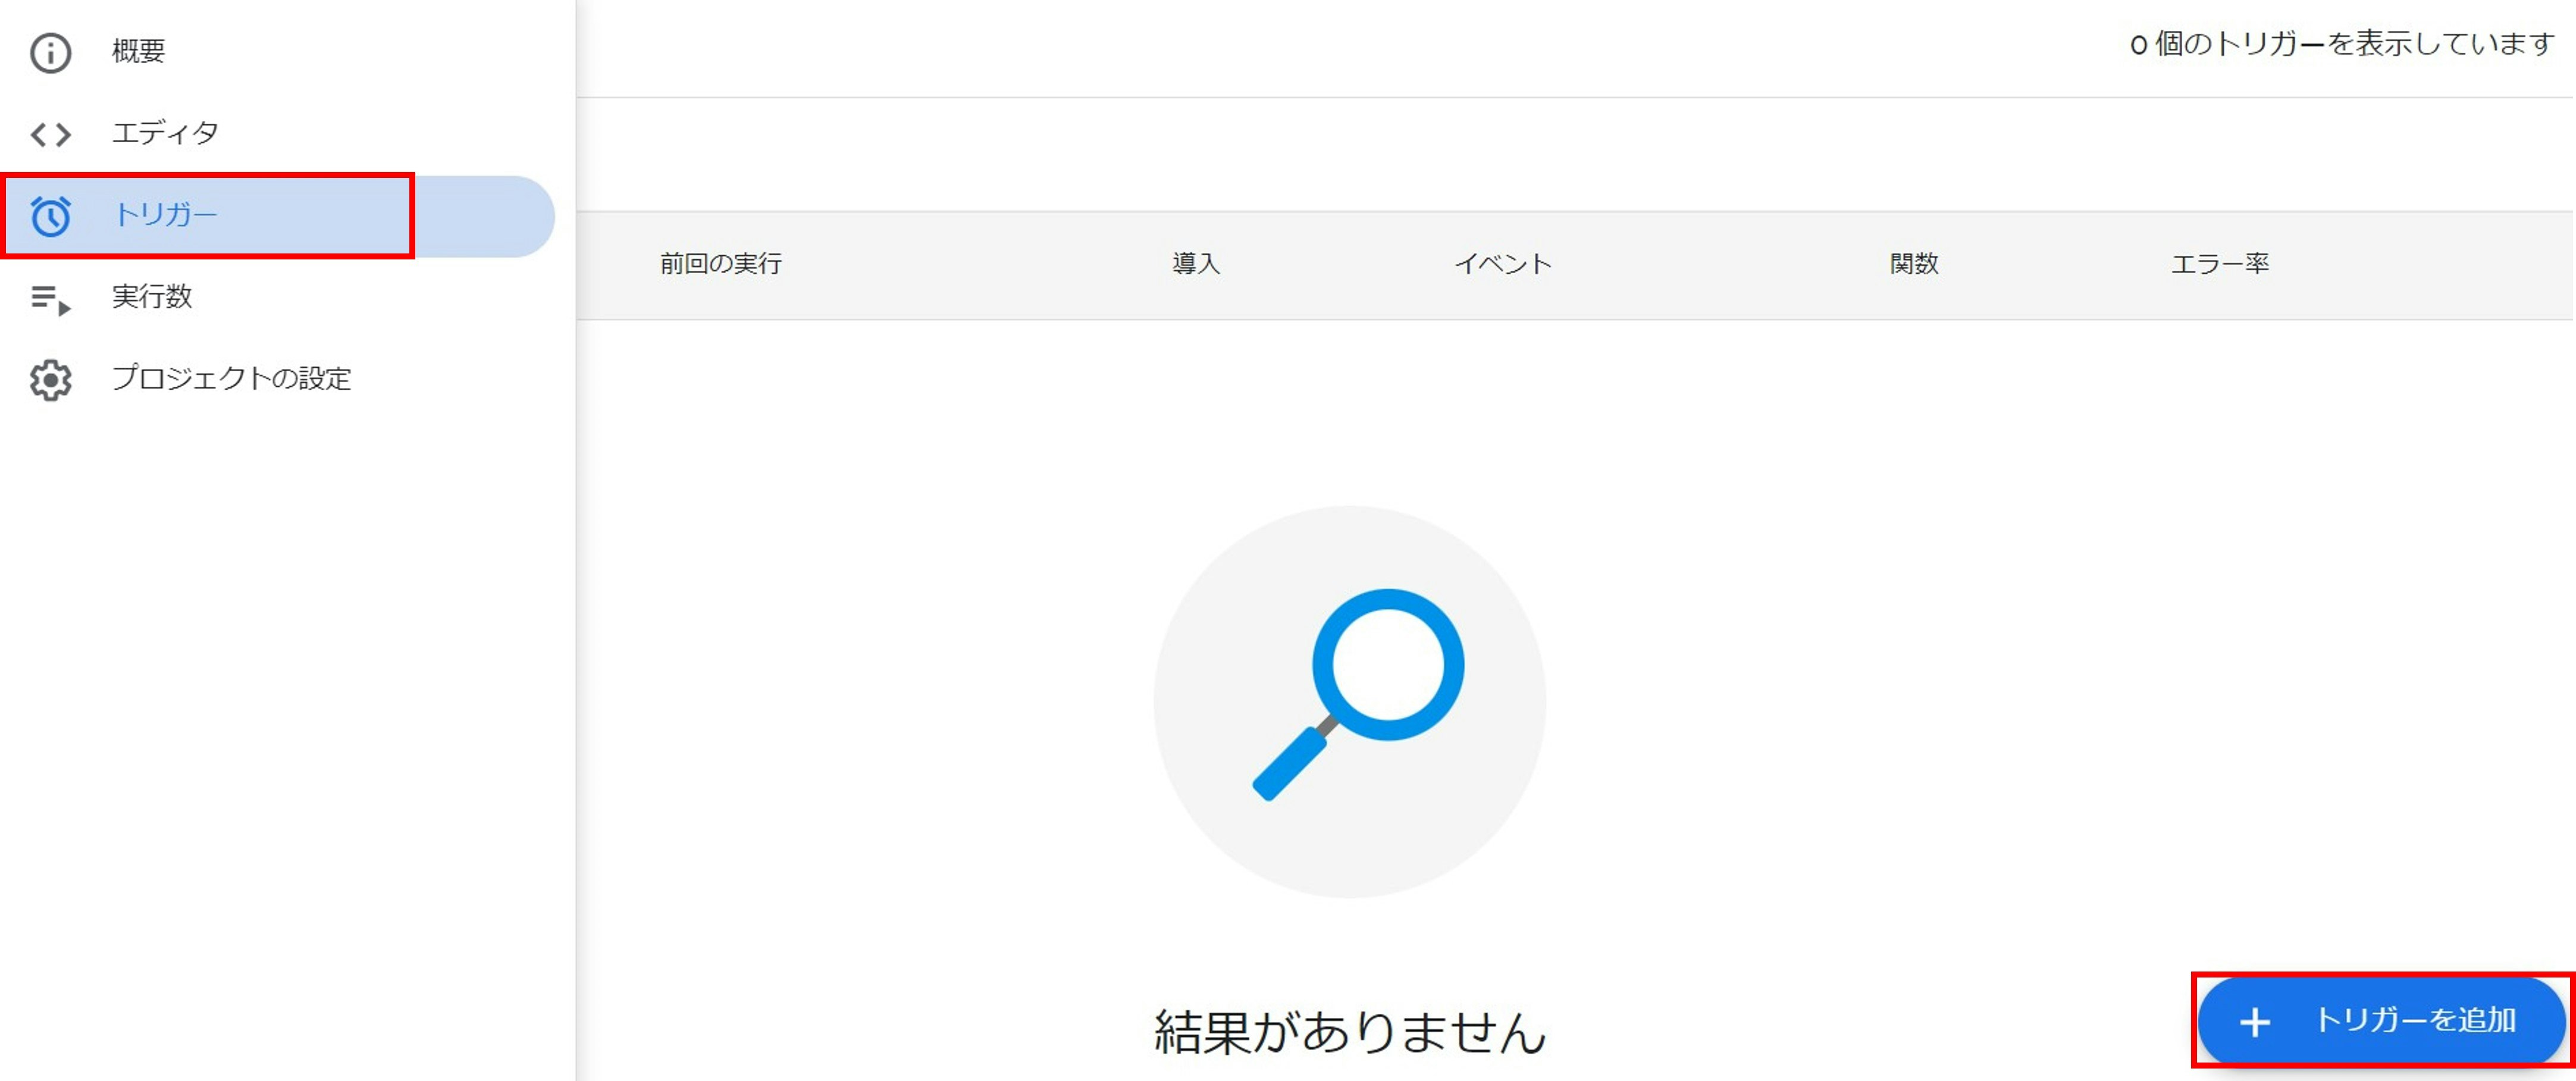
左側のメニューバーの「トリガー」をクリックして、「トリガーを追加」を選択します。
-
「ESET PROTECT」から送信される定期メールの頻度に合わせて、トリガーの設定を行います。
これにより、毎週自動的にレポートを集計することが出来ます。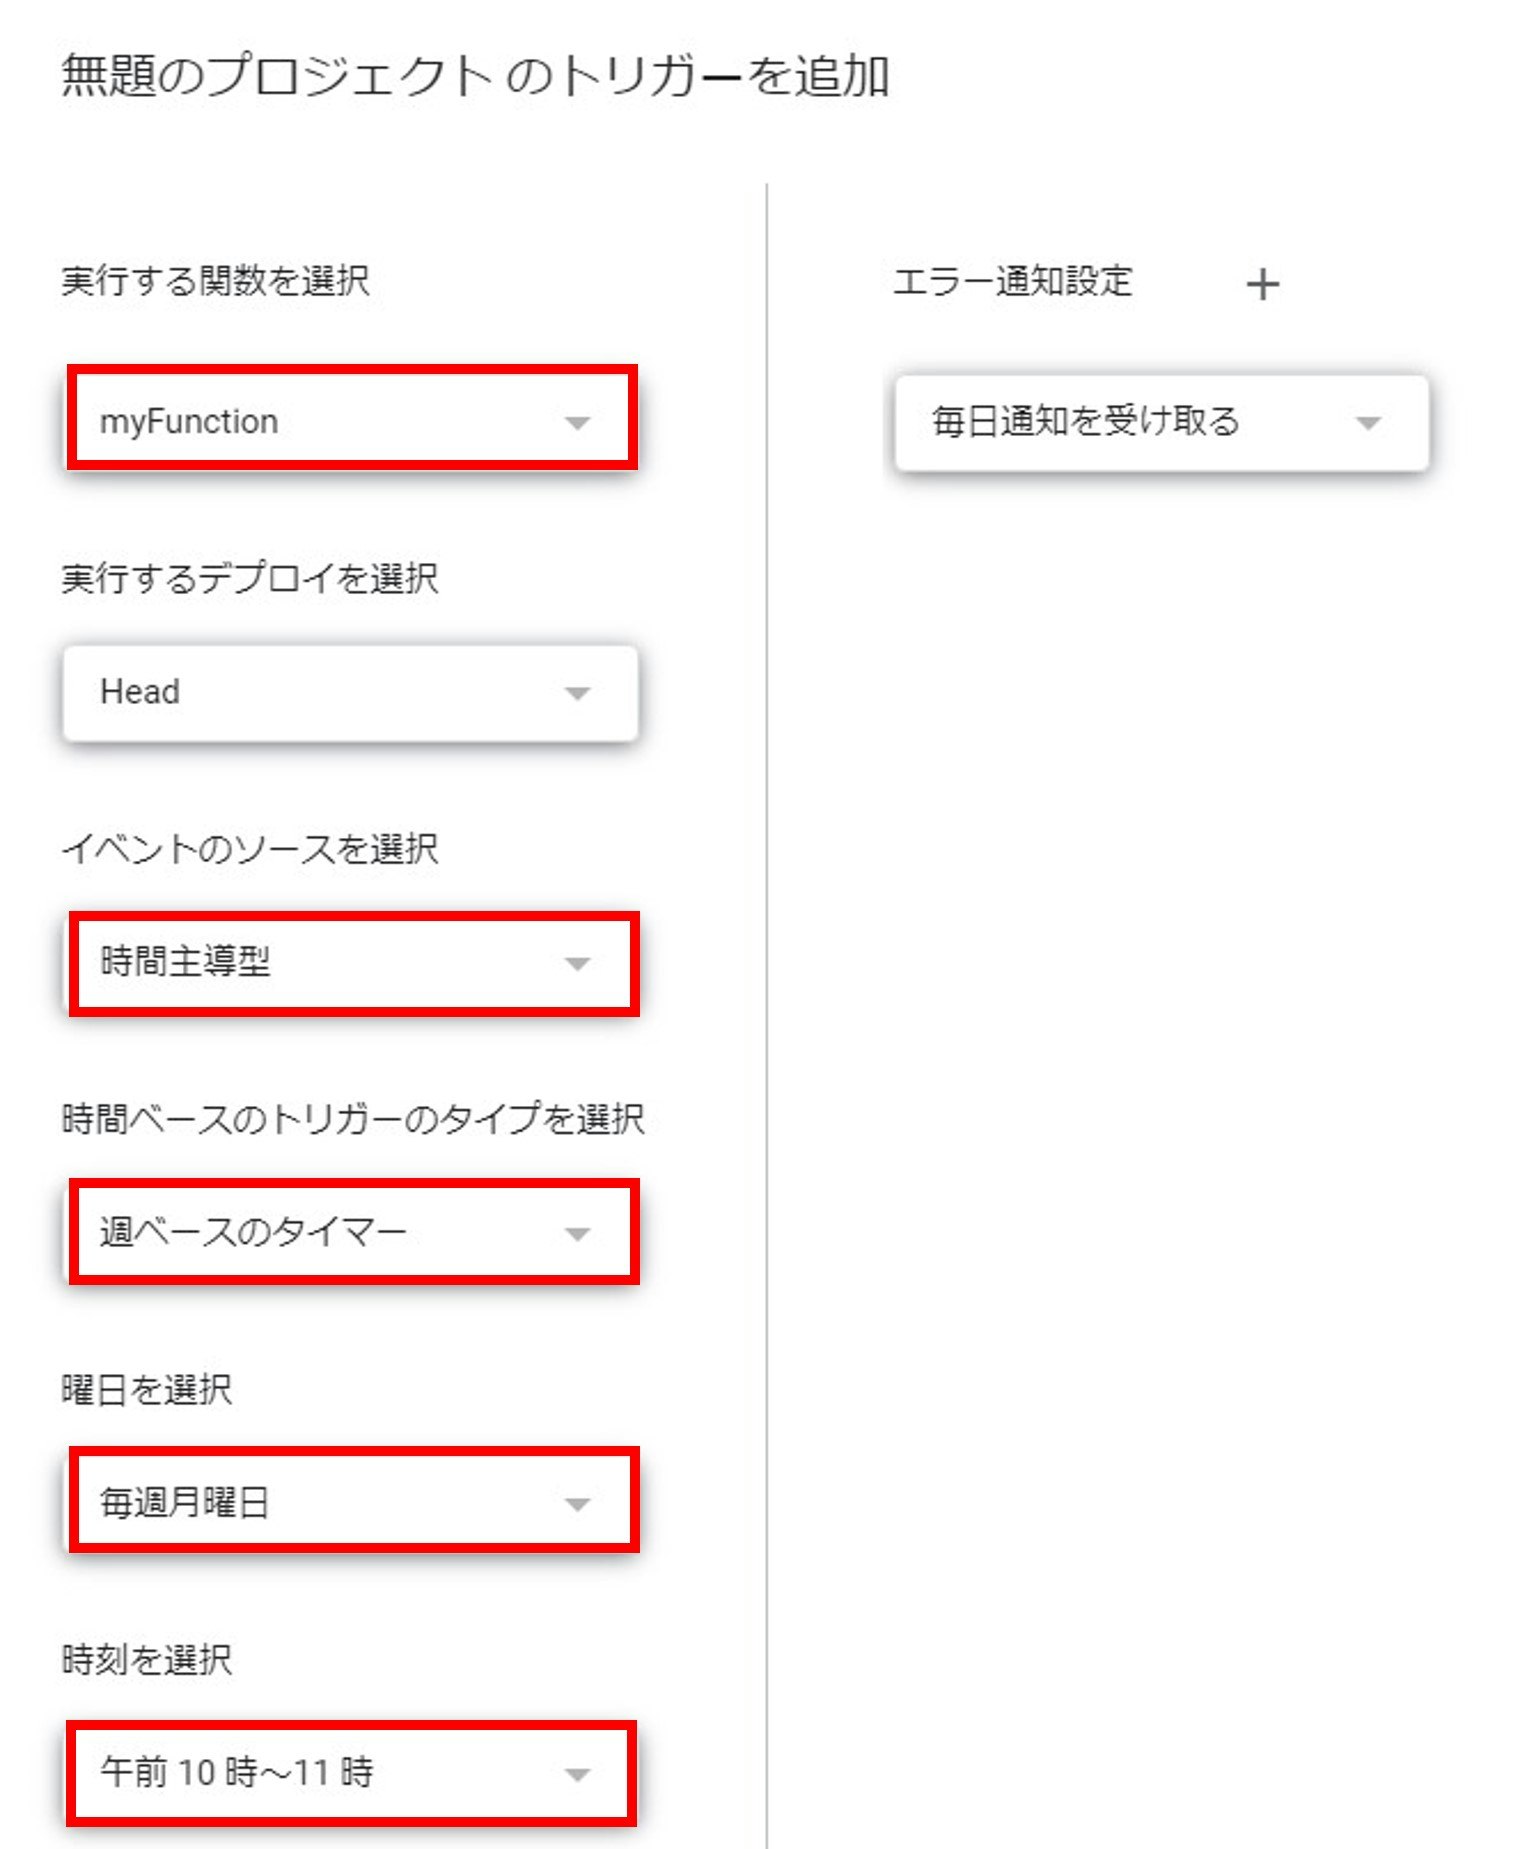
出力例
スクリプト実行後、スプレッドシートは以下のような内容になります。
| コンピューター名 | データベースのバージョン | ユーザー | 完了時間 | 最終接続 | セキュリティ製品バージョン | OS名 | OSバージョン | MACアドレス | アダプタIPアドレス |
|---|---|---|---|---|---|---|---|---|---|
| desktop1 | 27017 (20230404) | hoge | 2023/4/5 13:33 | 2023/4/5 16:33 | 10.0.2034.1 | Microsoft Windows 11 Pro | 10.0.22621.1413 | AA-AA-AA-AA-AA-AA | 192.192.192.192 |
| desktop2 | 27017 (20230404) | hoge | 2023/4/5 13:33 | 2023/4/5 16:33 | 10.0.2045.1 | Microsoft Windows 10 Pro | 10.0.19044.2728 | AA-AA-AA-AA-AA-AA | 192.192.192.192 |
| desktop3 | 27017 (20230404) | hoge | 2023/4/5 13:33 | 2023/4/5 16:33 | 10.0.2034.1 | Microsoft Windows 10 Pro | 10.0.19044.2728 | AA-AA-AA-AA-AA-AA | 192.192.192.192 |
補足
- 更新時にスプレッドシートが上書きされないように、実行日ごとにシートを分ける機能を追加すれば、より使いやすい一覧表になると思います。
- 作成した一覧表は、すべての情報を網羅しているわけではないので、必要に応じてカスタマイズするとよいでしょう。