開発環境
Rails 6.0.3.2
Ruby sass 3.7.4 (scss)
haml 5.1.2
jquery
概要
小さいサムネイル画像にマウスカーソルを当てると、大きいメイン画像に表示が切り替わる。
商品詳細ページや不動産の物件ページなんかで見たことあると思います。
今回はそんな動作をする この↓美味しそうなページを作成したので記事にします。

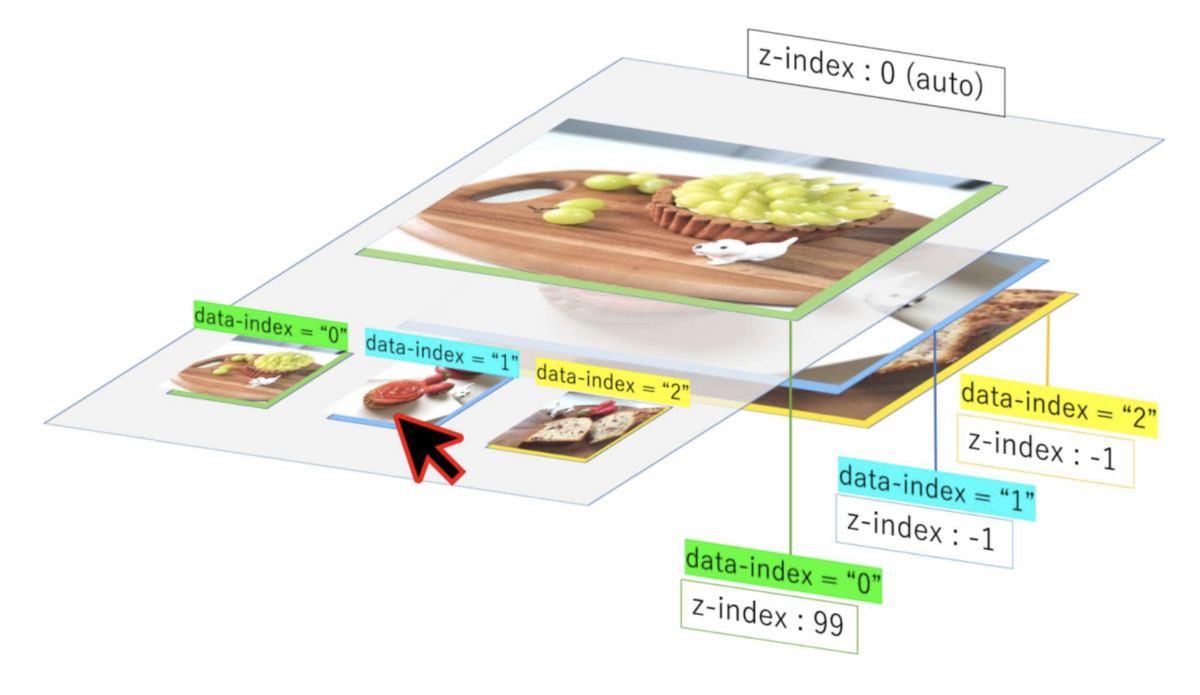
図に表すとこんな感じ
ビュー
.wrapper
  .main
    .main__lists
      %div{class: 'main__lists__image', data: {index:0}, style: "z-index:99;"}
        =image_tag "image1.jpg", width: '600', alt: "画像0"
      %div{class: 'main__lists__image', data: {index:1}, style: "z-index:-1;"}
        =image_tag "image2.jpg", width: '600', alt: "画像1"
      %div{class: 'main__lists__image', data: {index:2}, style: "z-index:-1;"}
        =image_tag "image3.jpg", width: '600', alt: "画像2"
  .thumbs
    .thumbs__lists
      %div{class: 'thumbs__lists__item' , data: {index:0}}
        =image_tag "image1.jpg", width: '150', alt: "画像0", class: "thumbs__lists__item__image"
      %div{class: 'thumbs__lists__item' , data: {index:1}}
        =image_tag "image2.jpg", width: '150', alt: "画像1", class: "thumbs__lists__item__image"
      %div{class: 'thumbs__lists__item' , data: {index:2}}
        =image_tag "image3.jpg", width: '150', alt: "画像2", class: "thumbs__lists__item__image"
説明
大きい画像のほうが main ブロック
小さいサムネのほうが thumbs ブロック に記述されています。
それぞれの画像には 対となる data-index が設定されており、
mainの画像には z-index 設定。
z-indexについて補足
z-index : 99 … 最前面に表示
z-index : -1 … 最背面に表示(つまり表示されない)
CSS
.wrapper {
  width: 100%;
}
.main {
  height: 500px;
  margin-top: 30px;
  &__lists{
    display: flex;
    justify-content: center;
    position: relative;
    &__image {
      position: absolute;
    }
  }
}
.thumbs {
  height: 120px;
  &__lists {
    width: 500px;
    margin: 0 auto;
    display: flex;
    justify-content: space-around;
    &__item {
      &__image {
        opacity: 0.5;
      }
    }
  }
}
説明
.main__lists に position: relative;
.main__lists__image に positon: absolute;
を設定することで、3枚の画像が重なった状態になります。
この中で z-index の値が大きいほうが最前面にきて表示されているように見えるようになります。
.thumbs__lists__item__image に opacity: 0.5;
を設定することで、サムネイル画像を半透明にします。
jQuery
$(function(){
  // 最初の画像のみ半透明解除
  $(".thumbs__lists__item__image").first().css('opacity', '1'); // ①
  // マウスオーバーの処理
  $(".thumbs__lists__item__image").mouseover(function(e){       // ②
    let mainDataIndex = $(this).parent().attr('data-index')     // ③
    $(".thumbs__lists__item__image").each(function(){           // ④
      let subDataIndex = $(this).parent().attr('data-index');   // ⑤
      if (subDataIndex == mainDataIndex){                       // ⑥
        $(this).css('opacity', '1');
      } else {
        $(this).css('opacity', '0.5');
      };
    });
    $(".main__lists__image").each(function(index){              // ⑦
      if(index == mainDataIndex){                               // ⑧
        $(this).css('z-index', 99);
      } else {
        $(this).css('z-index', -1);
      };
    });
  });
});
説明
① ページ読み込み時、.thumbs__lists__item__imageの一番最初の要素を半透明解除
② .thumbs__lists__item__image にマウスオーバーしたら発火
③ マウスオーバーしたサムネ画像の親要素のdeta-indexを取得
④ 全てのサムネ画像(.thumbs__lists__item__image)に対してeachで順番に⑤〜⑥
の処理
⑤ deta-indexを取得
⑥ ③と⑤の値を比較し、一致していたら半透明解除、一致していなかったら半透明
⑦全てのメイン画像(.main__lists__image)に対してeachで順番に⑧〜の処理
⑧ ③とeachメソッドのindexを比較し、一致していたら 最前面、一致していなかったら再背面
余談
jqueryで画像のsrcを変える手法がググると真っ先にでてきますが
私はz-indexで表示を切り替える手法を真っ先に思いつき、実装しました。
↓私のブログに図解でz-indexの動きを解説していますので、あわせてご覧ください。
| nakauの技術ブログ 〜プログラミングを学ぶ〜 | |

|
jQuery - マウスオーバーしたサムネイル画像をメイン画像に表示/切り替え |
