はじめに
WatchFaceの構成アクティビティの作成方法について記述。
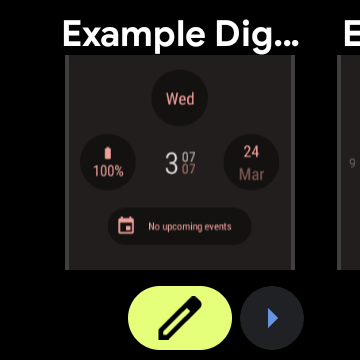
下画像の鉛筆ボタンタップ時に起動する画面。

WatchFaceの作成手順については、下記を参照。
これを実装してから構成アクティビティを作成することをおすすめする。
実装手順
下準備
ライブラリの導入
構成アクティビティに必要なライブラリの導入
build.gradle
dependencies {
	implementation 'androidx.wear.watchface:watchface:1.1.1'
	implementation 'androidx.wear.watchface:watchface-editor:1.1.1'
	implementation 'androidx.activity:activity-ktx:1.6.0'
}
構成アクティビティ側
ステートホルダーの作成
設定反映を行うためのステートホルダーの作成
WatchFaceConfigStateHolder.kt
class WatchFaceConfigStateHolder(scope: CoroutineScope, private val activity: ComponentActivity) {
	companion object {
		const val CUSTOM_VALUE = "CustomValue"
	}

	private lateinit var editorSession: EditorSession
	private lateinit var configDataKey: UserStyleSetting.CustomValueUserStyleSetting

	sealed class EditWatchFaceUiState {
		data class Success(val configData: String) : EditWatchFaceUiState()
		data class Loading(val message: String) : EditWatchFaceUiState()
	}

	val uiState = flow<EditWatchFaceUiState> {
		editorSession = EditorSession.createOnWatchEditorSession(activity)
		extractsUserStyles(editorSession.userStyleSchema)
		emitAll(
			combine(editorSession.userStyle, editorSession.complicationsPreviewData) { userStyle, _ ->
				yield()
				EditWatchFaceUiState.Success(getConfigData(userStyle))
			}
		)
	}.stateIn(scope + Dispatchers.Main.immediate, SharingStarted.Eagerly, EditWatchFaceUiState.Loading("Initializing"))

	private fun extractsUserStyles(userStyleSchema: UserStyleSchema) {
		for (setting in userStyleSchema.userStyleSettings) {
			if (setting.id.toString() == CUSTOM_VALUE) {
				configDataKey = setting as UserStyleSetting.CustomValueUserStyleSetting
			}
		}
	}

	private fun getConfigData(userStyle: UserStyle): String {
		val option = userStyle[configDataKey] as UserStyleSetting.CustomValueUserStyleSetting.CustomValueOption
		return option.customValue.toString(Charsets.UTF_8)
	}

	fun setConfigData(configData: String) {
		val byteArray = configData.toByteArray(Charsets.UTF_8)
		setUserStyleOption(configDataKey, UserStyleSetting.CustomValueUserStyleSetting.CustomValueOption(byteArray))
	}

	private fun setUserStyleOption(userStyleSetting: UserStyleSetting, userStyleOption: UserStyleSetting.Option) {
		val mutableUserStyle = editorSession.userStyle.value.toMutableUserStyle()
		mutableUserStyle[userStyleSetting] = userStyleOption
		editorSession.userStyle.value = mutableUserStyle.toUserStyle()
	}
}
構成アクティビティのレイアウト作成
設定変更用のボタン作成
activity_watch_face_config.xml
<?xml version="1.0" encoding="utf-8"?>
<RadioGroup
	xmlns:android="http://schemas.android.com/apk/res/android"
	android:id="@+id/radio_group"
	android:layout_width="match_parent"
	android:layout_height="match_parent"
	android:paddingHorizontal="36dp">

	<RadioButton
		android:id="@+id/button_a"
		android:layout_width="match_parent"
		android:layout_height="72dp"
		android:text="A"/>

	<RadioButton
		android:id="@+id/button_b"
		android:layout_width="match_parent"
		android:layout_height="72dp"
		android:text="B"/>

	<RadioButton
		android:id="@+id/button_c"
		android:layout_width="match_parent"
		android:layout_height="72dp"
		android:text="C"/>
</RadioGroup>
構成アクティビティのクラス作成
構成アクティビティでボタン押下時の処理部分の作成
WatchFaceConfigActivity.kt
class WatchFaceConfigActivity : ComponentActivity() {

	private val binding by lazy { ActivityWatchFaceConfigBinding.inflate(layoutInflater) }
	private val stateHolder by lazy { WatchFaceConfigStateHolder(lifecycleScope, this@WatchFaceConfigActivity) }

	override fun onCreate(savedInstanceState: Bundle?) {
		super.onCreate(savedInstanceState)
		setContentView(binding.root)

		lifecycleScope.launch(Dispatchers.Main.immediate) {
			stateHolder.uiState.collect { uiState: WatchFaceConfigStateHolder.EditWatchFaceUiState ->
				when (uiState) {
					is WatchFaceConfigStateHolder.EditWatchFaceUiState.Loading -> {
					}
					is WatchFaceConfigStateHolder.EditWatchFaceUiState.Success -> {
						val id = when (uiState.configData) {
							"A" -> R.id.button_a
							"B" -> R.id.button_b
							"C" -> R.id.button_c
							else -> null
						}
						if (id != null) binding.radioGroup.check(id)

						binding.radioGroup.setOnCheckedChangeListener { _, checkedId ->
							when (checkedId) {
								R.id.button_a -> stateHolder.setConfigData("A")
								R.id.button_b -> stateHolder.setConfigData("B")
								R.id.button_c -> stateHolder.setConfigData("C")
							}
							finish()
						}
					}
				}
			}
		}
	}
}
ウォッチフェイス側
WatchFace用のRenderer作成
設定値を取り出して表示
CustomWatchFaceRenderer.kt
class CustomWatchFaceRenderer(
	context: Context,
	surfaceHolder: SurfaceHolder,
	currentUserStyleRepository: CurrentUserStyleRepository,
	watchState: WatchState
) : Renderer.CanvasRenderer2<Renderer.SharedAssets>(
	surfaceHolder,
	currentUserStyleRepository,
	watchState,
	CanvasType.HARDWARE,
	16L,
	false
) {
	private val binding = CustomWatchFaceBinding.inflate(LayoutInflater.from(context))

	override suspend fun init() {
		super.init()
		CoroutineScope(SupervisorJob() + Dispatchers.Main.immediate).launch {
			currentUserStyleRepository.userStyle.collect {
				binding.text.text = getConfigData(it)
			}
		}
	}

	override suspend fun createSharedAssets() = object : SharedAssets {
		override fun onDestroy() {}
	}

	override fun renderHighlightLayer(canvas: Canvas, bounds: Rect, zonedDateTime: ZonedDateTime, sharedAssets: SharedAssets) {}

	override fun render(canvas: Canvas, bounds: Rect, zonedDateTime: ZonedDateTime, sharedAssets: SharedAssets) {
		if (renderParameters.watchFaceLayers.contains(WatchFaceLayer.COMPLICATIONS_OVERLAY)) {
			binding.root.measure(
				View.MeasureSpec.makeMeasureSpec(bounds.width(), View.MeasureSpec.EXACTLY),
				View.MeasureSpec.makeMeasureSpec(bounds.height(), View.MeasureSpec.EXACTLY)
			)
			binding.root.layout(0, 0, bounds.width(), bounds.height())
			binding.time.text = String.format("%02d:%02d", zonedDateTime.hour, zonedDateTime.minute)
			binding.root.draw(canvas)
		}
	}

	private fun getConfigData(userStyle: UserStyle): String {
		userStyle.forEach {
			if (it.key.id.toString() == CUSTOM_VALUE) {
				val customValue = it.value as UserStyleSetting.CustomValueUserStyleSetting.CustomValueOption
				return customValue.customValue.toString(Charsets.UTF_8)
			}
		}
		return ""
	}
}
WatchFaceServiceの作成
createUserStyleSchemaメソッドをoverrideして、設定値の初期化を行う。
CustomWatchFaceService.kt
class CustomWatchFaceService : WatchFaceService() {
	override suspend fun createWatchFace(surfaceHolder: SurfaceHolder, watchState: WatchState, complicationSlotsManager: ComplicationSlotsManager, currentUserStyleRepository: CurrentUserStyleRepository) =
		WatchFace(WatchFaceType.DIGITAL, CustomWatchFaceRenderer(applicationContext, surfaceHolder, currentUserStyleRepository, watchState))

	override fun createUserStyleSchema(): UserStyleSchema {
		val setting = UserStyleSetting.CustomValueUserStyleSetting(
			listOf(WatchFaceLayer.COMPLICATIONS_OVERLAY),
			"Default".toByteArray(Charsets.UTF_8)
		)
		return UserStyleSchema(listOf(setting))
	}
}
マニフェスト部分
マニフェスト定義
・service部分にメタデータ定義
・activity部分にWatchFaceConfigActivity定義
AndroidManifest.xml
<manifest ...>
	<application ...>
		<service ...>
			...
			<meta-data
				android:name="com.google.android.wearable.watchface.wearableConfigurationAction"
				android:value="androidx.wear.watchface.editor.action.WATCH_FACE_EDITOR" />
			<meta-data
				android:name="com.google.android.wearable.watchface.companionBuiltinConfigurationEnabled"
				android:value="true" />
			...
		</service>

		<activity
			android:name=".WatchFaceConfigActivity"
			android:exported="true"
			android:label="Configuration">

			<intent-filter>
				<action android:name="androidx.wear.watchface.editor.action.WATCH_FACE_EDITOR"/>

				<category android:name="com.google.android.wearable.watchface.category.WEARABLE_CONFIGURATION"/>
				<category android:name="android.intent.category.DEFAULT"/>
			</intent-filter>
		</activity>
	</application>
</manifest>
参考サイト