はじめに
Qiitaが面白そうなイベントやってたので、参加してみました🙋♂️
概要
PCとスマホでビデオ通話を作成しました!
SkyWayというものを使えば、簡単に実装できるみたい。
SkyWay はアプリケーションに音声・ビデオ通話をはじめとしたリアルタイム・コミュニーケーション機能を容易に組み込むことを可能とするプラットフォームです。
詳しくはこちら。
開発ドキュメントも充実しているので、比較的簡単に実装できました。ただ、サーバ構築部分だったり、スマホの接続方法だったりが少し手間取ったので、そこら辺を補足しながら説明していければと思います。
出来上がったもの

スマホの画面はこんな感じです。左側が自分の映像、右側が相手の映像。
構成
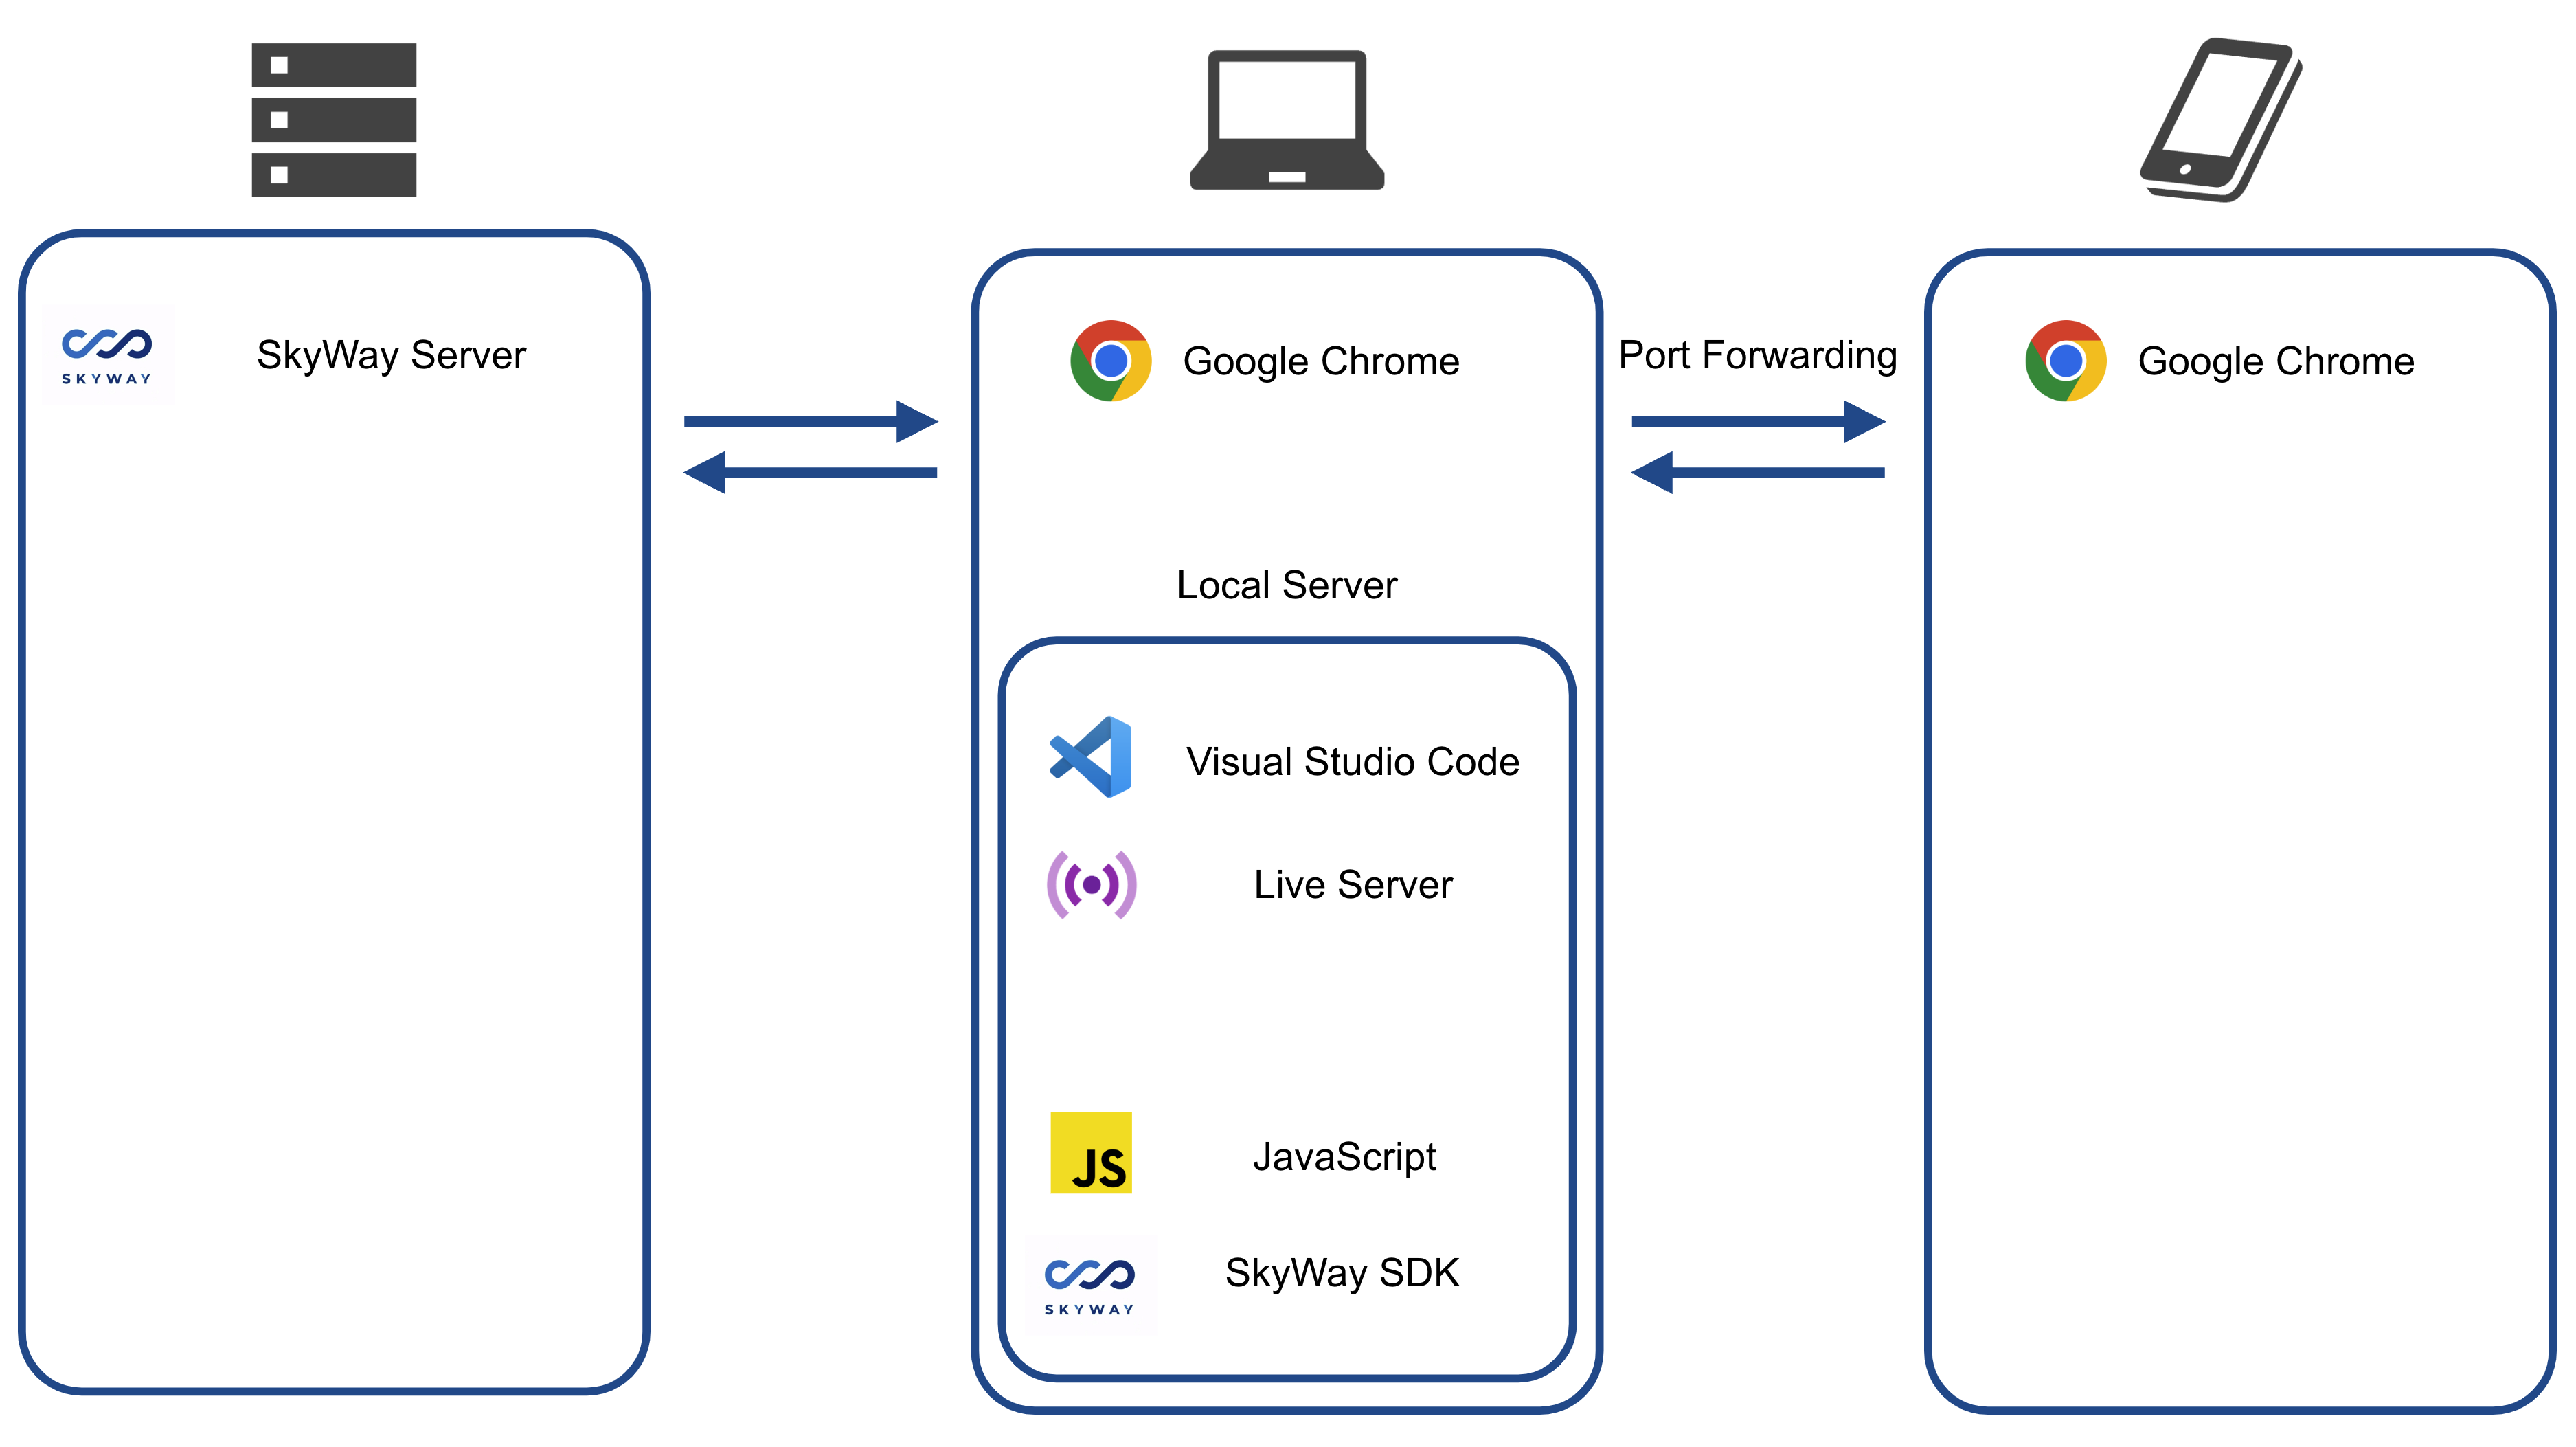
ざっくりこんな感じ。やることとしては、
1. SkyWayサイトからIDとキーを取得
2. コード作成
3. サーバ立ち上げ
4. Port Forwarding接続
となってます。
SkyWayサイトからIDとキーを取得
ここからSkyWayアカウントを作成。

トップ画面でプロジェクトを作成をクリック、アプリケーションを作成をクリックする。

ここで出てくるアプリケーションIDとシークレットキーをメモしておく。
コード作成
ここら辺は、SkyWayの開発者ドキュメント通りでOK。以下のindex.htmlとmain.jsを同一フォルダ内に保存。
<!DOCTYPE html>
<html>
  <head>
    <meta charset="UTF-8" />
    <meta name="viewport" content="width=device-width" />
    <title>SkyWay Tutorial</title>
  </head>
  <body>
    <p>ID: <span id="my-id"></span></p>
    <div>
      room name: <input id="room-name" type="text" />
      <button id="join">join</button>
    </div>
    <video id="local-video" width="400px" muted playsinline></video>
    <div id="button-area"></div>
    <div id="remote-media-area"></div>
    <script type="module" src="main.js"></script>
  </body>
</html>
main.js内に、先ほどメモしたアプリケーションIDとシークレットキーを貼り付ける。
const token = new SkyWayAuthToken({
  jti: uuidV4(),
  iat: nowInSec(),
  exp: nowInSec() + 60 * 60 * 24,
  scope: {
    app: {
      id: 'ここにアプリケーションIDをペーストしてください',
      turn: true,
      actions: ['read'],
      channels: [
        {
          id: '*',
          name: '*',
          actions: ['write'],
          members: [
            {
              id: '*',
              name: '*',
              actions: ['write'],
              publication: {
                actions: ['write'],
              },
              subscription: {
                actions: ['write'],
              },
            },
          ],
          sfuBots: [
            {
              actions: ['write'],
              forwardings: [
                {
                  actions: ['write'],
                },
              ],
            },
          ],
        },
      ],
    },
  },
}).encode('ここにシークレットキーをペーストしてください');

(async () => {
  const localVideo = document.getElementById('local-video');
  const buttonArea = document.getElementById('button-area');
  const remoteMediaArea = document.getElementById('remote-media-area');
  const roomNameInput = document.getElementById('room-name');

  const myId = document.getElementById('my-id');
  const joinButton = document.getElementById('join');

  const { audio, video } =
    await SkyWayStreamFactory.createMicrophoneAudioAndCameraStream();
  video.attach(localVideo);
  await localVideo.play();

  joinButton.onclick = async () => {
    if (roomNameInput.value === '') return;

    const context = await SkyWayContext.Create(token);
    const room = await SkyWayRoom.FindOrCreate(context, {
      type: 'p2p',
      name: roomNameInput.value,
    });
    const me = await room.join();

    myId.textContent = me.id;

    await me.publish(audio);
    await me.publish(video);

    const subscribeAndAttach = (publication) => {
      if (publication.publisher.id === me.id) return;

      const subscribeButton = document.createElement('button');
      subscribeButton.textContent = `${publication.publisher.id}: ${publication.contentType}`;
      buttonArea.appendChild(subscribeButton);

      subscribeButton.onclick = async () => {
        const { stream } = await me.subscribe(publication.id);

        let newMedia;
        switch (stream.track.kind) {
          case 'video':
            newMedia = document.createElement('video');
            newMedia.playsInline = true;
            newMedia.autoplay = true;
            break;
          case 'audio':
            newMedia = document.createElement('audio');
            newMedia.controls = true;
            newMedia.autoplay = true;
            break;
          default:
            return;
        }
        stream.attach(newMedia);
        remoteMediaArea.appendChild(newMedia);
      };
    };

    room.publications.forEach(subscribeAndAttach);
    room.onStreamPublished.add((e) => subscribeAndAttach(e.publication));
  };
})();
サーバ立ち上げ
Visual Studio Codeをインストール。
先ほど作成したコードが保存されているフォルダをVisual Studio Codeで立ち上げる。拡張機能からLive Serverを検索し、インストール。

右下のGo Liveをクリック。自動でブラウザが立ち上がる。

Port Forwarding接続
PCとAndroidスマホをコードで繋ぐ。Android側のUSBデバッグを有効にする。詳しくはこちら。
PCのChromeでChrome://inspectを入力し、DevTools画面を立ち上げる。

先ほど自動で立ち上がったブラウザのポート番号を入力。
Androidスマホ側のChromeで、先ほど自動で立ち上がったブラウザのURLを入力することで、ビデオ通話が可能となる。
さいごに
初心者なので間違いがあったら申し訳ありません。
少し手間取ったところもありましたが、上手く実装できた時は感動しました😂
チュートリアルに従って基本的な動作の実装を行いましたが、UIとか機能とかの面で色々応用ができそう!
いいね宜しくお願いします🙇♂️