はじめに
Vue.js(Nuxt.js)とRailsで新規開発を行っており、JWTを用いてユーザー新規登録・ログイン・ログアウト等の認証周りを担当したのでここに記しておきます。備忘録。
今回はauthmoduleとdevise_token_authを使用して実装しました。
別々で解説している記事はあったのですが、全体の流れがわかる記事が少なかったので、執筆しました![]()
![]()
この記事が見知らぬ誰かの糧となれば良いなあと思っております〜〜![]()
authmodule公式
devise_token_auth公式
環境
- MacOS
- yarn 1.21.1
- node 12.0.0
- vue 2.6.1
- rails 5.2.4
- ruby 2.6.3
新規登録の流れ
Nuxt側: APIにEメールとパスワードをのせて、HTTPリクエストを送信する。
Rails側: HTTPリクエストを受け取り、devise_token_authでパスワードとEメールで認証をする。
Nuxt側: 認証されると、APIから認証TOKENを送り返す。
Nuxt側: レスポンスヘッダー情報をlocalStrageに保存する
Nuxt側: ユーザをログイン画面からホーム画面へリダイレクトする
Nuxt側: ログイン済みであればログインしていないとアクセスできないページへのアクセスを許可する。ログイン済みでなければ、ログインページにリダイレクトする。
プラグインの導入
Axiosを導入
Nuxt側にaxiosを追加します。
axios公式
$ yarn add @nuxtjs/axios
Auth Moduleを導入
Nuxt側にAuth Moduleも追加します。
$ yarn add @nuxtjs/auth
Vuex用にindex.jsを作成
Auth moduleはVuexを使用して、ユーザの認証情報を管理します。
そこで、Vuex用のindex.jsファイルを用意しておく必要があります。
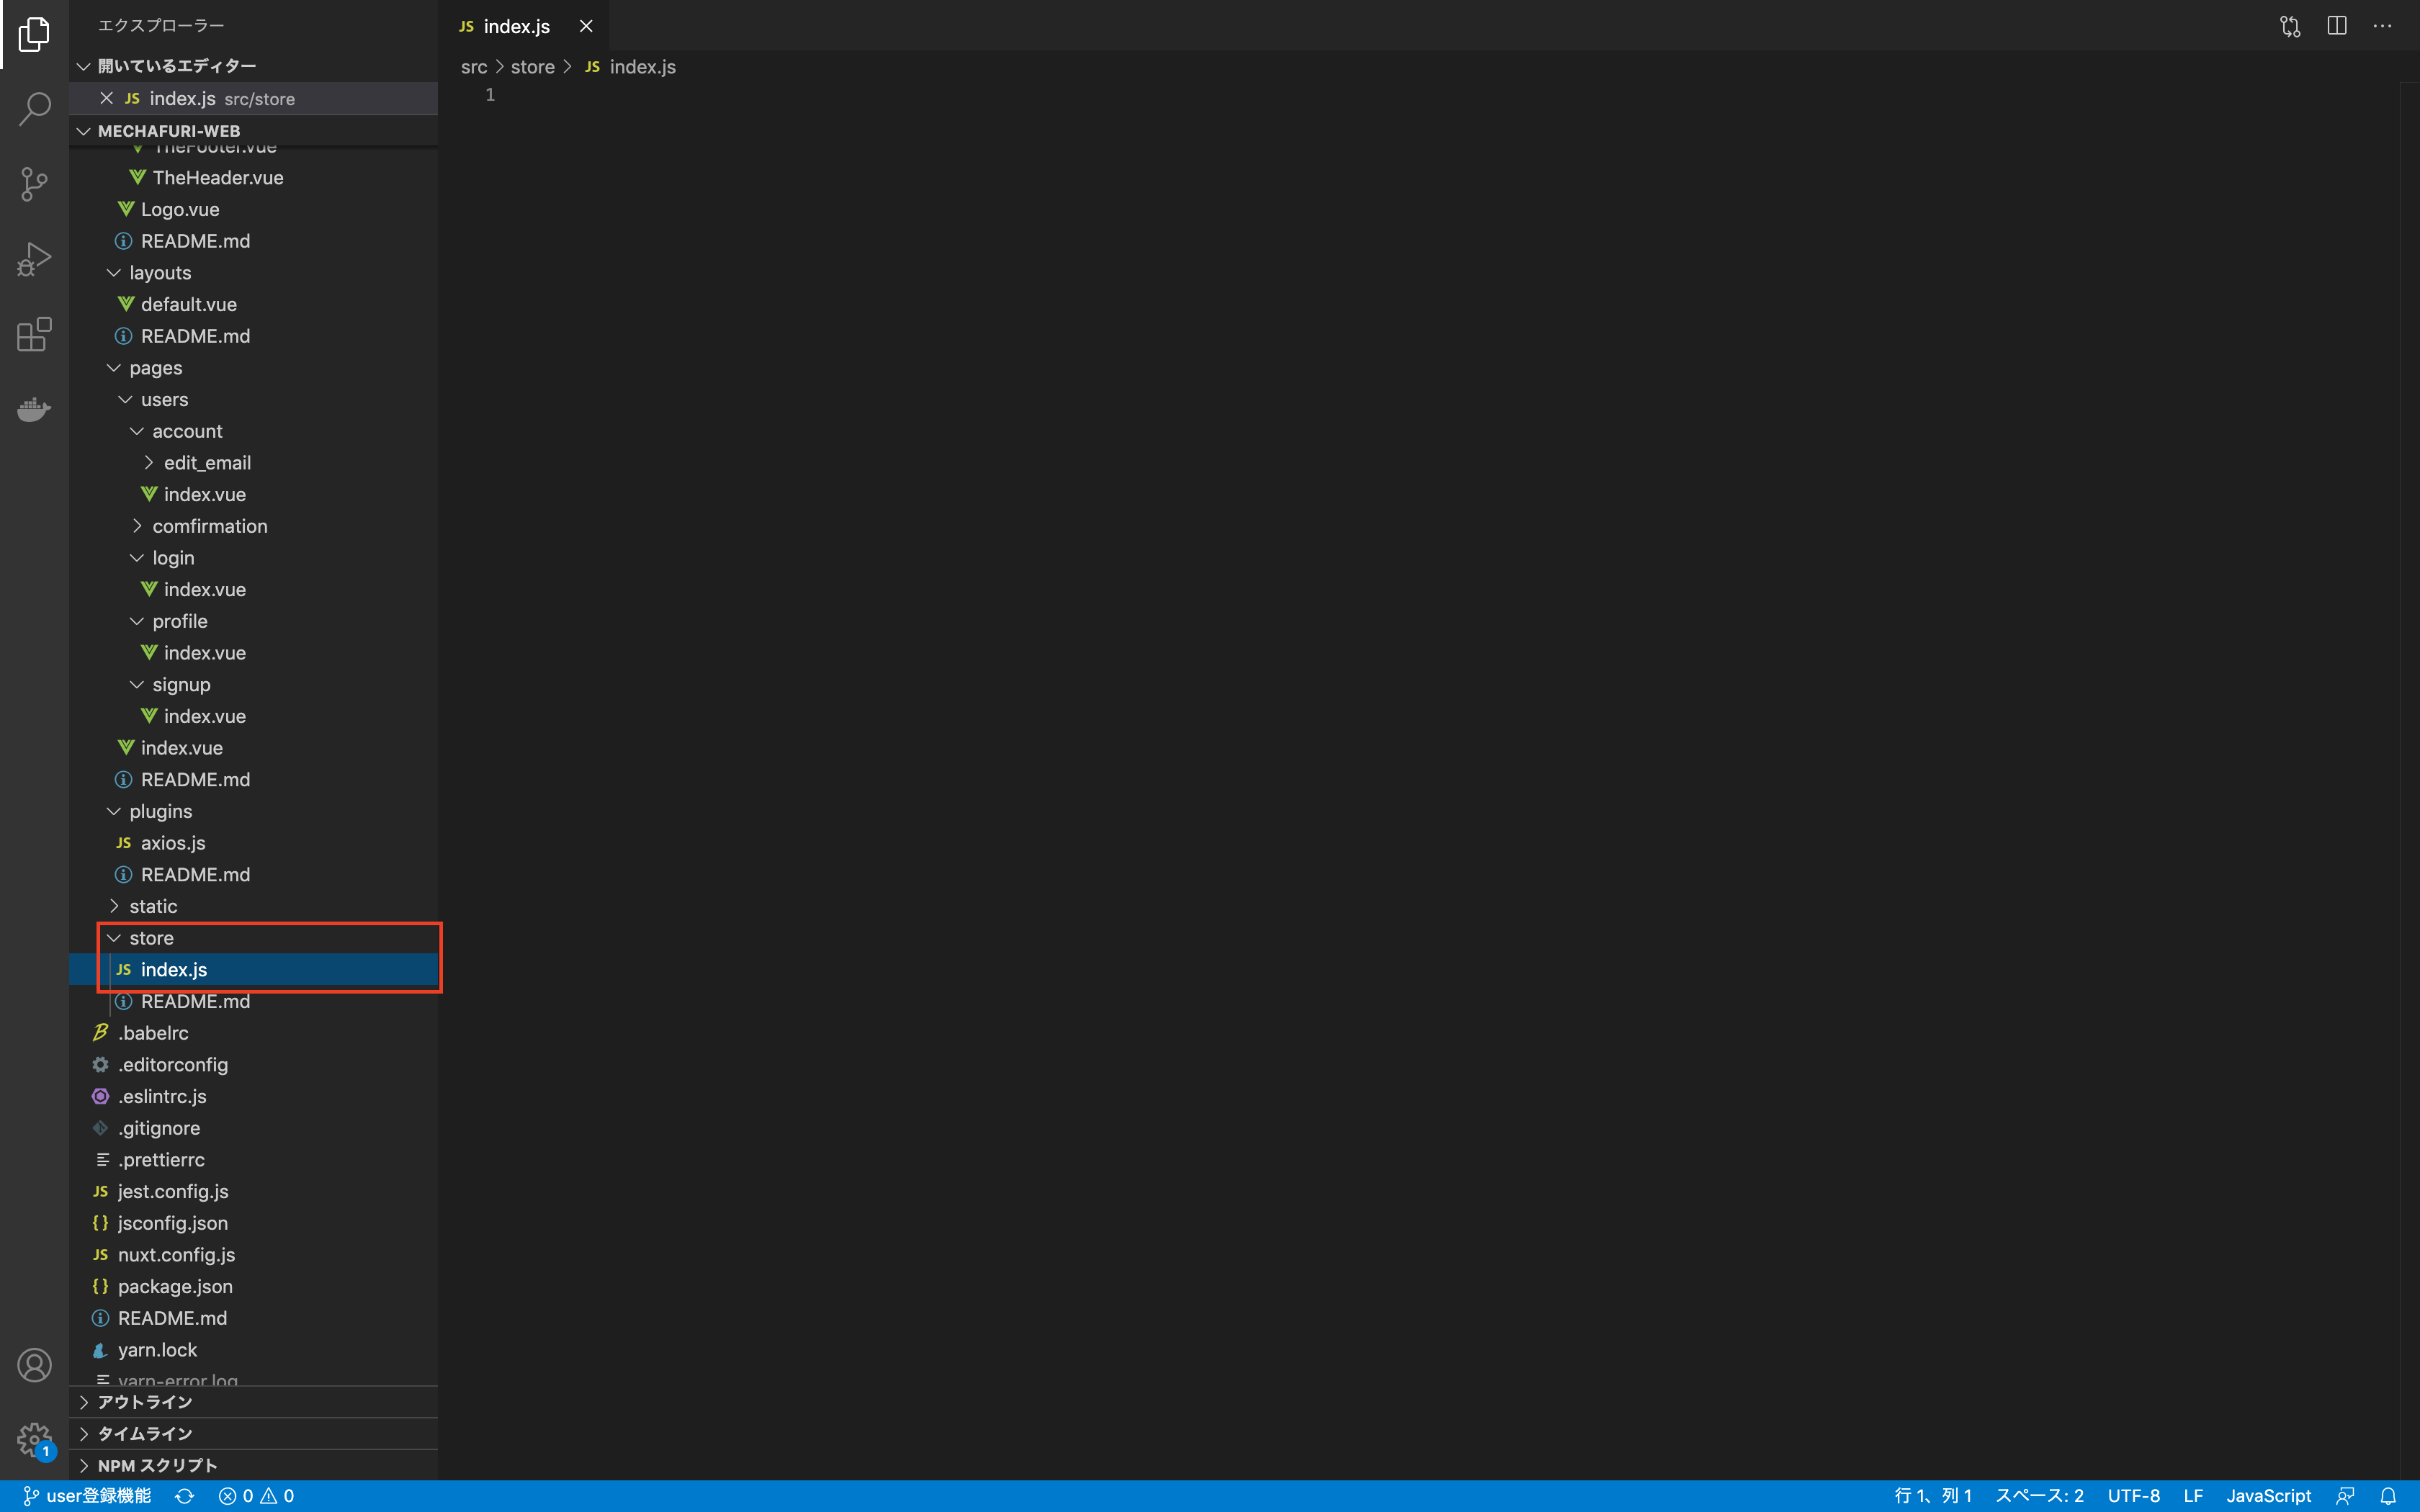
nuxtアプリのルートディレクトリにstoreというファイルが作成されるので、そこにindex.jsという名前のファイルを作成しておきます。index.jsの中はなにも記載しなくて大丈夫です。

Nuxt
nuxt.config.jsにプラグインを記載
追加したaxiosとauthをnuxtアプリに読み込ませます。
modules: [
  '@nuxtjs/axios',
  '@nuxtjs/auth'
]
nuxt.config.jsにauthオプションを記載
authで用意されているオプションを記載していきます。
auth: {
  redirect: {
      login: '/users/login',
      logout: '/',
      callback: false,
      home: '/users/profile',
  },
  strategies: {
    local: {
      endpoints: {
        login: { url: '/api/v1/auth/login', method: 'post', propertyName: 'token' },
        logout: { url: '/api/v1/auth/logout', method: 'post' },
        user: false,
      },
    }
  }
}
redirect
ユーザーのアクションに応じたリダイレクト先のURL設定。
- login:未ログイン時にリダイレクトされる先のURL
- logout:ログアウトした後にリダイレクトされる先のURL
- callback:コールバック用のURL。Oauth認証(SNS認証)等に使われる。
- home:ログイン後にリダイレクトされる先のURL
strategies
Auth Moduleの認証ロジックの設定です。JWTとCookieを使うlocalと、OAuthを使うsocialの2種類の設定ができます。今回はOauth認証は使わないので、socialは記載していません。
- endpoint:どのメソッドが呼ばれた際に、APIのどのエンドポイントに飛ばすかを設定します。例えば、loginメソッドが呼び出されたら、APIにpost: /api/auth/loginにHTTPリクエストを送信します。
ログイン
ログイン画面の実装です。
vuetifyというUIフレームワークを使用しています。template部分は適宜変えてください。
<template>
  <v-container>
    <v-card width="400px" class="mx-auto mt-5">
      <v-card-title>
        <h1 class="display-1">
          ログイン
        </h1>
      </v-card-title>
      <v-card-text>
        <v-form ref="form" lazy-validation>
          <v-text-field
            v-model="email"
            prepend-icon="mdi-email"
            label="メールアドレス"
          />
          <v-text-field
            v-model="password"
            prepend-icon="mdi-lock"
            append-icon="mdi-eye-off"
            label="パスワード"
          />
          <v-card-actions>
            <v-btn
              color="light-green darken-1"
              class="white--text"
              @click="loginWithAuthModule"
            >
              ログイン
            </v-btn>
          </v-card-actions>
        </v-form>
      </v-card-text>
    </v-card>
  </v-container>
</template>

<script>
export default {
  name: 'App',
  auth: false,
  data() {
    return {
      password: '',
      email: '',
    }
  },
  methods: {
    // loginメソッドの呼び出し
    async loginWithAuthModule() {
      await this.$auth
        .loginWith('local', {
         // emailとpasswordの情報を送信
          data: {
            email: this.email,
            password: this.password,
          },
        })
        .then(
          (response) => {
       // レスポンスで返ってきた、認証に必要な情報をlocalStorageに保存
            localStorage.setItem('access-token', response.headers['access-token'])
            localStorage.setItem('client', response.headers.client)
            localStorage.setItem('uid', response.headers.uid)
            localStorage.setItem('token-type', response.headers['token-type'])
            return response
          },
          (error) => {
            return error
          }
        )
    },
  },
}
</script>
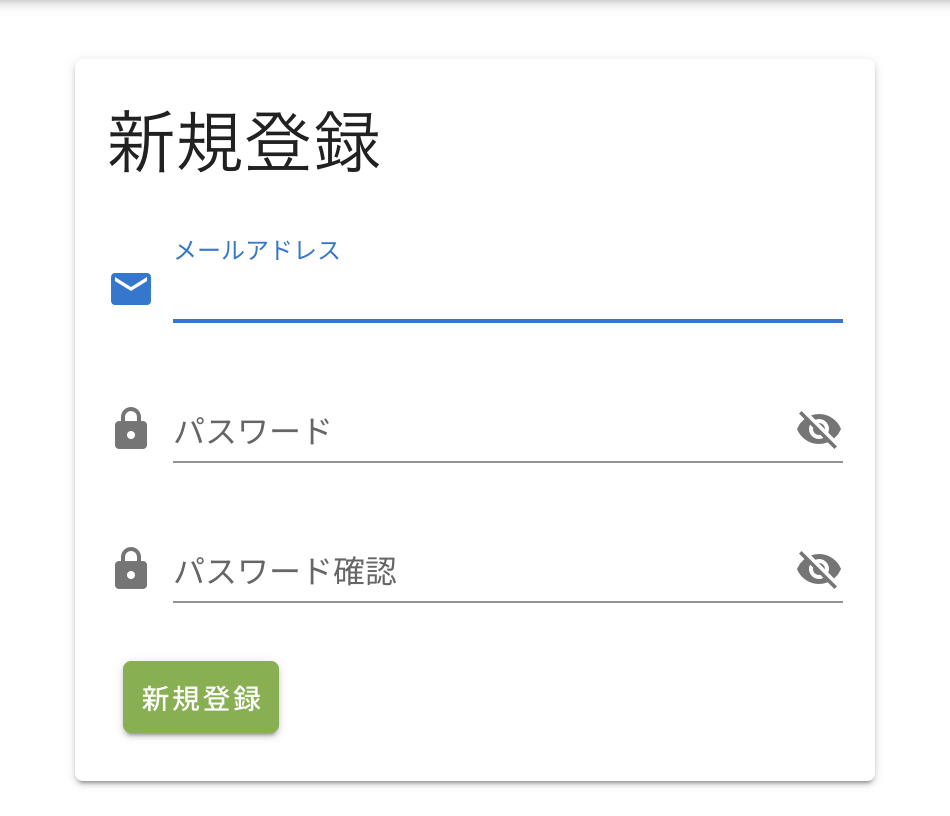
 見た目はこんな感じですね。vuetifyすごい、、、
methodの部分をざっくり説明すると、
1.入力されたemailとpasswordの情報をloginメソッドを用いて、APIに送信する。
2.RailsAPI側からのレスポンスから認証機能に必要な情報(access-token・client・uid・token-type)をlocalStorageに保存する
ということをやっています。他にもやり方はありますし、仕様によっても異なるので、あくまで参考程度に、、、
ただ、APIに入力された情報を送信して、認証機能に必要な情報を保持するというのは基本的に同じです。
この仕組みをある程度理解しておくと、応用できると思います。
新規登録
新規登録画面の実装です。
<template>
  <v-container>
    <v-card width="400px" class="mx-auto mt-5">
      <v-card-title>
        <h1 class="display-1">
          新規登録
        </h1>
      </v-card-title>
      <v-card-text>
        <v-form ref="form" lazy-validation>
          <v-text-field
            v-model="user.email"
            prepend-icon="mdi-email"
            label="メールアドレス"
          />
          <v-text-field
            v-model="user.password"
            prepend-icon="mdi-lock"
            append-icon="mdi-eye-off"
            label="パスワード"
          />
          <v-text-field
            v-model="user.password_confirmation"
            prepend-icon="mdi-lock"
            append-icon="mdi-eye-off"
            label="パスワード確認"
          />
          <v-card-actions>
            <v-btn
              color="light-green darken-1"
              class="white--text"
              @click="registerUser"
            >
              新規登録
            </v-btn>
          </v-card-actions>
        </v-form>
      </v-card-text>
    </v-card>
  </v-container>
</template>

<script>
export default {
  name: 'App',
  auth: false,
  data() {
    return {
      user: {
        password: '',
        email: '',
        password_confirmation: '',
      },
    }
  },
  methods: {
    registerUser() {
      this.$axios.post('/api/v1/auth', this.user).then((response) => {
        window.location.href = '/users/comfirmation'
      })
    },
  },
}
</script>
auth moduleには新規登録のヘルパーメソッドはないので、axiosを使ってメソッドを自作します。
といっても、registerUserが発火されたら新規登録のエンドポイントにメールアドレスやパスワードの必要情報を送信するだけです。

見た目は各自適当に弄ってください!!
ログアウト・退会
<template>
  <v-app>
    <v-container>
      <v-row>
        <v-spacer></v-spacer>
        <v-col cols="12" lg="4">
          <v-row>
            <v-col
              cols="12"
              lg="7"
              class="grey--text text--darken-3 font-weight-bold pa-2 text-h6"
            >
              <p>
                アカウント設定
              </p>
            </v-col>
          </v-row>
          <v-row class="my-5">
            <v-col cols="12" lg="7" class="pa-2">
              <a
                href="/"
                class="grey--text text--darken-3 mb-1"
                @click="$auth.logout()"
              >
                ログアウト
              </a>
            </v-col>
            <v-col cols="12" lg="5" class="pa-2 text-right">
              <font-awesome-icon icon="angle-right" />
            </v-col>
          </v-row>
          <v-divider></v-divider>
          <v-row class="my-5">
            <v-col cols="12" lg="7" class="pa-2">
              <a
                href="#"
                class="red--text text--darken-3 mb-1"
                @click="deleteUser"
              >
                退会
              </a>
            </v-col>
            <v-col cols="12" lg="5" class="pa-2 text-right">
              <font-awesome-icon icon="angle-right" />
            </v-col>
          </v-row>
        </v-col>
        <v-spacer></v-spacer>
      </v-row>
    </v-container>
  </v-app>
</template>

<script>
export default {
  name: 'App',
  data: () => ({}),
  methods: {
    deleteUser() {
      this.$axios
        .delete('api/v1/auth', {
          headers: {
            'access-token': localStorage.getItem('access-token'),
            uid: localStorage.getItem('uid'),
            client: localStorage.getItem('client'),
          },
        })
        .then((response) => {
          this.$auth.logout()
          window.location.href = '/'
        })
    },
  },
}
</script>
ログアウトはauth moduleにヘルパーメソッドがあるので利用しましょう。
クリックと同時に$auth.logout()を発火すれば、完了です。
header内に保存されていた認証情報がすべて削除され、未ログイン状態になります。
退会は新規登録と同様にメソッドを作ります。
axiosでエンドポイントに認証情報を付与して送信します。httpメソッドはdeleteですね。
その後、ログアウトメソッドを実行しとけばエラーにならず、安心です。
簡単ですね。
編集
<template>
  <v-app>
    <v-container>
      <v-card width="400px" class="mx-auto mt-5">
        <v-card-title>
          <h1 class="display-1">
            メールアドレス変更
          </h1>
        </v-card-title>
        <v-card-text>
          <v-form ref="form" lazy-validation>
            <v-text-field
              v-model="user.email"
              prepend-icon="mdi-email"
              label="新しいメールアドレス"
            />
            <v-text-field
              v-model="user.password"
              prepend-icon="mdi-lock"
              append-icon="mdi-eye-off"
              label="パスワード"
            />
            <v-card-actions>
              <v-btn
                color="light-green darken-1"
                class="white--text"
                @click="editEmail"
              >
                保存する
              </v-btn>
            </v-card-actions>
          </v-form>
        </v-card-text>
      </v-card>
    </v-container>
  </v-app>
</template>

<script>
export default {
  name: 'App',
  data() {
    return {
      user: {
        password: '',
        email: '',
      },
    }
  },
  methods: {
    editEmail() {
      this.$axios
        .put('api/v1/auth', this.user, {
          headers: {
            'access-token': localStorage.getItem('access-token'),
            uid: localStorage.getItem('uid'),
            client: localStorage.getItem('client'),
          },
        })
        .then((response) => {
          localStorage.setItem('access-token', response.headers['access-token'])
          localStorage.setItem('client', response.headers.client)
          localStorage.setItem('uid', response.headers.uid)
          localStorage.setItem('token-type', response.headers['token-type'])
          window.location.href = '/'
        })
    },
  },
}
</script>
メールアドレスの編集ページです。見た目はほとんど新規登録・ログイン画面と同じです。
編集は認証情報を渡して、受け取らなければなりません。
リクエストで認証情報を付与して送信する。成功したら受け取った認証情報をlocalStrageに保存する。
理由はアカウント編集すると認証情報が変わるからです。
これで編集もできました。
auth module補足
一連の流れを見ていただいた方ならおわかりかと思いますが、auth moduleはそこまで機能がもりもりではありません。
すべてのメソッドを作ってくれているわけではなく、ある程度は自力で頑張る必要があります。
認証機能の補助輪くらいに考えておいてください!!
ただ、リダイレクト先の指定やloginメソッドなど優秀な機能もありますので、Nuxtで認証機能を実装する方は是非使ってみてください。
他に認証機能で良いプラグインがあれば教えて下さい![]()
![]()
Rails
フロント側(Nuxt側)ばかりやってきましたが、APIが飛ばないとお話になりませんので、バックエンド側(Rails側)もやっていきましょう!!
devise_token_authを導入
Gemfileにdevise_token_authとrack-corsを記載し、bundle installをします。
# ログイン機能
gem 'devise'
gem 'devise_token_auth'

# CORS設定
gem 'rack-cors'
$ rails g devise:install
$ rails g devise_token_auth:install User auth
これで色々ファイルが生成されると思います。
※すでにUserモデルがある方は設定方法が少し変わるので、対処法は公式を読んでください。
DB作成
class DeviseTokenAuthCreateUsers < ActiveRecord::Migration[5.2]
  def change

    create_table(:users) do |t|
      ## Required
      t.string :provider, :null => false, :default => "email"
      t.string :uid, :null => false, :default => ""

      ## Database authenticatable
      t.string :encrypted_password, :null => false, :default => ""

      ## Recoverable
      t.string   :reset_password_token
      t.datetime :reset_password_sent_at
      t.boolean  :allow_password_change, :default => false

      ## Rememberable
      t.datetime :remember_created_at

      # ここを追記 --------------------------------------------
      ## Trackable
      t.integer  :sign_in_count, default: 0, null: false
      t.datetime :current_sign_in_at
      t.datetime :last_sign_in_at
      t.string   :current_sign_in_ip
      t.string   :last_sign_in_ip
      # -----------------------------------------------------

      ## Confirmable
      t.string   :confirmation_token
      t.datetime :confirmed_at
      t.datetime :confirmation_sent_at
      t.string   :unconfirmed_email # Only if using reconfirmable

      ## Lockable
      # t.integer  :failed_attempts, :default => 0, :null => false # Only if lock strategy is :failed_attempts
      # t.string   :unlock_token # Only if unlock strategy is :email or :both
      # t.datetime :locked_at

      ## User Info
      t.string :name
      t.string :nickname
      t.string :image
      t.string :email

      ## Tokens
      t.text :tokens

      t.timestamps
    end

    add_index :users, :email,                unique: true
    add_index :users, [:uid, :provider],     unique: true
    add_index :users, :reset_password_token, unique: true
    add_index :users, :confirmation_token,   unique: true
    # add_index :users, :unlock_token,       unique: true
  end
end
migrateしてDBを作成します。
devise_token_authの設定
DeviseTokenAuth.setup do |config|
  # リクエストごとにトークンを更新するか
  config.change_headers_on_each_request = false

  # トークンの有効期間
  config.token_lifespan = 2.weeks

  # headersの名前対応
  config.headers_names = {:'access-token' => 'access-token',
                          :'client' => 'client',
                          :'uid' => 'uid',
                          :'token-type' => 'token-type' }
end
ここで諸々の設定をします。
トークンの有効期限やheadersの送信名もここで設定します。
class ApplicationController < ActionController::Base
  include DeviseTokenAuth::Concerns::SetUserByToken
  skip_before_action :verify_authenticity_token, if: :devise_controller?
end
APIではCSRFチェックをしないようにapplication_controller.rbをすこしいじったら、
準備完了です。
ルーティング設定
Rails.application.routes.draw do
  devise_for :users

  namespace :api do
    scope :v1 do
      mount_devise_token_auth_for 'User', at: 'auth'
    end
  end
end
公式通りだとこんな感じですね。
リクエストテスト
では実際にリクエストを投げてみましょう。
今回はログイン機能で試してみます。
※email:example@example.com,password:passwordというユーザーが登録されている想定です。

ログイン機能のエンドポイントである/api/v1/auth/sign_inにpostでリクエストを送信します。
Content-Typeはapplication/jsonを選択しておきましょう。
BODYにemailとpasswordの情報をjson形式で付与します。
これでリクエストを投げます。
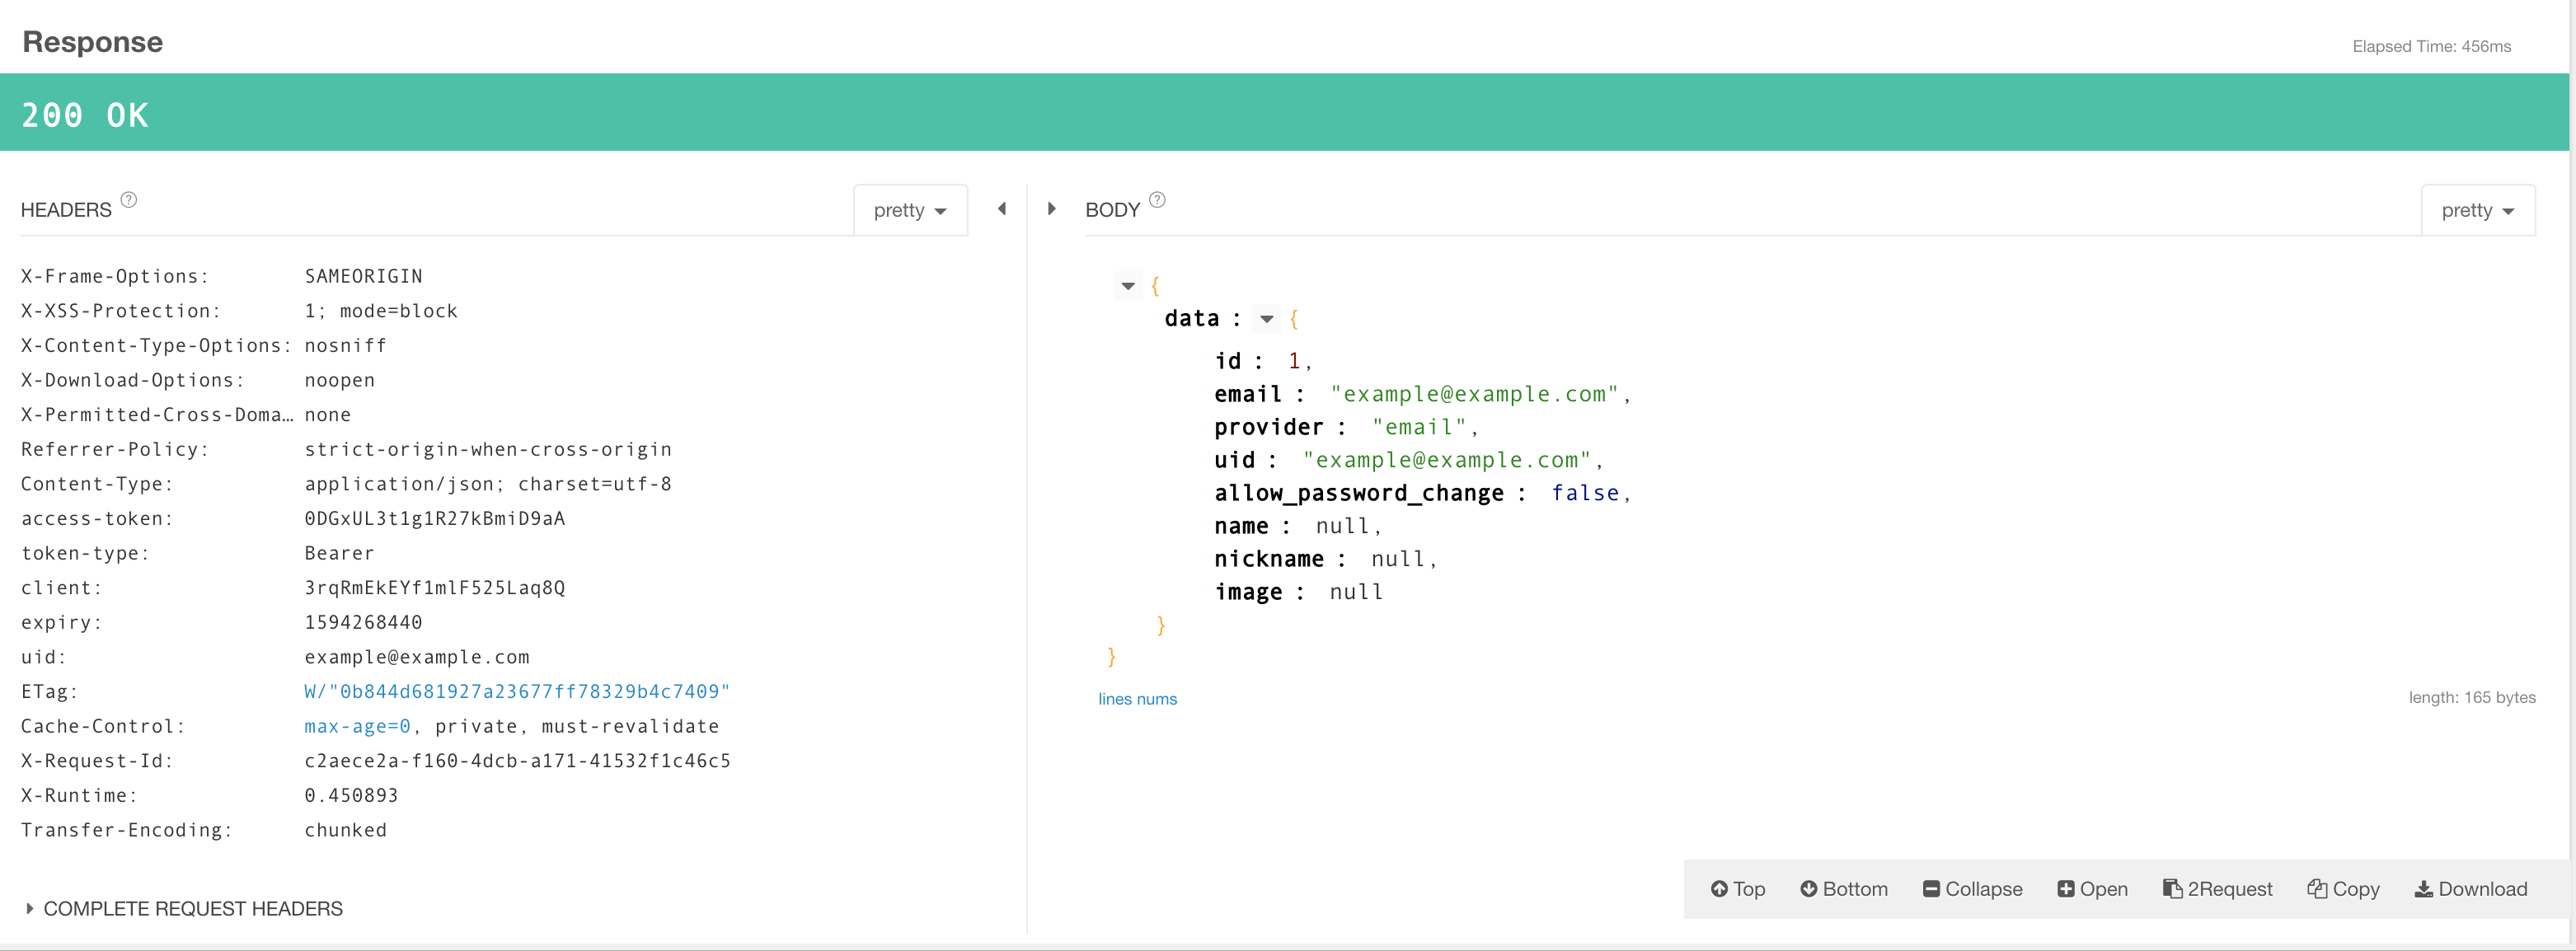
うまく行けばステータスコード200でレスポンスが返ってきます。

こんな感じですね。
新規登録やログアウトも同様です。
エンドポイント、HTTPメッソド、付与情報を変更して、リクエストを送れば、それに応じたレスポンスが返ってくるはずです。
devise_token_auth補足
devise_token_authではdeviseと同じようにbefore_action :authenticate_user!やcurrent_userも使えます。
フロント側で保持しておくべき情報も基本的にはレスポンスで返してくれるので、それを取り出してlocalStrage等で保存しておきましょう。
詳しくは公式を読んでみてください。
devise_token_auth公式
完成!!!
これで完成です!!!長かったですね、、、
フロント側(Nuxt側)もバックエンド側(Rails側)もバッチリだと思います。
もう一度、新規登録を例にとって流れを振り返ります。
Nuxt側: APIにEメールとパスワードをのせて、HTTPリクエストを送信する。
Rails側: HTTPリクエストを受け取り、devise_token_authでパスワードとEメールで認証をする。
Nuxt側: 認証されると、APIから認証TOKENを送り返す。
Nuxt側: レスポンスヘッダー情報をlocalStrageに保存する
Nuxt側: ユーザをログイン画面からホーム画面へリダイレクトする
Nuxt側: ログイン済みであればログインしていないとアクセスできないページへのアクセスを許可する。ログイン済みでなければ、ログインページにリダイレクトする。
これができているはずです。
ログインや退会等のその他の機能も流れは基本的に変わりません!!
最後に
auth moduleとdevise_token_auth別々の解説記事はあったのですが、まとまった記事(流れがわかるような記事)がなかったため、今回執筆しました。
長かった、、、かなり、、、
もしわからない点があれば気軽にコメントしてくださいね〜![]()
![]()