内容
新しいCDKレポ (https://github.com/aws-samples/aws-mlflow-sagemaker-cdk) が出来ていて、SageMakerとMLflowを一発でDeployできそうなので試す。
MLflow初であれば→MLflow 基礎
準備
AWS CDKの設定が終わっている必要があるので、まだの方はこちらから
デプロイされるもの
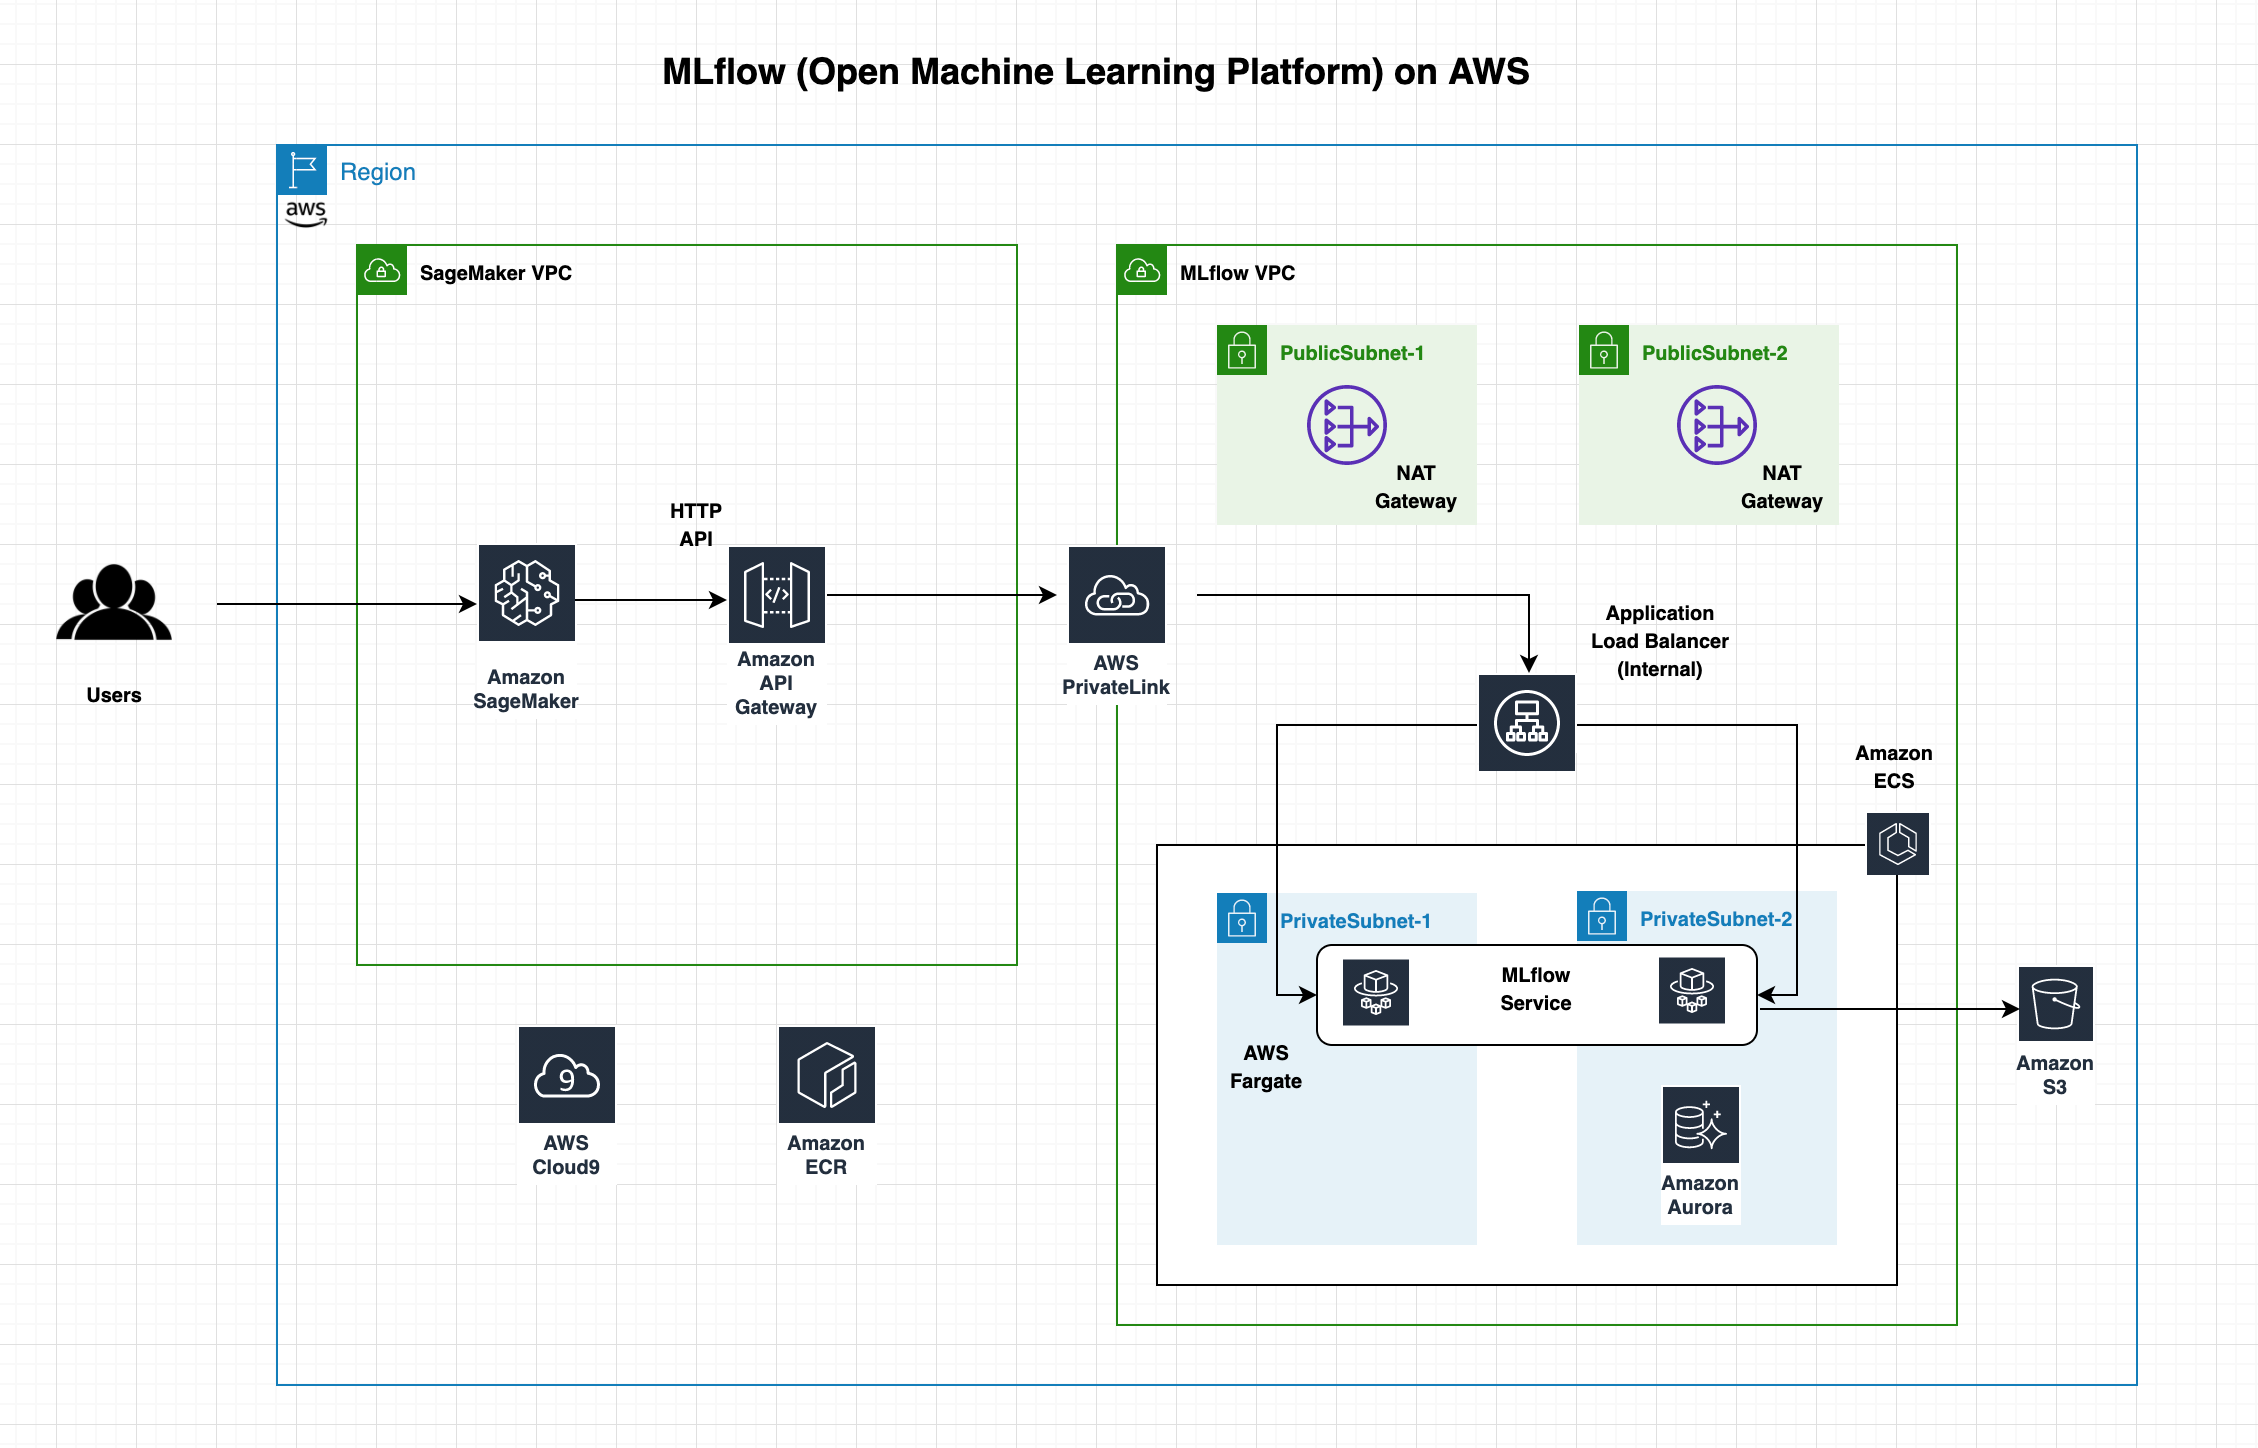
- MLflow
- MLflow用のVPC (SubnetsやPrivateLink、NatGatewayなどもろもろ)
- ECS + Fargate
- MLflowというECS Serviceで起動 (Nginx + mlflowコンテナ)
- AuroraDBをMLflowのデータストアとして利用
- S3をArtifactとして使用
- SageMaker
- SageMaker用のVPC (Subnets、PrivateLinkへの)
- SageMaker
ステップ
1. CDKの準備
git clone https://github.com/aws-samples/aws-mlflow-sagemaker-cdk
cd aws-mlflow-sagemaker-cdk/cdk/singleAccount
npm install
npm run build
cdk bootstrap # すでにBootstrapしてあればいらない
2. Deploy (MLflow + SageMaker) (20分くらい)
(profileで defaultを使う人は、 README通り ./deploy.shでよい。)
AWS_REGION=ap-northeast-1 cdk deploy --all --profile <プロファイル名>
ただし、MLflow UIは、Internalロードバランサーで作成されているので、アクセスは内部からしか出来ない。 (ここは、なんかしらの工夫が必要。 (VPNなど)
3. SageMaker確認
(省略‥)
4. Client VPNを設定 (MLflow UIにアクセスしなければ不要)
今回は、サーバ証明書・クライアント証明書による相互認証を使用します。
4-1. 証明書を作成・準備
git clone https://github.com/OpenVPN/easy-rsa.git
cd easy-rsa/easyrsa3
PKIのInit
./easyrsa init-pki
CA構築
± ./easyrsa build-ca nopass
Using SSL: openssl LibreSSL 2.8.3
Generating RSA private key, 2048 bit long modulus
...........+++
.........................+++
e is 65537 (0x10001)
You are about to be asked to enter information that will be incorporated
into your certificate request.
What you are about to enter is what is called a Distinguished Name or a DN.
There are quite a few fields but you can leave some blank
For some fields there will be a default value,
If you enter '.', the field will be left blank.
-----
Common Name (eg: your user, host, or server name) [Easy-RSA CA]:

CA creation complete and you may now import and sign cert requests.
Your new CA certificate file for publishing is at:
/Users/masato-naka/repos/OpenVPN/easy-rsa/easyrsa3/pki/ca.crt
サーバー証明書とキーを生成
± ./easyrsa build-server-full server nopass
Using SSL: openssl LibreSSL 2.8.3
Generating a 2048 bit RSA private key
........................................+++
............+++
writing new private key to '/Users/masato-naka/repos/OpenVPN/easy-rsa/easyrsa3/pki/easy-rsa-55399.BZw1sP/tmp.NsBTDg'
-----
Using configuration from /Users/masato-naka/repos/OpenVPN/easy-rsa/easyrsa3/pki/easy-rsa-55399.BZw1sP/tmp.zWNqlt
Check that the request matches the signature
Signature ok
The Subject's Distinguished Name is as follows
commonName            :ASN.1 12:'server'
Certificate is to be certified until Jan 24 00:46:30 2024 GMT (825 days)

Write out database with 1 new entries
Data Base Updated
クライアント証明書とキーを生成
± ./easyrsa build-client-full client1.domain.tld nopass
Using SSL: openssl LibreSSL 2.8.3
Generating a 2048 bit RSA private key
...............+++
.............+++
writing new private key to '/Users/masato-naka/repos/OpenVPN/easy-rsa/easyrsa3/pki/easy-rsa-55607.nyYDyK/tmp.P5DBSw'
-----
Using configuration from /Users/masato-naka/repos/OpenVPN/easy-rsa/easyrsa3/pki/easy-rsa-55607.nyYDyK/tmp.sft09h
Check that the request matches the signature
Signature ok
The Subject's Distinguished Name is as follows
commonName            :ASN.1 12:'client1.domain.tld'
Certificate is to be certified until Jan 24 00:46:45 2024 GMT (825 days)

Write out database with 1 new entries
Data Base Updated
ファイルを移動
± mkdir ~/cert_folder/
± cp pki/ca.crt ~/cert_folder/
cp pki/issued/server.crt ~/cert_folder/
cp pki/private/server.key ~/cert_folder/
cp pki/issued/client1.domain.tld.crt ~/cert_folder
cp pki/private/client1.domain.tld.key ~/cert_folder/
cd ~/cert_folder/
AWS ACMへ登録 (server)
aws acm import-certificate --certificate fileb://server.crt --private-key fileb://server.key --certificate-chain fileb://ca.crt --region ap-northeast-1
{
    "CertificateArn": "arn:aws:acm:ap-northeast-1:135493629466:certificate/xxxxxx"
}
AWS ACMへ登録 (client)
aws acm import-certificate --certificate fileb://client1.domain.tld.crt --private-key fileb://client1.domain.tld.key --certificate-chain fileb://ca.crt --region ap-northeast-1

{
    "CertificateArn": "arn:aws:acm:ap-northeast-1:135493629466:certificate/xxxxxxxx"
}
4-2. Client VPNを作成・設定
Client VPN endpointの作成 (Split Tunnelを指定することを奨励)
aws ec2 create-client-vpn-endpoint \
--client-cidr-block 10.10.0.0/22 \ # こちらは、Client VPNが配置されるCidrで、目的VPCのCidrとかぶってはいけない
--server-certificate-arn arn:aws:acm:ap-northeast-1:135493629466:certificate/xxxx \
--authentication-options Type=certificate-authentication,MutualAuthentication={ClientRootCertificateChainArn=arn:aws:acm:ap-northeast-1:135493629466:certificate/xxxx} \
--connection-log-options Enabled=false \
--split-tunnel
{
    "ClientVpnEndpointId": "cvpn-endpoint-xxxx",
    "Status": {
        "Code": "pending-associate"
    },
    "DnsName": "cvpn-endpoint-xxxx.prod.clientvpn.ap-northeast-1.amazonaws.com"
}
VPN endpointとSubnetを連携 (MLflowのSubnetは今回2つなので、2つ連携)
aws ec2 associate-client-vpn-target-network \
--client-vpn-endpoint-id cvpn-endpoint-xxxx\ # うえで取得したendpoint-id
--subnet-id subnet-xxxx1 # MLflowがいるSubnetを指定
aws ec2 associate-client-vpn-target-network \
--client-vpn-endpoint-id cvpn-endpoint-xxxx\ # うえで取得したendpoint-id
--subnet-id subnet-xxxx2 # MLflowがいるSubnetを指定
クライアントがアクセスできるようにAuthorizeする
aws ec2 authorize-client-vpn-ingress \
--client-vpn-endpoint-id cvpn-endpoint-xxx \
--target-network-cidr 10.0.0.0/16 \ # 今回はMLflow VPCのCidrをそのまま指定
--authorize-all-groups
{
    "Status": {
        "Code": "authorizing"
    }
}
設定完了
4-3. Client設定ファイルを作成
Client設定をAWSのコンソールからダウンロードする
ダウンロードしたファイルの以下の2つを変更:
-
ファイルの末尾にCertを加える
<cert> ※最初に作成したclient1.domain.tld.crt(-----BEGIN CERTIFICATE-----~-----END CERTIFICATE-----)の内容※ </cert> <key> ※最初に作成したclient1.domain.tld.key(-----BEGIN PRIVATE KEY-----~-----END PRIVATE KEY-----)の内容※ </key> -
DNSの前にランダムな文字列を追加
cvpn-endpoint-xxxx.prod.clientvpn.ap-northeast-1.amazonaws.com->test.cvpn-endpoint-xxxx.prod.clientvpn.ap-northeast-1.amazonaws.com
4-4. Client VPNのクライアントを設定
https://aws.amazon.com/vpn/client-vpn-download/からダウンロードして、インストール。
ファイル>プロファイルを追加から上で作成したClient設定ファイルをインポート
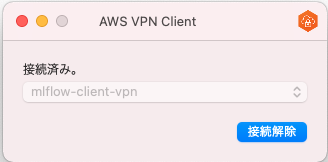
接続。
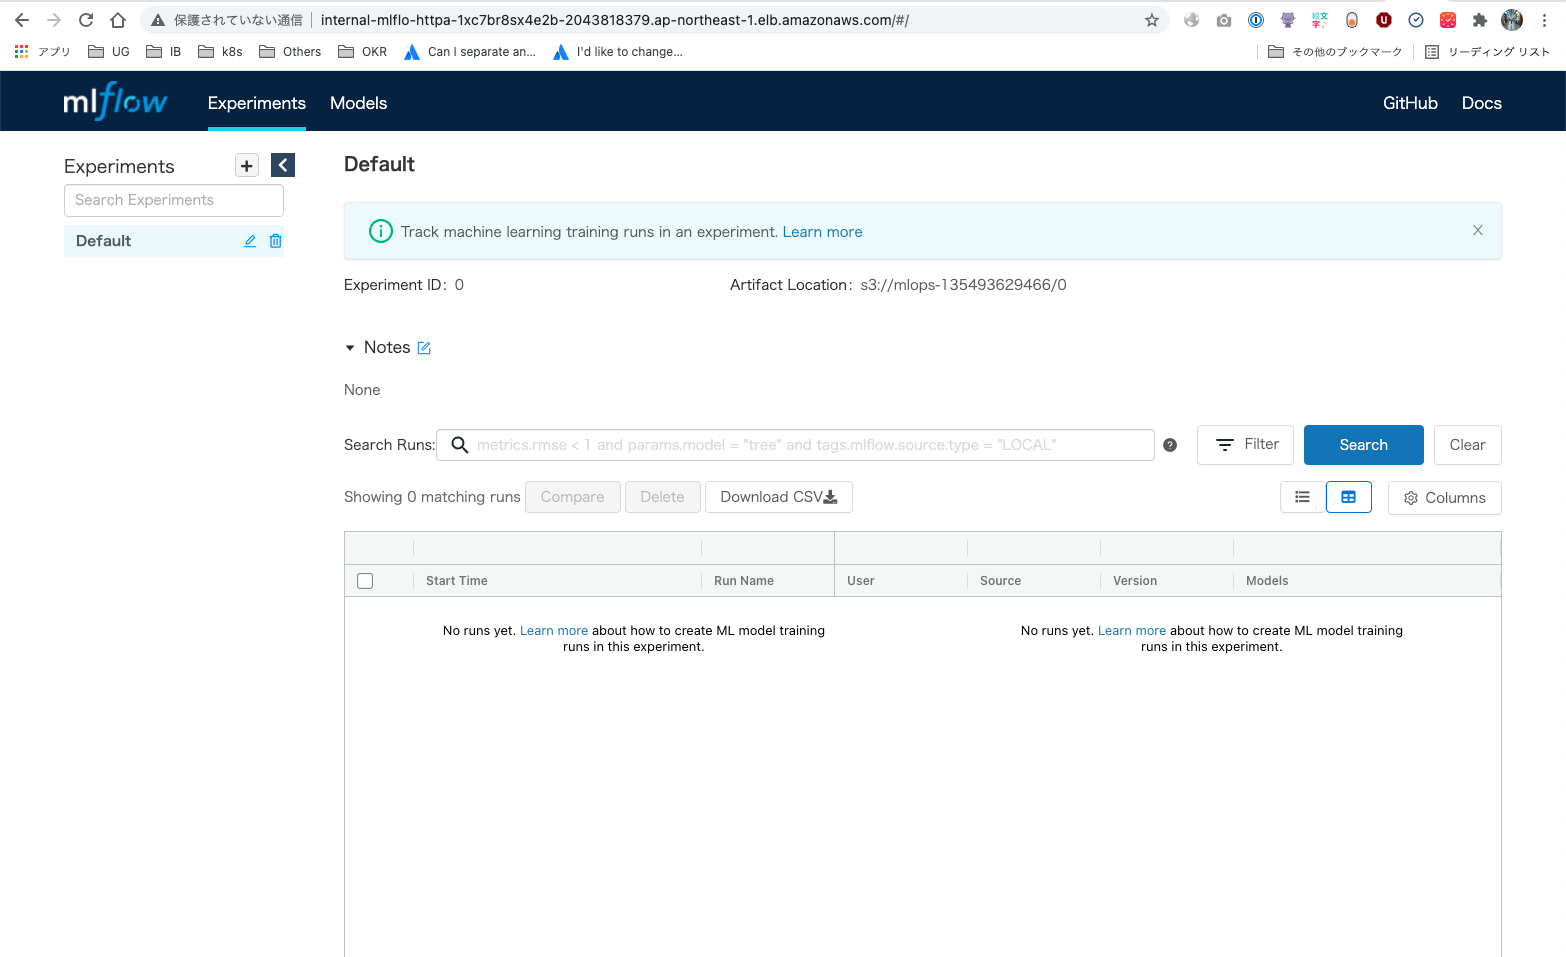
4. MLflowを確認
前のステップでClient VPNを設定していないとアクセスできない!
ローカルからVPN越しにinternal loadbalancerへ接続。
5. Destroy MLflow + SageMaker
aws-mlflow-sagemaker-cdkのディレクトリに戻る
cd aws-mlflow-sagemaker-cdk/cdk/singleAccount
削除
AWS_REGION=ap-northeast-1 cdk destroy --all --profile <プロファイル名>
5. Delete Client VPN
2つのSubnetsをdisassociateする
aws ec2 disassociate-client-vpn-target-network \
--client-vpn-endpoint-id cvpn-endpoint-xxx \
--association-id cvpn-assoc-xxxxx
{
    "AssociationId": "cvpn-assoc-xxxx",
    "Status": {
        "Code": "disassociating"
    }
}
aws ec2 disassociate-client-vpn-target-network \
--client-vpn-endpoint-id cvpn-endpoint-xxx \
--association-id cvpn-assoc-xxxx
{
    "AssociationId": "cvpn-assoc-xxxx",
    "Status": {
        "Code": "disassociating"
    }
}
client VPNを削除する
aws ec2 delete-client-vpn-endpoint \
--client-vpn-endpoint-id cvpn-endpoint-xxx
{
    "Status": {
        "Code": "deleting"
    }
}
acmを削除
aws acm delete-certificate --certificate-arn arn:aws:acm:ap-northeast-1:xxxx:certificate/xxxx # for server
aws acm delete-certificate --certificate-arn arn:aws:acm:ap-northeast-1:xxxx:certificate/xxxx # for client
まとめ
- https://github.com/aws-samples/aws-mlflow-sagemaker-cdk をつかって一発でSageMakerとMLflowをデプロイ出来た
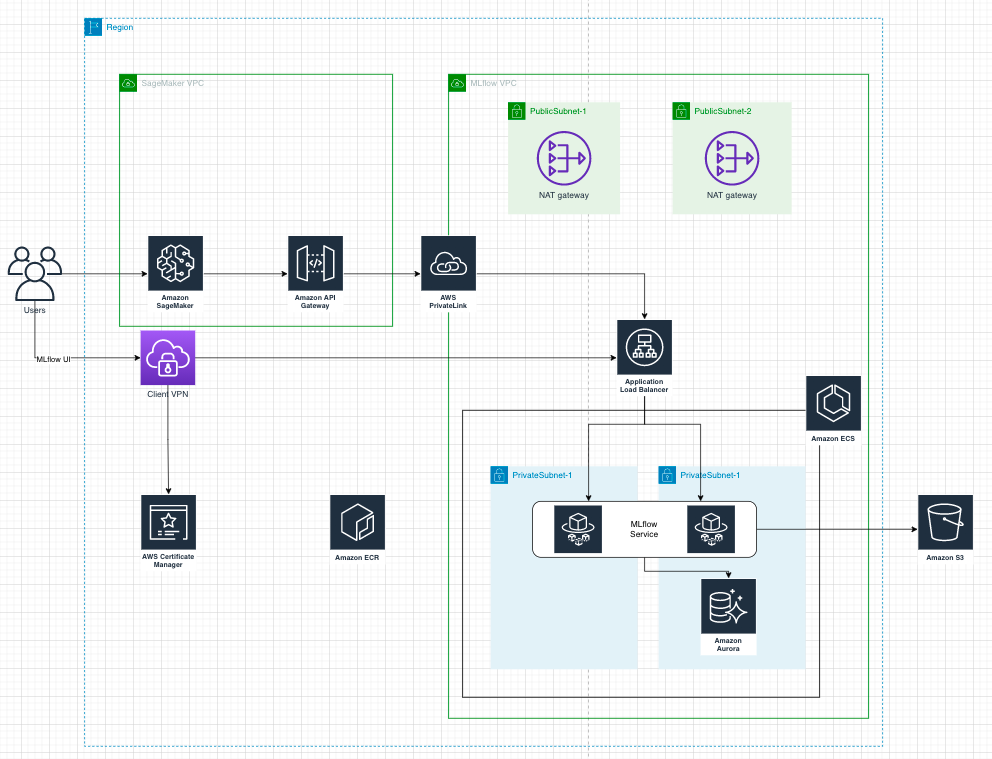
- Client VPNを使ってinternalに作成されたMLflow UIにもアクセスできるようになった <- このステップはマニュアルなコマンドが多いので、CDK作るかもっと簡単に作成できるようにしたい
最終的に出来たアーキテクチャ図はこちら (Client VPNを追加)