はじめに
KubernetesのYaml管理関連でよく出てくるHelmとKustomize。 やってることは似て非なるもの。比較してみた結果をまとめておく。
- Helm:https://helm.sh/
- Kustomize:https://kustomize.io/
比較
比較はしてみたものの実は結構違うものなので、比較対象にそもそもならないかもという気持ちを置いて比較してみる。
Helm (Package manager)
-
メリット
- 配布しやすい
- テンプレートのみでなく、Hook、Rollback、Packagingなどがある
- 拡張性がある
- if文やloopが可能
- helpersに自分で定義をしたものをテンプレート内で使用できる
- すでに公開されているChartsが豊富にある
- Values.yamlによって更新できる部分を限定できる
- lintやテスト機能がある
-
デメリット
- テンプレートの可読性が低い
- シンプルなデプロイにはオーバーヘッドとなる
- 抽象レイヤーが追加されることで学習コストが増える
- 既存のChartで変更がサポートされてない場合は、Chartの更新が必要になる
-
複数環境へのデプロイ方法
- value fileを環境ごとに準備して環境固有の値を与える
Kustomize
- メリット
- kubectlに入っている kubernetes-1-14-release-announcement
- すべてがプレーンyamlなためvalidationが楽
- シンプルにYamlパッチをしてくれる
- Overlaysでの変更は比較的自由
- デメリット
- kubectlに入っているが、1.21前だと最新系が使えない (v2.0.3) (CHANGELOG-1.21.md#kustomize-updates-in-kubectl)
- BaseやOverlaysの変更が実際に最終的にどんな変更になるのかが変更ファイルからのみだと分かりづらい
- DRY原則に則っていない
- Package Managerではないため、ある時点でのVersionを見るにはGitなどのVCSで特定のVersionに戻るしかない
- 複数環境へのデプロイ方法
-
overlays/<環境>に環境ごとに変更する部分を書いてbaseを上書きする
-
Helmとkustomize作成の比較
Helm作成のステップ
-
helm create <name>で初期化 例:helm create helm-example(以下はhelm-exampleを前提に進める) -
helm-exampleというディレクトリの中に生成されたtemplatesやValues.yamlを自分のアプリケーションのデプロイしたいものに調整する。-
helpersを利用した例
templates/_helpers.tpl{{/* Create a default fully qualified app name. We truncate at 63 chars because some Kubernetes name fields are limited to this (by the DNS naming spec). If release name contains chart name it will be used as a full name. */}} {{- define "helm-example.fullname" -}} {{- if .Values.fullnameOverride }} {{- .Values.fullnameOverride | trunc 63 | trimSuffix "-" }} {{- else }} {{- $name := default .Chart.Name .Values.nameOverride }} {{- if contains $name .Release.Name }} {{- .Release.Name | trunc 63 | trimSuffix "-" }} {{- else }} {{- printf "%s-%s" .Release.Name $name | trunc 63 | trimSuffix "-" }} {{- end }} {{- end }} {{- end }}templates/deployment.yamlmetadata: name: {{ include "helm-example.fullname" . }} -
values.yamlを利用した例
values.yamlnginx: image: repository: nginx pullPolicy: IfNotPresent tag: ""templates/deployment.yaml... spec: template: spec: containers: - name: nginx image: "{{ .Values.nginx.image.repository }}:{{ .Values.nginx.image.tag | default "latest" }}" ...
-
-
調整してから実際にKubernetesにDeployする前に
dryrun機能をつかって準備したYamlファイルや変数などが正しいかどうかチェックするhelm install helm-example --debug --dry-run ./helm-example -
Lintのチェック
helm lint helm-example -
Kubernetesクラスタへインストール (namespaceを指定したい場合は、
-n <namespace>をつける)helm install helm-example --debug ./helm-example -
インストールされたhelmのチェック
helm ls -
インストールされたHelmアプリケーションに対してテスト (
test以下に何をテストするか自分で書く必要がある。test用のPodが立ち上がってtest以下に書かれたテストが実行される。)helm test helm-example -
パッケージ (開発が終わったらパッケージ化する)
helm package helm-examplehelm-example-0.1.0.tgzが作成される。 -
Chartを公開する (今回はGithub RepoをChart Repoとして使用 例: https://github.com/nakamasato/helm-charts-repo)
helm repo index ./ --url https://nakamasato.github.io/helm-charts-repoこれで、
index.yamlが作成される。上のステップで作成されたhelm-example-0.1.0.tgzと合わせてchart repoにPushする -
作成したRepoを追加
helm repo add nakamasato https://nakamasato.github.io/helm-charts-repo
helm repo update # update the repository info
自分のチャートを探して見つかることを確認
helm search repo naka -
Chartをインストール
helm install example-from-my-repo nakamasato/helm-example -
Chart をEnvごとに変えてインストール
values-prod.yamlreplicaCount: 2 nginx: image: repository: nginx pullPolicy: IfNotPresent tag: "1.15.2"helm upgrade -f values-prod.yaml helm-example nakamasato/helm-example -n helm-prod
Kustomize作成のステップ
-
ディレクトリの作成 (今回はディレクトリを
kustomize-exampleとする)mkdir -p kustomize-example/{base,overlays/dev,overlays/prod} && cd kustomize-example生成されたディレクトリを確認:
tree . ├── base └── overlays ├── dev └── prod 4 directories, 0 files -
baseに必要なリソースのYamlファイルを作成し、kustomization.yamlでそれらを指定する。-
commonLabelsはkustomizeで展開されるすべてのリソースにつけるラベル -
resourcesには、必要なyamlをリストで渡す -
configMapGeneratorやsecretGeneratorを必要に応じて使う (詳細参照: Secrets and ConfigMaps
)
Fileからconfigmapを作成してconfigmap名の最後にhashをつけてくれるので、configmapの変更でも依存しているDeploymentなどをRolloutすることができる。
例:
kustomization.yamlcommonLabels: app: kustomize-example resources: - deployment.yaml - configmap.yaml - service.yaml - secret.yaml configMapGenerator: - name: kustomize-example-nginx files: - nginx.conf -
-
overlaysを環境ごとに作り (今回の例では
devとprod)、baseを書き換える部分を書く-
例: イメージを環境ごとに書き換える
overlays/dev/kustomization.yamlnamespace: kustomize-dev bases: - ../../base images: - name: nginx newName: nginx newTag: v1.15.2 -
例: replicaの数を書き換える.
deployment.yamlをoverlaysに追加して、kustomization.yamlでpatchesに追加overlays/prod/kustomization.yaml... patches: - deployment.yamloverlays/prod/deployment.yamlapiVersion: apps/v1 kind: Deployment metadata: name: kustomize-example spec: replicas: 2
-
-
アプリケーションのデプロイ
-
dev:
kubectl apply -k overlays/dev -
prod:
kubectl apply -k overlays/prod
-
CD
ArgoCDはhelmもkustomizeも対応しているので試してみる
Helmの場合のApplication設定
サンプルコード: https://github.com/nakamasato/kubernetes-training/tree/master/helm-vs-kustomize/argocd/helm
-
spec.source.repoURLとspec.source.pathとtargetRevisionに作成したHelm Chartのコードレポ, Dir, Revisionをそれぞれ指定する。直接Chart repositoryから持ってくるわけではない。 -
spec.source.helm.valueFilesにこの環境で使いたいvalue fileを指定する。今回は、value-dev.yaml(上で指定したDirにある必要がある。コマンドラインで渡すようにChart Repo + value fileで指定できたらいいなと思った) - その他destinationとsyncPolicyはHelmの場合とkustomizeの場合で関係ないので割愛
apiVersion: argoproj.io/v1alpha1
kind: Application
metadata:
  name: helm-dev
  namespace: argocd
  finalizers:
    - resources-finalizer.argocd.argoproj.io
spec:
  project: helm

  source:
    repoURL: https://github.com/nakamasato/kubernetes-training.git
    targetRevision: master
    path: helm-vs-kustomize/helm-example/helm-example
    helm:
      releaseName: helm-dev
      valueFiles:
        - values-dev.yaml

  destination:
    server: https://kubernetes.default.svc
    namespace: helm-dev

  syncPolicy:
    automated:
      prune: true
      selfHeal: true
    syncOptions:
      - CreateNamespace=true
KustomizeのApplication設定
サンプルコード: https://github.com/nakamasato/kubernetes-training/tree/master/helm-vs-kustomize/argocd/kustomize
-
spec.source.repoURL,spec.source.targetRevision,spec.source.pathにそれぞれkustomizationのRepo、Regision, Pathを書く。 - その他destinationとsyncPolicyはHelmの場合とkustomizeの場合で関係ないので割愛
apiVersion: argoproj.io/v1alpha1
kind: Application
metadata:
  name: kustomize-dev
  namespace: argocd
  finalizers:
    - resources-finalizer.argocd.argoproj.io
spec:
  project: kustomize

  source:
    repoURL: https://github.com/nakamasato/kubernetes-training.git
    targetRevision: master
    path: helm-vs-kustomize/kustomize-example/overlays/dev

  destination:
    server: https://kubernetes.default.svc
    namespace: kustomize-dev

  syncPolicy:
    automated:
      prune: true
      selfHeal: true
    syncOptions:
      - CreateNamespace=true
Example: 同じApplicationを複数環境 (devとprod)にhelmとkustomizeを用いて、ArgoCDからDeployする。
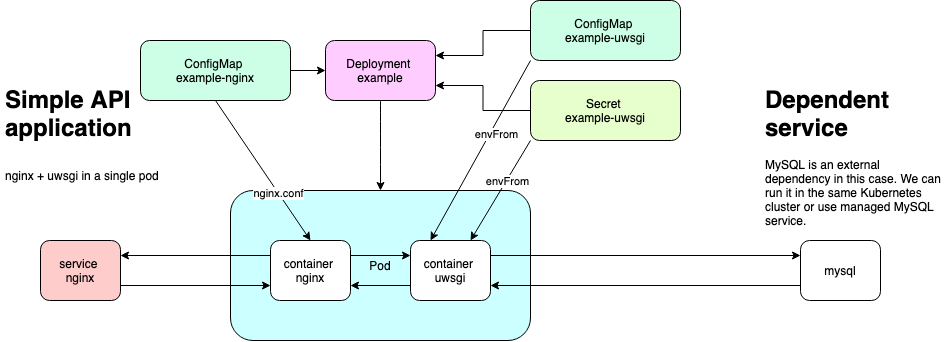
デプロイする内容は以下のような単純なApplication (今回はHelmとKustomizeの比較がメインなのでPasswordは丸見え状態+ちょっとめんどくさがってMulti-containersにした..)
-
ArgoCDのインストール (v2.0.3)
kubectl create namespace argocd kubectl apply -n argocd -f https://raw.githubusercontent.com/argoproj/argo-cd/v2.0.3/manifests/install.yaml -
Prepare application dependency (Deployment and Service for MySQL)
kubectl create ns database; kubectl -n database apply -f https://raw.githubusercontent.com/nakamasato/kubernetes-training/master/helm-vs-kustomize/dependencies/mysql/mysql.yaml -
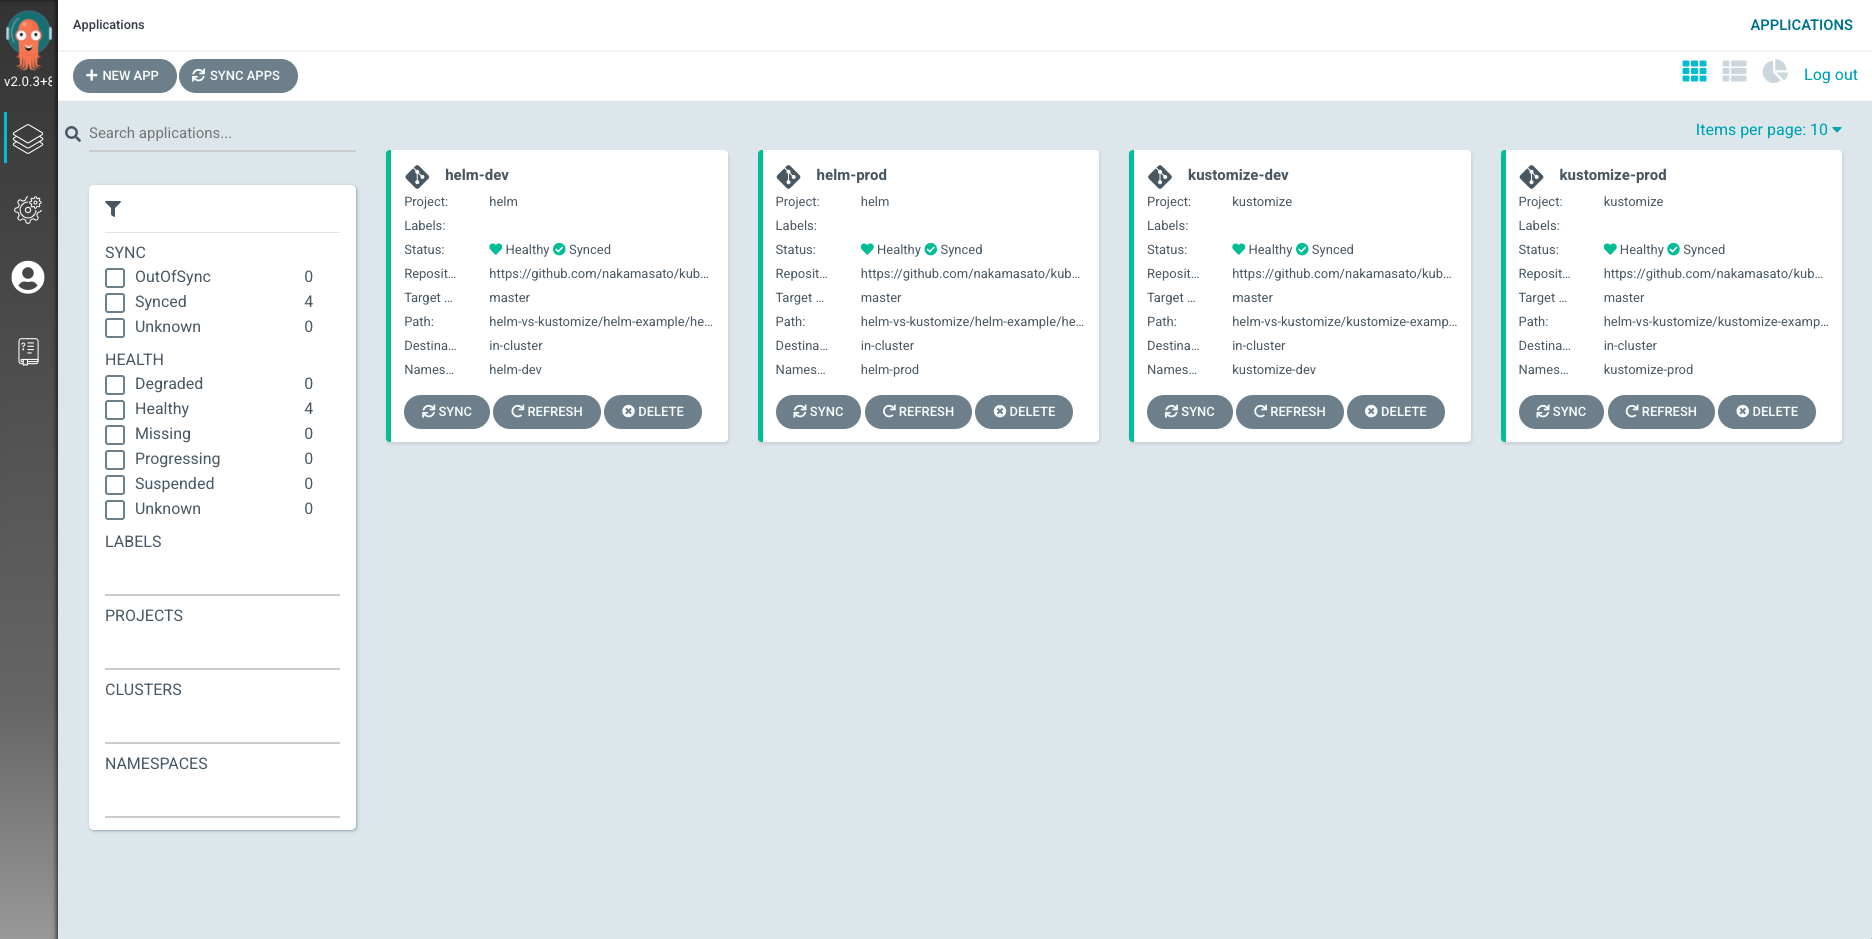
HelmでConfigurationしたArgoCD Applicationのアプライ
argocd/helmの中身は、
helmというなのArgoProjectとhelm-devとhelm-prodというApplication. (サンプルコード: https://github.com/nakamasato/kubernetes-training/tree/master/helm-vs-kustomize/argocd/helm)kubectl apply -f argocd/helm -
KustomizeでConfigurationしたArgoCD Applicationのアプライ
argocd/kustomizeの中身は、
kustomizeというなのArgoProjectとkustomize-devとkustomize-prodというApplication. (サンプルコード: https://github.com/nakamasato/kubernetes-training/tree/master/helm-vs-kustomize/argocd/kustomize)kubectl apply -f argocd/kustomize -
確認
-
ArgocdのDefaultのSecretを取得
kubectl get secret argocd-initial-admin-secret -n argocd -o jsonpath='{.data.password}' | base64 --decode -
ArgoCDをPortForwardして確認
kubectl port-forward svc/argocd-server 8080:80 -n argocd
-
感想
一度Chartを作ってしまえば、Helmを使って開発するのが良さそうな気がした。
良さそうなところ:
- 開発しているアプリケーションのHelm Chartを作成することで配布が楽
- ArgoCDのようにHelm対応しているCDもあるため、Kustomizeとリリース自体はほぼ変わらない
- パッケージマネージャなので、アプリケーションのYamlを含めたVersion参照ができる
- 大規模なYaml変更が必要な場合はChartのVersion更新が必要になるが、その場合のみReviewをすればよくなる
- 環境ごとの存在するYamlファイルが減らせる (values.yamlだけでいい)
検討が必要なところ:
-
Helmでやる場合、Secretをどう管理するかはよくわかってない。 kustomizeの場合はsealed-secretsを使ってGithub Repoに入れたりできるが、Chartのコード中に入れるのは微妙な感じ?
その他:
-
kustomizeのConfigMapGeneratorやSecretGeneratorが便利なのでそれが使えなくなるのはちょっと痛手。

