はじめに
みなさんは、Duration型 をご存知でしょうか?
自分は、つい先日、初めて知りました(後述する Stopwatch クラスを作る際に、たまたま見つけた)。
iOS 16.0 から、macOS 13.0 からサポートされた 新しい型で、TimeInterval型を超高精度にしたような型となっています。
TimeInterval型とは
おさらいになりますが、
TimeInterval型の実態は、単なるDouble型です。
つまり、浮動小数点の整数部と少数部で、経過秒を表現します。
例えば、整数部=3、少数部=0.33であれば、(浮動小数点そのまんまの)3.33秒を意味します。正負符号は重要な意味を持ちます。
また、Date型と密接に関係していて、次のような演算が可能です。
- Date - Date = TimeInterval
(引き算演算子は標準には無く、Date.timeIntervalXXX を使う) - Date + TimeInterval = Date
- Date - TimeInterval = Date
これに対して、
Duration型とは
Duration型は 経過秒を、整数部 Int64 と 少数部($10^{-18}$単位の)UInt64 で保持します。
例を挙げると、3.33秒の場合、
整数部=3、少数部=330_000_000_000_000_000という値になります。
Double型と比べて高い精度であることが分かると思います。
そんなDuration型ですが、値の設定 / 取り出し が面白いと感じました。
// どれも 3.33秒を設定
let d0 = Duration(secondsComponent: 3, attosecondsComponent: Int64(0.33 * 1e18))
let d1 = Duration.seconds(3.33)
let d2 = Duration.seconds(3) + .milliseconds(330)
print(d0)
// 3.33 seconds
print(d1.components)
// (seconds: 3, attoseconds: 330000000000000000)
print(d2.formatted(.time(pattern: .hourMinuteSecond(padHourToLength: 2, fractionalSecondsLength: 3))))
//00:00:03.330
print(d0.formatted(.units(allowed: [.seconds, .milliseconds], width: .narrow)))
//3秒 330ms
 print(d1.formatted(.units(allowed: [.seconds, .milliseconds], width: .wide)))
//3秒 330ミリ秒
時分秒変換もやってくれます。
let d3 = Duration.seconds(195448.3635906)
print(d3.formatted(.units(allowed: [.days, .hours, .minutes, .seconds, .milliseconds], width: .abbreviated)))
//2日 6時間 17分 28秒 364 ms
print(d3.formatted(.units(allowed: [.hours, .minutes, .seconds, .milliseconds], width: .wide)))
//54時間 17分 28秒 364ミリ秒
print(d3.formatted(.units(allowed: [.minutes, .seconds, .milliseconds], width: .narrow)))
//3,257分28秒364ms
詳しい内容は、公式リファレンスを参照していただきたい。
今回の本題は次のStopwatchクラス です。
Stopwatchクラス
C#には標準でStopwatchクラスが提供されているが、Swiftには存在しないので 自作しました。
使い方はほぼ同じです。
経過時間を、前述したDuration型で取得できるelapsedDurationプロパティも付けました。
let stopwatch = Stopwatch()
stopwatch.start()
Thread.sleep(forTimeInterval: 10) // Sleep 10s
stopwatch.stop()

// Get the elapsed time as a Duration value.
let duration = stopwatch.elapsedDuration

// Format and display the duration value.
let elapsedTime = duration.formatted(.units(allowed: [.seconds, .milliseconds], width: .narrow))
print("Run Time: \(elapsedTime)")
//Run Time: 10秒5ms
実装は極々簡単なため、内容の説明は省略します。
import Foundation

class Stopwatch {
    private var _startDate: Date? = nil
    private var _elapsedDuration: TimeInterval = 0
    private(set) var isRunning: Bool = false
    init() { }
    func reset() {
        _startDate = nil
        _elapsedDuration = 0
        isRunning = false
    }
    static func startNow() -> Stopwatch {
        let stopwatch = Stopwatch()
        stopwatch.start()
        return stopwatch
    }
    func start() {
        guard !isRunning else { return }
        _startDate = .now
        isRunning = true
    }
    func restart() {
        _startDate = .now
        _elapsedDuration = 0
        isRunning = true
    }
    func stop() {
        guard isRunning else { return }
        if let startDate = _startDate {
            let elapsedPeriod = -startDate.timeIntervalSinceNow
            _elapsedDuration += elapsedPeriod
            _startDate = nil
        }
        isRunning = false
    }
    var elapsedSeconds: TimeInterval {
        var timeElapsed = _elapsedDuration
        if isRunning, let startDate = _startDate {
            let elapsedThisPeriod = -startDate.timeIntervalSinceNow
            timeElapsed += elapsedThisPeriod
        }
        return timeElapsed
    }
    var elapsedMilliseconds: TimeInterval { elapsedSeconds * 1e3 }
    var elapsedDuration: Duration { Duration.seconds(elapsedSeconds) }
}
extension Stopwatch: CustomStringConvertible {
    public var description: String {
        let startDate = _startDate == nil ? "nil" : "\(_startDate!)"
        return "Stopwatch { isRunning: \(isRunning), startDate: \(startDate), elapsedDuration: \(_elapsedDuration), elapsedSeconds: \(elapsedSeconds), elapsedDuration: \(elapsedDuration) }"
    }
}
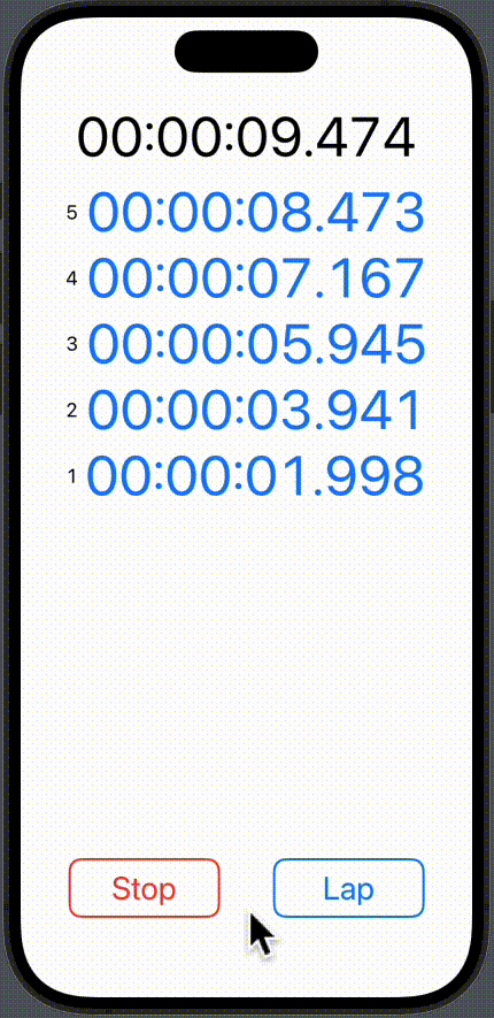
ストップウォッチアプリ
上記のStopwatchクラスを使う例として、ストップウォッチアプリを示します。
 |
|---|
↑うまく表示されていない場合は、 クリック クリック |
- ・Start
- 計測 開始 / 再開始
- ・Stop
- 計測 停止
- ・Reset
- 計測値リセット
- ・Lap
- ラップタイム
コードは以下のとおり。
import SwiftUI

struct ContentView: View {
    let stopwatch = Stopwatch()
    let timer = Timer.publish(every: 0.001, on: .main, in: .common).autoconnect()
    @State var elapsed = ""
    @State var isRunning = false
    @State var laps = [Duration]()
    var body: some View {
        //let _ = Self._printChanges()
        ScrollViewReader { reader in
            VStack {
                Text(elapsed)
                    .font(Font(UIFont.monospacedDigitSystemFont(ofSize: 48, weight: .regular)))
                Spacer()
                ScrollView(.vertical, showsIndicators: false) {
                    ForEach(Array(laps.reversed().enumerated()), id: \.0) { index, lap in
                        HStack {
                            Text("\(laps.count - index)")
                            Text(lap.formatted(.time(pattern: .hourMinuteSecond(padHourToLength: 2, fractionalSecondsLength: 3))))
                                .font(Font(UIFont.monospacedDigitSystemFont(ofSize: 48, weight: .regular)))
                                .foregroundColor(Color.blue)
                                .id(index)
                        }
                    }
                }
                HStack {
                    Button(action: {
                        if stopwatch.isRunning {
                            stopwatch.stop()
                            laps.append(stopwatch.elapsedDuration)
                        } else {
                            stopwatch.start()
                        }
                        isRunning = stopwatch.isRunning
                    }, label: {
                        Text(isRunning ? "Stop" : "Start")
                            .font(.title)
                            .foregroundColor(isRunning ? Color.red : Color.blue)
                            .frame(width: 130, height: 50, alignment: .center)
                            .overlay(
                                RoundedRectangle(cornerRadius: 10)
                                    .stroke(isRunning ? Color.red : Color.blue, lineWidth: 2)
                            )
                            .background(RoundedRectangle(cornerRadius: 10).fill(Color.white))
                            .padding(20)
                    })
                    Button(action: {
                        if stopwatch.isRunning {
                            laps.append(stopwatch.elapsedDuration)
                            reader.scrollTo(0)
                        } else {
                            stopwatch.reset()
                            laps.removeAll()
                        }
                    }, label: {
                        Text(isRunning ? "Lap" : "Reset")
                            .font(.title)
                            .foregroundColor(isRunning ? Color.blue : Color.red)
                            .frame(width: 130, height: 50, alignment: .center)
                            .overlay(
                                RoundedRectangle(cornerRadius: 10)
                                    .stroke(isRunning ? Color.blue : Color.red, lineWidth: 2)
                            )
                            .background(RoundedRectangle(cornerRadius: 10).fill(Color.white))
                            .padding(20)
                    })
                }
            }
            .onReceive(timer) { _ in
                elapsed = stopwatch.elapsedDuration.formatted(.time(pattern: .hourMinuteSecond(padHourToLength: 2, fractionalSecondsLength: 3)))
            }
            .padding()
        }
    }
}
stopwatch が NOT isRunning の状態のときも、1ミリ秒ごとに(無駄な)描画が 行われているのでは?と、気になったが、
確認すると、一切無駄な再描画は行われていなかった。さすが SwiftUI 。
以上