※記事の内容はPAN-OS6.1.xが対象です
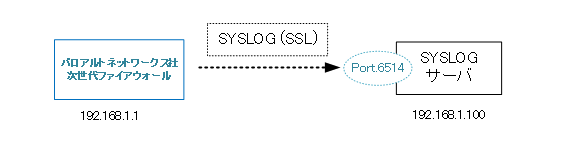
パロアルトネットワークス次世代ファイアウォールから送信されるSYSLOG通信をSSL化する手順です。
インターネット経由でSYSLOGを送信する場合などに有効です。
※必要最低限の手順のみ記載しています
環境に応じて、設定などの追加・変更を行って下さい
環境
■ファイアウォール(SYSLOGクライアント):
H/W:パロアルトネットワークス社 次世代ファイアウォール(PA-200)
S/W:PAN-OS 6.1.11
■SYSLOGサーバ
H/W:仮想基盤サーバ
S/W:CentOS Linux release 7.2.1511 (Core)
rsyslogd 7.4.7
CA証明書の作成
今回はファイアウォールでCA証明書を作成します。
[Device] > [ 証明書の管理] > [ 証明書] > [ デバイス証明書] の順に選択。
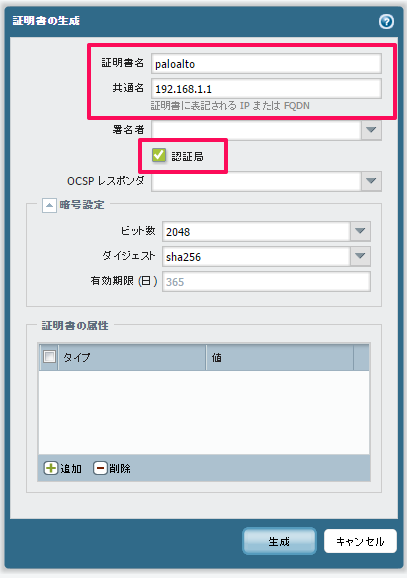
画面下の[生成]をクリックし、証明書作成画面を表示します。
- 証明書名を入力
- 共通名を入力
- 認証局にチェックを入れる
- [生成]をクリック
証明書が作成されます。
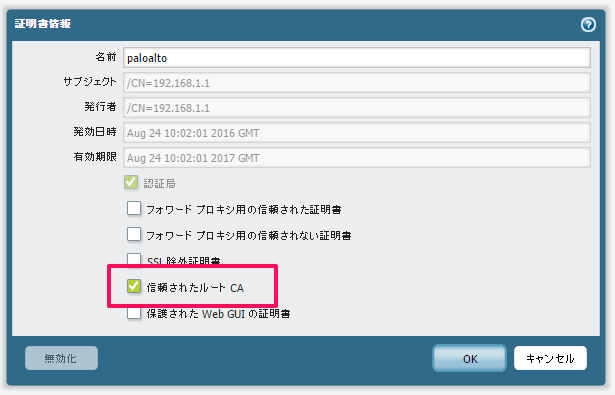
作成後に作成した証明書名をクリックします。
- 信頼されたルートCAにチェックを入れる
- [OK]をクリック
- [コミット]を実施
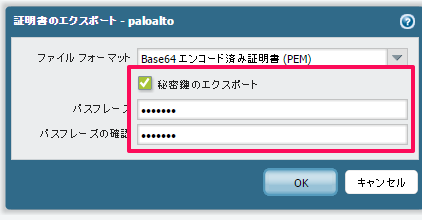
作成した証明書を選択し、画面下の「エクスポート」をクリックします。
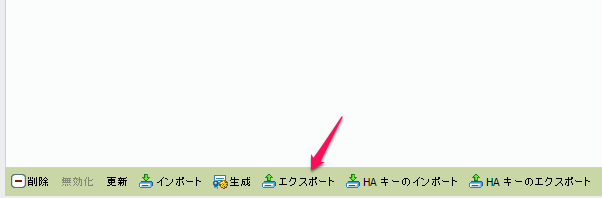
以下の画面が表示されます。
- 秘密鍵のエクスポートにチェックを入れる
- 秘密鍵のパスワードを入力
- [OK]をクリック
SYSLOGサーバの設定
続いて、SYSLOGサーバ(rsyslog)の設定を行います。
事前準備
1.証明書格納ディレクトリを作成します。
# mkdir /etc/rsyslog.cert/
2.必要なパッケージをインストールします。
# yum install gnutls-utils
# yum install rsyslog-gnutls
3.ファイアウォールで作成したCA証明書をSCP等でSYSLOGサーバに転送します。
1で作成したディレクトリにCA証明書を格納します。
サーバ証明書の作成
「事前準備」で作成したディレクトリに移動して、以下の作業を行います。
サーバ証明書を作成します。
※今回のCA証明書名は「cert_paloalto.pem」です
# certtool --generate-privkey --outfile key.pem
Generating a 2048 bit RSA private key...

# certtool --generate-request --load-privkey key.pem --outfile request.pem

Generating a PKCS #10 certificate request...
Common name: 192.168.1.100
Organizational unit name:
Organization name:
Locality name:
State or province name:
Country name (2 chars):
Enter the subject's domain component (DC):
UID:
Enter a dnsName of the subject of the certificate:
Enter a URI of the subject of the certificate:
Enter the IP address of the subject of the certificate:
Enter the e-mail of the subject of the certificate:
Enter a challenge password:
Does the certificate belong to an authority? (y/N): N
Will the certificate be used for signing (DHE and RSA-EXPORT ciphersuites)? (Y/n): n
Will the certificate be used for encryption (RSA ciphersuites)? (Y/n): n
Is this a TLS web client certificate? (y/N): n
Is this a TLS web server certificate? (y/N): y
# certtool --generate-certificate --load-request request.pem --load-ca-certificate cert_paloalto.pem --load-ca-privkey cert_paloalto.pem --outfile cert.pem

Generating a signed certificate...
Enter password: ★秘密鍵のパスワードを入力
Enter the certificate's serial number in decimal (default: 6322336484918993431):


Activation/Expiration time.
The certificate will expire in (days): 1825


Extensions.
Do you want to honour the extensions from the request? (y/N): n
Does the certificate belong to an authority? (y/N): n
Is this a TLS web client certificate? (y/N): y
Will the certificate be used for IPsec IKE operations? (y/N): n
Is this a TLS web server certificate? (y/N): y
Enter a dnsName of the subject of the certificate:
Enter a URI of the subject of the certificate:
Enter the IP address of the subject of the certificate:
Enter the e-mail of the subject of the certificate:
Will the certificate be used for signing (required for TLS)? (Y/n): n
Will the certificate be used for encryption (not required for TLS)? (Y/n): y
X.509 Certificate Information:

<略>

Is the above information ok? (y/N): y
rsyslogの設定
rsyslogの設定を行います。
SSL化に関係がある箇所を"###★"で記載しています。
/etc/rsyslog.conf
# rsyslog configuration file

# For more information see /usr/share/doc/rsyslog-*/rsyslog_conf.html
# If you experience problems, see http://www.rsyslog.com/doc/troubleshoot.html

#### MODULES ####

# The imjournal module bellow is now used as a message source instead of imuxsock.
$ModLoad imuxsock # provides support for local system logging (e.g. via logger command)
$ModLoad imjournal # provides access to the systemd journal
# $ModLoad imklog # reads kernel messages (the same are read from journald)
# $ModLoad immark  # provides --MARK-- message capability

# Provides UDP syslog reception
# $ModLoad imudp
# $UDPServerRun 514

# Provides TCP syslog reception
$ModLoad imtcp ###★
# $InputTCPServerRun 514

### SSL ###

$DefaultNetstreamDriver gtls ###★

$DefaultNetstreamDriverCAFile /etc/rsyslog.cert/cert_paloalto.pem ###★
$DefaultNetstreamDriverCertFile /etc/rsyslog.cert/cert.pem ###★
$DefaultNetstreamDriverKeyFile /etc/rsyslog.cert/key.pem ###★

$InputTCPServerStreamDriverMode 1 ###★
$InputTCPServerStreamDriverAuthMode anon ###★

$InputTCPServerRun 6514 ###★


#### GLOBAL DIRECTIVES ####
<略>
設定後、rsyslogの再起動を行います。
# systemctl restart rsyslog
ファイアウォール設定
SYSLOGサーバプロファイルの作成
[Device] > [サーバプロファイル] > [syslog] の順に選択。
画面下の[追加]をクリックします。
- SYSLOGサーバの情報を入力
- ”転送”項目で「SSL」を指定
- [OK]をクリック
- [コミット]を実施

動作確認
ファイアウォールのシステムログに以下のログが表示されていれば、SYSLOGサーバとの接続が完了しています。
Syslog connection established to server[\'AF_INET.192.168.1.100:6514.\']
次世代ファイアウォールのログ解析ツールをOSSで提供しています。