概要
ボタン押してiOSキーボードの上に送信フォームを表示させる方法についての記事です。
処理の簡単な流れは以下の通りです。
- ボタン押下時、キーボードを表示
- iOSキーボードの最大Y座標と画面の外に設置されているUIView(送信フォーム)の最小Y座標の差分を取得
- 座標の差分を送信フォームのbottomの制約に加算
テキストフィールドをタップしてキーボードを呼び出した際に送信フォームを追従させる方法はいくつか見つかったのですが、どうしてもボタンで呼び出したかったので今回の実装に挑戦しました。
テキストフィールドが画面上に無くてもキーボードの上に送信フォーム等を表示させたい…!と思っている方の役に立てば幸いです。
実行環境
【Xcode】 Version 10.1
【Swift】 version 4.2.1
実装方法
1. Main.storyboard
まずはMain.storyboardを色々といじります。
今回ObjectLibraryからMain.storyboardに配置するものは以下の4種類です。
・Button(2つ)
・Label
・View
・TextField
下の画像のようにTextFieldとButtonはViewの上に配置します。
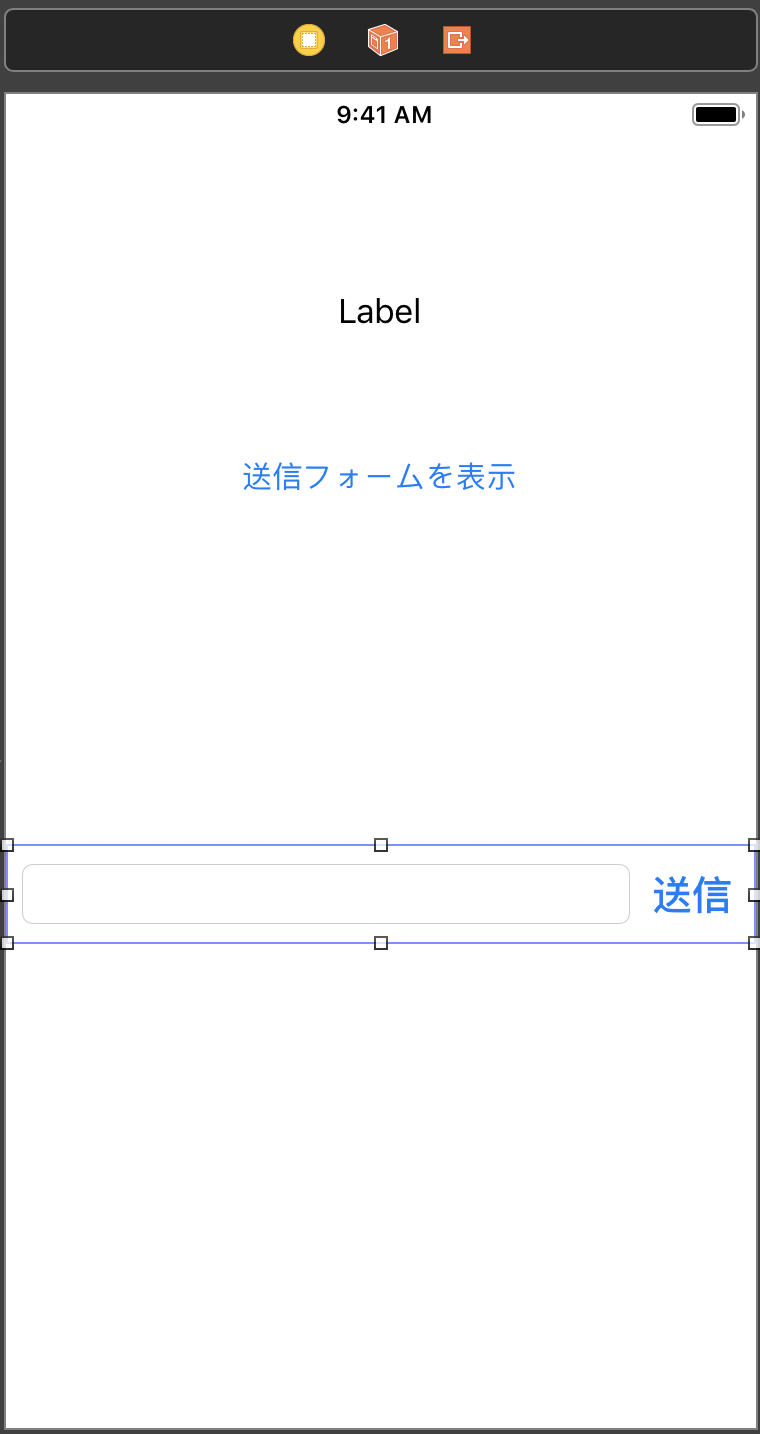
こんな感じで配置できたら、次はConstraintsを設定していきます。
まず、追加したView上のTextFieldとButtonに対して制約を加えます。

次に追加したViewを画面外へ出すためにViewのbottomを設定します。

2. Outlet接続, Action接続
次はOutlet接続と、Action接続です。
■Outlet接続するもの
・Label
・View(送信フォーム)
・TextField
・ViewのbottomConstraints
■Action接続するもの
・Button(2つ)
・Tap Gesture Recognizer
    @IBOutlet weak var textLabel: UILabel!
    @IBOutlet weak var submitForm: UIView!
    @IBOutlet weak var textField: UITextField!
    @IBOutlet weak var submitFormBottomConstraints: NSLayoutConstraint!

    @IBAction func showKeyboard(_ sender: Any) {
    }

    @IBAction func closeKeyboard(_ sender: Any) {
    }

    @IBAction func submitText(_ sender: Any) {
    }
続いて処理を書いていきます。
3. キーボード表示する&閉じる処理
    // 「送信フォームを表示」ボタン押下時の処理
    @IBAction func showKeyboard(_ sender: Any) {
        // キーボードを表示
        textField.becomeFirstResponder()
    }

    // 画面タップ時の処理
    @IBAction func closeKeyboard(_ sender: Any) {
        // キーボードをしまう
        view.endEditing(true)
    }
4. イベントハンドラの作成
イベントハンドラはイベント発生時に実行するメソッドのことです。
・キーボードのframeが変化したとき
・キーボードが登場したとき
・キーボードが退場したとき
の3つのメソッドを実装します。
// キーボードのフレーム変化時の処理
    @objc func keyboardChangeFrame(_ notification: NSNotification) {
        // keyboardのframeを取得
        let userInfo = (notification as NSNotification).userInfo!
        let keyboardFrame = (userInfo[UIResponder.keyboardFrameEndUserInfoKey] as! NSValue).cgRectValue

        // submitFormの最大Y座標と、keybordの最小Y座標の差分を計算
        let diff = self.submitForm.frame.maxY -  keyboardFrame.minY

        if (diff > 0) {
            //submitFormのbottomの制約に差分をプラス
            self.submitFormBottomConstraints.constant += diff
            self.view.layoutIfNeeded()
        }
    }

    // キーボード登場時の処理
    @objc func keyboardWillBeShow(_ notification: NSNotification) {
        // 現在のsubmitFormの最大Y座標を保存
        submitFormY = self.submitForm.frame.maxY
        textField.text = textLabel.text
    }

    //キーボードが退場時の処理
    @objc func keyboardWillBeHide(_ notification: NSNotification) {
        //submitFormのbottomの制約を元に戻す
        self.submitFormBottomConstraints.constant = -submitFormY
        self.view.layoutIfNeeded()
    }
5. 通知センターにイベントハンドラを登録
最後にイベントハンドラを通知センターに登録します。
通知センターはイベントハンドラとイベントの発生通知を紐づけるものです。
これにより、イベント発生時に設定したイベントハンドラが実行されるようになります。
    override func viewDidLoad() {
        super.viewDidLoad()
        // 通知センターの取得
        let notification =  NotificationCenter.default

        // keyboardのframe変化時
        notification.addObserver(self,
                                 selector: #selector(self.keyboardChangeFrame(_:)),
                                 name: UIResponder.keyboardDidChangeFrameNotification,
                                 object: nil)

        // keyboard登場時
        notification.addObserver(self,
                                 selector: #selector(self.keyboardWillShow(_:)),
                                 name: UIResponder.keyboardWillShowNotification,
                                 object: nil)

        // keyboard退場時
        notification.addObserver(self,
                                 selector: #selector(self.keyboardDidHide(_:)),
                                 name: UIResponder.keyboardDidHideNotification,
                                 object: nil)
    }
完成したもの

ソースコードはGitHubにあげていますので、参照したい方はそちらからどうぞ!
課題
現在の実装方法だと、キーボードの出現が出現するタイミングと送信フォームが出現するタイミングでラグが生じてしまいます。
キーボードの出現と同時に下から上に追従してくるようにできたら、さらに良さそうですね!
参考
以下の記事を参考にさせていただきました。いつもありがとうございます![]()
・キーボードに追従するViewをAutolayoutで実装してみた
・【Swift4】キーボードの上に送信フォームを実装する方法