前回の記事で書いたように、Write TclとExport Block Designを使えばxprプロジェクトやBlock Designをエクスポートできます。
しかし、Block DesignやMIGの扱いはそう甘くはありません。
サンプルプロジェクトと開発環境
問題を本質を見極めるため、より簡単なサンプルプロジェクトを作ります。
- Vivadoのバージョンは、Vivado 2019.2
- プロジェクトのディレクトリはd:\vivadotest\project
- デバイスはArtix-7のXC7A100T-1CSG324C
Block Designの保存場所や、MIGの保存場所、CreateWrapperしたVHDLファイルの保存場所はデフォルトのまま(Vivadoに提案されるままOKを押す)にします。
すると、
- Block DesignはD:\vivadotest\project\project_1.srcs\sources_1\bd\design_1\design_1.bd、ほか
- MIGはD:\vivadotest\project\project_1.srcs\sources_1\bd\design_1\ip\design_1_mig_7series_0_0\design_1_mig_7series_0_0.xci、他。たくさんのファイル
- WrapperはD:\vivadotest\project\project_1.srcs\sources_1\bd\design_1\hdl\design_1_wrapper.v
に出来上がります。
Block Designのフォルダ
Block Designのフォルダを見てみます。
bdファイル以外にbxmlファイルやxdcが作られています。また、ipやsynthなどのフォルダも作られています。普通にVivadoを使うならこれらのフォルダをすべて保存しなければなりません。

MIGのフォルダ
MIGの設定ファイルの大本はmig_a.prjです。中身はXMLで、MIGで設定した項目が入ります。
実は、prjファイルにはバグがあって、先頭に3文字のゴミが入ります。このゴミが原因でVivado 2018.3以前のVivadoではMIGを開いたときやSynthを開始したときにクラッシュします。運が良ければクラッシュしません。2019ではゴミがあってもクラッシュしにくくなっています。
- Vivado 2019.2でもゴミは付きます。
- このゴミは0xEE 0xEFとかいう大きな値なので、エディタによっては表示されません。バイナリモードが使えるエディタで編集してください。
- このゴミは、Export Block Designや、Write TclしたTCLにも入ってきます。TCLの中に入り込んだゴミも消す必要があります。
Vivadoが不安定だという人は、MIGを生成したときにテキストエディタでゴミを取り除くようにしてください。
?サソ<?xml version="1.0" encoding="UTF-8" standalone="no" ?>
<Project NoOfControllers="1">
<!-- IMPORTANT: This is an internal file that has been generated by the MIG software. Any direct editing or changes made to this file may result in unpredictable behavior or data corruption. It is strongly advised that users do not edit the contents of this file. Re-run the MIG GUI with the required settings if any of the options provided below need to be altered. -->
  <ModuleName>design_1_mig_7series_0_0</ModuleName>
  <dci_inouts_inputs>1</dci_inouts_inputs>
・・・
    <RowAddress>14</RowAddress>
    <ColAddress>10</ColAddress>
    <BankAddress>3</BankAddress>
    <MemoryVoltage>1.5V</MemoryVoltage>
    <C0_MEM_SIZE>134217728</C0_MEM_SIZE>
    <UserMemoryAddressMap>BANK_ROW_COLUMN</UserMemoryAddressMap>
・・・
xciファイル
同じような内容がdesign_1_mig_7series_0_0.xciに書かれます。
xciはXILINXの標準的なIP設定ファイルで、これもまたXMLです。
<?xml version="1.0" encoding="UTF-8"?>
<spirit:design xmlns:xilinx="http://www.xilinx.com" xmlns:spirit="http://www.spiritconsortium.org/XMLSchema/SPIRIT/1685-2009" xmlns:xsi="http://www.w3.org/2001/XMLSchema-instance">
  <spirit:vendor>xilinx.com</spirit:vendor>
  <spirit:library>xci</spirit:library>
  <spirit:name>unknown</spirit:name>
  <spirit:version>1.0</spirit:version>
  <spirit:componentInstances>
    <spirit:componentInstance>
      <spirit:instanceName>design_1_mig_7series_0_0</spirit:instanceName>
      <spirit:componentRef spirit:vendor="xilinx.com" spirit:library="ip" spirit:name="mig_7series" spirit:version="4.2"/>
      <spirit:configurableElementValues>
・・・
XMLファイル
XCIファイルだけでは飽き足らず、さらに6MバイトのXMLに膨れ上がったXMLが生成されます。
<?xml version="1.0" encoding="UTF-8"?>
<spirit:design xmlns:xilinx="http://www.xilinx.com" xmlns:spirit="http://www.spiritconsortium.org/XMLSchema/SPIRIT/1685-2009" xmlns:xsi="http://www.w3.org/2001/XMLSchema-instance">
  <spirit:vendor>xilinx.com</spirit:vendor>
  <spirit:library>xci</spirit:library>
  <spirit:name>unknown</spirit:name>
  <spirit:version>1.0</spirit:version>
・・・
      <spirit:master/>
      <spirit:connectionRequired>true</spirit:connectionRequired>
      <spirit:portMaps>
        <spirit:portMap>
          <spirit:logicalPort>
            <spirit:name>RST</spirit:name>
          </spirit:logicalPort>
          <spirit:physicalPort>
            <spirit:name>ddr3_ui_clk_sync_rst</spirit:name>
          </spirit:physicalPort>
        </spirit:portMap>
      </spirit:portMaps>
      <spirit:parameters>
        <spirit:parameter>
          <spirit:name>POLARITY</spirit:name>
          <spirit:value spirit:id="BUSIFPARAM_VALUE.DDR3_RESET.POLARITY">ACTIVE_HIGH</spirit:value>
        </spirit:parameter>
・・・
こんな感じで次から次へとファイルを変換しながら巨大なフォルダへと膨れ上がっていきます。
普通にプロジェクトを管理するのであれば、全部保存しなければなりません。
エクスポートをして、復元できるかテスト
Write Tclの場合(Block Designを入れない)
File->Project->WriteTclでTCLを生成します。このとき、Recreate Block Design using Tclのチェックは外してみます。

エクスポート先は、D:\vivadotest\export\project_1.tclにします。
tclファイルには、
#    "D:/vivadotest/project/project_1.srcs/sources_1/bd/design_1/design_1.bd"
#    "D:/vivadotest/project/project_1.srcs/sources_1/bd/design_1/hdl/design_1_wrapper.v"
#    "d:/vivadotest/project/project_1.srcs/sources_1/bd/design_1/ip/design_1_mig_7series_0_0/mig_a.prj"
と書かれているので、これらの3つのファイルを残して元のプロジェクトフォルダの他のファイルを消してしまいます。そして、VivadoのTCLコンソールからsourceコマンドでproject_1.tclを読み込んで復元できるかどうかを試してみることにします。
Tclからの復元
Tclの呼び出しは、Vivadoを起動して、プロジェクトを開く前に下のTCLコンソールに
cd エクスポートしたTCLファイルがあるフォルダ名
source ./エクスポートしたTCLファイル
と入力します。

結果はこのとおり。

途中まではいい感じだったのですが、MIGの生成でエラーとなってしまいました。
エラーの内容は
ERROR: [IP_Flow 19-3460] Validation failed on parameter 'XML_INPUT_FILE(XML_INPUT_FILE)' for Specified PRJ file does not exist 'mig_a.prj'
. BD Cell 'mig_7series_0'
CRITICAL WARNING: [BD 41-2161] Unable to find interface <S_AXI> in cell <mig_7series_0> while setting up interface connections during loading of BD file.
CRITICAL WARNING: [BD 41-2161] Unable to find interface <SYS_CLK> in cell <mig_7series_0> while setting up interface connections during loading of BD file.
CRITICAL WARNING: [BD 41-2161] Unable to find interface <DDR3> in cell <mig_7series_0> while setting up interface connections during loading of BD file.
というものです。MIGが自動的に置かれたときにはカスタマイズされていない素のMIGのままなので、TCLがポートを作ろうとしてもポートがまだできていなかったのでしょう。
Write Tclの場合(Block Designを入れる)
今度はRegenerate Block Design using Tclのチェックを入れてエクスポートしてみます。

必要ファイルは
#    "D:/vivadotest/project/project_1.srcs/sources_1/bd/design_1/hdl/design_1_wrapper.v"
#    "D:/vivadotest/project/project_1.srcs/sources_1/bd/design_1/ip/design_1_mig_7series_0_0/mig_a.prj"
の2つになりました。
その代わり、project_1.tclの中で、
proc write_mig_file_design_1_mig_7series_0_0 { str_mig_prj_filepath } {

   file mkdir [ file dirname "$str_mig_prj_filepath" ]
   set mig_prj_file [open $str_mig_prj_filepath  w+]

   puts $mig_prj_file {?サソ<?xml version="1.0" encoding="UTF-8" standalone="no" ?>}
   puts $mig_prj_file {<Project NoOfControllers="1">}
   puts $mig_prj_file {  }
   puts $mig_prj_file {<!-- IMPORTANT: This is an internal file that has been generated by the MIG software. Any direct editing or changes made to this file may result in unpredictable behavior or data corruption. It is strongly advised that users do not edit the contents of this file. Re-run the MIG GUI with the required settings if any of the options provided below need to be altered. -->}
   puts $mig_prj_file {  <ModuleName>design_1_mig_7series_0_0</ModuleName>}
・・・
  connect_bd_intf_net -intf_net CLK_REF_0_1 [get_bd_intf_ports CLK_REF_0] [get_bd_intf_pins mig_7series_0/CLK_REF]
  connect_bd_intf_net -intf_net SYS_CLK_0_1 [get_bd_intf_ports SYS_CLK_0] [get_bd_intf_pins mig_7series_0/SYS_CLK]
  connect_bd_intf_net -intf_net S_AXI_0_1 [get_bd_intf_ports S_AXI_0] [get_bd_intf_pins mig_7series_0/S_AXI]
のような記述が追加され、MIGのprjファイルやブロックデザインをTCLの中で作るようになります。
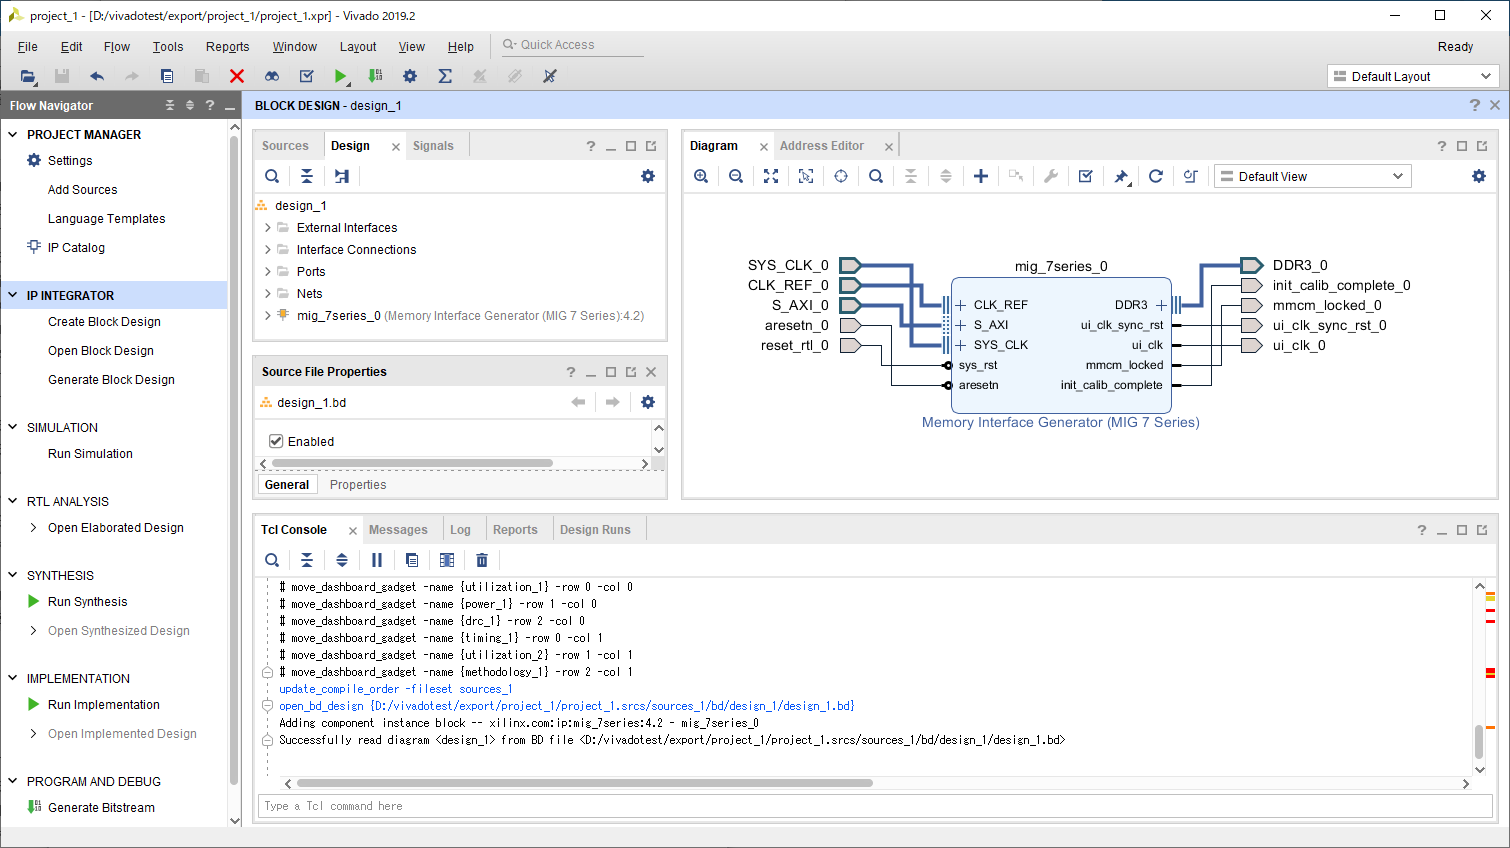
このtclファイルを実行すると、

と、なってプロジェクトの復元に成功しました。
Write Tclを行うときに、Regenerate Block Design using Tclのチェックを入れてを行うのが正解のようです。
第3話に続く

