概要
AWS Amplify Advent Calendar 2019、7日目はAWS Amplify CLIでAWS AppSync + Amazon DynamoDBをセットアップするschema.graphqlで使用可能な3つのディレクティブ(@model、@auth、 @key)を触っていきます。
想定読者
amplify add api、なんとなく使ったことあるけど、@model、@authとか@keyよくわからん!という方に向けた記事になります。検証用アプリケーションはReactでの実装ですが、Reactの知識がなくても大丈夫です。
動作確認環境
- @aws-amplify/cli 4.5.0
- aws-amplify 2.2.0
- aws-amplify-react 3.1.1
- @aws-amplify/api 2.1.1
下準備
React App
$ npx create-react-app amplify-react
$ cd amplify-react
$ npm start
ブラウザが立ち上がり、おなじみのスタートページが現れます。
Amplifyの初期設定
amplify configureは一度実行している想定です。(amplify configureがまだの方はコチラ)
${profile name}にはご自身が使用されているAmplify用のProfile名を入力してください。
amplify init
? Enter a name for the project amplify-react
? Enter a name for the environment dev
? Choose your default editor: Vim (via Terminal, Mac OS only)
? Choose the type of app that you're building javascript
Please tell us about your project
? What javascript framework are you using react
? Source Directory Path:  src
? Distribution Directory Path: build
? Build Command:  npm run-script build
? Start Command: npm run-script start
Using default provider  awscloudformation

For more information on AWS Profiles, see:
https://docs.aws.amazon.com/cli/latest/userguide/cli-multiple-profiles.html

? Do you want to use an AWS profile? Yes
? Please choose the profile you want to use ${profile name}
Amplifyのセットアップが終了しました!
GraphQL APIの作成
AmplifyではapiとしてREST APIとGraphQLが選択できます。REST APIを選択するとAPI Gateway + LambdaによるREST APIの雛形が、GraphQLを選択するとAppSync + DynamoDBの雛形が作成されます。今回はGraphQLをいじりたいので、ServiceでGraphQLを選択します。
$ amplify add api
? Please select from one of the below mentioned services: GraphQL
? Provide API name: amplifyreact
? Choose the default authorization type for the API Amazon Cognito User Pool
Using service: Cognito, provided by: awscloudformation

 The current configured provider is Amazon Cognito.

 Do you want to use the default authentication and security configuration? Default configuration
 Warning: you will not be able to edit these selections.
 How do you want users to be able to sign in? Username
 Do you want to configure advanced settings? No, I am done.
Successfully added auth resource
? Do you want to configure advanced settings for the GraphQL API No, I am done.
? Do you have an annotated GraphQL schema? No
? Do you want a guided schema creation? No
? Provide a custom type name MyType
default authorization typeにAmazon Cognito User Poolを選択すると、同時にAuthカテゴリのリソースも作成されます。amplify statusで確認してみましょう。
$ amplify status
Current Environment: dev
| Category | Resource name        | Operation | Provider plugin   |
| -------- | -------------------- | --------- | ----------------- |
| Auth     | amplifyreactbc0d7af4 | Create    | awscloudformation |
| Api      | amplifyreact         | Create    | awscloudformation |
Auth、Apiがそれぞれ作成されたことを確認できました。
@model
@modelとは?
公式ドキュメントによれば、@modelを使用することで、以下のAWSリソースを設定することができます。
- デフォルトでPAY_PER_REQUEST請求モードのAmazon DynamoDB
- schema.graphqlで設定した通りにアクセス可能なAWS AppSync DataSource
- AWS AppSyncがAmazon DynamoDBを呼び出すのに必要なIAM Role
- 最大8つのresolver(create, update, delete, get, list, onCreate, onUpdate, onDelete)
- mutation(create, update, delete)に使用するInput objects
- list系のqueriyと
@connectionで使用可能な、Filter input objects
schema.graphqlでの非常に少ない記述量で、これだけのリソース設定を終えてしまうことができるのはAmplifyの魅力の一つでしょう。
Todo typeの作成
amplify/backend/api/amplifyreact/schema.graphqlを開くと、次のような中身になっています。今回は全て削除してしまいましょう。
type MyType @model {
    id: ID!
    title: String!
    content: String!
    price: Int
    rating: Float
}
そして次のようなTodoモデルを定義します。
type Todo
    @model
{
	id: ID!
	name: String!
	description: String!
	updatedAt: AWSDateTime
	createdAt: AWSDateTime
}
ここで一旦、amplify pushをして変更を反映しましょう。
色々聞かれますが、すべて何も入力せずEnterを押して、デフォルトの選択肢で進めます。
$ amplify push
✔ Successfully pulled backend environment dev from the cloud.

Current Environment: dev

| Category | Resource name        | Operation | Provider plugin   |
| -------- | -------------------- | --------- | ----------------- |
| Auth     | amplifyreactbc0d7af4 | Create    | awscloudformation |
| Api      | amplifyreact         | Create    | awscloudformation |
? Are you sure you want to continue? Yes

The following types do not have '@auth' enabled. Consider using @auth with @model
     - Todo
Learn more about @auth here: https://aws-amplify.github.io/docs/cli-toolchain/graphql#auth


GraphQL schema compiled successfully.

Edit your schema at /Users/daisnaga/Dev/tmp/amplify-react/amplify/backend/api/amplifyreact/schema.graphql or place .graphql files in a directory at /Users/daisnaga/Dev/tmp/amplify-react/amplify/backend/api/amplifyreact/schema
? Do you want to generate code for your newly created GraphQL API Yes
? Choose the code generation language target javascript
? Enter the file name pattern of graphql queries, mutations and subscriptions src/graphql/**/*.js
? Do you want to generate/update all possible GraphQL operations - queries, mutations and subscriptions Yes
? Enter maximum statement depth [increase from default if your schema is deeply nested] 2

----
a lot of logs...
----

UPDATE_COMPLETE amplify-amplify-react-dev-XXXXXX AWS::CloudFormation::Stack Fri Dec 06 2019 21:36:26 GMT+0900 (Japan Standard Time)
✔ Generated GraphQL operations successfully and saved at src/graphql
✔ All resources are updated in the cloud

GraphQL endpoint: https://XXXXXXXX.appsync-api.us-west-2.amazonaws.com/graphql
たくさんのログが吐かれますが、UPDATE_COMPLETEと、GraphQLのendpointが表示されればamplify push成功です。
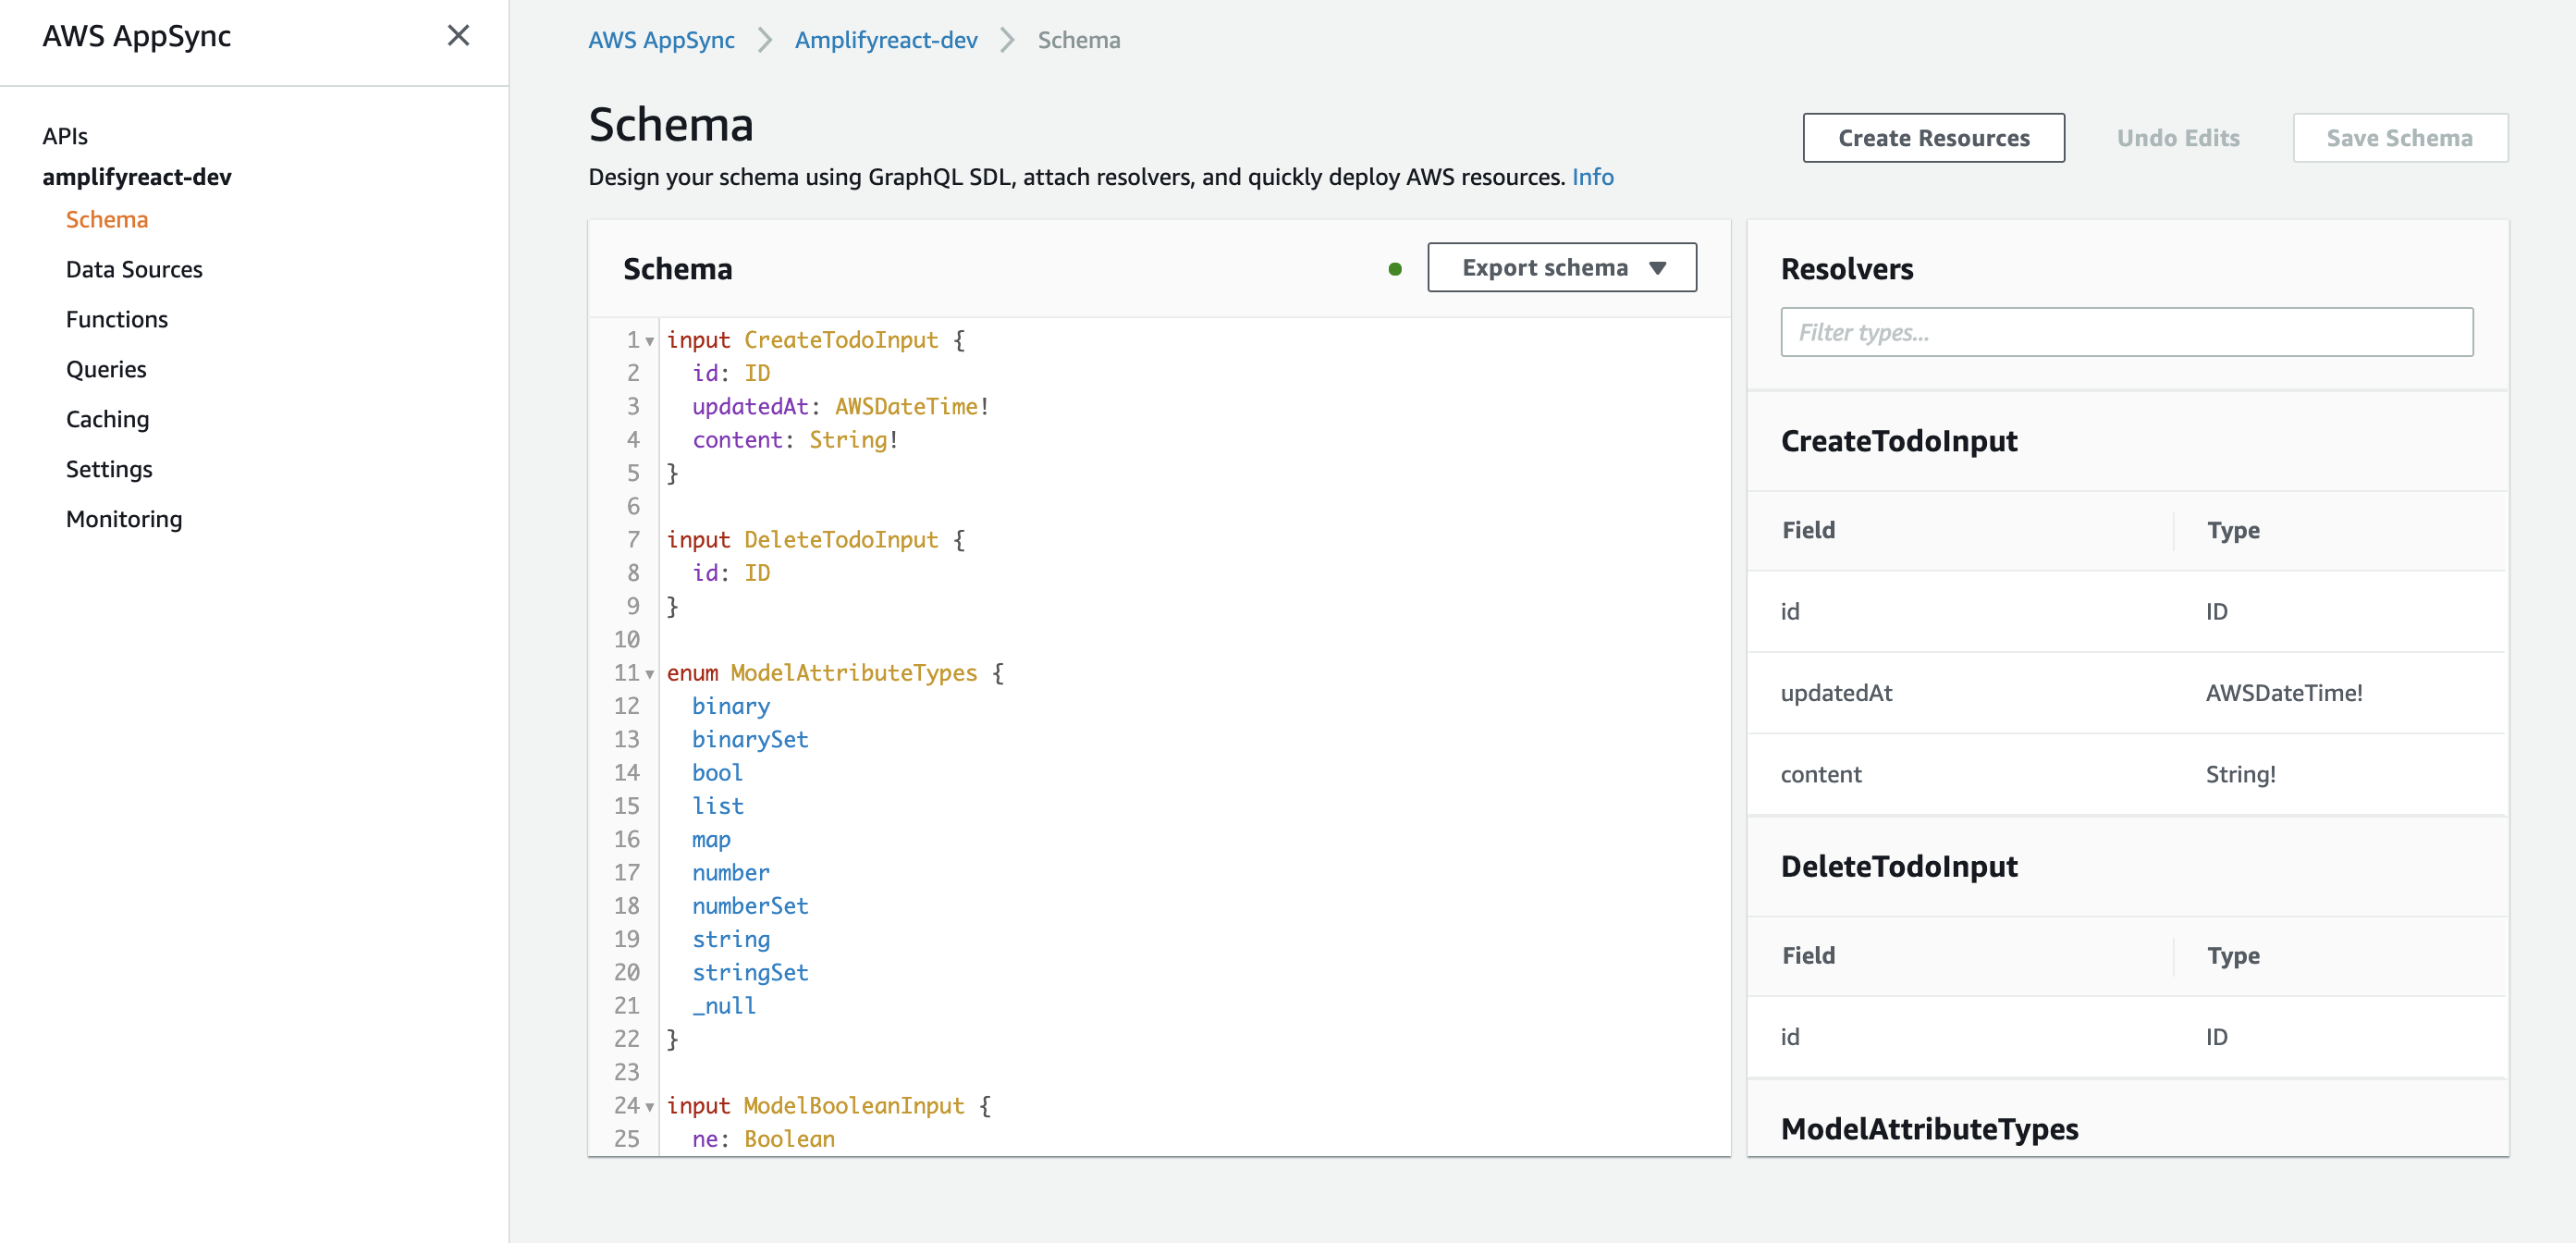
AppSyncのManagement Consoleから、作成したリソースを確認しましょう。
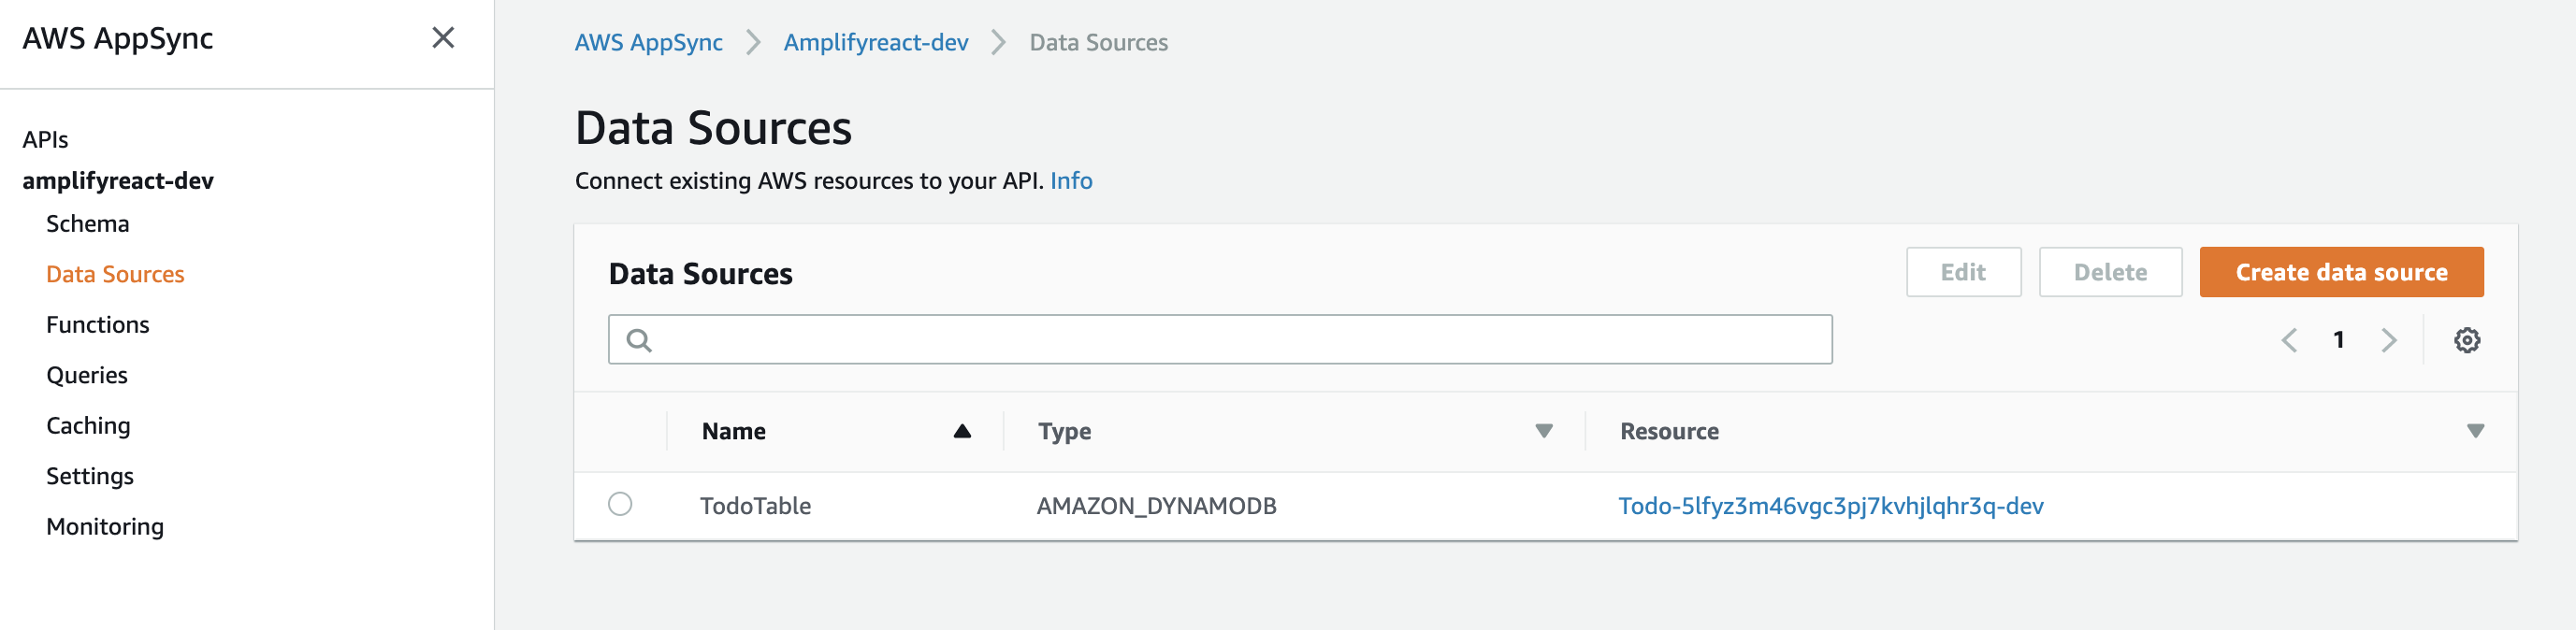
同様に、Amazon DynamoDBに新しいTableが作成されています。

検証用Web Applicationの作成
サーバー側の準備が整ったので、Todoを追加、確認できるインタフェースを作成しましょう。
$ npm install --save aws-amplify @aws-amplify/api @aws-amplify/pubsub aws-amplify-react
$ vim src/App.js
適当なエディタでsrc/App.jsを開いたら、中身を全部消して次のコードをコピペします。
import React, {useState, useEffect, useReducer } from 'react';

import Amplify, { Auth } from 'aws-amplify';
import API, { graphqlOperation } from '@aws-amplify/api';

import { withAuthenticator } from 'aws-amplify-react'

import { createTodo } from './graphql/mutations';
import { listTodos } from './graphql/queries';
import { onCreateTodo } from './graphql/subscriptions';

import awsconfig from './aws-exports';
import './App.css';

Amplify.configure(awsconfig);

const QUERY = 'QUERY';
const SUBSCRIPTION = 'SUBSCRIPTION';

const initialState = {
  todos: [],
};

const reducer = (state, action) => {
  switch (action.type) {
    case QUERY:
      return {...state, todos: action.todos};
    case SUBSCRIPTION:
      return {...state, todos:[...state.todos, action.todo]}
    default:
      return state;
  }
};

async function createNewTodo() {
  const todo = { name:  "Todo " + Math.floor(Math.random() * 10) };
  await API.graphql(graphqlOperation(createTodo, { input: todo }));
}

function signOut(){
  Auth.signOut()
  .then(data => console.log(data))
  .catch(err => console.log(err));
}

function App() {
  const [state, dispatch] = useReducer(reducer, initialState);
  const [user, setUser] = useState(null);

  useEffect(() => {

    async function getUser(){
      const user = await Auth.currentUserInfo();
      setUser(user);
      return user
    }

    getUser();

    async function getData() {
      const todoData = await API.graphql(graphqlOperation(listTodos));
      dispatch({ type: QUERY, todos: todoData.data.listTodos.items });
    }

    getData();


    const subscription = API.graphql(graphqlOperation(onCreateTodo)).subscribe({
      next: (eventData) => {
        const todo = eventData.value.data.onCreateTodo;
        dispatch({ type: SUBSCRIPTION, todo });
      }
    });

    return () => subscription.unsubscribe();
  }, []);

  return (
    <div className="App">
      <p>user: {user!= null && user.username}</p>
      <button onClick={signOut}>Sign out</button>
      <button onClick={createNewTodo}>Add Todo</button>
      <div>
        {state.todos.length > 0 ?
          state.todos.map((todo) => <p key={todo.id}>{todo.name} ({todo.createdAt})</p>) :
          <p>Add some todos!</p>
        }
      </div>
    </div>
  );
}

export default withAuthenticator(App, {
  signUpConfig: {
    hiddenDefaults: ['phone_number']
  }
});
これで下準備が整いました!@authと@keyをみていきましょう。
@auth
本セクションでは、@authを用いて、ユーザー自身が作成したTodoしか一覧に表示されないようにしてみます。
@authとは?
Authorization is required for applications to interact with your GraphQL API. API Keys are best used for public APIs (or parts of your schema which you wish to be public) or prototyping, and you must specify the expiration time before deploying. IAM authorization uses Signature Version 4 to make request with policies attached to Roles. OIDC tokens provided by Amazon Cognito User Pools or 3rd party OpenID Connect providers can also be used for authorization, and simply enabling this provides a simple access control requiring users to authenticate to be granted top level access to API actions. You can set finer grained access controls using @auth on your schema which leverages authorization metadata provided as part of these tokens or set on the database items themselves.
@auth object types that are annotated with @auth are protected by a set of authorization rules giving you additional controls than the top level authorization on an API. You may use the @auth directive on object type definitions and field definitions in your project’s schema.
When using the @auth directive on object type definitions that are also annotated with @model, all resolvers that return objects of that type will be protected. When using the @auth directive on a field definition, a resolver will be added to the field that authorize access based on attributes found the parent type.
https://aws-amplify.github.io/docs/cli-toolchain/graphql#auth より
要約すると、
- Amazon Cognito User PoolやサードパーティのOIDCプロバイダによって認証(Authentication)されたユーザーに対し、ユーザーの認証メタデータを使用してGraphQL APIのアクションに対する認可(Authorization)のルールを設定することが可能です。
-
@authを使用することでAPIの認可をトップレベルで行うことが可能です -
@authと@modelがついたtypeのObjectをreturnする全てのGraphQL resolverは、設定したAuthorization Ruleによって保護されます。
@authをTodoに追加
自分が作成したitemのみを表示できるよう@authで認可ルールを書いてみましょう。
amplify/backend/api/amplifyreact/schema.graphqlを開いて以下のように書き換えます。
type Todo
    @model
    @auth(rules: [{allow: owner}])
{
    id: ID!
    name: String!
    owner: String
    description: String!
    updatedAt: AWSDateTime
    createdAt: AWSDateTime
}
amplify pushして、ここまでの変更をAWSのリソースに反映しましょう。
$ amplify push
Reactのアップデート
Developer Toolでみると、以下のようなエラーがAppSyncから返却されています。
"Connection failed: {"errors":[{"message":"Variable 'owner' has coerced Null value for NonNull type 'String!'"}]}"
@authを指定したことにより、Subscriptionの際にownerフィールドを指定する必要が生じたためです。
/src/App.jsを一部変更しましょう。[-]のコードを消し、同じ場所に[+]を追加してください。
[-]
const subscription = API.graphql(graphqlOperation(onCreateTodo)).subscribe({
  next: (eventData) => {
    const todo = eventData.value.data.onCreateTodo;
    dispatch({ type: SUBSCRIPTION, todo });
  }
});

[+]
let subscription;
getUser().then((user) => {
  subscription = API.graphql(graphqlOperation(onCreateTodo, {owner: user.username})).subscribe({
    next: (eventData) => {
      const todo = eventData.value.data.onCreateTodo;
      dispatch({ type: SUBSCRIPTION, todo });
    }
  });
});
動作確認
アプリケーションに戻ってみると、Todoが表示されていない状態になります。
これは、今まで作成したDynamoDBのitemに、ownerフィールドがないため、@authによって取得が禁止されているためです。
いくつかTodoを作成しておきます。

続いて、別のUserでサインインしてみましょう。一旦SignOutボタンをおしてサインアウトし、別のアカウントを作成してサインインします。別のブラウザを使ったり、ChromeのIncognitoモードを使用すると検証しやすいかもしれません。

先ほどのアカウントで作成したTodoが一切表示されていないことがわかります。
Add Todoを押した上でDynamoDBをみてみましょう。
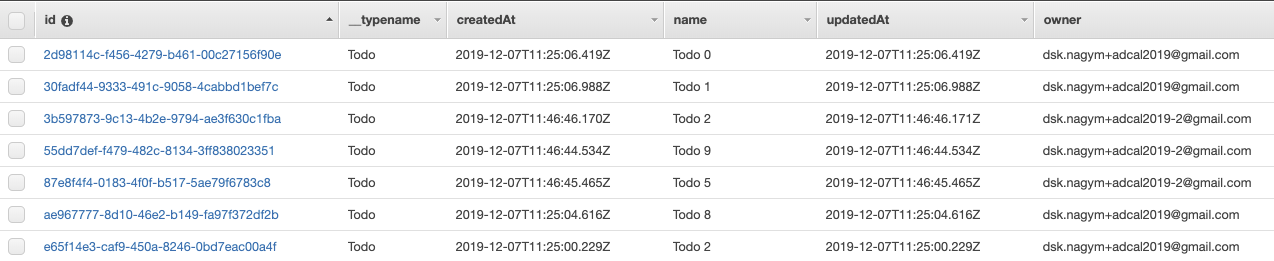
ownerフィールドにitemを作成したUserのusernameが入力されていることを確認できました。
おまけ
公式ドキュメントによると、実は先ほどの書き方は以下の書き方と全く同じ内容です。
type Post
  @model
  @auth(
    rules: [
      {allow: owner, ownerField: "owner", operations: [create, update, delete, read]},
    ])
{
    id: ID!
    name: String!
    description: String!
    updatedAt: AWSDateTime
    createdAt: AWSDateTime
   owner: String
}
-
ownerFieldを省略するとowner -
operationsを省略すると、create, update, delete, read
がそれぞれ設定されていたことがわかります。
ではallowでは何を指定しているのでしょうか?Definitionを見てみましょう。
# When applied to a type, augments the application with
# owner and group-based authorization rules.
directive @auth(rules: [AuthRule!]!) on OBJECT, FIELD_DEFINITION
input AuthRule {
  allow: AuthStrategy!
  provider: AuthProvider
  ownerField: String # defaults to "owner" when using owner auth
  identityClaim: String # defaults to "username" when using owner auth
  groupClaim: String # defaults to "cognito:groups" when using Group auth
  groups: [String]  # Required when using Static Group auth
  groupsField: String # defaults to "groups" when using Dynamic Group auth
  operations: [ModelOperation] # Required for finer control

  # The following arguments are deprecated. It is encouraged to use the 'operations' argument.
  queries: [ModelQuery]
  mutations: [ModelMutation]
}
enum AuthStrategy { owner groups private public }
enum AuthProvider { apiKey iam oidc userPools }
enum ModelOperation { create update delete read }

# The following objects are deprecated. It is encouraged to use ModelOperations.
enum ModelQuery { get list }
enum ModelMutation { create update delete }
allowではAuthStrategy、つまり認可戦略を指定しています。認可戦略には次の4つがあります。
-
owner: itemの作成者をownerとし、ownerに関する認可を指定する -
groups: itemの作成者が所属するgroupに対し、groupに関する認可を指定する -
private: 認証済みユーザー全体に対して認可を指定する -
public: 認証していないユーザー全体に対して認可を指定する
そして、ownerFieldではownerの認可戦略を使う時に使用するフィールドを指定することができる、というわけです。@authは一つのtypeに対し複数指定することが可能ですから、かなり柔軟に認可のロジックを作成することができそうです。
@key
本セクションでは@keyを用いて、Todoのnameでソートして一覧を表示してみましょう。
@keyとは?
Amazon DynamoDB is a key-value and document database that delivers single-digit millisecond performance at any scale but making it work for your access patterns requires a bit of forethought. DynamoDB query operations may use at most two attributes to efficiently query data. The first query argument passed to a query (the hash key) must use strict equality and the second attribute (the sort key) may use gt, ge, lt, le, eq, beginsWith, and between. DynamoDB can effectively implement a wide variety of access patterns that are powerful enough for the majority of applications.
公式ドキュメントより
一番大事なところは太字の箇所です。DynamoDBのクエリは、最大で二つのAttributeを使うのがよいとされます。この二つのAttributeはPartition Key(PK)とSort Key(SK)と呼ばれます。DynamoDBのBlack Belt資料によると、DynamoDBはPK単体、あるいはPKとSKを組み合わせてプライマリキーとして利用することができます。
- Partition Table
- Partition Key単体でプライマリキーとして利用
- 順序を指定しないハッシュインデックスを構築するためのキー
- テーブルは、性能を確保するために分割(パーティショニング)される場合あり
- Partition-Sort Table
- Partation + Sortでプライマリキーとすることもできる
- 同一のPartation Keyでのデータの並びを保証するためにSort Keyが使われる
- Partition Keyの数に上限はない(Local Secondary Indexesを使用時はデータサイズ上限あり)
@keyの主な役割は、このPKとSKを指定することにあります。PKとSKを使わずにクエリを書く場合、DynamoDBのTableの中身全てをスキャンすることになり、非常に効率が悪いです。効率が悪いと、クエリに時間がかかるだけでなく、従量課金制であるためコストもかさんでしまいます。(そもそもAmplifyのschema.graphqlでセットアップしたQueryでは、@keyで指定したフィールド以外をinputにできません。全文検索を行いたい場合などは@searchableを使用してElasticSearchをリソースとしたResolverを利用するのが良いでしょう。)
そのため、本来はどのようなKeyで各itemを取り出すかアプリケーション全体のアーキテクティングを行い、逆算してPK、SKを設計することが肝心です。このあたりは一見面倒にも思えますが、適切に設計することでスケールした際のクエリ発行時のレイテンシを短くすることにもつながります。具体的なDynamoDBのデザインパターンについてはこちらをご参照ください。
では、@keyを設定しないまま作成したDynamoDB Tableは何をPK、SKとしているのでしょうか?

確認してみると、PKとしてid、SKには何も設定されていないことがわかります。
GraphQL リクエスト返却時にソートして返す
一度作成したDynamoDB TableのPK、SKを変更することはできないため、Tableを作り直すことになってしまいます。今回はDynamoDBのGlobal Secondary Index(GSI)を使用してdescriptionフィールドを用いたSort機能を実装します。
アプリケーションによっては、さまざまな属性をクエリ基準に使用して、いろいろな種類のクエリを実行する必要があります。このような要件に対応するために、1 つ以上のグローバルセカンダリインデックスを作成して、Amazon DynamoDB でそのインデックスに対して Query リクエストを発行できます。
グローバルセカンダリインデックスより
GSIの詳細な説明は省かせていただきますが、__ざっくり__いうとPKとSKを変えたTableをもう一つ作成し、スキャンを回避して高速に特定のクエリを実行するための機能です。
今回は、新たにownerをPK、nameをSKとしたGSIを作成します。
type Todo
	@model
	@auth(rules: [{allow: owner}])
	@key(name: "SortByName", fields:["owner", "name"], queryField: "listTodosSortedByName" )
{
	id: ID!
	name: String!
	owner: String
	updatedAt: AWSDateTime
	createdAt: AWSDateTime
}
-
nameはGSIの名前です -
fieldsの配列のうち、一つ目がPK、二つ目がSKになります -
queryFieldは、このGSIを用いてqueryする時に使用するresolverの名前です - 明示的に
ownerフィールドを書かないと@keyで指定できないため、ownerフィールドを足しています
では、このResolverを利用するようにApp.jsに変更を加えましょう。[-]のコードを消し、同じ場所に[+]を追加してください。
[-]
import { listTodos} from './graphql/queries';

[+]
import { listTodos, listTodosSortedByName } from './graphql/queries';
[-]
async function getData() {
    const todoData = await API.graphql(graphqlOperation(listTods));
    dispatch({ type: QUERY, todos: todoData.data.listTodos.items });
}
getData();

[+]
async function getData(user) {
    const todoData = await API.graphql(graphqlOperation(listTodosSortedByName, {owner: user.username}));
    dispatch({ type: QUERY, todos: todoData.data.listTodosSortedByName.items });
}
getUser().then((user) => getData(user));
動作確認
変更が完了したらアプリケーションに戻ってみましょう!作成順に表示されていたTodoが、Todoのnameの昇順に変更されていることが確認できます。

この例では件数が少ないので、@keyを使わずReact側でソートしても大差ないように感じるかもしれません。実際に件数が非常に多くフロント側で処理するのが辛い場合や、NextTokenを使用してページネーションを実現する際に効力を発揮します。
まとめ
-
@modelはAppSyncとDynamoDBのリソースを準備するよーという宣言です。 -
@authを使い、AppSyncのResolverに対するアクセス権限の設定を行うことが可能です。 -
@keyを使うことで、任意のフィールドを使用したQuery Resolverを作成することができます。
最後まで読んでいただいてありがとうございました!
AWS Amplify Advent Calendar、明日は @FumihikoSHIROYAMA さんです!