経緯
これまで、カスタムイメージで作成したVMスケールセットのイメージ更新は、次のように毎回マニュアルで実施していたが(特にVMスケールセットが複数ある場合など)、手間と時間がかかるため、Azure AutomationのRunbookを作成し、自動化を試してみた。
| No | 手順 | 自動化方法 |
|---|---|---|
| 1 | RDPでVMに接続し一般化(Sysprep)を行う | VMの一般化(Sysprep)は、VM上に登録したバッチファイルで行う。バッチファイルはタスクスケジューラで定期実行する。Sysprepの実行有無はAzureファイル共有上のtriggerファイルの有無で判定する。 |
| 2 | Azure Portal上でVMを停止し、マスターイメージを作成する | マスターイメージの作成は、Azure AutomationのRunbookにPowershellスクリプトを登録し、自動化する。 |
| 3 | Azure Portal上でマスターイメージから、VMを再作成する (一般化するとVM起動できなくなるため再作成が必要) | VMを再作成は、Azure AutomationのRunbookにPowershellスクリプトを登録し、自動化する。 |
| 4 | 一般化済みのイメージをVMSSの「イメージ」リソースとして登録する | 一般化済みのイメージのVMSSへの登録は、Azure AutomationのRunbookにPowershellスクリプトを登録し、自動化する。 |
| 5 | Azure Portal上でVMSSのインスタンスのアップグレードを行いソースイメージを更新する | VMSSインスタンスのアップグレードは、Azure AutomationのRunbookにPowershellスクリプトを登録し、自動化する。 |
前提
・既にVMスケールセットを動作させる環境(VMスケールセット、仮想ネットワーク、VM、ストレージアカウント、ネットワークセキュリティグループなど)は作成済とします。
・VMのOSはWindowsとします。
手順
1.下記のバッチファイルを作成し、VM上のタスクスケジューラに登録する。実行ユーザーは「SYSTEM」、トリガーは「スタートアップ時」、繰り返し間隔は「5分」で登録。Azureファイル共有をZドライブに接続し、testディレクトリにトリガーファイル(trigger.txt)があれば、一般化(sysprep)を実行します。
@echo off
echo Sysprep Batch Executing ...
cd /d %~dp0

if not exist "Z:" (
   call :CONNECT_FILE_STORAGE
)

set triggerfile=Z:\test\trigger.txt
if not exist %triggerfile% (
  goto :END
)

call :SYSPREP
goto :END

:CONNECT_FILE_STORAGE
net use Z: \\[ストレージアカウント名].file.core.windows.net\share /u:AZURE\[ストレージアカウント名] [アクセスキー]
exit /b

:SYSPREP
start /wait %windir%\system32\sysprep\sysprep.exe /generalize /oobe /shutdown
exit /b

:END
exit /b 0
2.下記コマンドでAzure ファイル共有を作成する。この例では、share という名前の共有と、ファイル共有のルートで test という名前の新しいディレクトリを作成を作成します。
$rgName = "リソースグループ名"
$location = "リージョン名"
$storageAccountName = "ストレージ管理者名"

# ストレージアカウント作成
$storageAcct = New-AzureRmStorageAccount -ResourceGroupName $rgName -Name $storageAccountName -Type Premium_LRS -Location $location
New-AzureStorageShare -Name "share" -Context $storageAcct.Context
New-AzureStorageDirectory -Context $storageAcct.Context -ShareName "share" -Path "test"
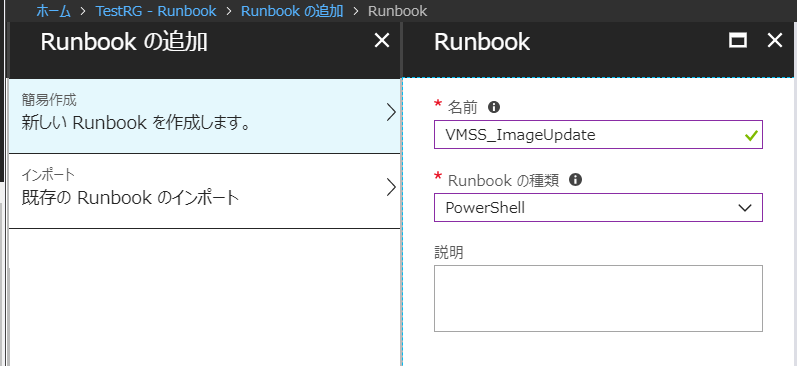
3.Automationアカウントを作成し、RunBookを作成する。
・Runbookの名前:VMSS_ImageUpdate
・Runbookの種類:Powershell
4.下記のPowershellスクリプトを登録し、公開する。Automation アカウントのモジュールは最新に更新しておく。
    $connectionName = "AzureRunAsConnection"
    # Get the connection "AzureRunAsConnection "
    $servicePrincipalConnection=Get-AutomationConnection -Name $connectionName

    "Logging in to Azure..."
    Add-AzureRmAccount `
        -ServicePrincipal `
        -TenantId $servicePrincipalConnection.TenantId `
        -ApplicationId $servicePrincipalConnection.ApplicationId `
        -CertificateThumbprint $servicePrincipalConnection.CertificateThumbprint

    try
    {
        $rgName = "リソースグループ名"
        $location = "リージョン名"
        $VnetName = "仮想ネットワーク名"
        $nsgName = "ネットワークセキュリティグループ名"
        $VmName = "仮想マシン名"
        $Vmpip = "パブリックIPアドレス名"
        $nicName = "ネットワークインターフェース名"
        $VmSize = "VMサイズ"
        $vmssName = "スケールセット名"
        $storageAccountName = "ストレージアカウント名"

        # upload trigger file to Azure file share
        $curdir = Get-Location
        $curdir
        New-Item  $curdir\trigger.txt -type file -Force
        $storageAcct = Get-AzureRmStorageAccount -ResourceGroupName $rgName -Name $storageAccountName
        Set-AzureStorageFileContent `
            -Context $storageAcct.Context `
            -ShareName "share" `
            -Source "$curdir\trigger.txt" `
            -Path "test\trigger.txt" -Force

        # waitting for completion of sysprep
        While($true){
            $VMState = Get-AzureRmVM -Name $VMName -ResourceGroupName $rgName -Status
            $VMPowerState = $VMState.Statuses[1].DisplayStatus
            if ($VMPowerState -eq 'VM stopped')
            {
                break
            }
            if ($VMPowerState -eq 'VM deallocated')
            {
                break
            }
            Start-Sleep -s 30
            $VMPowerState
        }
        if ($VMPowerState -eq 'VM deallocated')
        {
            Write-Output "Exit for VM deallocated"
            exit
        }
        # delete trigger file to Azure file share
        Remove-AzureStorageFile `
            -Context $storageAcct.Context `
            -ShareName "share" `
            -Path "test\trigger.txt"
        Write-Output "Delete trigger file completed"

        $t = Get-Date -Format "yyyy/MM/dd HH:mm:ss"
        $jst = [TimeZoneInfo]::ConvertTimeBySystemTimeZoneId([DateTime]$t, 'Tokyo Standard Time');
        $jst
        $dt = ([DateTime]$jst).ToString('yyyyMMddHHmm');
        $imageName = $VmName + "-Image" + $dt
        $imageName
        Write-Output "-------------------------"
	    Write-Output "Start Create Image"
        Stop-AzureRmVM -ResourceGroupName $rgName -Name $VmName -Force
	    Set-AzureRmVm -ResourceGroupName $rgName -Name $VmName -Generalized
	    $vm = Get-AzureRmVM -Name $VmName -ResourceGroupName $rgName
	    $image = New-AzureRmImageConfig -Location $location -SourceVirtualMachineId $vm.ID
        $image
	    New-AzureRmImage -Image (New-AzureRmImageConfig -Location $location -SourceVirtualMachineId $vm.ID) -ImageName $imageName -ResourceGroupName $rgName

        Write-Output "-------------------------"
	    Write-Output "Remove VM"
	    Remove-AzureRmVM -ResourceGroupName $rgName -Name $VmName -force
        Get-AzureRmDisk -ResourceGroupName $rgName | Where { $_.ManagedBy -eq $null } | Remove-AzureRmDisk -Force

        Write-Output "-------------------------"
	    Write-Output "Start Create VM"
	    $password = ConvertTo-SecureString "ユーザアカウントパスワード" -asplaintext -force
	    $Credential = New-Object System.Management.Automation.PsCredential "ユーザアカウント名",$password

	    $publicIP = Get-AzureRmPublicIpAddress -Name $Vmpip -ResourceGroupName $rgName
	    $Vnet = Get-AzureRmVirtualNetwork -ResourceGroupName $rgName -Name $VnetName
	    $Subnet = (Get-AzureRmVirtualNetwork -ResourceGroupName $rgName -Name $VnetName).Subnets[0]
	    $nsg = Get-AzureRmNetworkSecurityGroup -ResourceGroupName $rgName -Name $nsgName
	    $nsg.Id

	    $nic = Get-AzureRmNetworkInterface -ResourceGroupName $rgName -Name $nicName

	    $image = Get-AzureRmImage `
	        -ImageName $imageName `
	        -ResourceGroupName $rgName
        $image.Id

        Write-Output "-------------------------"
	    Write-Output "Start Create VM Config"
        $vmConfig = New-AzureRmVMConfig -VMName $VmName -VMSize $VmSize
        $vmConfig = Set-AzureRmVMOperatingSystem -VM $vmConfig -Windows -ComputerName $VmName -Credential $Credential
        $vmConfig = Set-AzureRmVMSourceImage -VM $vmConfig -Id $image.Id
        $vmConfig = Add-AzureRmVMNetworkInterface -VM $vmConfig -Id $nic.Id

        Write-Output "-------------------------"
	    Write-Output "Start Create VM"
        New-AzureRmVM `
            -ResourceGroupName $rgName `
            -Location $location `
            -VM $vmConfig

        Write-Output "-------------------------"
        Write-Output "***** Start VMSS Update *****"
        # Get current scale set
        $vmss = Get-AzureRmVmss -ResourceGroupName $rgName -VMScaleSetName $vmssName

        # Set and update the ImageReference of your scale set
        $vmss.VirtualMachineProfile.StorageProfile.ImageReference.Id = $image.Id

        Update-AzureRmVmss -ResourceGroupName $rgName -Name $vmssName -VirtualMachineScaleSet $vmss

        $vmssInstanceIds = (Get-AzureRmVmssVM -ResourceGroupName $rgName -VMScaleSetName $VmssName).InstanceID
        Foreach ($instanceId in $vmssInstanceIds){
            Write-Output "Upgdading instanceId : $instanceId"
            # now start updating instances
            Update-AzureRmVmssInstance -ResourceGroupName $rgName -VMScaleSetName $vmssName -InstanceId $instanceId
        }
        Get-Date -Format "yyyy-MMdd-HHmmss"
        Write-Output "***** End VMSS Update *****"

    } catch {
	    Write-Error "Error : $_.Exception"
    }
実行
1.Azure Portal上でVMを起動する。OS起動後、タスクスケジューラによりsysprep.batが5分毎に実行される。
・Azureファイル共有のtestディレクトリにトリガーファイルを検出すると、一般化(Sysprep)が実行される。
・一般化が完了するとOSはシャットダウンされ、VMは停止状態になる。
2.Azure Automation RunbookのVMSS_ImageUpdateを実行する。あとは完了まで待つだけ。
・Powershellスクリプトによりトリガーファイルが作成され一般化(Sysprep)が自動実行される。
・VMイメージの取得からVMスケールセットのイメージ更新までが実行され終了する
◆Runbookの処理内容
①Azureファイル共有のtestディレクトリにトリガーファイルを作成
⇒バッチファイルにより一般化(Sysprep)が実行
②VMが停止状態になるまでWait
③VMが停止状態になったら、VMを「割り当て解除」状態にし、イメージを取得
④元のVMを削除し、取得したイメージからVMを再作成
⑤VMスケールセットのソースイメージ定義を更新
⑥VMスケールセットのアップグレードを実行し、イメージ更新を反映
実行結果
Logging in to Azure...


Environments
------------
{[AzureChinaCloud, AzureChinaCloud], [AzureCloud, AzureCloud], [AzureGermanCloud, AzureGermanCloud], [AzureUSGovernme...

:
:

Mode                LastWriteTime         Length Name
----                -------------         ------ ----
------         7/3/2018   8:21 AM              0 trigger.txt

VM running

VM running

:
:

Delete trigger file completed


Tuesday, July 3, 2018 5:25:57 PM

TestVM-Image201807031725

-------------------------

Start Create Image


OperationId : xxxxxxxx-xxxx-xxxx-xxxx-xxxxxxxxxxxx
Status      : Succeeded
StartTime   : 7/3/2018 8:25:57 AM
EndTime     : 7/3/2018 8:28:32 AM
Error       :
Name        :

:
:

Start Create VM


RequestId IsSuccessStatusCode StatusCode ReasonPhrase
--------- ------------------- ---------- ------------
                         True         OK OK

-------------------------

Start Install IaaSAntimalware


RequestId IsSuccessStatusCode StatusCode ReasonPhrase
--------- ------------------- ---------- ------------
                         True         OK OK

-------------------------

***** Start VMSS Update *****


ResourceGroupName        : [ResourceGroupName]
FullyQualifiedDomainName :
Sku                      : Microsoft.Azure.Management.Compute.Models.Sku
Plan                     :
UpgradePolicy            : Microsoft.Azure.Management.Compute.Models.UpgradePolicy
VirtualMachineProfile    : Microsoft.Azure.Management.Compute.Models.VirtualMachineScaleSetVMProfile
ProvisioningState        : Succeeded
Overprovision            : True
UniqueId                 : xxxxxxxx-xxxx-xxxx-xxxx-xxxxxxxxxxxx
SinglePlacementGroup     : True
ZoneBalance              :
PlatformFaultDomainCount :
Identity                 :
Zones                    :
Id                       : /subscriptions/[subscriptionId]/resourceGroups/[ResourceGroupName]/providers/Microsoft
                           .Compute/virtualMachineScaleSets/TestVMSS
Name                     : TestVMSS
Type                     : Microsoft.Compute/virtualMachineScaleSets
Location                 : japaneast
Tags                     : {}

Upgdading instanceId : 0


Name      : xxxxxxxx-xxxx-xxxx-xxxx-xxxxxxxxxxxx
StartTime : 7/3/2018 8:39:32 AM
EndTime   : 7/3/2018 8:41:03 AM
Status    : Succeeded
Error     :

2018-0703-084104

***** End VMSS Update *****
所感
実際にテスト環境を構築し、試したところ正常にVMスケールセットのイメージ更新までできた。
Azureポータル上でRunbookの「開始」をクリックするだけで、VMへRDP接続し、一般化(sysprep)を実施することなく、VMSSのイメージ更新ができるのは、アプリケーションの入れ替えやWindowsパッチ適用などでイメージ更新が必要となる運用作業時の負担の軽減が期待できそうに思う。
改善点(下記)はいろいろありますが、今後の検討内容としておきます。
・エラー発生時のハンドリング
・WebHookへの対応
・複数VMSSのイメージ更新の対応
:
参考にしたドキュメント
・Azure Virtual Machine Scale Sets (VMSS) の構成方法
・Azure PowerShell での Azure ファイル共有の管理
・Azure VM から非管理対象 VM イメージを作成する方法

