忘備録
【OS】
今回はCentOS6.6_x86_64版を使用。詳細は以下を参照。
http://centos.server-manual.com/
事前準備
セットアップに必要なパッケージを事前に設定しておく必要がある。以下を全て設定する。
システム変更が発生するので管理者権限が必須。rootにsuしておく事。
【YUMパッケージ管理】
yum -y install yum-plugin-fastestmirror
yum -y update
yum -y groupinstall "Base" "Development tools" "Japanese Support"
[RPMforgeリポジトリ追加]
rpm --import http://apt.sw.be/RPM-GPG-KEY.dag.txt
rpm -ivh http://apt.sw.be/redhat/el6/en/x86_64/rpmforge/RPMS/rpmforge-release-0.5.3-1.el6.rf.x86_64.rpm
[EPELリポジトリ追加]
rpm --import http://dl.fedoraproject.org/pub/epel/RPM-GPG-KEY-EPEL-6
rpm -ivh http://dl.fedoraproject.org/pub/epel/6/x86_64/epel-release-6-8.noarch.rpm
[ELRepoリポジトリ追加]
rpm --import https://www.elrepo.org/RPM-GPG-KEY-elrepo.org
rpm -Uvh http://www.elrepo.org/elrepo-release-6-6.el6.elrepo.noarch.rpm
[Remiリポジトリ追加]
rpm --import http://rpms.famillecollet.com/RPM-GPG-KEY-remi
rpm -ivh http://rpms.famillecollet.com/enterprise/remi-release-6.rpm
【SELinux無効化】
getenforce
Enforcing ←SELinux有効
setenforce 0
getenforce
Permissive ←SELinux無効
vi /etc/sysconfig/selinux
SELINUX=enforcing
SELINUX=disabled ←変更(起動時に無効にする)
【iptablesでHTTPを許可】
vi /etc/sysconfig/iptables
-A INPUT -m state --state NEW -m tcp -p tcp --dport 22 -j ACCEPT
-A INPUT -m state --state NEW -m tcp -p tcp --dport 80 -j ACCEPT ←追加
-A INPUT -j REJECT --reject-with icmp-host-prohibited
-A FORWARD -j REJECT --reject-with icmp-host-prohibited
COMMIT
Iptables再起動
service iptables restart
【MySQL設定】
CentOS構築時にデフォルトでインストールされたバージョンをアンインストール。
yum erase mysql*
rpmの追加
yum install http://dev.mysql.com/get/mysql-community-release-el6-5.noarch.rpm
MySQL5.6のインストール
yum install mysql mysql-devel mysql-server mysql-utilities
確認
mysql –-version
mysql Ver 14.14 Distrib 5.6.15, for Linux (x86_64) using EditLine wrapper
デフォルトキャラクタセットをutf8に設定
vi /etc/my.cnf
[mysqld]
datadir=/var/lib/mysql
socket=/var/lib/mysql/mysql.sock
symbolic-links=0
sql_mode=NO_ENGINE_SUBSTITUTION,STRICT_TRANS_TABLES
character-set-server=utf8
;任意設定
innodb_file_per_table
query-cache-size=16M
[mysqld_safe]
log-error=/var/log/mysqld.log
pid-file=/var/run/mysqld/mysqld.pid
[mysql]
default-character-set=utf8
起動・自動起動設定
service mysqld start
chkconfig mysqld on
DB設定
rootパスワード変更
mysql -u root
SET PASSWORD FOR root@localhost=password('***'); ←rootパスワード設定
EXIT;
Redmine用設定
mysql -u root -p パスワード
create database db_redmine default character set utf8;
grant all on db_redmine.* to user_redmine@localhost identified by '**';←パスワード設定
flush privileges;
exit;
【追加パッケージ】
■RubyとPassengerのビルドに必要なヘッダファイル
yum -y install openssl-devel readline-devel zlib-devel curl-devel libyaml-devel
■Apacheヘッダファイルのインストール
yum -y install httpd-devel
■ImageMagickとヘッダファイル・日本語フォントのインストール
yum -y install ImageMagick ImageMagick-devel ipa-pgothic-fonts
【Apache+PHP設定】
上記
http://centos.server-manual.com/
Apache2・PHP参照
【Ruby】
ソースコードのダウンロード
http://www.ruby-lang.org/ja/downloads/
tar zxvf ruby-2.0.0-p451.tar.gz
cd ruby-2.0.0-p451
./configure --disable-install-doc
Make
make install
cd ..
確認
ruby –v
ruby 2.0.0p451 (2014-02-24 revision 45167) [x86_64-linux]
【bundler】
gem install bundler --no-rdoc --no-ri
【Redmineインストール】
http://www.redmine.org/projects/redmine/wiki/Download
tar xvf redmine-2.6.0.tar.gz
mv redmine-2.6.0 /var/lib/redmine
cd /var/lib/redmine/config
cp configuration.yml.example configuration.yml
cp database.yml.example database.yml
■vi database.yml
production:
adapter: mysql2
database: db_redmine ←上記で設定したDB名
host: localhost
username: user_redmine ←上記で設定したユーザ名
password: ******** ←上記で設定したパスワード
encoding: utf8
■vi configuration.yml
production:
email_delivery:
delivery_method: :smtp
smtp_settings:
address: "localhost"
port: 25
domain: '××××.co.jp' ←メール送信するFQDN
rmagick_font_path: /usr/share/fonts/ipa-pgothic/ipagp.ttf
【Gemパッケージのインストール】
bundle install --without development test
■Redmineの初期設定とデータベースのテーブル作成
bundle exec rake generate_secret_token
RAILS_ENV=production bundle exec rake db:migrate
■Passengerのインストール
gem install passenger --no-rdoc --no-ri
■PassengerのApache用モジュールのインストール
passenger-install-apache2-module
インストールが完了すると以下のように表示されます。赤字の部分はApacheに設定すべき内容なので控えておきます。
The Apache 2 module was successfully installed.
Please edit your Apache configuration file, and add these lines:

LoadModule passenger_module /usr/local/lib/ruby/gems/1.9.1/gems/passenger-3.0.17/ext/apache2/mod_passenger.so
   PassengerRoot /usr/local/lib/ruby/gems/1.9.1/gems/passenger-3.0.17
   PassengerRuby /usr/local/bin/ruby

After you restart Apache, you are ready to deploy any number of Ruby on Rails
applications on Apache, without any further Ruby on Rails-specific
configuration!
Press ENTER to continue.
赤字の部分は環境により異なります。上記設定はあくまでも例ですのでそのまま転記して使用せず、必ずインストール作業中に表示された設定か passenger-install-apache2-module --snippet により表示されたものを使用してください。
【Apache】
confファイルに追記するのではなく、下記ファイルを作成し、管理を軽減。
vi /etc/httpd/conf.d/passenger.conf
;Passengerの基本設定。
;passenger-install-apache2-module --snippet を実行して表示される設定を使用。
;環境によって設定値が異なりますので以下の3行はそのまま転記しないでください。
;
LoadModule passenger_module /usr/local/lib/ruby/gems/1.9.1/gems/passenger-3.0.17/ext/apache2/mod_passenger.so
PassengerRoot /usr/local/lib/ruby/gems/1.9.1/gems/passenger-3.0.17
PassengerRuby /usr/local/bin/ruby
;Passengerが追加するHTTPヘッダを削除するための設定(任意)。
;
Header always unset "X-Powered-By"
Header always unset "X-Rack-Cache"
Header always unset "X-Content-Digest"
Header always unset "X-Runtime"
;必要に応じてPassengerのチューニングのための設定を追加(任意)。
PassengerMaxPoolSize 20
PassengerMaxInstancesPerApp 4
PassengerPoolIdleTime 3600
PassengerHighPerformance on
PassengerStatThrottleRate 10
PassengerSpawnMethod smart
RailsAppSpawnerIdleTime 86400
PassengerMaxPreloaderIdleTime 0
RackBaseURI /redmine ←最終行に追記
■Apache再起動・自動起動設定
service httpd start
chkconfig httpd on
■オーナー変更
chown -R apache:apache /var/lib/redmine
■サブディレクトリ設定
ln -s /var/lib/redmine/public /var/www/html/redmine
■Apache再起動
service httpd restart
ブラウザで接続確認。ID:admin PW:adminでログオンを実施し、各種設定を実施する。
【初期設定】
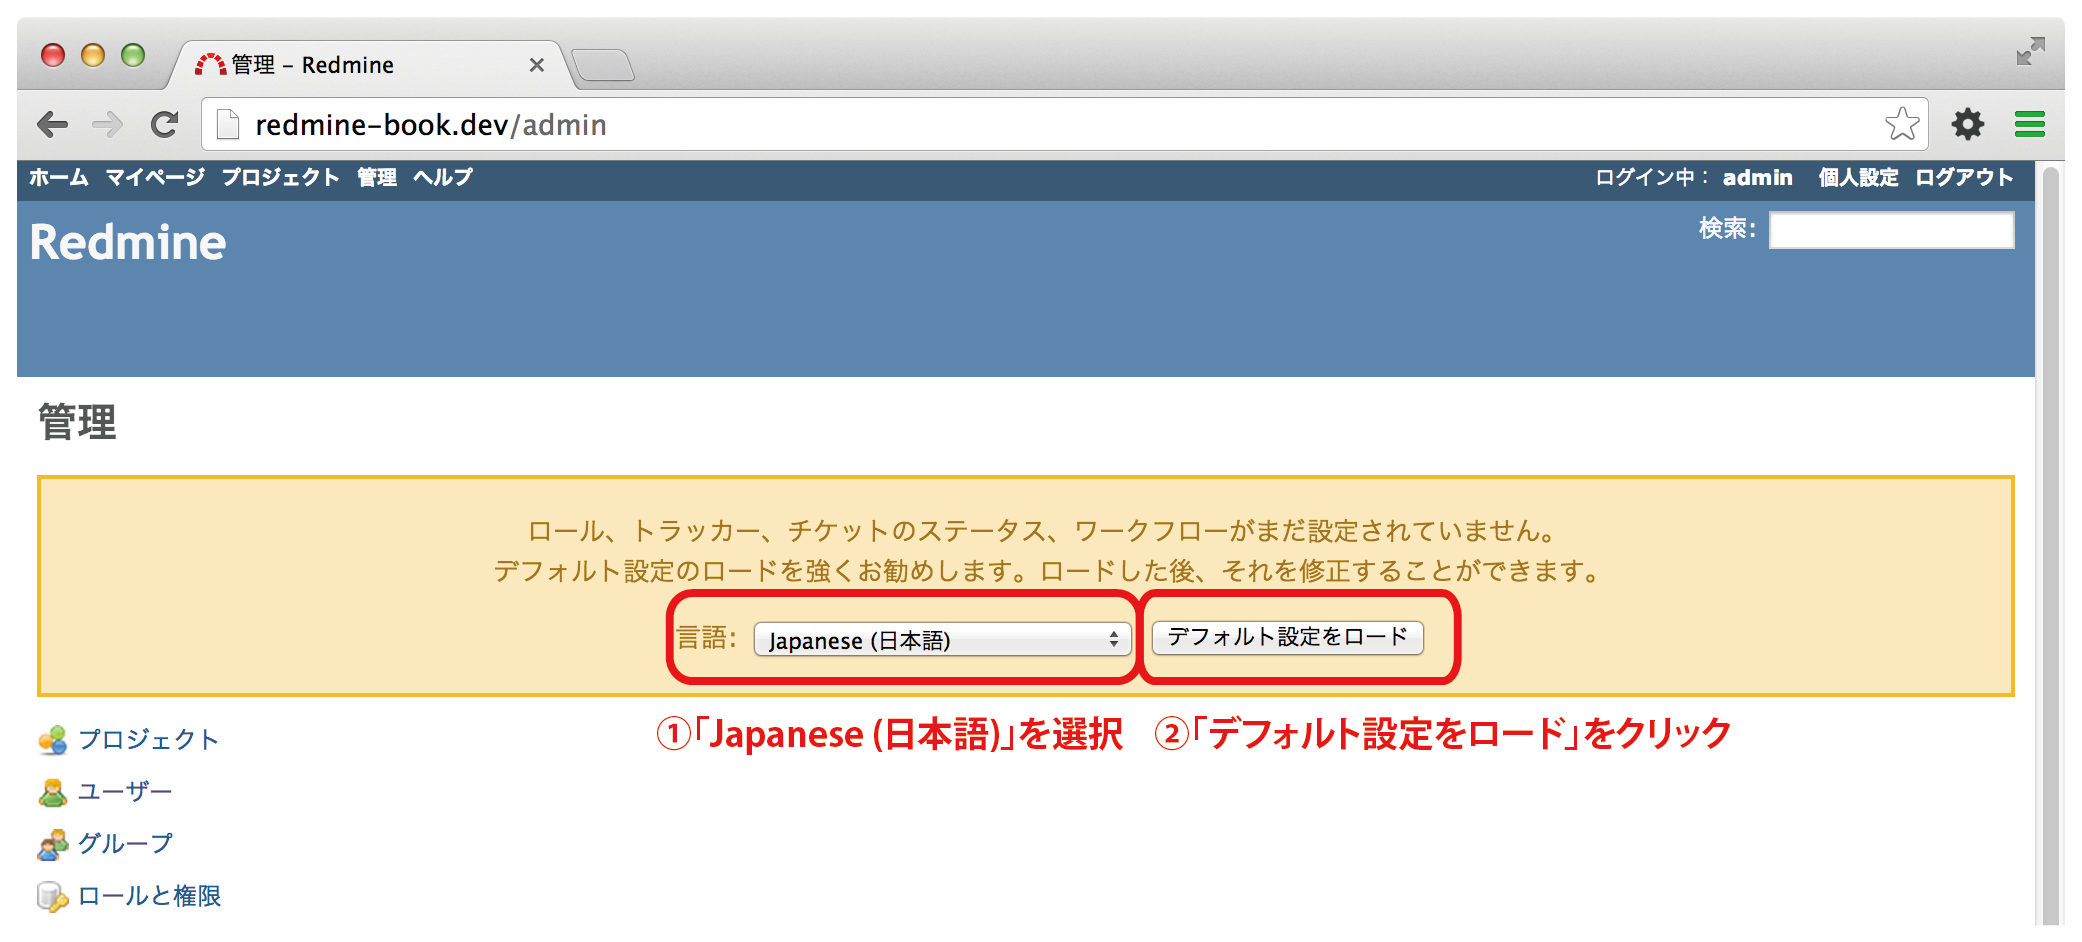
■デフォルトデータのロード
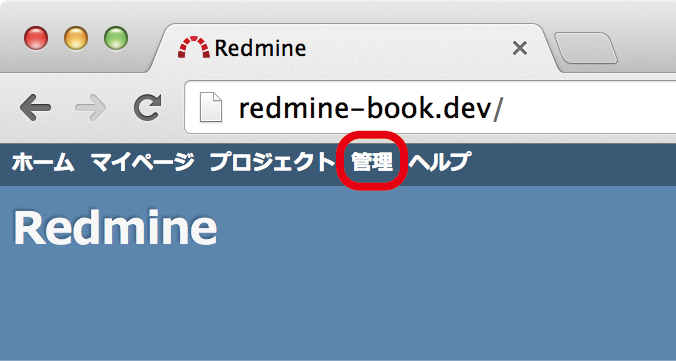
画面左上の「管理」をクリック

管理画面中央付近にデフォルト設定のロードを促す表示があります。そこでトラッカーやロールの名称で使用する言語(通常は「Japanese (日本語)」)を選択し、「デフォルト設定をロード」ボタンをクリック
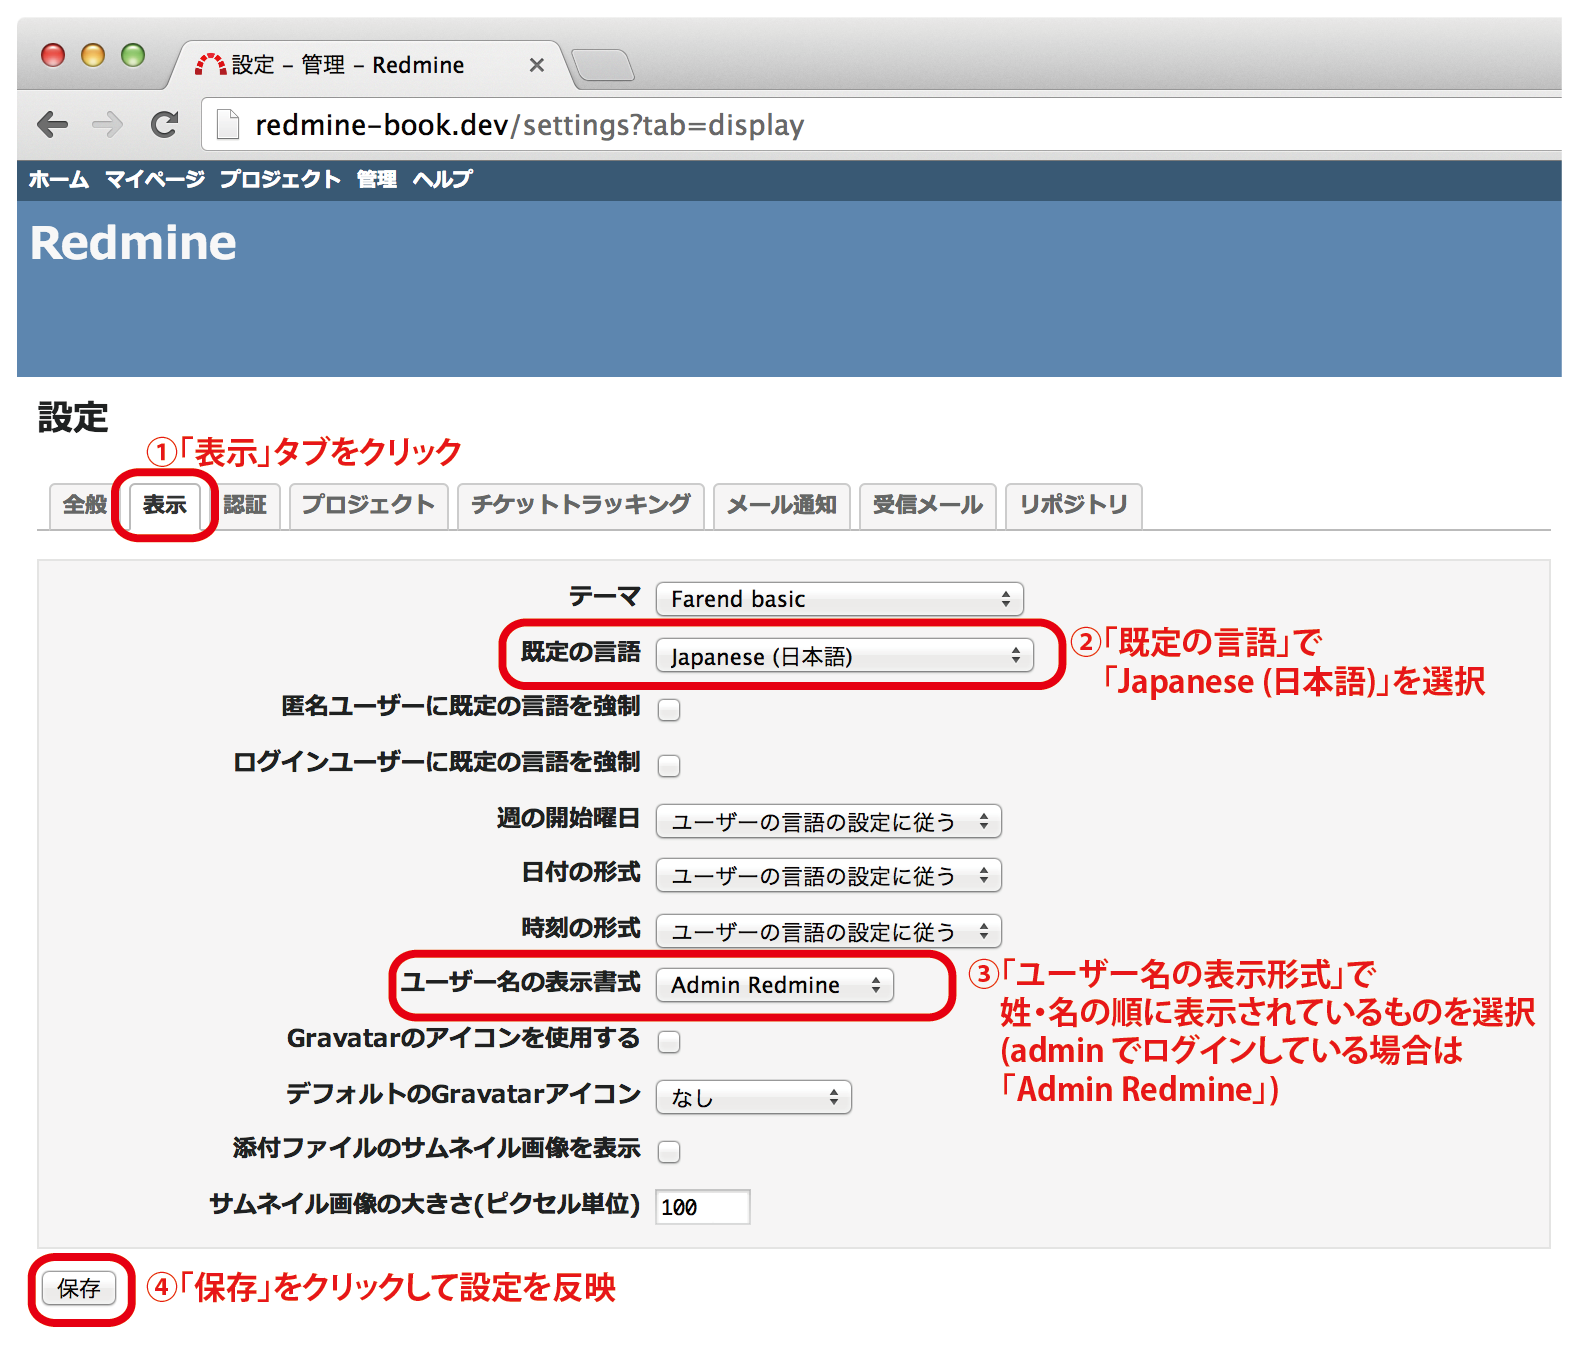
■日本語での利用に適した設定
以下の設定を行います。
「既定の言語」を「日本語 (Japanese)」に設定
「名前の書式」を姓が先に来るよう設定
リポジトリブラウザで文字コードの自動判別を設定
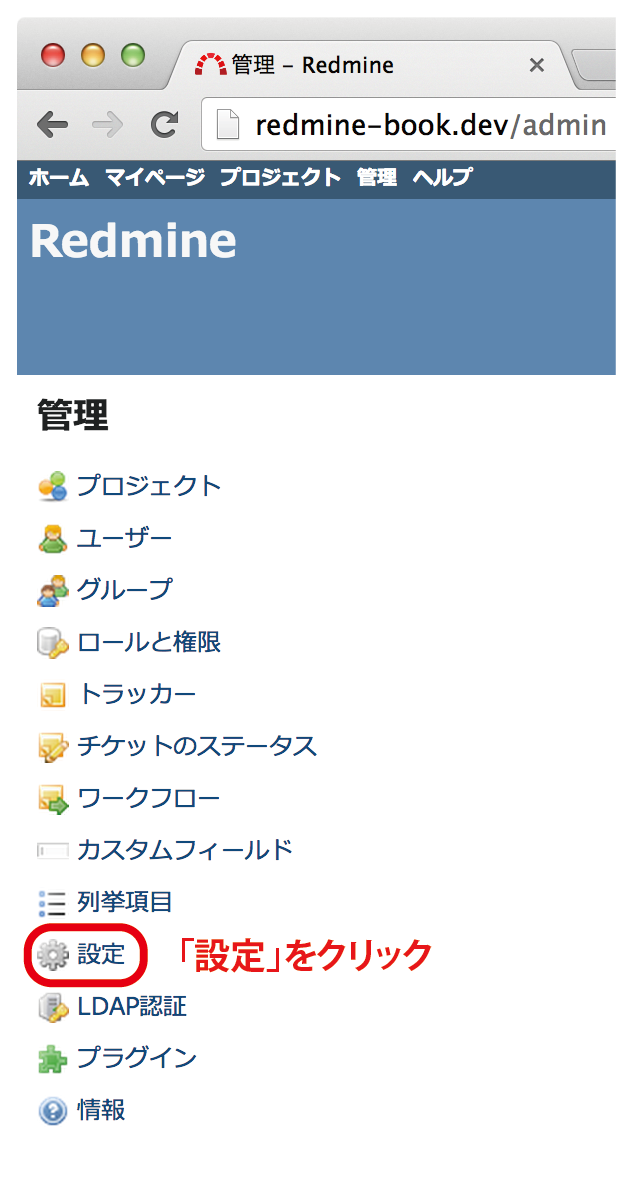
画面左上の「管理」をクリック
管理画面の「設定」をクリック
「表示」タブを開き、以下のように設定
上記二つの設定を行うために開いている「管理」→「設定」画面内の「全般」タブを開き、「添付ファイルとリポジトリのエンコーディング」を以下の様に設定
utf-8,cp932,euc-jp【おまけ】
個人的にお勧めの設定。Redmineのテーマを簡単に変更できます
■farend fancy
URL: https://github.com/farend/redmine_theme_farend_fancy
Redmineのインストールディレクトリで以下のコマンドを実行
git clone git://github.com/farend/redmine_theme_farend_fancy.git public/themes/farend_fancy新しいテーマの利用
「管理」→「設定」→「表示」画面内の項目「テーマ」で「Fare fancy」を択、画面最下部の「保存」ボタンをクリック