環境
Xcode 12.4
macOS BigSur 11.2.1
前提
Homebrewがインストールされていることを前提として手順を紹介します。
導入されていない方はこちらから → 【Homebrew - 公式日本語サイト】
手順
- SwiftLintをローカルにインストール
- Xcodeでビルド設定を追加
- SwiftLintの設定ファイルを作成
- SwiftLintの設定ファイルを編集
- 自動修正を有効化(任意)
- ビルドして確認
1. SwiftLintをローカルにインストール
brew install swiftlintをターミナルで実行するだけ。
2. Xcodeでビルド設定を追加
プロジェクトのビルド設定を開き、
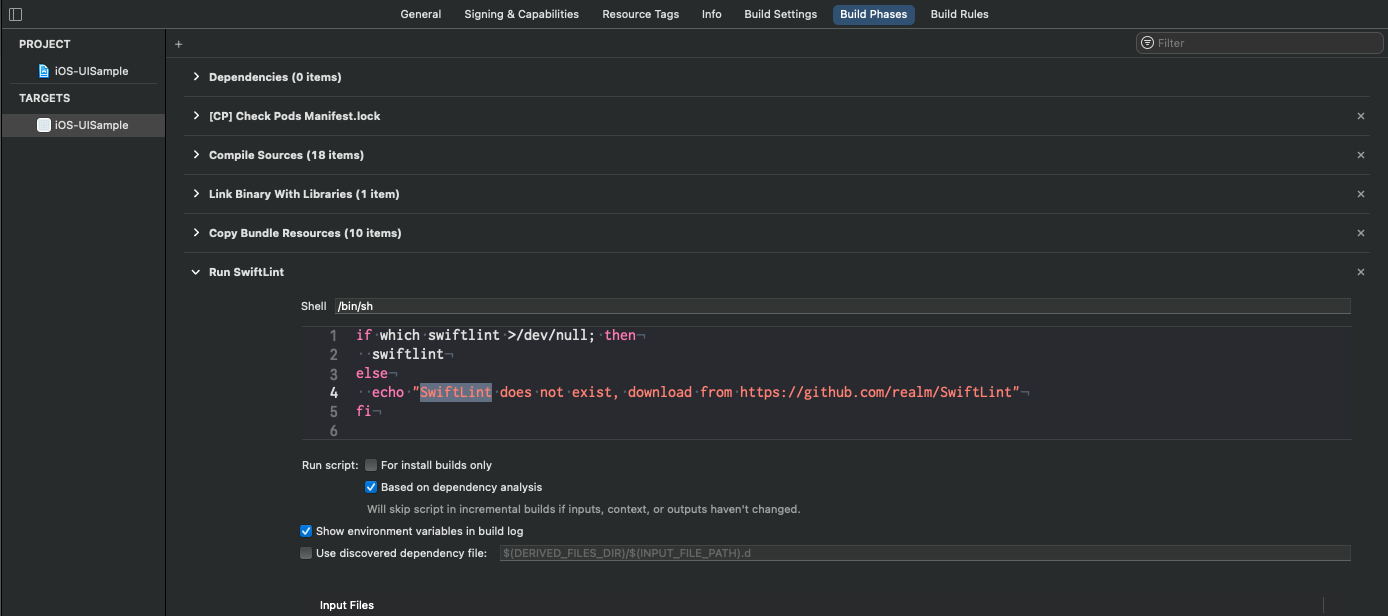
TARGETS → Build Phases → 左上の+アイコンをクリック
→ New Run Script Phaseを選択してRun Scriptの項目を追加
※ Run Scriptの項目名を一度クリックすると変更できるので、Run SwiftLintとか適切な名前に変更しておくといいです。
→ 追加した項目内に以下のコードを記述
if which swiftlint >/dev/null; then
  swiftlint
else
  echo "SwiftLint does not exist, download from https://github.com/realm/SwiftLint"
fi
| Run Scriptの追加 | コード記述後 |
|---|---|
 |
 |
3. SwiftLintの設定ファイルを作成
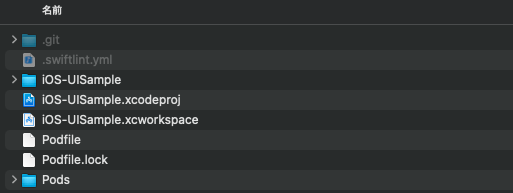
.swiftlint.ymlファイルを.xcodeprojと同じ階層に作成。

4. SwiftLintの設定ファイルを編集
.swiftlint.yml内を編集することで適用するルールを変更できます。
参考:
【SwiftLintFramework Docs - 公式ドキュメント】
【SwiftLintの全ルール一覧(Swift 4.2版) -Qiita】
参考までに自分の設定ファイルはこちら
【swiftlint 0.18.1 の設定ファイル(.swiftlint.yml)のサンプル -Qiita】をベースにさせていただきました。
# SwiftLintFramework Docs: https://realm.github.io/SwiftLint/index.html
# ルール追加時の参考: https://qiita.com/uhooi/items/7f5d6cf2b240f60ba1ed
# ルール引用元: https://qiita.com/rd0501/items/ceabe756c419ec082030

# デフォルト有効のルールのうち、無効にするもの
disabled_rules:
# コードの記載のない改行を許可するため
- trailing_whitespace
# force_castは場合によっては使用するため
- force_cast
# closureが返す値を明示しておきたい場合があるため
- unused_closure_parameter

# デフォルト無効のルールのうち、有効にするもの
opt_in_rules:
- closure_end_indentation
- closure_spacing
- collection_alignment
- empty_count
- explicit_self
- explicit_init
- fatal_error_message
- first_where
- force_unwrapping
- implicitly_unwrapped_optional
- missing_docs
- nimble_operator
- number_separator
- operator_usage_whitespace
- overridden_super_call
- private_outlet
- prohibited_super_call
- redundant_nil_coalescing
- sorted_imports

# 追加したOSSライブラリは対象に含めない
excluded:
- Pods/
- Carthage/

# 1行あたりの文字数制限変更
line_length: 120

# 変数名に関する制約
identifier_name:
  allowed_symbols: "_"
  min_length: 2
  excluded:
    - i
    - j
    - n
    - x
    - y
5. 自動修正の有効化(任意)
手順2で設定したスクリプトにswiftlint autocorrect --formatを追加することで自動修正を有効化できます。
コード量が多いプロジェクトだと差分が一気に出るのでお好みで有効化してください。
参考: 【SwiftLintの運用ノウハウ - Qiita】
if which swiftlint >/dev/null; then
  swiftlint autocorrect --format # 自動修正の有効化
  swiftlint
else
  echo "SwiftLint does not exist, download from https://github.com/realm/SwiftLint"
fi
6. ビルドして有効になっているかを確認
有効になっていればこんな感じで色々警告がでるようになってるはず。
参考記事まとめ
【Homebrew - 公式日本語サイト】
【SwiftLintFramework Docs - 公式ドキュメント】
【SwiftLintの全ルール一覧(Swift 4.2版) - Qiita】
【swiftlint 0.18.1 の設定ファイル(.swiftlint.yml)のサンプル - Qiita】
【SwiftLintの運用ノウハウ - Qiita】
【SwiftLint 導入 - Qiita】
補足
M1 Mac時のエラー参考
Swiftlint can't be found on Apple Silicon xcode -Stackoverflow
