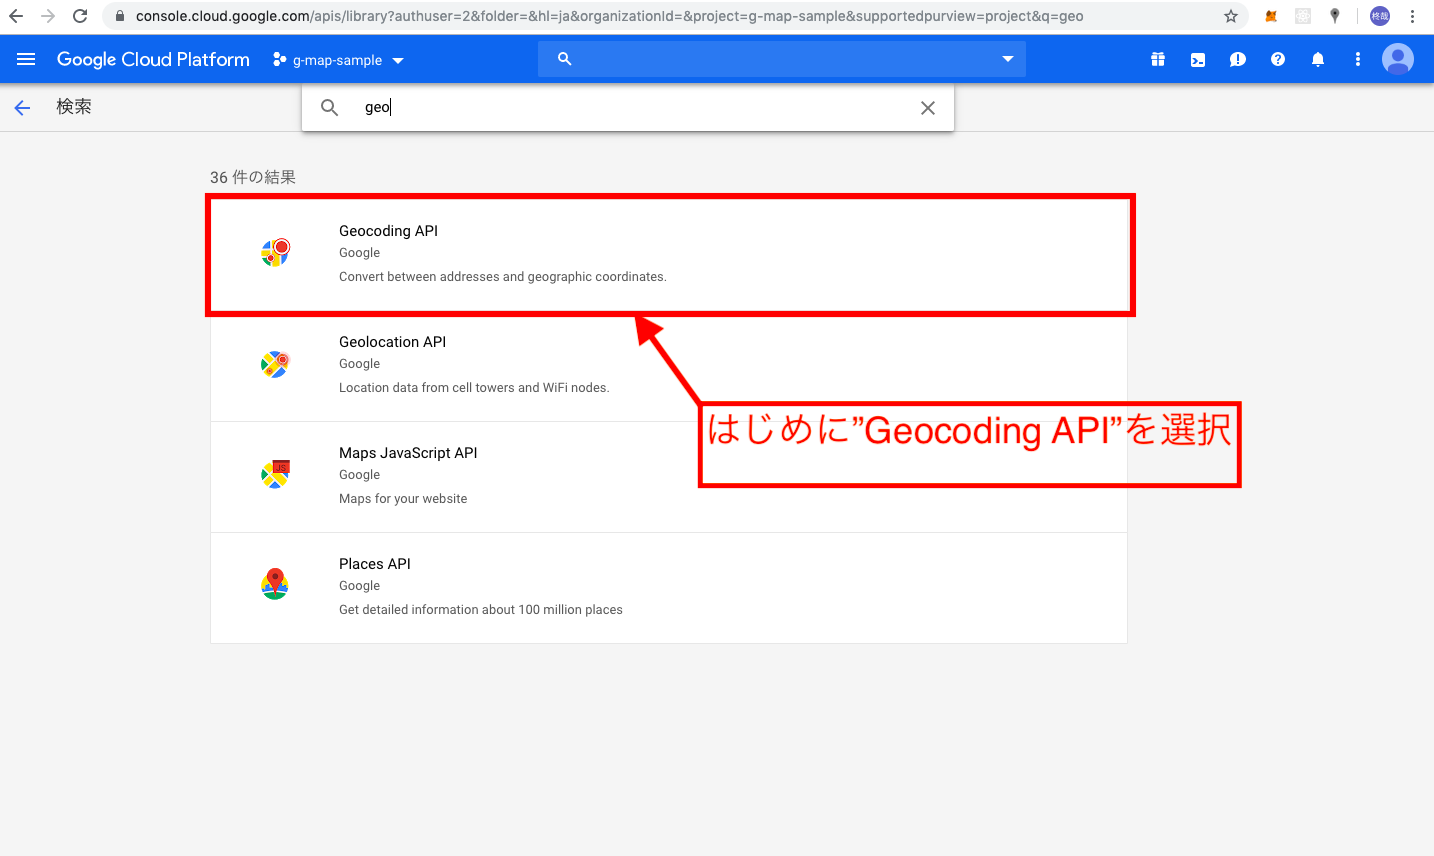
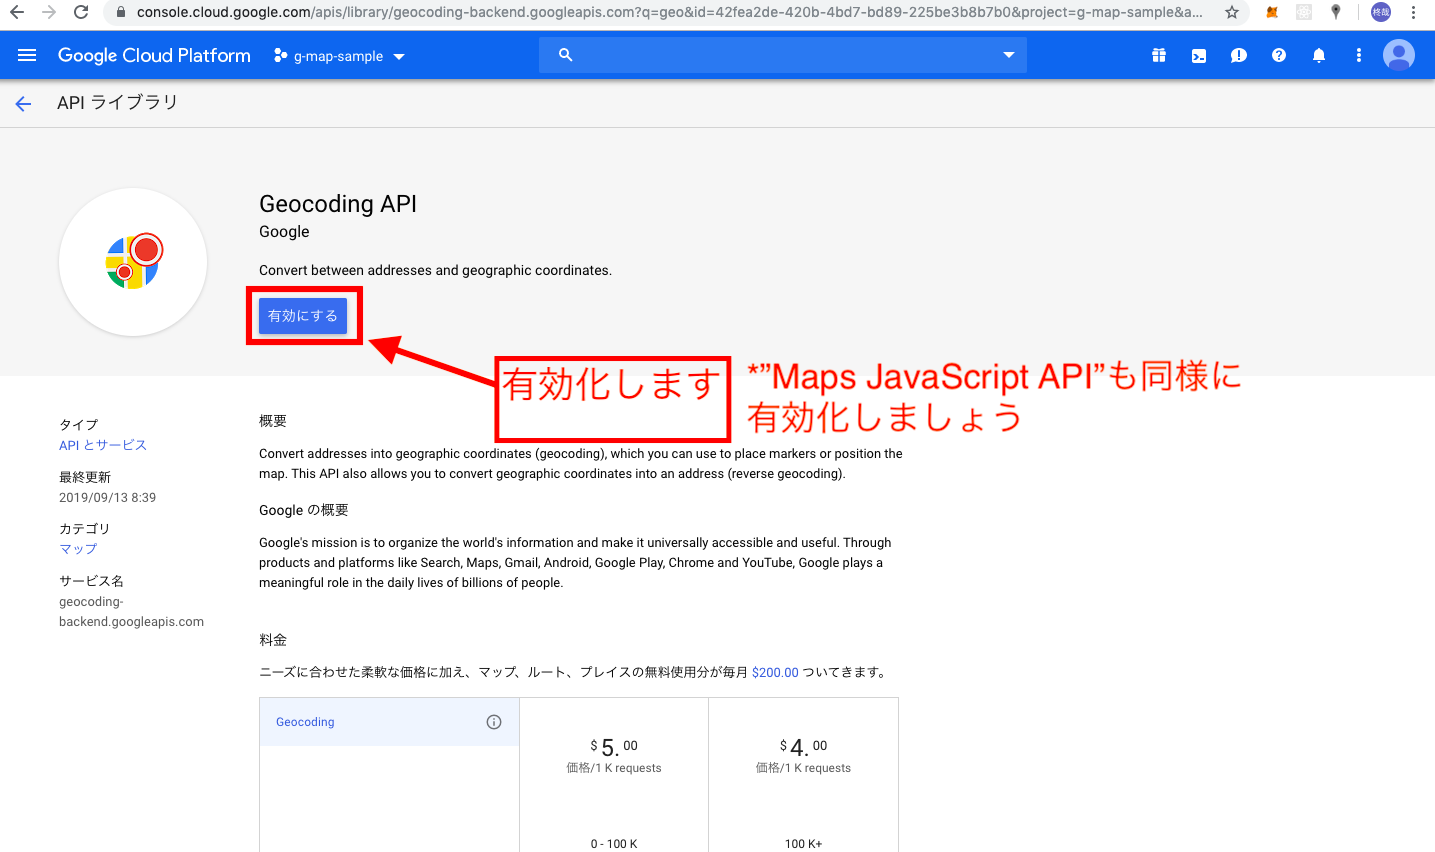
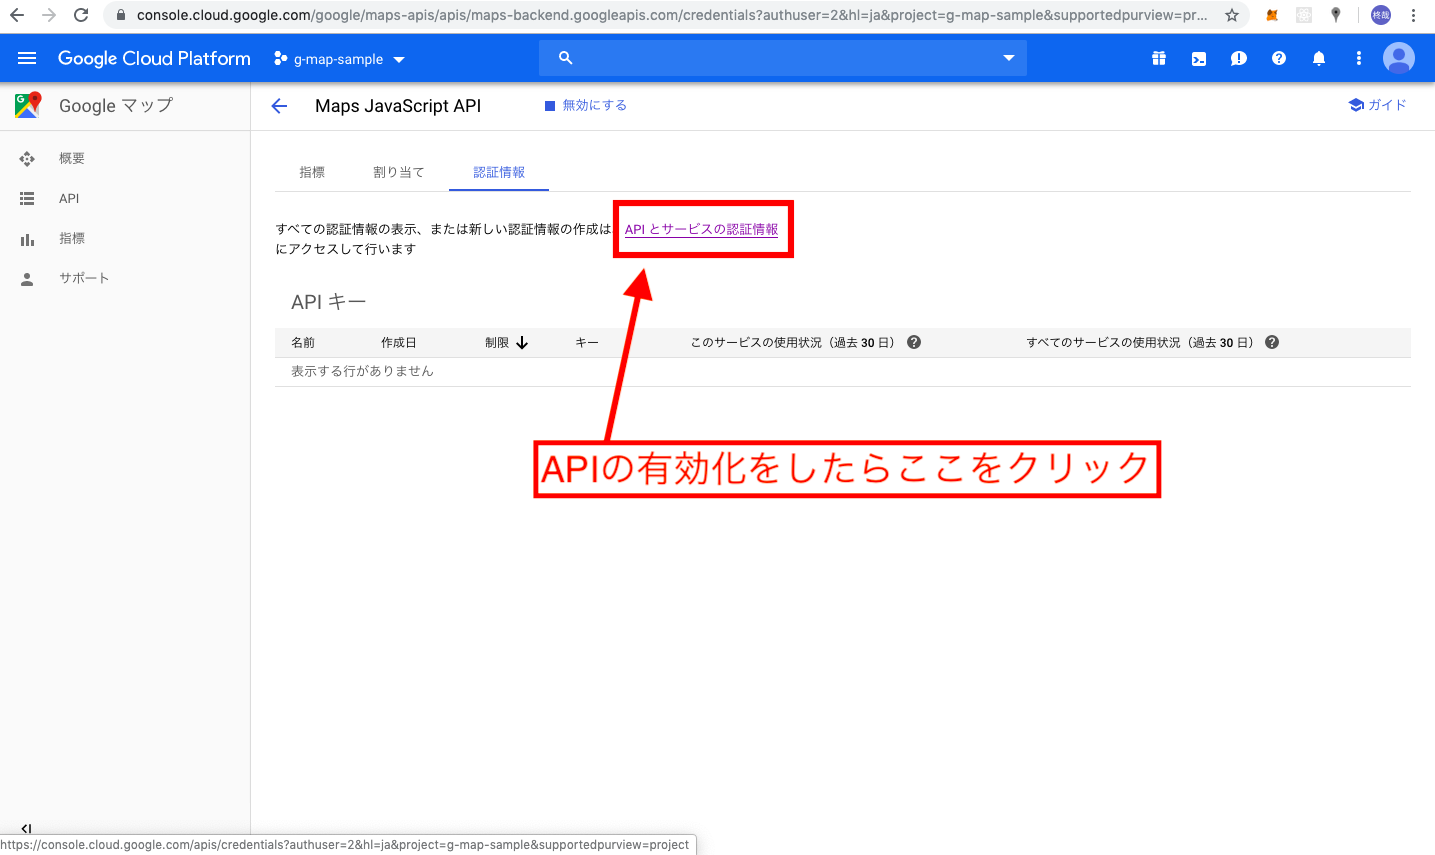
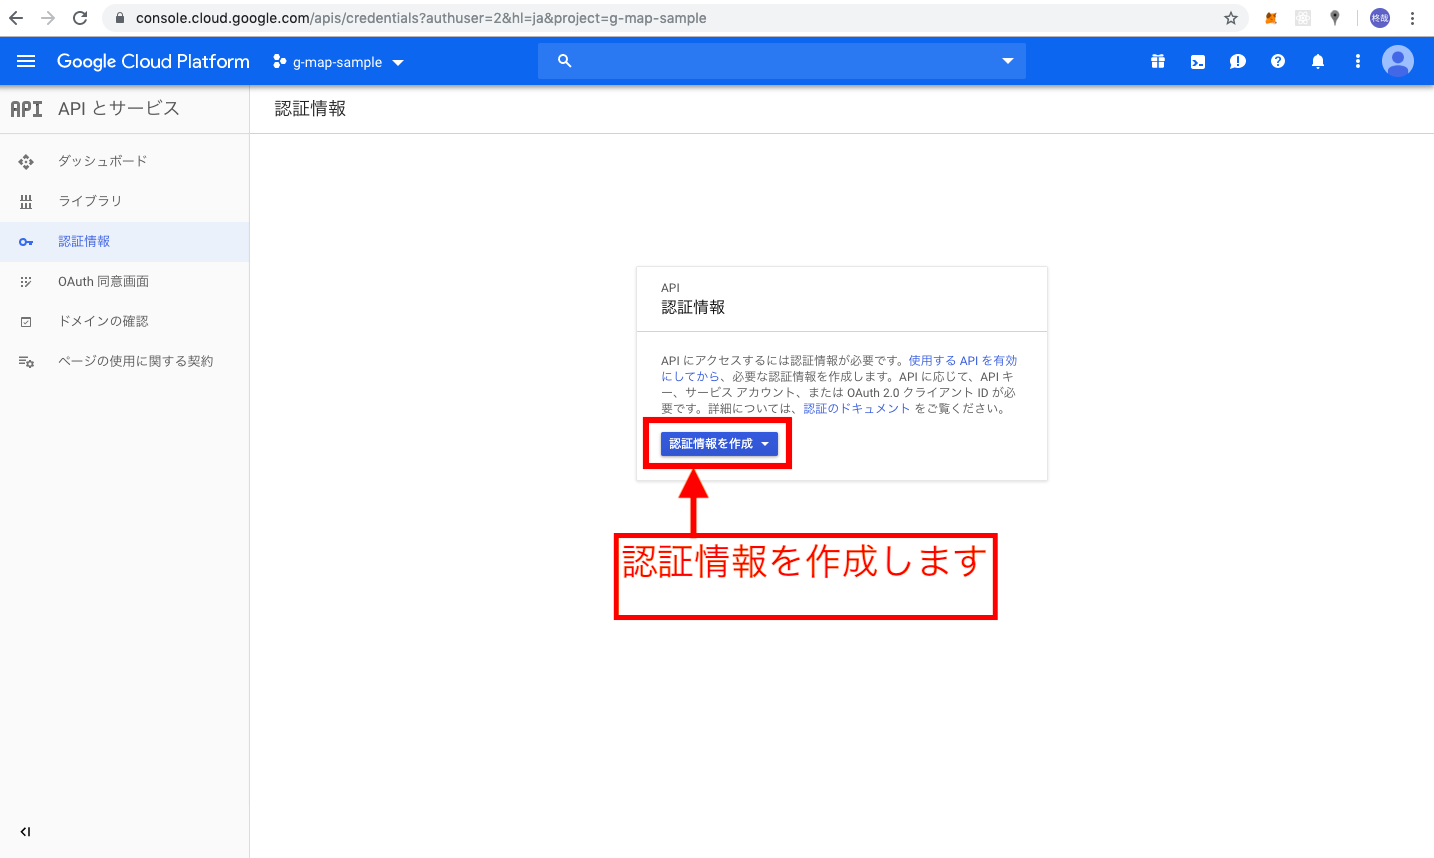
はじめに
つくるもの
Google Map APIを導入しページに地図を表示させます。
今回は検索した住所にピンを立て、そこの緯度経度を表示させるまでを実装します。
コードを書く前に
Google Maps API を利用するには、API キーという許可証のようなものを取得する必要があります。
API キーを取得する為にGoogle アカウントが必要になるため、事前に準備しておきましょう。
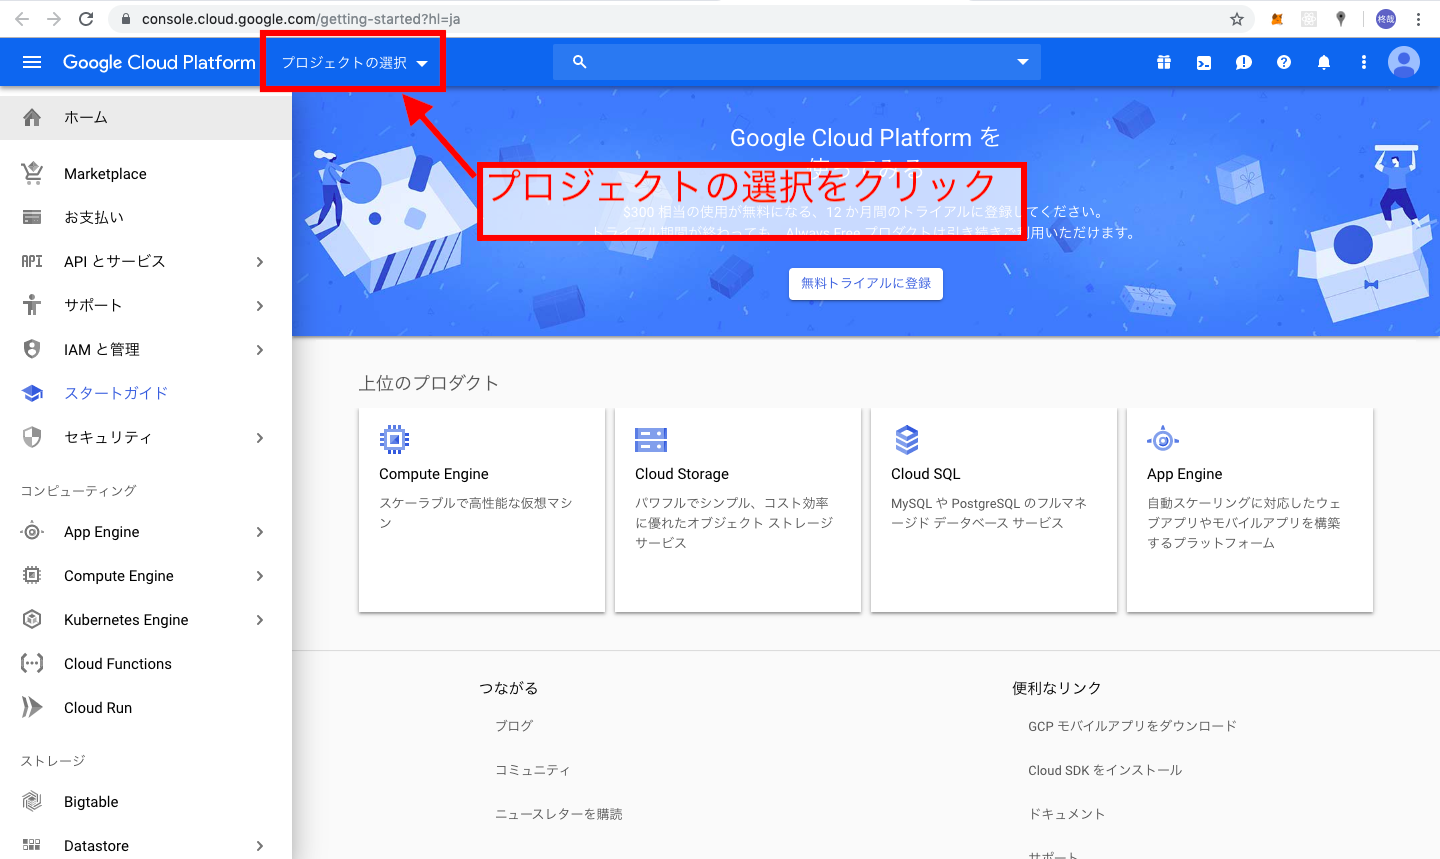
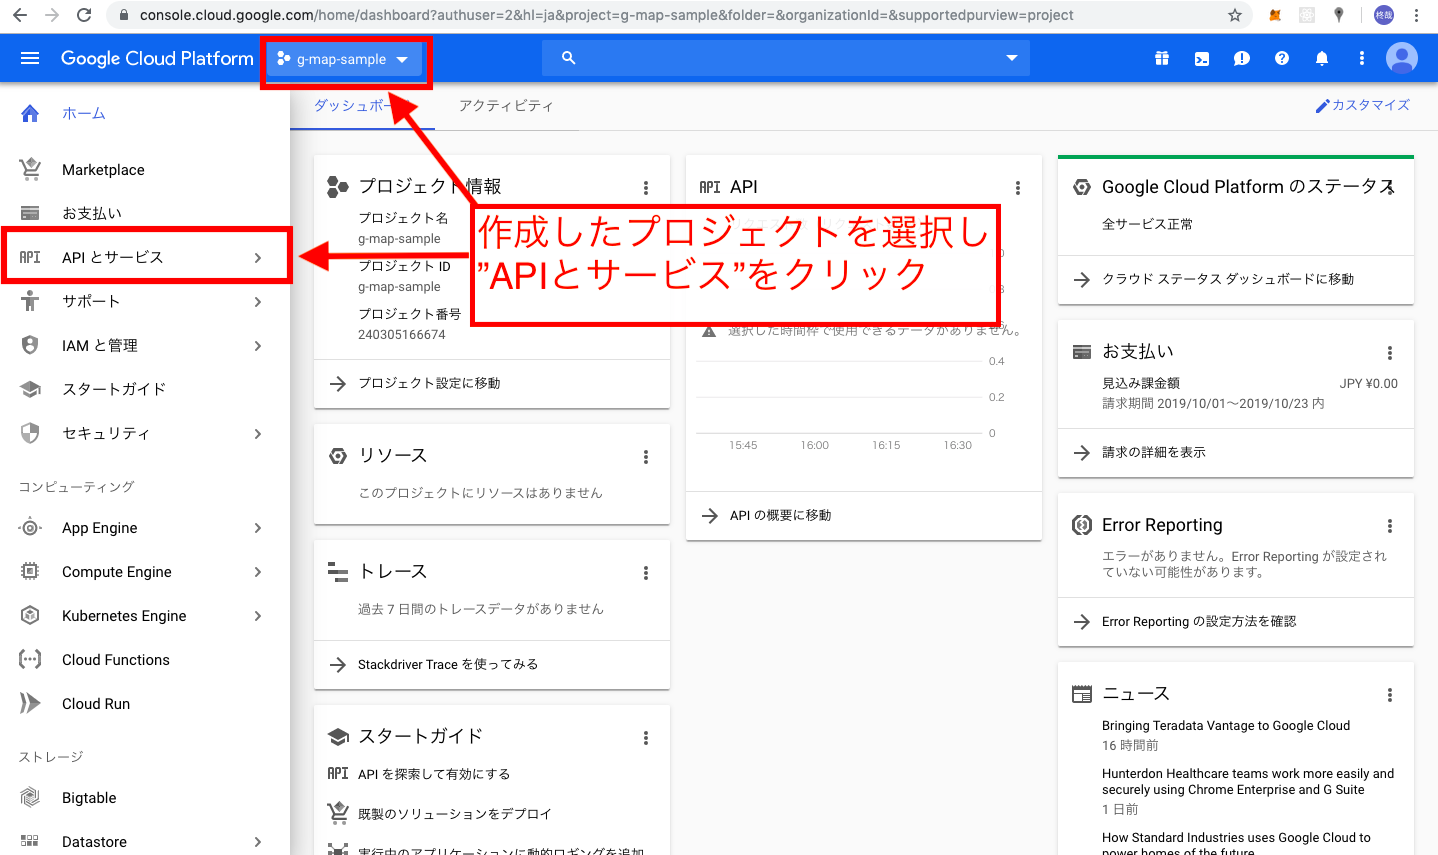
そしてGoogle Cloud Platformへアクセスして、APIキーを取得しましょう。
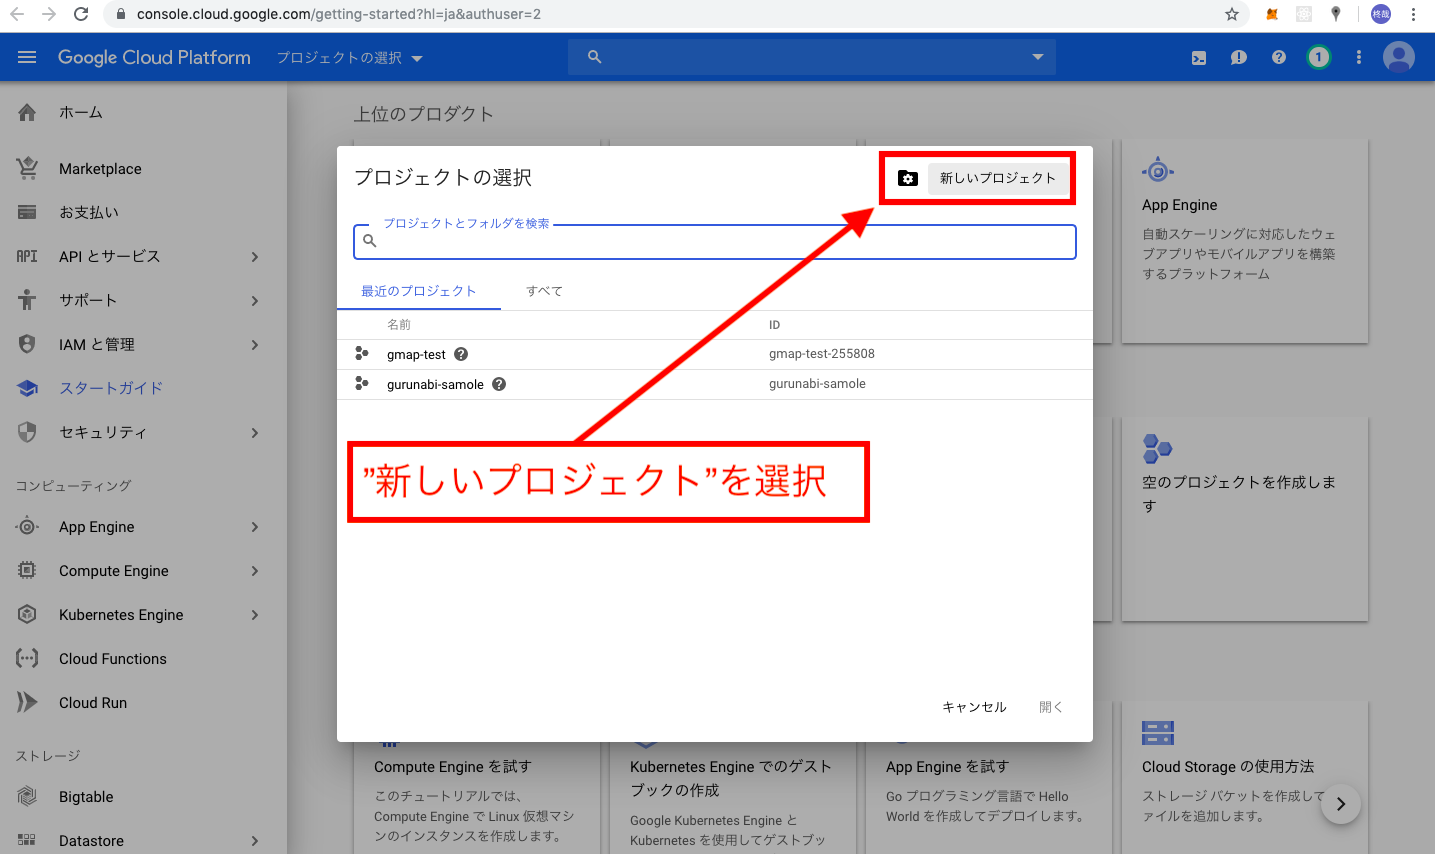
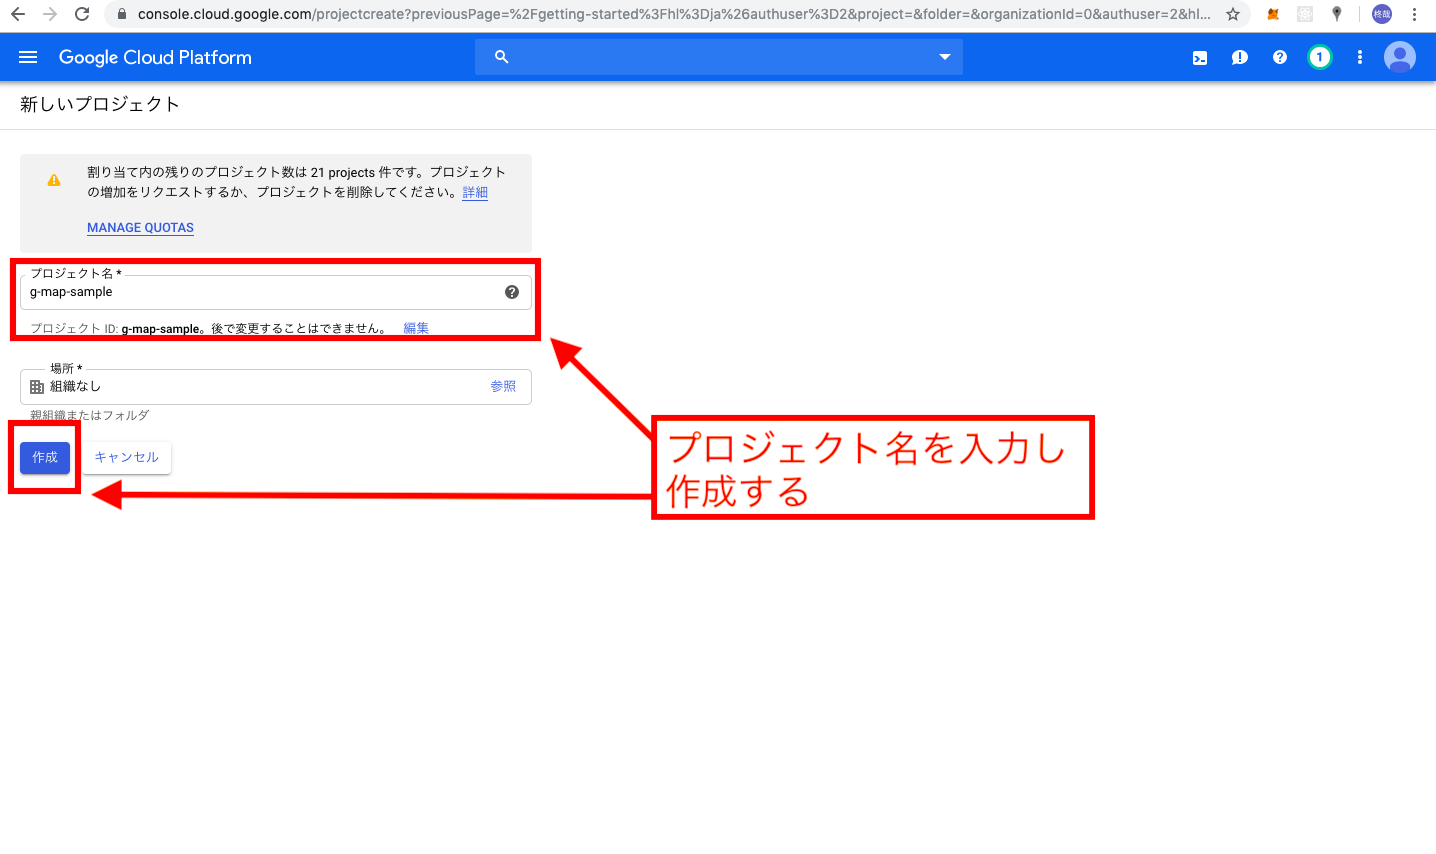
プロジェクトの作成
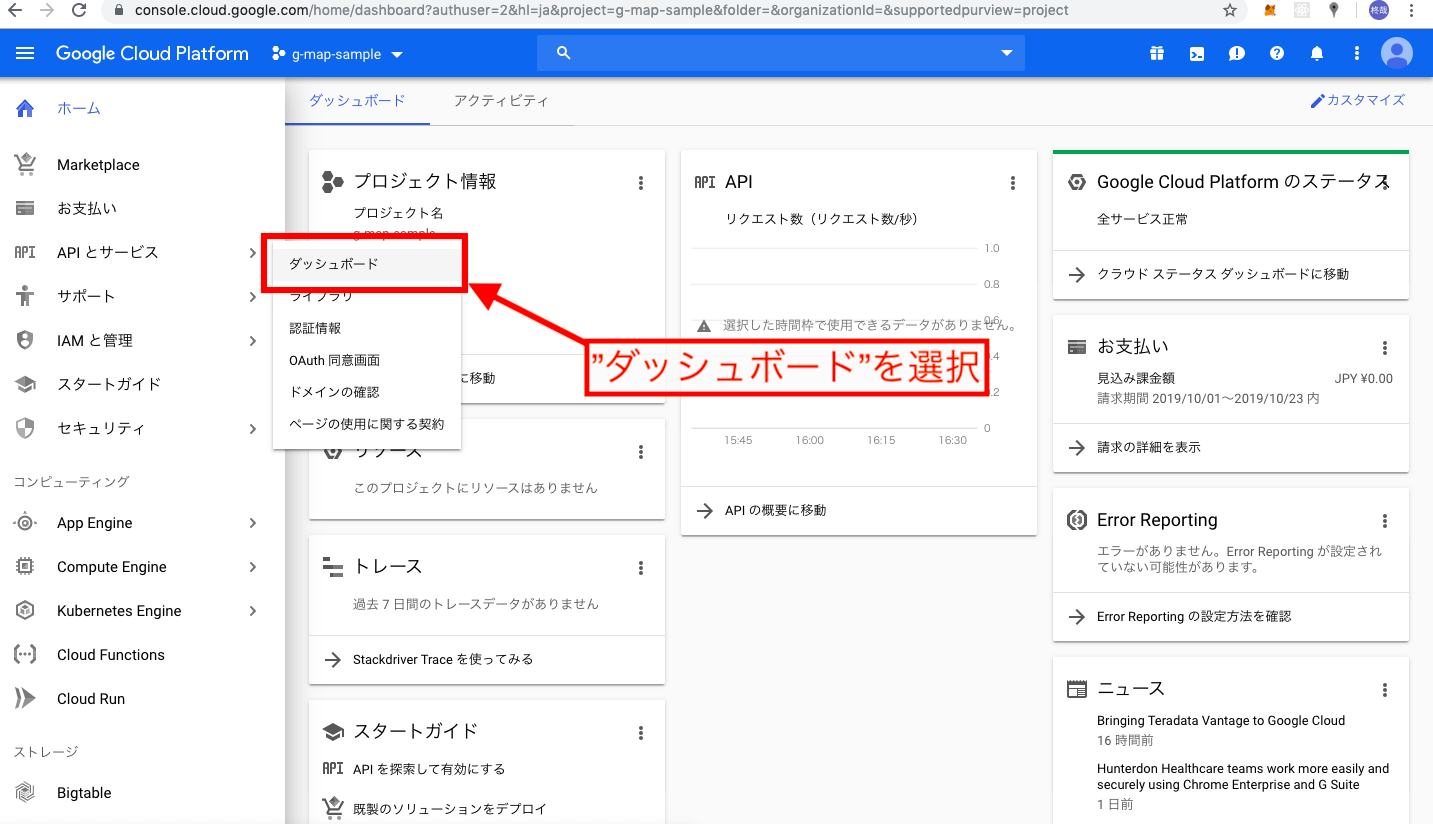
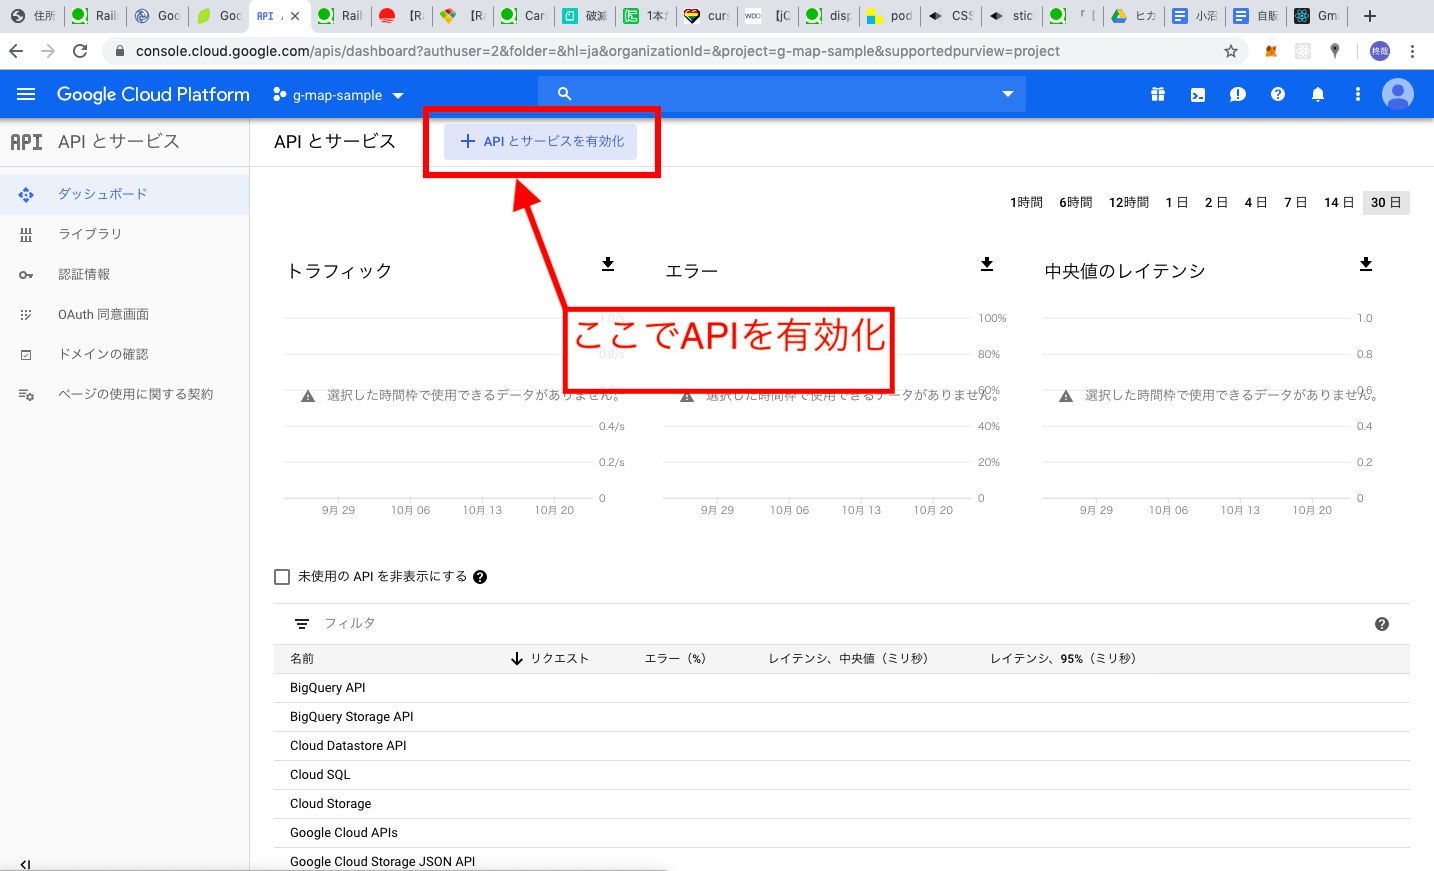
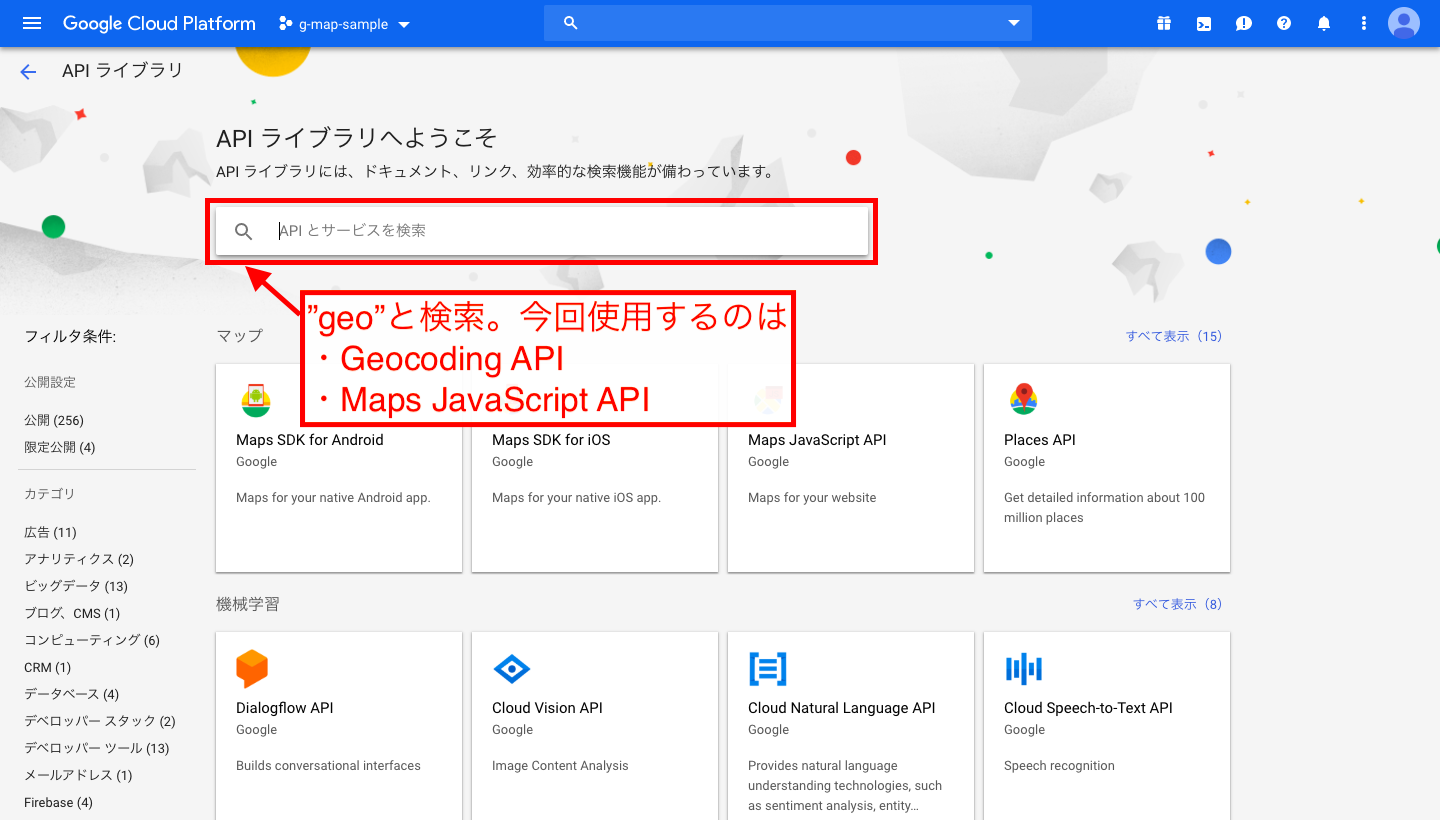
APIの有効化
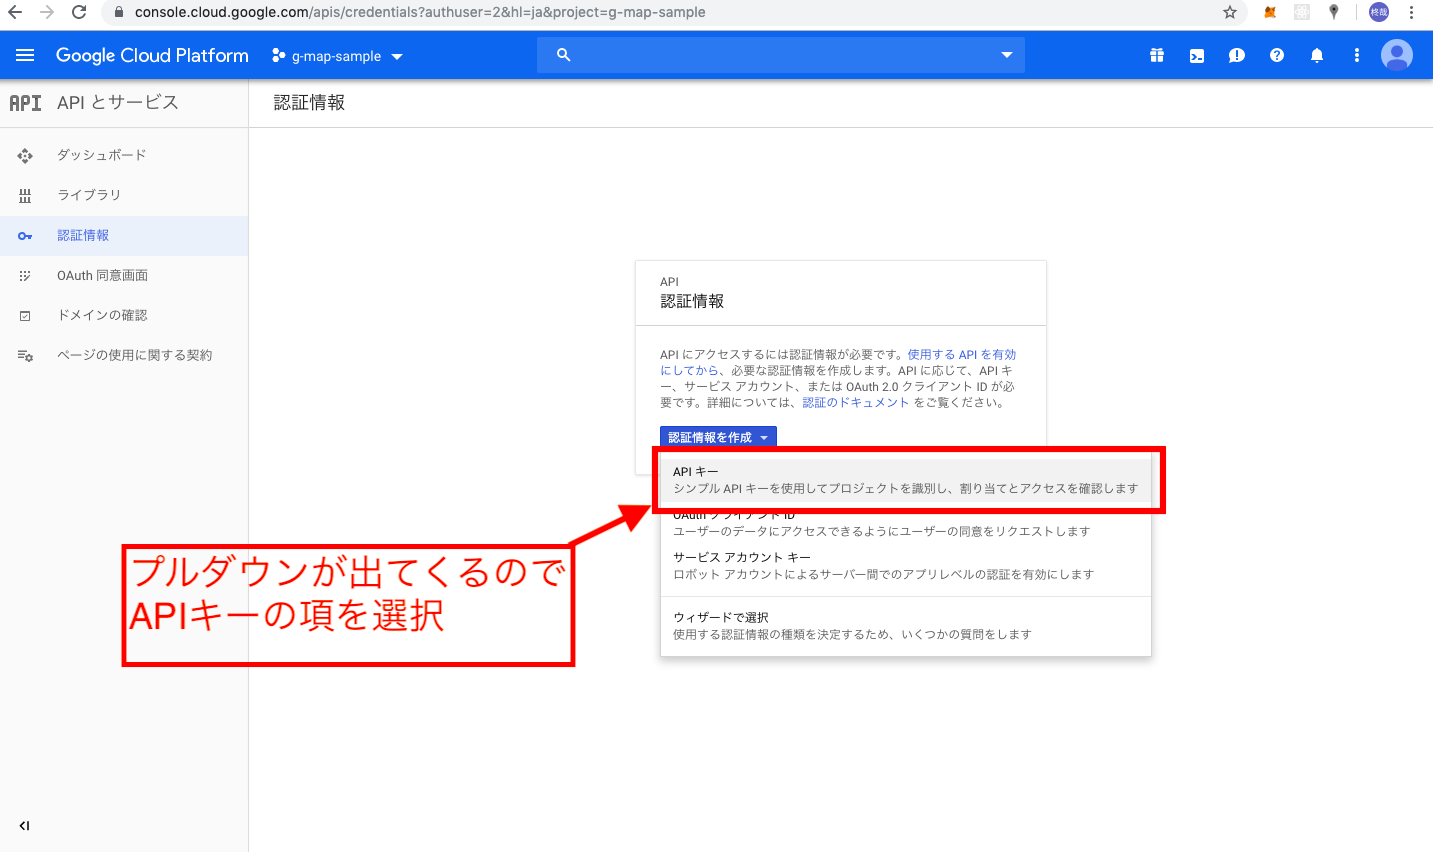
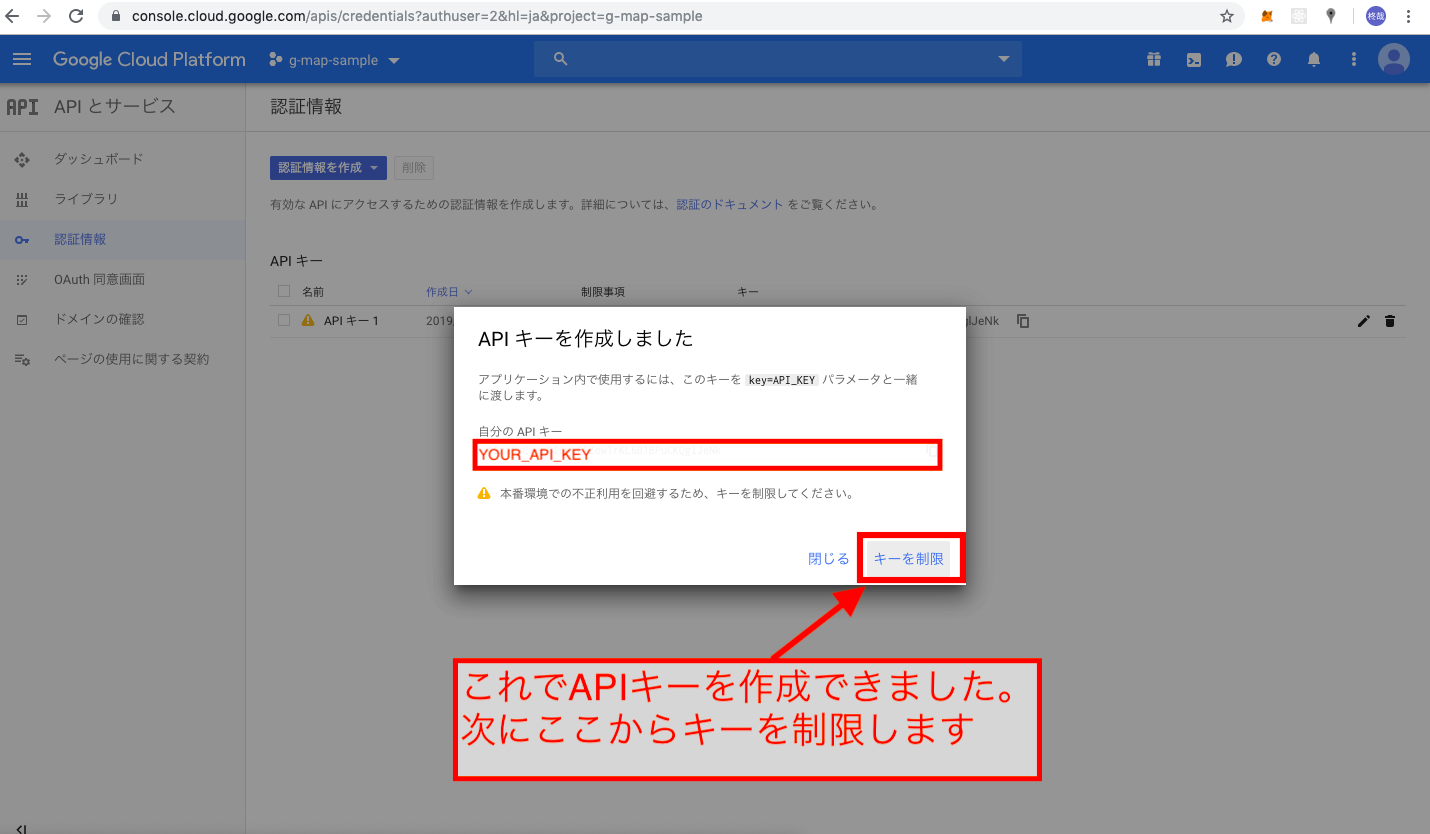
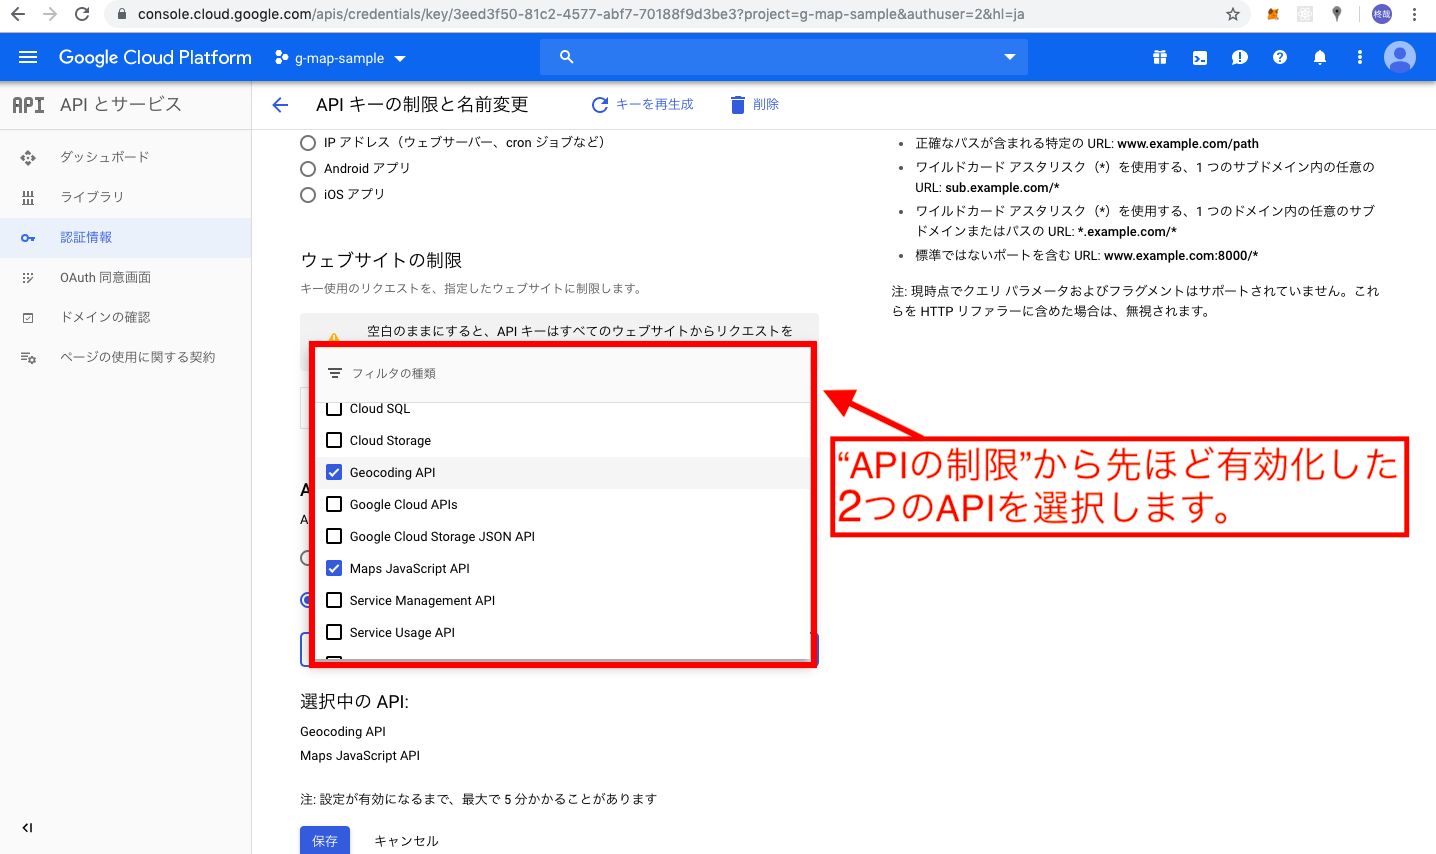
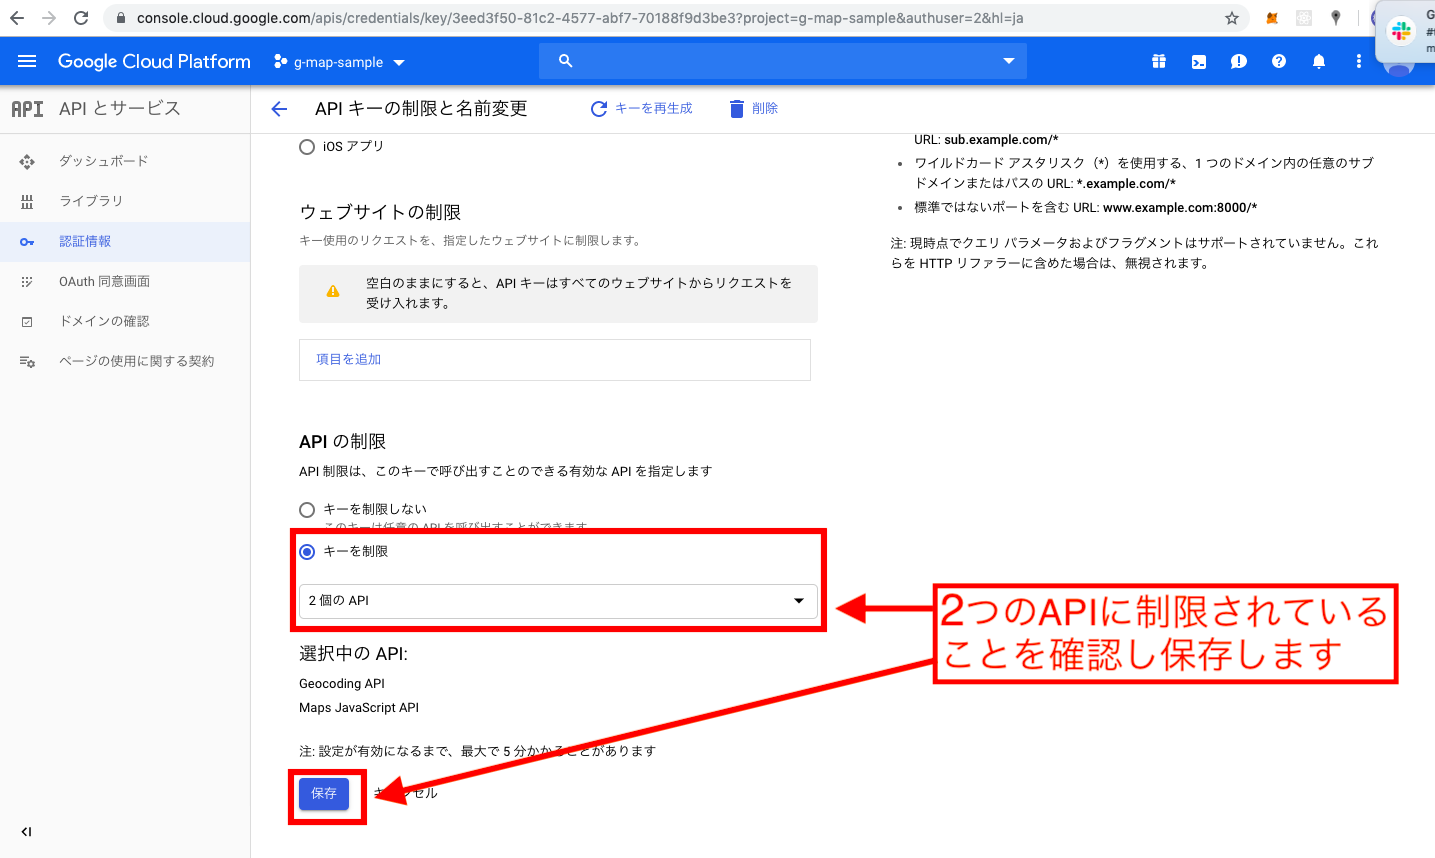
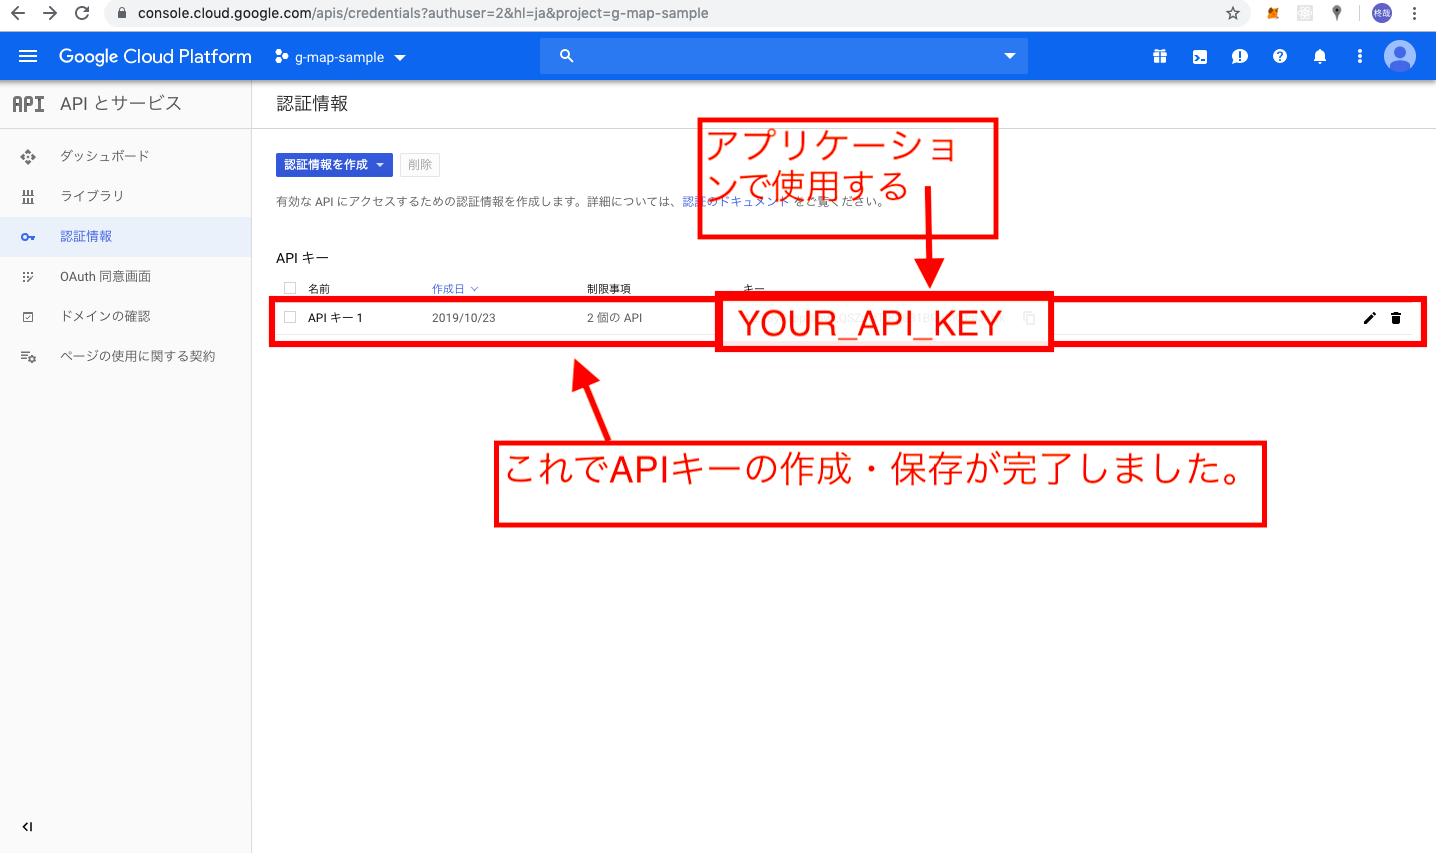
APIキーの作成
移行ツール
課金設定をしていないと、いざ地図を表示しようとしてもエラーが出てしまいます。
エラー文は以下の通りです。
You have exceeded your request quota for this API. See https://developers.google.com/maps/documentation/javascript/error-messages?utm_source=maps_js&utm_medium=degraded&utm_campaign=billing#api-key-and-billing-errors
移行ツール にアクセスし、手順にしたがって登録します。
アプリケーション作成
長きにわたる諸々の設定おつかれさまでした。
ここから早速アプリケーションを作っていきましょう。
ファイルを作成する前に先ほど作成したAPIキーを用意しておいてください。
登場人物
今回作成・編集するページは
- routes.rb
- maps_controller.rb
- index.html.erb
この3つです。それぞれのファイルに書き込んでください。
ルーティング
Rails.application.routes.draw do
  get 'maps/index'
  root to: 'maps#index'
  resources :maps, only: [:index]
end
コントローラー
class MapsController < ApplicationController
  def index
  end
end
ビューページ
ビュー作成
地図を表示させる
では以下のコードをファイルにコピーしてみましょう。
<h2>gmap</h2>
<div id='map'></div>

<style>
# map {
  height: 600px;
  width: 600px;
}
</style>

<script>
let map

function initMap(){
  geocoder = new google.maps.Geocoder()

  map = new google.maps.Map(document.getElementById('map'), {
    center: {lat: 40.7828, lng:-73.9653},
    zoom: 12,
  });

  marker = new google.maps.Marker({
    position:  {lat: 40.7828, lng:-73.9653},
    map: map
  });
}
</script>
<script src="https://maps.googleapis.com/maps/api/js?key=YOUR_API_KEY&callback=initMap" async defer></script>
<style>タグでマップの大きさを指定していますが、ここを省いてしまうと地図が表示されないので必ず書きましょう。
<style>#map {height: 600px;width: 600px;}</style>
次に地図の初期設定についてですが、 centerで初期位置の緯度経度を指定し、 zoomで表示領域の大きさを決めます。
function initMap(){
  geocoder = new google.maps.Geocoder()

  map = new google.maps.Map(document.getElementById('map'), {
    //latが緯度、lngが経度を示します
    center: {lat: 40.7828, lng:-73.9653},
    //数値は0〜21まで指定できます。数値が大きいほど拡大されます
    zoom: 12,
  });
  //positionに指定した座標にピンを表示させます
  marker = new google.maps.Marker({
    position:  {lat: 40.7828, lng:-73.9653},
    map: map
  });
}
そして最後の行の YOUR_API_KEYの部分に自分で作成したキーを入れてください。
<script src="https://maps.googleapis.com/maps/api/js?key=YOUR_API_KEY&callback=initMap" async defer></script>
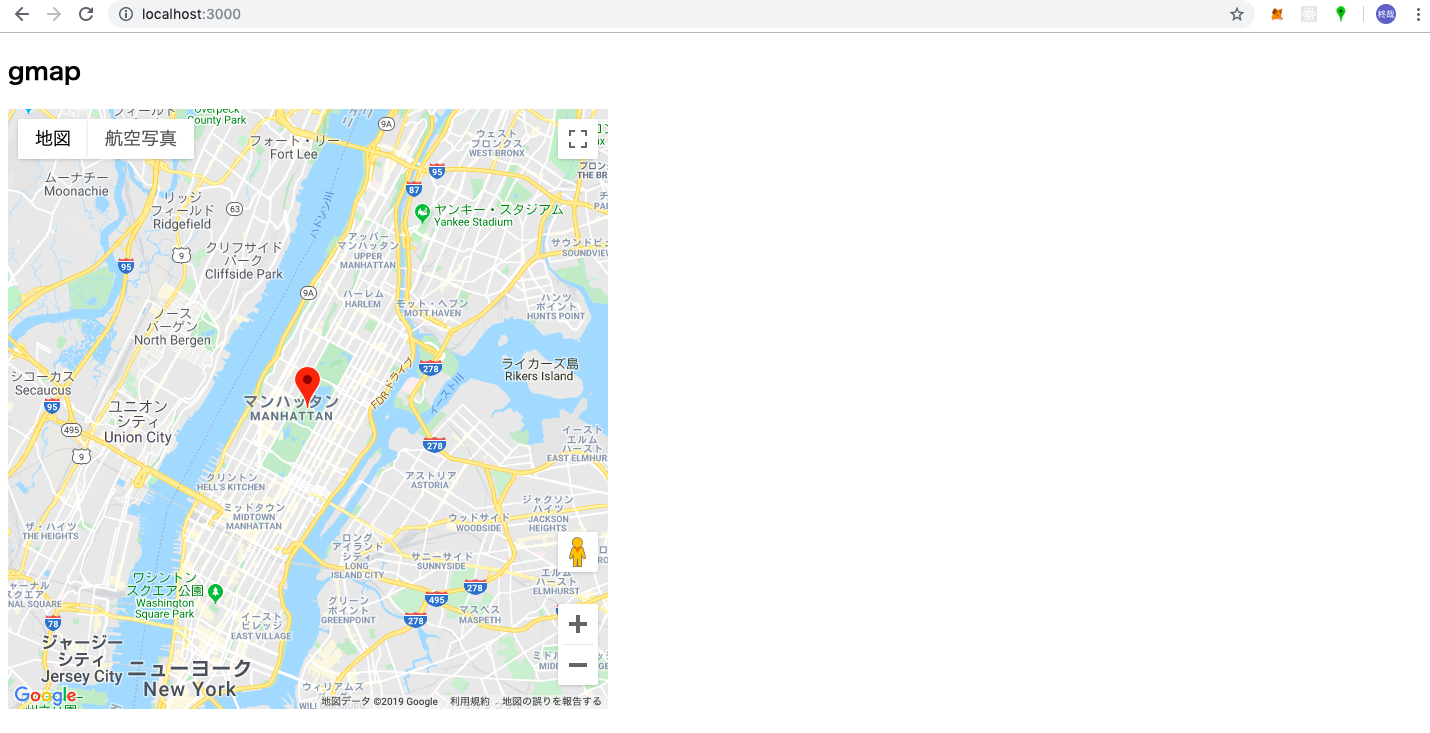
ではここで実際にブラウザで地図が表示されるか確認してみましょう。
以下のように表示されたでしょうか?
検索フォームから住所を特定しピンを刺す
次に検索フォームを作成します。
<h2>gmap</h2>

<!-- ここから追加 -->
<input id="address" type="textbox" value="GeekSalon">
<input type="button" value="Encode" onclick="codeAddress()">
<!-- ここまで追加-->

<div id='map'></div>

<style>
# map {
  height: 600px;
  width: 600px;
}
</style>

<script>
let map
function initMap(){
  geocoder = new google.maps.Geocoder()

  map = new google.maps.Map(document.getElementById('map'), {
    center: {lat: 40.7828, lng:-73.9653},
    zoom: 12,
  });

  marker = new google.maps.Marker({
    position:  {lat: 40.7828, lng:-73.9653},
    map: map
  });
}
// ここから追加
let geocoder

function codeAddress(){
  let inputAddress = document.getElementById('address').value;

  geocoder.geocode( { 'address': inputAddress}, function(results, status) {
    if (status == 'OK') {
      map.setCenter(results[0].geometry.location);
      var marker = new google.maps.Marker({
          map: map,
          position: results[0].geometry.location
      });
    } else {
      alert('該当する結果がありませんでした:' + status);
    }
  });
}
// ここまで追加
</script>
<script src="https://maps.googleapis.com/maps/api/js?key=YOUR_API_KEY&callback=initMap" async defer></script>
2箇所追加しました。
ビューに関する部分では検索フォームとボタンを作成しました。
<input id="address" type="textbox" value="GeekSalon">
<input type="button" value="Encode" onclick="codeAddress()">
次に <script>タグ内に検索機能の処理を追加しました。
let geocoder

  //検索フォームのボタンが押された時に実行される
function codeAddress(){
  //検索フォームの入力内容を取得
  let inputAddress = document.getElementById('address').value;

  geocoder.geocode( { 'address': inputAddress}, function(results, status) {
    //該当する検索結果がヒットした時に、地図の中心を検索結果の緯度経度に更新する
    if (status == 'OK') {
      map.setCenter(results[0].geometry.location);
      var marker = new google.maps.Marker({
          map: map,
          position: results[0].geometry.location
      });
    } else {
      //検索結果が何もなかった場合に表示
      alert('該当する結果がありませんでした:' + status);
    }
  });
}
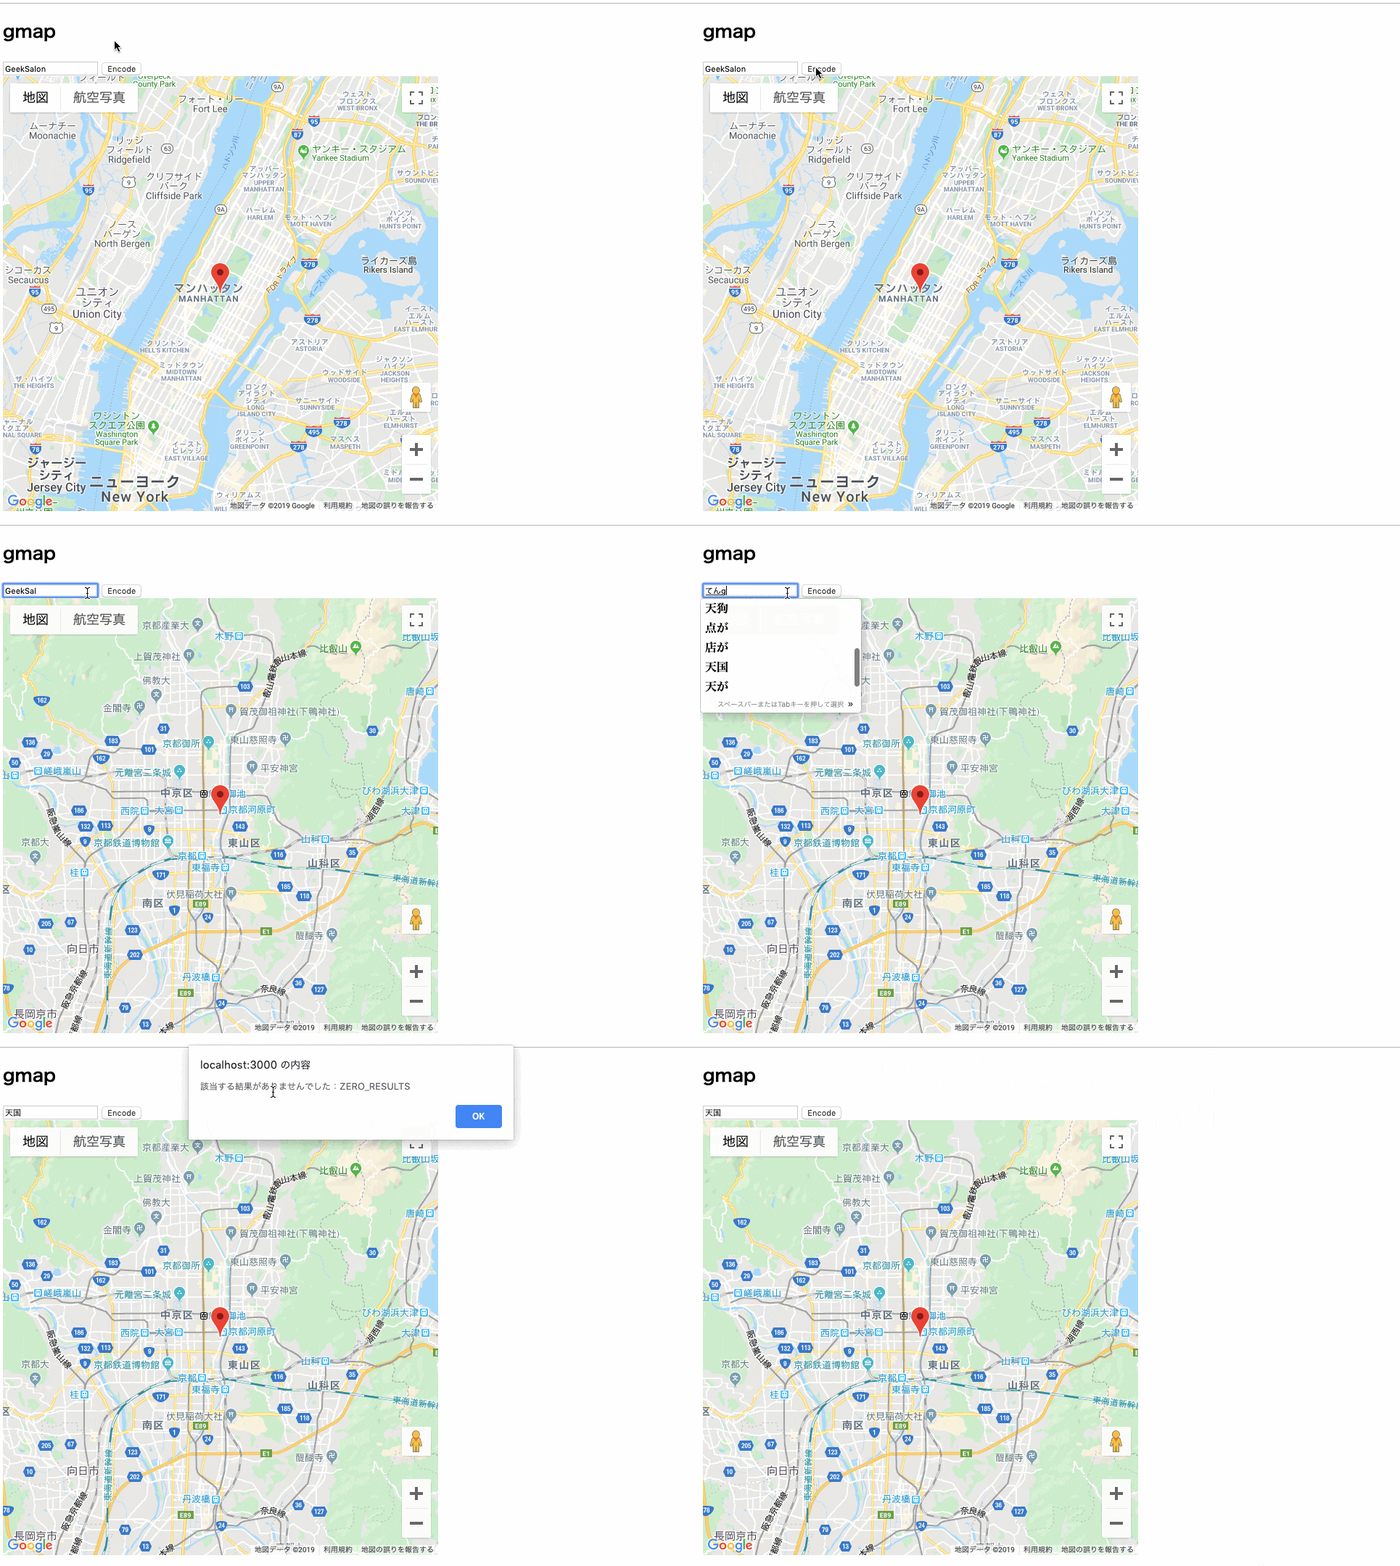
では早速ブラウザを開いて見てみましょう。
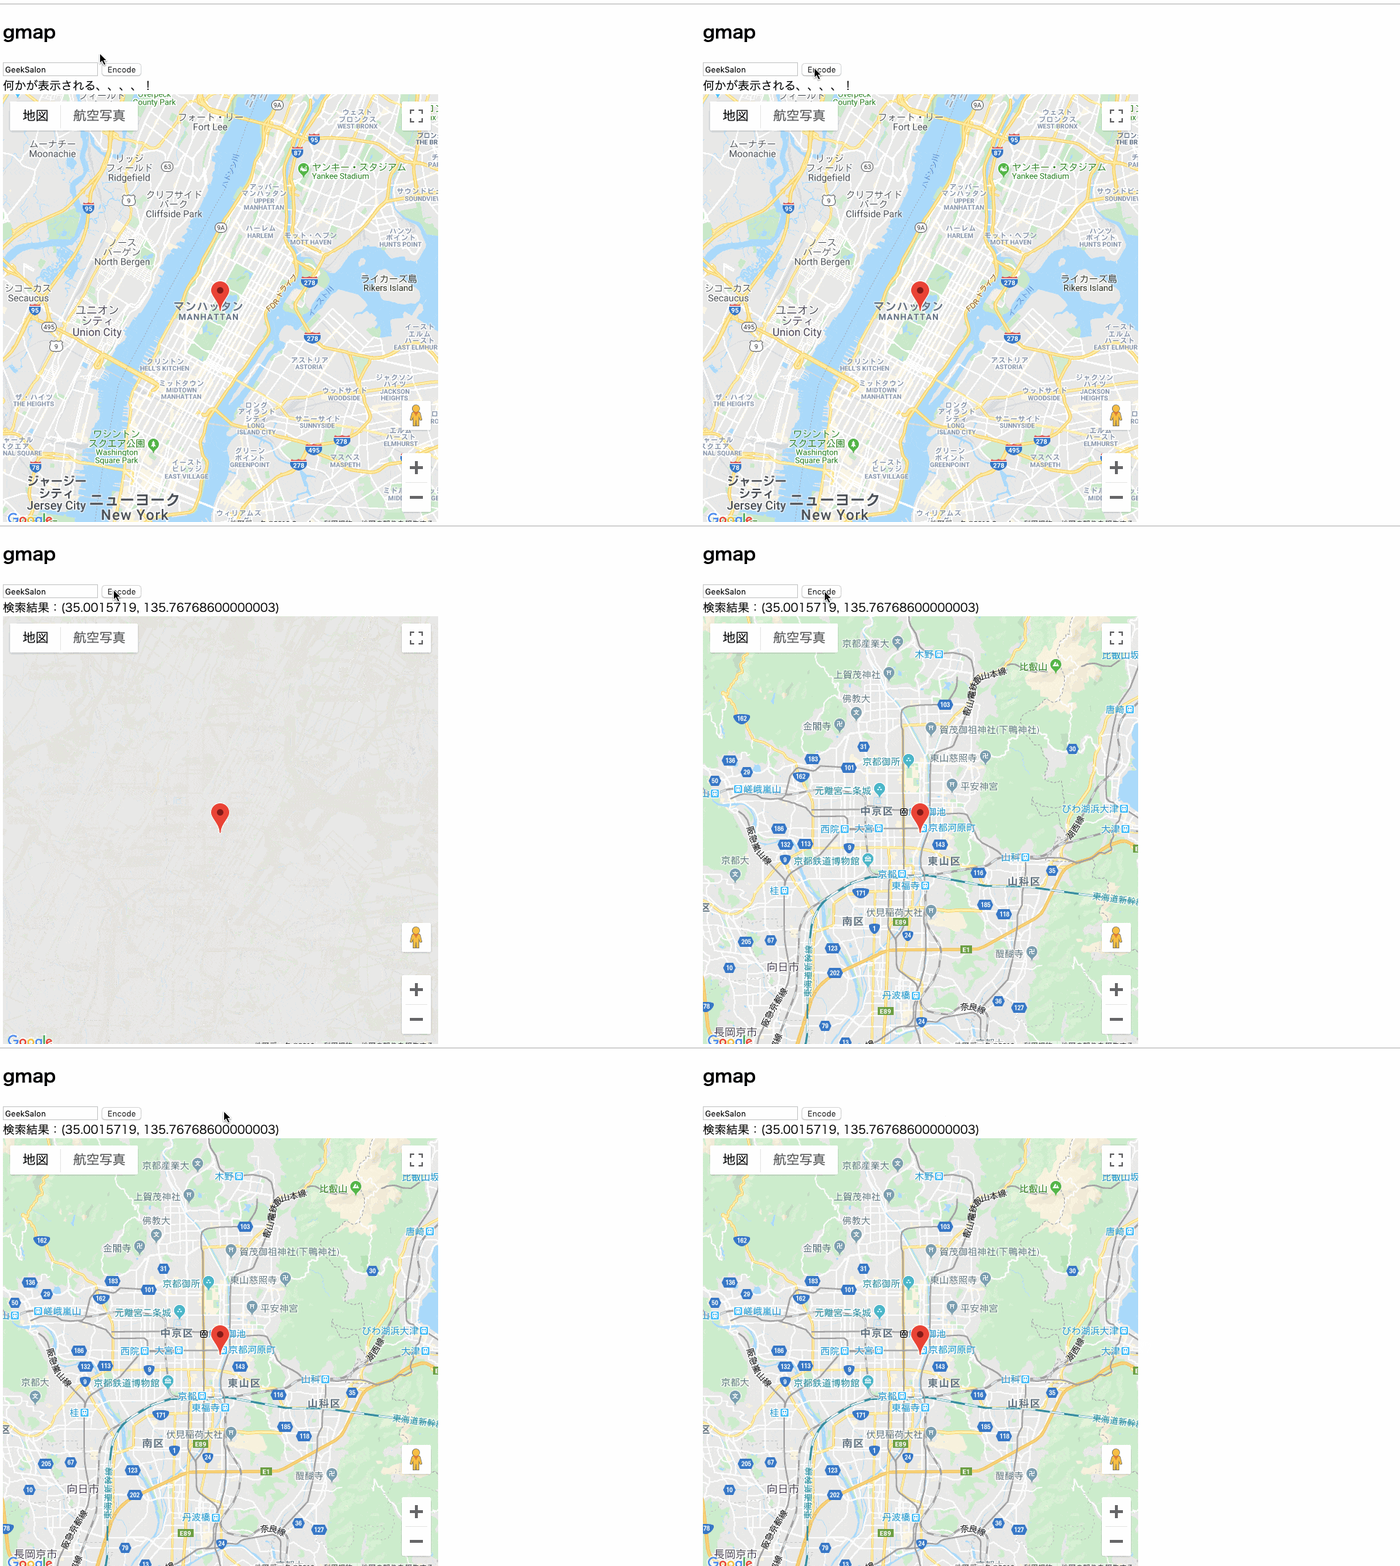
以下のように検索結果に応じて結果が処理される機能をつけました。
検索結果から緯度経度を取得し、表示させる
さて初めてのGoogleマップ講座もいよいよ大詰めです。
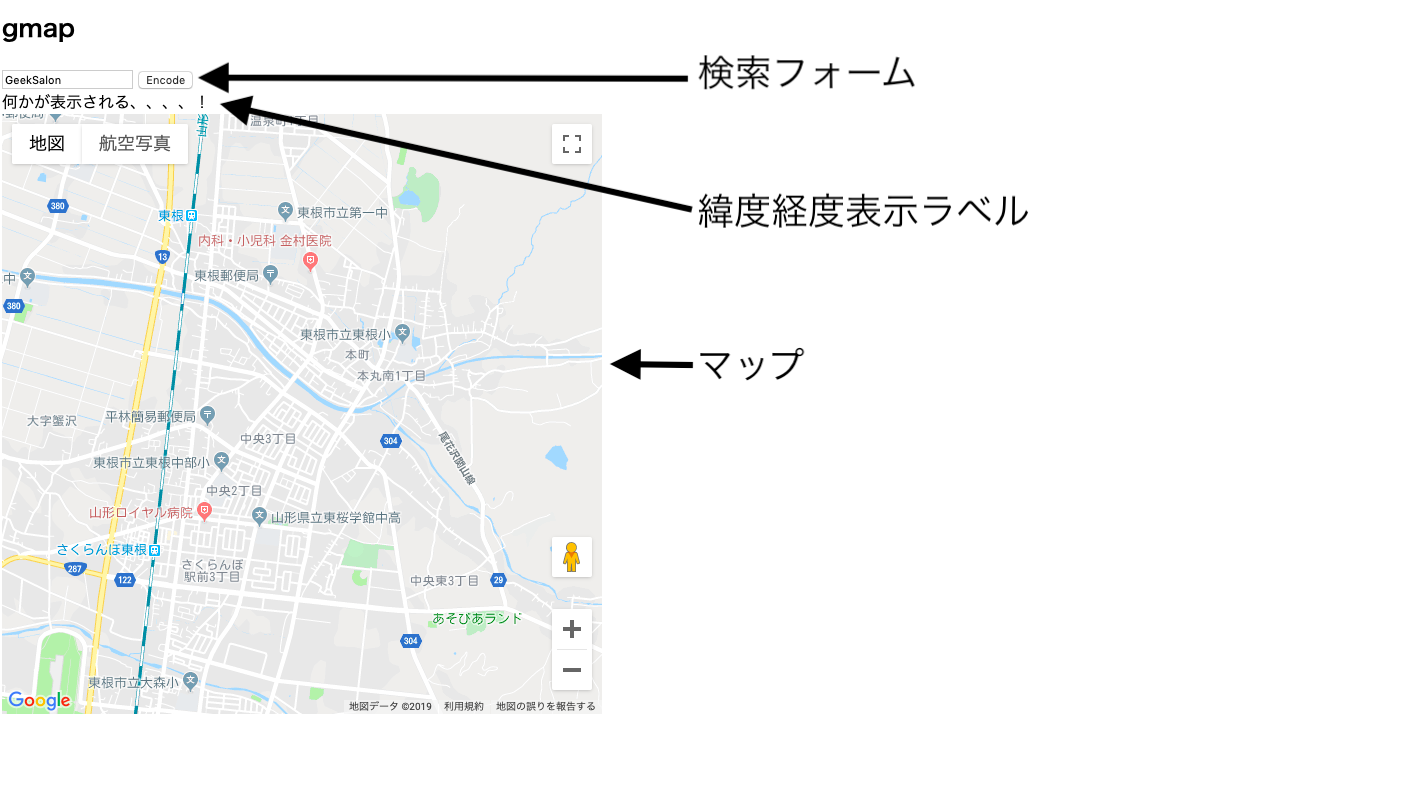
最後に検索結果の緯度経度をページに表示させましょう。
コードは以下の通りです。
<h2>gmap</h2>

<input id="address" type="textbox" value="GeekSalon">
<input type="button" value="Encode" onclick="codeAddress()">
<!-- 下の1行を追加 -->
<div id="display">何かが表示される、、、、!</div>

<div id='map'></div>

<style>
# map {
  height: 600px;
  width: 600px;
}
</style>

<script>
let map
let geocoder
// 下の1行を追加
const display = document.getElementById('display')

function initMap(){
  geocoder = new google.maps.Geocoder()

  map = new google.maps.Map(document.getElementById('map'), {
    center: {lat: 40.7828, lng:-73.9653},
    zoom: 12,
  });

  marker = new google.maps.Marker({
    position:  {lat: 40.7828, lng:-73.9653},
    map: map
  });
}

function codeAddress(){
  let inputAddress = document.getElementById('address').value;

  geocoder.geocode( { 'address': inputAddress}, function(results, status) {
    if (status == 'OK') {
      map.setCenter(results[0].geometry.location);
      var marker = new google.maps.Marker({
          map: map,
          position: results[0].geometry.location
      });
      // 下の1行を追加
      display.textContent = "検索結果:" + results[ 0 ].geometry.location
    } else {
      alert('該当する結果がありませんでした:' + status);
    }
  });
}
</script>
<script src="https://maps.googleapis.com/maps/api/js?key=YOUR_API_KEY&callback=initMap" async defer></script>
ビューに関して1箇所、 <script>タグ内に2箇所追加しました。
それぞれ追加する場所を確認し、追加して見てください。
追加した要素・処理は
- 検索結果を表示させるためのディスプレイ
- ディスプレイの情報を取得
- 検索結果をディスプレイに表示
の3つです。なので追加箇所も3箇所です。
これでコードの書き込みは完了です。
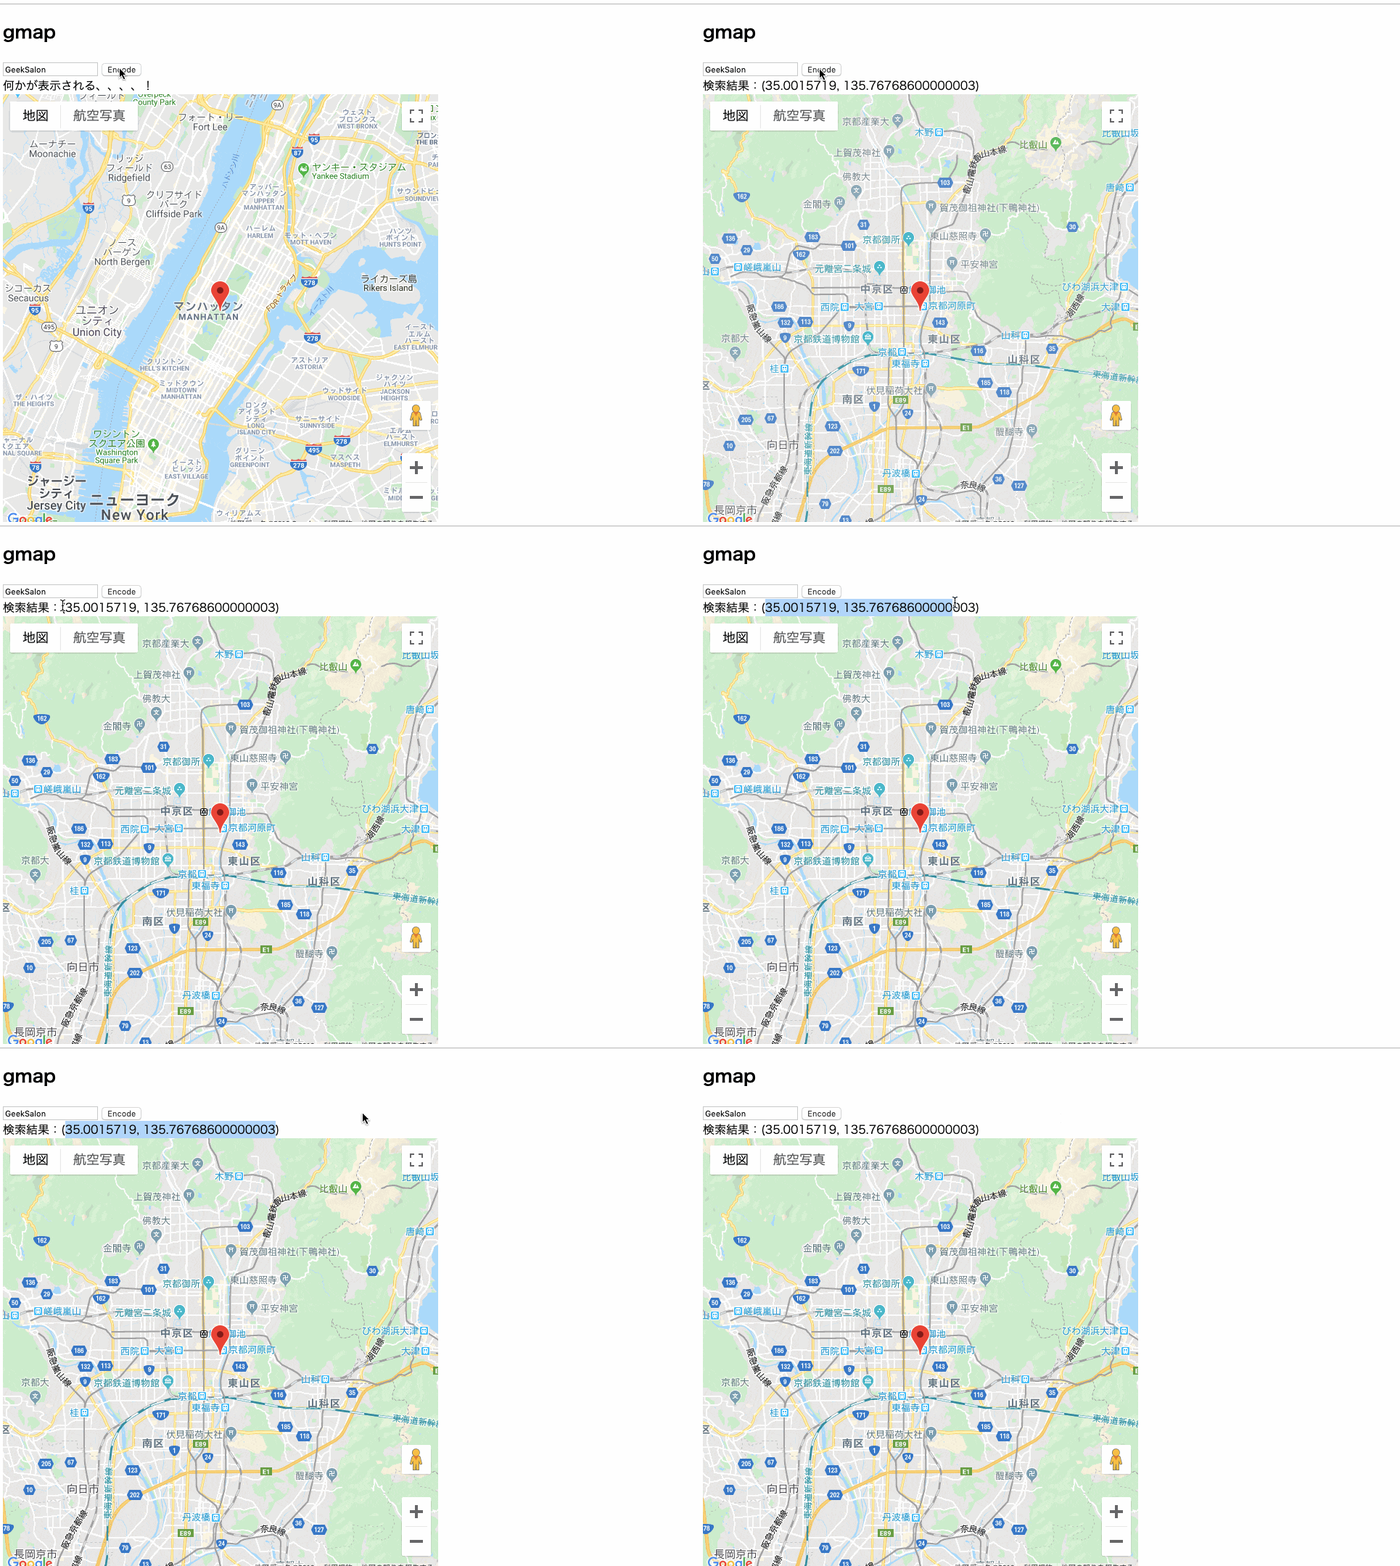
ではでは最後にブラウザを開いて確認してみましょう。
検索結果がディスプレイに表示されれば完成です。
復習
ファイルの中身を編集して、地図の初期位置を自分のお気に入りスポットに変えてみましょう!
